2019 VOLVO S60 TWIN ENGINE park assist
[x] Cancel search: park assistPage 374 of 645

DRIVER SUPPORT
* Option/accessory.372
Park Assist Pilot* messages
Messages for Park Assist Pilot (PAP97) may bedisplayed in the instrument panel and/or thecenter display.Some examples of symbols and messages are shown in the table below.
MessageMeaning
Park Assist System
Sensors blocked, cleaning needed
One or more of the sensors are blocked. Check and clean/remove the obstacle as soon as possible.
Park Assist System
Unavailable Service required
The system is not functioning as intended. Contact a workshop ‒ an authorized Volvo workshop is recommended.
A text message can be erased by briefly pressing
the button in the center of the right-sidesteering wheel keypad.
If the message persists: Contact a workshop ‒ anauthorized Volvo workshop is recommended.
Related information
Park Assist Pilot* (p. 364)
97Park Assist Pilot
Page 398 of 645

STARTING AND DRIVING
396
Selecting ignition mode
The vehicle's ignition can be put in variousmodes (levels) to make different functions availa-ble.
Selecting an ignition mode
Start knob in the tunnel console.
Ignition mode 0 – Unlock the vehicle andkeep the remote key in the passenger com-partment.
NOTE
To set level I or II without engine start – donot depress the brake pedal (or clutch pedalfor vehicles with manual transmission) whenselecting this ignition mode.
Ignition mode I – Turn the start knob clock-wise and release it. The control will automati-cally return to the original position.
Ignition mode II – Turn the start knobclockwise and hold it there forapprox. 5 seconds. Release the knob, whichwill automatically return to its original posi-tion.
Back to ignition mode 0 – To return toignition mode 0 from modes I and II, turn thestart knob clockwise and release it. The con-trol will automatically return to the originalposition.
Related information
Starting the vehicle (p. 392)
Switching off the vehicle (p. 394)
Ignition modes (p. 395)
Adjusting the steering wheel (p. 193)
Jump starting using another battery (p. 432)
Brake functions
The vehicle's brakes are used to reduce speedor prevent the vehicle from rolling.
In addition to the wheel brakes and parkingbrakes, the vehicle is also equipped with a num-ber of automatic brake assist functions. Thesesystems help the driver by e.g. keeping the vehi-cle stationary when the brake pedal is notdepressed (e.g. at a traffic light or intersection) orwhen starting up a hill.
Depending on how the vehicle is equipped, thefollowing brake assist functions may be included:
Auto-hold brake function at a standstill (AutoHold)
Hill Start Assist (Hill Start Assist)
Braking assist after a collision
City Safety
Related information
Brakes (p. 397)
Parking brake (p. 400)
Auto-hold brakes (p. 403)
Braking assist after a collision (p. 405)
Hill Start Assist (p. 405)
City Safety™ (p. 305)
Page 406 of 645

||
STARTING AND DRIVING
404
Symbols in the instrument panel
SymbolMeaning
This symbol illuminates when thefunction is using the normal brakesto keep the vehicle stationary.
A
B
This symbol illuminates when thefunction is using the parking braketo keep the vehicle stationary.
ACanadian models.BUS models.
Related information
Activating and deactivating Auto-hold at astandstill (p. 404)
Brakes (p. 397)
Parking brake (p. 400)
Hill Start Assist (p. 405)
Activating and deactivating Auto-hold at a standstill
The Auto-hold brake function at a standstill isactivated with the button in the tunnel console.
–Press the button in the tunnel console toactivate or deactivate the function.
>The indicator light in the button will illumi-nate when the function is activated. Thefunction will remain active the next timethe vehicle is started.
When shutting off
If the function is active and holding thevehicle stationary using the normalbrakes (A symbol lit), the brake pedalmust be depressed while pressing thebutton in order to deactivate Auto-hold.
The function will remain off until it is reactiva-ted.
When Auto-hold is switched off, Hill StartAssist (HSA) will remain active to help pre-vent the vehicle from rolling backward whenstarting up a hill.
Related information
Auto-hold brakes (p. 403)
Page 407 of 645

STARTING AND DRIVING
* Option/accessory.405
Hill Start Assist
The function for assisting when starting the vehi-
cle on inclines (HSA4) helps prevent the vehiclefrom rolling backward when starting on an uphillgradient. When backing up a hill, HSA helpsprevent the vehicle from rolling forward.
The function retains pressure from the brakepedal in the brake system for several secondsafter the brake pedal has been released.
This temporary braking effect is released after afew seconds or when the driver begins driving.
Hill Start Assist is available even when the Auto-hold brake function is switched off.
Related information
Auto-hold brakes (p. 403)
Brakes (p. 397)
Braking assist after a collision
In a collision in which the activation level isreached for the pyrotechnic seat belt tensionersor airbags, or if a collision with a large animal isdetected, the vehicle's brakes will be automati-cally activated. This function is intended to helpprevent or reduce the effects of any subsequentcollision.
After a serious collision, it may no longer be pos-sible to control and steer the vehicle. In order toavoid or mitigate a possible further collision witha vehicle or an object in the vehicle's path, thebrake assist system is activated automatically tohelp stop the vehicle safely.
The brake lights and hazard warning flashers areactivated during braking. When the vehicle hasstopped, the hazard warning flashers will con-tinue to flash and the parking brake will beapplied.
If braking is not appropriate, e.g. if there is a riskof being hit by passing traffic, the driver can over-ride the system by depressing the acceleratorpedal.
This function assumes that the brake system isintact after a collision.
Brake assist is part of the Rear Collision Warningand Blind Spot Information safety systems.
Related information
Rear Collision Warning (p. 320)
BLIS* (p. 321)
Brake functions (p. 396)
4Hill Start Assist
Page 435 of 645

STARTING AND DRIVING
}}}}
433
To avoid short circuits or other damage, the fol-lowing steps are recommended when jump star-ting the battery:
1.Put the ignition in mode 0.
2.Make sure the auxiliary battery (the batteryused to jump start the discharged battery)has a voltage of 12 volts.
3. If the auxiliary battery is in another vehicle,turn off that vehicle's engine and make surethat the vehicles are not touching each other.
4. Clamp the red jumper cable onto the auxiliarybattery's positive (+) terminal (1).
CAUTION
Connect the jump cable carefully to preventshort circuits with other components in theengine compartment.
5. Fold back the cover over your vehicle's posi-tive (+) jump start terminal (2).
6.Clamp the other end of the red jumper cableto your vehicle's positive (+) jump start termi-nal (2).
7. Clamp the black jumper cable onto the auxili-ary battery's negative (-) terminal (3).
8. Clamp the other end of the black jumpercable to your vehicle's negative (-) groundpoint (4).
9. Make sure the jumper cables are securelyattached to help prevent sparks while jumpstarting.
10. Start the engine of the assisting vehicle andlet it run for a few minutes at a higher idlingspeed than normal, about 1500 rpm.
11. Start your vehicle's engine. If the enginedoes not start, allow an additional 10minutes of charging time and then try to startthe engine again.
NOTE
When the engine is started under normalconditions, the vehicle's electrical drive motoris prioritized – the gasoline engine remainsoff. This means that after the start knob hasbeen turned clockwise, the electric motor has"started" and the vehicle is ready to be driven.Start of the electric motor is indicated by theindicator lights on the instrument panel goingout and its preselected theme illuminating.
CAUTION
Do not touch the connections between thecable and the vehicle during the start attempt.Risk of sparking.
12. Remove the jumper cables in the reverseorder ‒ first the black cables and then thered cables.
Make sure that none of the clamps of theblack jumper cables come into contact witheither vehicle's positive (+) jump start termi-nals or either of the red jumper cable's con-nected clamps.
WARNING
PROPOSITION 65 WARNING! Battery posts,terminals, and related accessories containlead and lead compounds, chemicals knownto the state of California to cause cancer andreproductive harm. Wash hands after han-dling.
WARNING
Batteries generate hydrogen gas, whichis flammable and explosive.
Do not connect the jumper cable to anypart of the fuel system or to any movingparts. Avoid touching hot manifolds.
Battery fluid contains sulfuric acid. Do notallow battery fluid to contact eyes, skin,fabrics or painted surfaces.
Page 438 of 645

||
STARTING AND DRIVING
* Option/accessory.436
The automatic transmission selects the optimalgear for the current load and engine speed.
Steep inclines
Do not lock the automatic transmission into ahigher gear than what the engine can handle ‒ itis not always preferable to drive in high gears atlow rpm.
Parking on a hill
1. Depress the brake pedal.
2. Apply the parking brake.
3.Put the gear selector in P.
4. Release the brake pedal.
Put chocks behind the wheels when the vehicleis parked on a hill with a trailer attached.
Starting on a hill
1. Depress the brake pedal.
2.Put the gear selector in D.
3. Release the parking brake.
4. Release the brake pedal and start driving.
Related information
Trailer Stability Assist* (p. 436)
Checking trailer lights (p. 437)
Towing capacity and tongue weight (p. 618)
Overheating of engine and transmission(p. 431)
Trailer Stability Assist*
Trailer Stability Assist (TSA12) is a functiondesigned to help stabilize a vehicle that is tow-ing a trailer when the vehicle and trailer havebegun to sway. The function is part of the Elec-
tronic Stability Control system ESC13.
Reasons for swaying
A vehicle towing a trailer may begin to sway forvarious reasons. Normally this only occurs at highspeeds. However, if the trailer is overloaded orunevenly distributed, e.g. too far back, there is arisk of swaying even at low speeds.
Swaying may be caused by factors such as:
The vehicle and trailer are hit by a sudden,strong crosswind.
The vehicle and trailer are traveling on anuneven road or over a bump.
Sudden movements of the steering wheel.
Once swaying has begun, it can be difficult orimpossible to stop it. This makes the vehicle andtrailer difficult to control and there is a risk ofswerving into oncoming traffic or driving off theroad.
Trailer Stability Assist function
Trailer Stability Assist continuously monitors thevehicle's movements, particularly lateral move-
ments. If swaying is detected, the brakes areapplied individually on the front wheels, which hasa stabilizing effect on the vehicle and trailer. Thisis often enough to enable the driver to regaincontrol of the vehicle.
If the Trailer Stability Assist function's firstattempt is not adequate to stop the swayingmotion, the brakes are applied on all wheels andengine power is temporarily reduced. As theswaying motion begins to decrease and the vehi-cle and trailer have once again become stable,TSA stops regulating the brakes/engine powerand the driver regains control of the vehicle.
NOTE
Trailer Stability Assist is deactivated if thedriver selects the sport mode by deactivatingESC in the center display's menu system.
Trailer Stability Assist may not intervene if thedriver tries to compensate for the swaying motionby moving the steering wheel rapidly, becausethe system will then not be able to determine if itis the trailer or the driver causing the swaying.
12Trailer Stability Assist13Electronic Stability Control
Page 451 of 645
AUDIO, MEDIA AND INTERNET
}}
* Option/accessory.449
Premium Sound * (Bowers & Wilkins)
Tone - setting for e.g. bass, treble, equalizer,etc.
Balance - balance between right/left andfront/rear speakers.
System Volumes – adjusts volume in thevarious systems of the car, e.g. VoiceControl, Park Assist and Phone Ringtone.
High Performance Pro * (Harman
Kardon)
Equalizer - setting of equalizer.
Balance - balance between right/left andfront/rear speakers.
System Volumes – adjusts volume in thevarious systems of the car, e.g. VoiceControl, Park Assist and Phone Ringtone.
High Performance
Tone - setting for e.g. bass, treble, equalizer,etc.
Balance - balance between right/left andfront/rear speakers.
System Volumes – adjusts volume in thevarious systems of the car, e.g. VoiceControl, Park Assist and Phone Ringtone.
Related information
Sound experience* (p. 449)
Media player (p. 470)
Voice control settings (p. 147)
Phone settings (p. 492)
Audio, media and Internet (p. 448)
Internet-connected vehicle* (p. 494)
Sound experience*
Sound experience is an app that providesaccess to additional sound settings.
Open Sound Experience from the center dis-play's App view. Depending on the sound systeminstalled in the vehicle, the following settings arepossible:
Premium Sound * (Bowers & Wilkins)
Studio - the sound can be optimized forDriver, All and Rear.
Individual stage - surround sound modewith settings for intensity and enclosure.
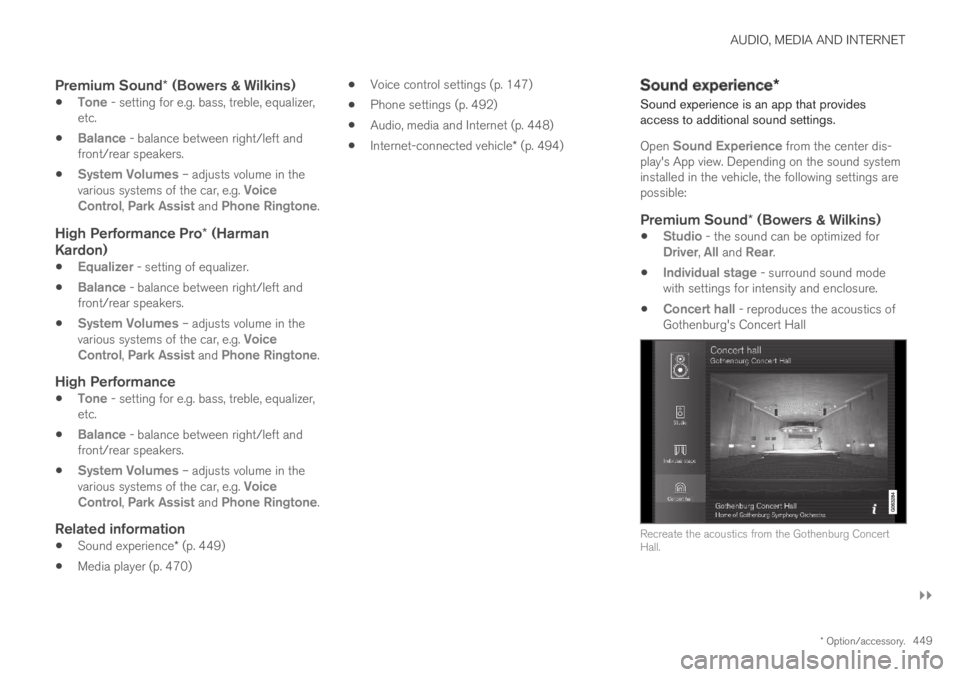
Concert hall - reproduces the acoustics ofGothenburg's Concert Hall
Recreate the acoustics from the Gothenburg ConcertHall.
Page 589 of 645
MAINTENANCE AND SERVICE
}}
* Option/accessory.587
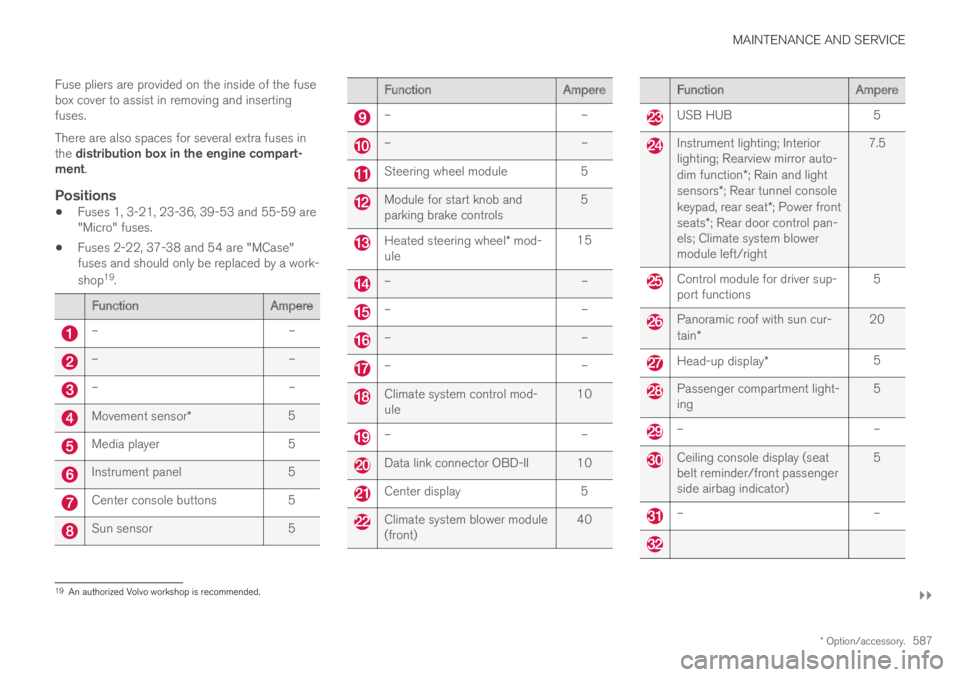
Fuse pliers are provided on the inside of the fusebox cover to assist in removing and insertingfuses.
There are also spaces for several extra fuses inthe distribution box in the engine compart-ment.
Positions
Fuses 1, 3-21, 23-36, 39-53 and 55-59 are"Micro" fuses.
Fuses 2-22, 37-38 and 54 are "MCase"fuses and should only be replaced by a work-
shop19.
FunctionAmpere
––
––
––
Movement sensor*5
Media player5
Instrument panel5
Center console buttons5
Sun sensor5
FunctionAmpere
––
––
Steering wheel module5
Module for start knob andparking brake controls5
Heated steering wheel* mod-ule15
––
––
––
––
Climate system control mod-ule10
––
Data link connector OBD-II 10
Center display5
Climate system blower module(front)40
FunctionAmpere
USB HUB5
Instrument lighting; Interiorlighting; Rearview mirror auto-dim function*; Rain and lightsensors*; Rear tunnel consolekeypad, rear seat*; Power frontseats*; Rear door control pan-els; Climate system blowermodule left/right
7.5
Control module for driver sup-port functions5
Panoramic roof with sun cur-tain*20
Head-up display*5
Passenger compartment light-ing5
––
Ceiling console display (seatbelt reminder/front passengerside airbag indicator)
5
––
19An authorized Volvo workshop is recommended.