2019 VOLKSWAGEN TRANSPORTER roof
[x] Cancel search: roofPage 59 of 486
A WARNING (Continued)
• Never leave children or people requiring assistance alone in the car, particularly if they have access to the vehicle key. Unsuper-vised use of the vehicle key can lock the ve-hicle, start the engine, switch on the ignition and operate the sliding/tilting roof.
• The sliding/tilting roof can be operated for a short period after the ignition has been switched off, provided that the driver door and front passenger door are not opened.
CD
• In order to avoid damage in winter, remove ice and snow from the roof of the vehicle be-fore opening or tilting the sliding/tilting roof.
m Leaves and other loose items must be re-L.!:J moved from the guide rails of the sliding/tilt-ing roof at regular inteNals, either by hand or using a vacuum cleaner.
m If there is a fault in the sliding/tilting roof, the L.!:J roil-back function will not work properly. Go to a qualified workshop.
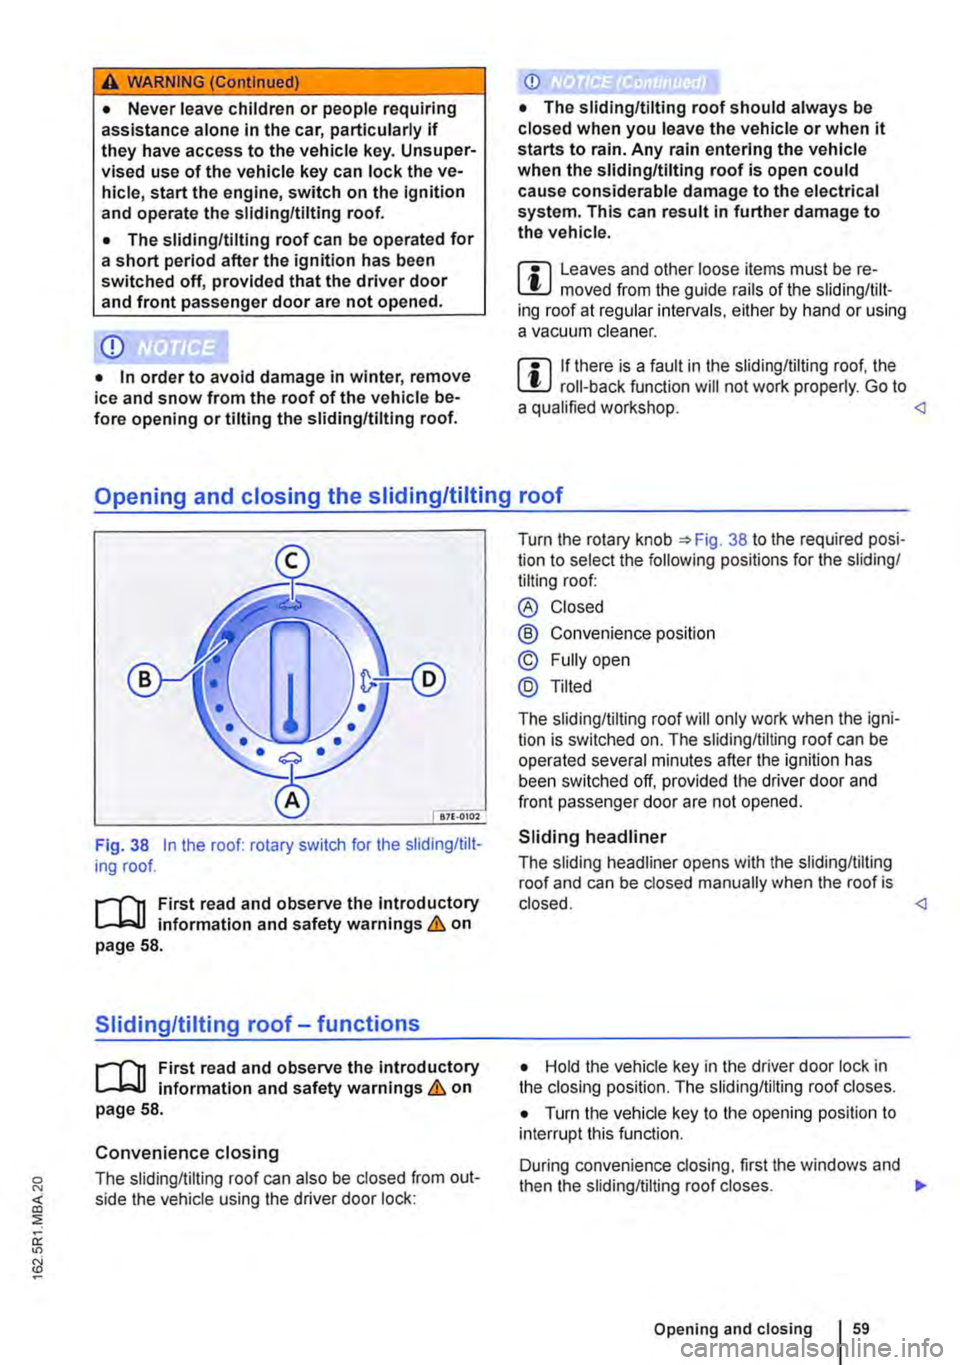
Fig. 38 In the roof: rotary switch for the sliding/tilt-ing roof.
r-T'n First read and observe the Introductory L-J,::.jJ information and safety warnings & on page 58.
Sliding/tilting roof-functions
r-T'n First read and obseNe the Introductory L-J,::.jJ information and safety warnings & on page 58.
Convenience closing
The sliding/tilting roof can also be closed from out-side the vehicle using the driver door lock:
Turn the rotary knob 38 to the required posi-tion to select the following positions for the sliding/ tilting roof:
® Closed
@ Convenience position
© Fully open
@Tilted
The sliding/tilting roof will only work when the igni-tion is switched on. The sliding/tilting roof can be operated several minutes after the ignition has been switched off, provided the driver door and front passenger door are not opened.
Sliding headliner
The sliding headliner opens with the sliding/tilting roof and can be closed manually when the roof is closed.
• Turn the vehicle key to the opening position to interrupt this function.
During convenience dosing, first the windows and then the sliding/tilting roof closes. .,..
Opening and closing 159
Page 60 of 486
m The sliding/tilting roof rotary switch remains W in the last position selected If the roof is closed from outside the vehicle using convenience closing. lt will have to be re-positioned the next time you drive. <1
Roll-back function for the sliding/tilting roof
r-111 First read and observe the introductory l..-J.::-1.1 Information and safety warnings & on page 58.
The roll-back function can reduce the risk of injury when closing the sliding/tilting roof => &. If the slid-ing/tilting roof is unable to close because it is stuck or obstructed, it will open again automatically.
• Check to see why the sliding/tilting roof has not closed.
• Try to close the sliding/tilting roof again.
• If the sliding/tilting roof is still obstructed, the sliding/tilting roof stops at this point. The sliding/tilt-ing roof then closes without the roll-back function.
Closing without the roll-back function
• Push the rotary knob at the front in position =>Fig. 38 ®until the sliding/tilting roof Is fully closed.
• The sliding/tilting roof then closes without the roll-back function.
• Please go to a qualified workshop if the sliding/ tilting roof still cannot be closed.
Before the journey
A WARNING
Closing the sliding/tilting roof without the roll-back function can lead to severe injuries.
• Always close the sliding/tilting roof care-fully.
• Ensure that nobody obstructs the operat-Ing area of the sliding/tilting roof, especially if the roll-back function Is not active.
• The roll-back function does not prevent fingers or other body parts from being press-ed against the roof frame and sustaining in-jury.
m The roll-back function is also activated if the W windows and sliding/tilting roof are closed us-ing the driver door lock for convenience clos-Ing =>page 57. <1
Page 68 of 486
A WARNING
Driving without head restraints or with Incor-rectly adjusted head restraints Increases the risk of severe or fatal injuries In the event of an accident or sudden' driving or braking ma-noeuvre.
• If a seat is occupied, the head restraint for that seat must be fitted and adjusted correct-ly.
• Each vehicle occupant must adjust the head restraint to suit their body size, to help reduce the risk of neck injuries in an acci-dent. As far as possible, the upper edge of
Adjusting the steering wheel position
an-0211
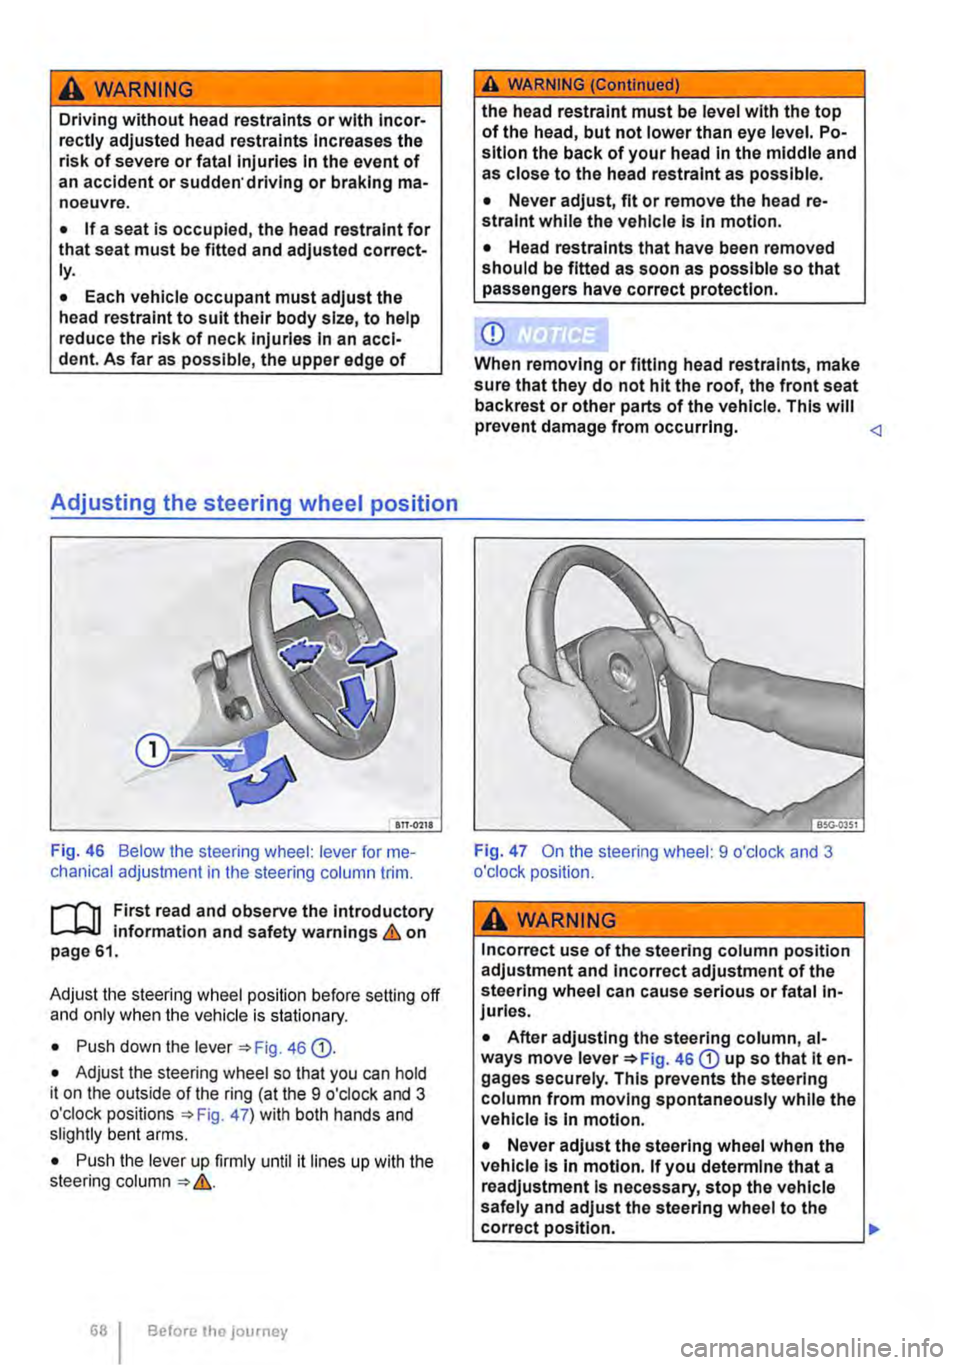
Fig. 46 Below the steering wheel: lever for me-chanical adjustment in the steering column trim.
r--f'n First read and observe the introductory L-W.I information and safety warnings & on page 61.
Adjust the steering wheel position before setting off and only when the vehicle is stationary.
• Push down the lever 46 Q).
• Adjust the steering wheel so that you can hold it on the outside of the ring (at the 9 o'clock and 3 o'clock positions =:o Fig. 47) with both hands and slightly bent arms.
• Push the lever up firmly until it lines up with the steering column =:o &.
Before the journey
A WARNING (Continued)
the head restraint must be level with the top of the head, but not lower than eye level. Po-sition the back of your head in the middle and as close to the head restraint as possible.
• Never adjust, fit or remove the head re-straint while the vehicle is in motion.
• Head restraints that have been removed should be fitted as soon as possible so that passengers have correct protection.
CD
When removing or fitting head restraints, make sure that they do not hit the roof, the front seat back rest or other parts of the vehicle. This will prevent damage from occurring.
A WARNING
Incorrect use of the steering column position adjustment and Incorrect adjustment of the steering wheel can cause serious or fatal In-juries.
• After adjusting the steering column, al-ways move lever =:oFig. 46 CD up so that it en-gages securely. This prevents the steering column from moving spontaneously while the vehicle Is In motion.
• Never adjust the steering wheel when the vehicle Is In motion. If you determine that a readjustment Is necessary, stop the vehicle safely and adjust the steering wheel to the correct position. .,.
Page 114 of 486
Interior and reading lights
0 ( )
ITT·0116
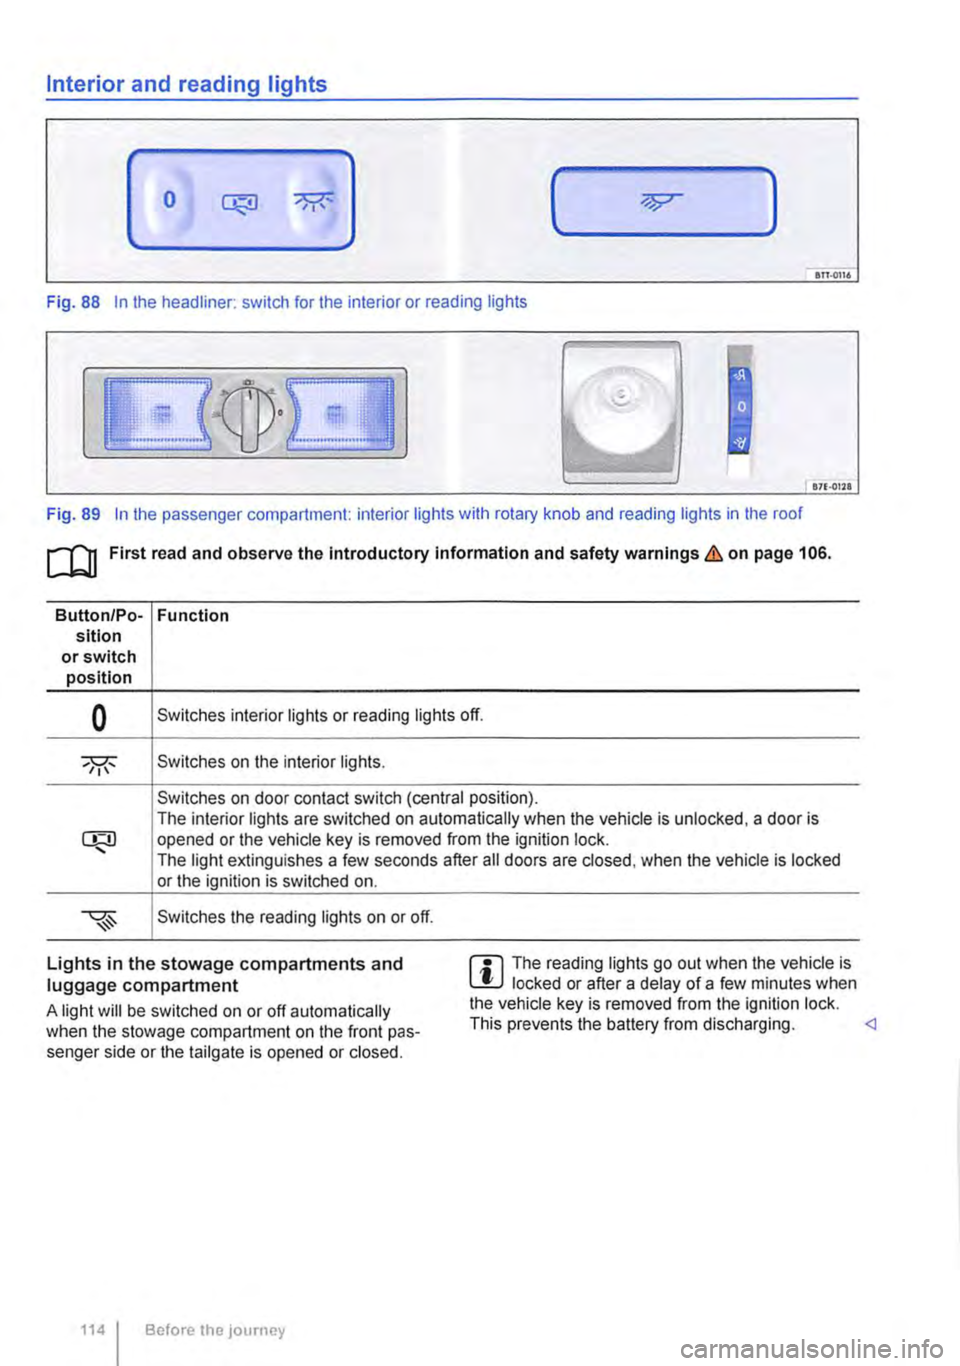
Fig. 88 In the headliner: switch for the interior or reading lights
871·01ll
Fig. 89 In the passenger compartment: interior lights with rotary knob and reading lights in the roof
[Q] First read and observe the Introductory information and safety warnings&. on page 106.
Button/Po-Function sition or switch position
0 Switches interior lights or reading lights off.
Switches on the interior lights.
Switches on door contact switch (central position). The interior lights are switched on automatically when the vehicle is unlocked, a door is opened or the vehicle key is removed from the ignition lock. The light extinguishes a few seconds after all doors are closed, when the vehicle is locked or the ignition is switched on.
Switches the reading lights on or off.
Lights in the stowage compartments and luggage compartment
A light will be switched on or off automatically when the stowage compartment on the front pas-senger side or the tailgate is opened or closed.
1141 Before the journey
m The reading lights go out when the vehicle is W locked or after a delay of a few minutes when the vehicle key is removed from the ignition lock. This prevents the battery from discharging.
Page 125 of 486
Transporting items
Driving notes
ClJl Introduction
This chapter contains information on the following subjects:
Stowing items of luggage . . . . . . . . . . . . . . . . . 126
Stowing cargo . . . . . . . . . . . . . . . . . . 127
Buckle straps . . . . . . . . . . . . . . . . . . . . . . . . . . . 128
Ratchet straps . . . . . . . . . . . . . . . . . . . 128 Driving with an open tailgate or open wing doors . . . . . . . . . . . . . . . . . . . . . 129
Driving a loaded vehicle .... 130
Always secure the load transported in the luggage compartment or load compartment, on the roof car-rier, on the load surface or trailer. Always use suita-ble securing straps with the fastening rings to se-cure heavy items. Never exceed the vehicle's max-imum payload. Both the payload and the distribu-tion of the load in the vehicle will have an effect on the driving response and braking distance &.
Using securing straps
• Follow the instructions for the securing straps.
• Observe specifications for maximum load rat-ing.
• The securing straps must be long enough for the item you wish to secure.
Damaged securing straps
Never use the securing straps if:
• Damage to the warp and weft of the webbing (cuts or fraying) accounts for more than 10% of the webbing.
• The seams are damaged.
• The webbing is deformed by friction or heat.
• The securing straps are cracked, especially if cracked across the strap, or if the straps have notches.
• The securing straps have splits or corrosion damage.
• There is damage to the tightening device and connection elements.
Additional information and warnings:
• Tailgate 49
• Wing doors 52
• Lights 106
• Luggage compartment 130
• Roof carrier 137
• Towing a trailer 139
• Wheels and tyres 367
• Vehicle weight and axle weight rating 450
A WARNING
Objects that are not secured, or are secured incorrectly, can cause serious injuries in the event of a sudden driving or braking manoeu-vre or accident. This applies particularly if objects are struck by the airbag when activa-ted and then flung through the vehicle interi-or. To reduce the risk of accidents, please ob-serve the following guidelines:
• Always stow all objects in the vehicle se· curely.
• Always use suitable straps to prevent ob-jects entering the deployment zones of the curtain alrbag, the combined curtain and side airbag or the front airbag during a sudden driving or braking manoeuvre.
• Objects should be stowed in the vehicle interior In such a way that they can never en-ter the alrbag deployment zones while the ve-hicle is In motion.
• Always keep stowage compartments closed while the vehicle is In motion.
• The front airbag must be switched off and the indicator lamp PASSENGER AIR BAG OFF 'Ji; must light up for as long as the front passenger seat backrest is folded forwards.
• Stowed objects must never cause passen-gers to assume an incorrect sitting position.
• If an item is being stowed on a seat, this seat must not be used by any passengers.
A WARNING
Transporting heavy objects changes the vehi-cle driving characteristics and increases the braking distance. Heavy loads which are not properly stowed or secured in the vehicle can lead to a loss of vehicle control and cause se-rious injury. .,..
Transporting items 125
Page 127 of 486
Always stow all items of luggage in the vehicle securely.
• Distribute items in the vehicle, on the roof and on the trailer as evenly as possible.
• Place heavy objects as far forward in the lug-gage compartment as possible. Position the rear seat backrests securely in the upright position.
• Secure luggage in the luggage compartment to the fastening rings with suitable straps 130.
• Adjust the headlight range 106.
• Adjust the tyre pressure according to the vehi-cle load. Adhere to the tyre pressure plate 367.
• In vehicles with a tyre monitoring system, set the new vehicle load level as necessary 318.
Stowing cargo
r-111 First read and observe the introductory L-l=:.LI information and safety warnings & on page 125.
Stow the load securely in the vehicle or on the load surface
• Before loading the vehicle, place a sturdy mat or similar cover flush with the vehicle floor. Where necessary, do not cover protruding parts of the ve-hicle floor.
• If necessary, remove the seats to increase the load area.
• The vehicle floor must be free of oil and dust, dry and fully clean in order to help prevent the load from sliding.
• Observe gross axle weight ratings and the gross vehicle weight rating.
• Distribute items in the vehicle, on the load sur-face, on the roof and on the trailer as evenly as possible.
• Stow heavy objects directly on the floor and above or in front of the rear axle and engage the rear seat backrests securely in an upright position.
CD
Hard objects on the shelf can chafe against the wires of the heating element in the rear window and cause damage.
m • Observe any information concerning the l!J loading of a trailer 139 .
• Observe any information concerning the load-ing of a roof carrier 137.
• Protect the seat rails or seat anchor points from damage.
• Secure luggage with suitable securing straps on the fastening rings 130.
• Adjust the headlight range 106.
• Adjust the tyre pressure according to the vehi-cle load. Adhere to the tyre pressure plate 367.
• In vehicles with a tyre monitoring system, set the new vehicle load level as necessary 318.
CD
Hard objects on the shelf can chafe against the wires of the heating element in the rear window and cause damage.
m • Observe any information concerning the l!J loading of a trailer =>page 139 .
• Observe any information concerning the load-ing of a roof carrier =>page 137 .
Page 130 of 486
A WARNING (Continued)
• Any objects protruding from the luggage compartment must be marked to ensure that they are visible to other road users. Comply with legal regulations.
• If items protrude out of the luggage com-partment, never use the tail gate or wing doors to "hold them in position".
• If you drive with the tailgate or wing doors open, remove any racks and luggage from the tail gate or a wing door.
A WARNING
Poisonous exhaust fumes can get into the in-terior when the tailgate or wing doors are open. This can result in loss of conscious-ness, carbon monoxide poisoning, serious Injury and accidents.
Driving a loaded vehicle
1"''l1 First read and observe the introductory L--Wl information and safety warnings & on page 125.
For good vehicle handling when driving a loaded vehicle, please observe the following:
• Stow all items of luggage page 127.
• Accelerate carefully and gently.
• Avoid sudden braking and driving manoeuvres.
• Brake earlier than in normal driving.
• If applicable, heed the information about driving with a trailer 139.
• If applicable, observe the information concern-ing the roof carrier 137.
Luggage compartment
CO Introduction
This chapter contains information on the following subjects:
Luggage compartment cover . . . . . . . . . . . . . . 132
130 Before the JOUrney
A WARNING (Continued)
• Always drive with the wing doors or tail-gate closed to prevent poisonous exhaust fumes getting into the vehicle.
• If exceptional circumstances require you to drive with an open tallgate or open wing doors, do the following to reduce the amount of poisonous exhaust fumes that could enter into the vehicle:
CD
-Close all windows and the sliding/tilting roof.
-Switch off air reclrculatlon mode.
-Open all vents In the dash panel.
-Switch the blowers to the highest set-ting.
The vehicle length and height are different when the wing doors or tailgate are open.
A wARNING
Moving loads can severely impair the vehi-cle's stability and driving safety which could cause accidents and severe Injuries.
• Secure objects properly to prevent them from sliding.
• Use suitable straps when securing heavy objects.
• Engage the rear seat backrests securely In
Page 137 of 486

n11 First read and observe the introductory l-J=,IJ information and safety warnings & on page 133.
The net partition can prevent objects in the lug-gage compartment entering the passenger com-partment.
The net partition can be fitted behind the front seats or behind the 3-seat bench.
Key to Fig. 111:
® Cross pieces with joints which lock into place
Preparing the net partition for fitting
• Take the net partition out of its plastic bag and unroll it fully.
• Fold out all the side rods fully, until you hear a "clicking• noise.
Fitting the net partition
• Make sure that the sewn-in instructions label is pointing to the rear.
• Hook the net partition up onto the left-hand side
• Push the rod together to hook the net partition onto the right-hand side.
• Pull the net partition to check that it has engag-ed securely in the retainers in the headliner.
• On the left and right sides. pull the strap down on the loop G) until you can insert the T-shaped holder into the outer seat rails.
• Turn each of the T-shaped holders through 90° so that they are positioned across the seat rails @.
• Make sure that the net partition is vertical and securely fitted in the seat rails.
Roof carrier
COl Introduction
This chapter contains information on the following subjects:
Attaching the mounts and roof carrier . . . . . . . 138 Loading the roof carrier . . . . . . . . . . . . . . . . . . . 139
Removing the net partition
• Slacken off the straps by pulling loop
• Push the net partition on one side slightly to the inside of the vehicle and lift it out of the upper re-tainer.
• Press the release button 111 ® in the joint of each cross piece and fold the cross pieces together.
• Roll up the net partition and stow it in its plastic bag.
• Stow the plastic bag securely in the vehicle.
A WARNING
Always use the net partition carefully, observ-Ing the Instructions. Risk of injury.
• The net partition is secured properly in the roof only if the T-shaped holders are securely fitted Into the retainers.
• The net partition is fitted correctly in the seat rails only if the T-shaped retainers are at right-angles to the seat rails and correctly en-gaged.
• The T-shaped holders must never be fitted close to the removable covers on the seat rails.
• Heavy, pointed or sharp items which are not stowed securely can cause Injury in the event of sudden braking manoeuvres or acci-dents. This may also happen when the net partition is fitted correctly.
• Vehicle occupants must not travel behind a fitted safety net.
• When it is no longer being used.
• When the vehicle is driving through a car wash.
• When the vehicle height exceeds the required clearance height, e.g. in a garage. .,.
Transporting items 1137