2019 VOLKSWAGEN TRANSPORTER oil pressure
[x] Cancel search: oil pressurePage 16 of 486

Instrument cluster
Warning and indicator lamps
The warning and indicator lamps indicate various warnings ::.&.faults ::.(D or certain functions. Some warning and indicator lamps light up when the ignition is switched on and should go out once the engine is running or the vehicle is in motion.
Depending on the vehicle's equipment level, addi-tional text messages could appear in the display on the instrument cluster to provide further infor-mation or to ask you to perform certain tasks ::.page 19, Instruments.
Symbol Meaning=:>&
Do not drive on I
Depending on the vehicle equipment level, sym-bols may be displayed in the instrument cluster in-stead of warning lamps.
Signal tones are given when some warning or indi-cator lamps light up.
For details on indicator lamps which light up in the light switch see Chapter "Lighting" ::.page 106.
See
Lit up: ·i:-Do not drive ont
-F-Coolant level too low. coolant temperature too high, or coolant ::.page 358 system is faulty.
Flashing: fault in engine coolant system. ::.page 358
Do not drive ont ::.page 353 "t:::r. Engine oil pressure too low.
oG The en£ine cannot be restarted! AdBiue level too low. ::.page 346
oG
with The engine cannot be restarted! Fault in the Ad Blue® system. ::.page 346
CRl ::0 Do not drive on I ::.page 45 .... At least one vehicle door is opened or not properly closed .
c:::5 Do not drive on I ::.page 49 The tailgate or wing doors are open or not properly closed. ::.page 52
!6 'er Driver seat belt is not fastened. ::.page 79
Changing gear ::.page 260
({5)) Depress the brake pedal. Brakes ::.page 269 Adaptive cruise con-trol (ACC) ::.page 298
Adaptive cruise control (ACC) not available. ::.page 298
0 Fault in the alternator. ::.page 362
m DSG® dual clutch gearbox is too hot. ::.page 260
Overv1cw of the vehicle
Page 17 of 486
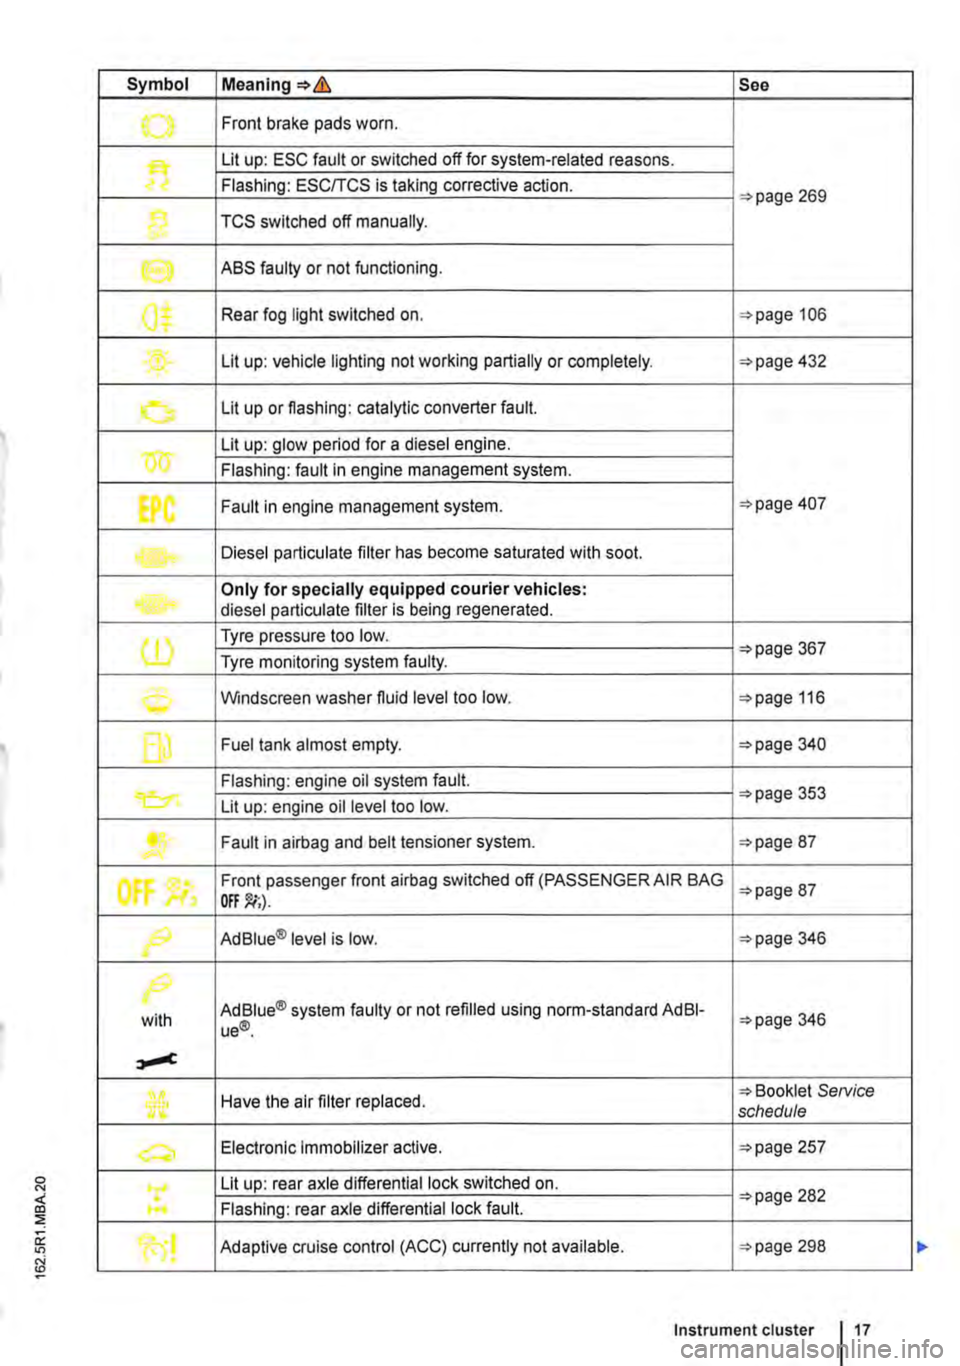
Symbol Meaning=>& See
.......,. Front brake pads worn .
Lit up: ESC fault or switched off for system-related reasons.
Flashing: ESC/TCS is taking corrective action. =>page 269
1} TCS switched off manually.
e ABS faulty or not functioning.
0$ Rear fog light switched on. =>page 106
Lit up: vehicle lighting not working partially or completely. =>page 432
0 Lit up or flashing: catalytic converter fault.
w Lit up: glow period for a diesel engine.
Flashing: fault in engine management system.
EPC Fault in engine management system. =>page 407
Diesel particulate filter has become saturated with soot.
Only for specially equipped courier vehicles: diesel particulate filter is being regenerated.
(1) Tyre pressure too low. =>page 367 Tyre monitoring system faulty.
0 Windscreen washer fluid level too low. =>page 116
f] Fuel tank almost empty. =>page 340
Flashing: engine oil system fault.
Lit up: engine oil level too low. =>page 353
....... Fault in airbag and belt tensioner system. =>page 87
tf'
Front passenger front airbag switched off (PASSENGER AIR BAG =>page 87
f9 Ad Blue® level is low. =>page 346
/>.
with Ad Blue® system faulty or not refilled using norm-standard AdBI-ue®. =>page 346
Have the air filter replaced. => Booklet SeNice schedule
a, Electronic Immobilizer active. =>page 257
Lit up: rear axle differential lock switched on. =>page 282 .... Flashing: rear axle differential lock fault.
Adaptive cruise control (ACC) currently not available. =>page 298
Instrument cluster 17
Page 33 of 486

Before the journey
Before setting off
Driving tips
CO Introduction
This chapter contains information on the following subjects:
Preparing for a journey and driving safely
Driving abroad ...................... .
Driving through water on roads ........ .
33 34
35
An engine and transmission guard may prove use-ful, depending on the conditions in which the vehi-cle is to be driven. An engine and transmission guard can reduce the risk of damage to the vehi-cle's underbody and engine oil sump, for example when driving over kerbs, driveways or unsurfaced roads. Volkswagen Commercial Vehicles recom-mends using a Volkswagen Commercial Vehicles dealership for this purpose.
Additional Information and warnings:
• Sitting correctly and safely 61
• Transporting 125
• Starting the engine, changing gear and parking the vehicle 257
• Driving with respect for the environment =>page 278
• Consumer information 404
A WARNING
Driving under the Influence of alcohol, drugs, medication or narcotics can cause serious accidents and fatal Injuries.
• Alcohol, drugs, medication and narcotics can severely impair perception, reaction times and driving safety. This could cause you to lose control of the vehicle.
l""""('n First read and observe the Introductory L-Wl Information and safety warnings th on page 33.
Checklist
Observe the following Information both before and during the journey to ensure your own safety and the safety of passengers and other road users
..( Check that all lights and turn signals are working properly.
Check the tyre pressure 367 and fuel level 340.
..( Ensure that you have a good, clear view through all of the windows.
..( Air intake to the engine must not be obstruc-ted, and the engine must not be covered with any kind of insulating materials th in ell Introduction on page 351.
0::
g!
..(
..(
..(
..(
..(
..(
..(
Secure any objects and luggage in the stowage compartments, the luggage corn-partment or on the roof 125 .
Ensure that you are able to operate the ped-als freely at all times .
Secure any children travelling in the vehicle in a restraint system suitable for their weight and size =>page 96.
Adjust the front seats, head restraints and mirrors properly in accordance with the size of the occupants 61.
Wear shoes that provide good grip for your feet when using the pedals.
The floor mat in the footwell on the driver side must leave the pedal area free and must be securely fastened .
Assume a correct sitting position before set-ling off and maintain this position while driv-ing. This also applies to all passengers =>page 61. ..
Before setting off 33
Page 127 of 486
Always stow all items of luggage in the vehicle securely.
• Distribute items in the vehicle, on the roof and on the trailer as evenly as possible.
• Place heavy objects as far forward in the lug-gage compartment as possible. Position the rear seat backrests securely in the upright position.
• Secure luggage in the luggage compartment to the fastening rings with suitable straps 130.
• Adjust the headlight range 106.
• Adjust the tyre pressure according to the vehi-cle load. Adhere to the tyre pressure plate 367.
• In vehicles with a tyre monitoring system, set the new vehicle load level as necessary 318.
Stowing cargo
r-111 First read and observe the introductory L-l=:.LI information and safety warnings & on page 125.
Stow the load securely in the vehicle or on the load surface
• Before loading the vehicle, place a sturdy mat or similar cover flush with the vehicle floor. Where necessary, do not cover protruding parts of the ve-hicle floor.
• If necessary, remove the seats to increase the load area.
• The vehicle floor must be free of oil and dust, dry and fully clean in order to help prevent the load from sliding.
• Observe gross axle weight ratings and the gross vehicle weight rating.
• Distribute items in the vehicle, on the load sur-face, on the roof and on the trailer as evenly as possible.
• Stow heavy objects directly on the floor and above or in front of the rear axle and engage the rear seat backrests securely in an upright position.
CD
Hard objects on the shelf can chafe against the wires of the heating element in the rear window and cause damage.
m • Observe any information concerning the l!J loading of a trailer 139 .
• Observe any information concerning the load-ing of a roof carrier 137.
• Protect the seat rails or seat anchor points from damage.
• Secure luggage with suitable securing straps on the fastening rings 130.
• Adjust the headlight range 106.
• Adjust the tyre pressure according to the vehi-cle load. Adhere to the tyre pressure plate 367.
• In vehicles with a tyre monitoring system, set the new vehicle load level as necessary 318.
CD
Hard objects on the shelf can chafe against the wires of the heating element in the rear window and cause damage.
m • Observe any information concerning the l!J loading of a trailer =>page 139 .
• Observe any information concerning the load-ing of a roof carrier =>page 137 .
Page 144 of 486
A WARNING (Continued)
• If the ball coupling will not fit properly, the towing bracket should be checked by a quali-fied workshop.
• Do not use the towing bracket If the ball coupling does not engage properly or if you are unable to set it to the "ready" position.
• Do not use the towing bracket if you are unable to remove the key from the handwheel once the ball coupling has been mounted. This means that ball coupling Is not locked properly.
Removing the ball coupling
r--T'n First read and observe the Introductory L-J.:.IJ information and safety warnings & on page 139.
• Unhitch the trailer => &.
• Remove the cover =>Fig. 113 ®from the lock on the handwheel.
• Insert the key® into the lock and turn it clock-wise.
• Hold the ball coupling tightly in your left hand =>&.
• Use your right hand to pull out the handwheel 0 in the direction of arrow 1 and keep it in this po-sition.
• Turn the handwheel 0 in the direction of arrow 2 until it engages.
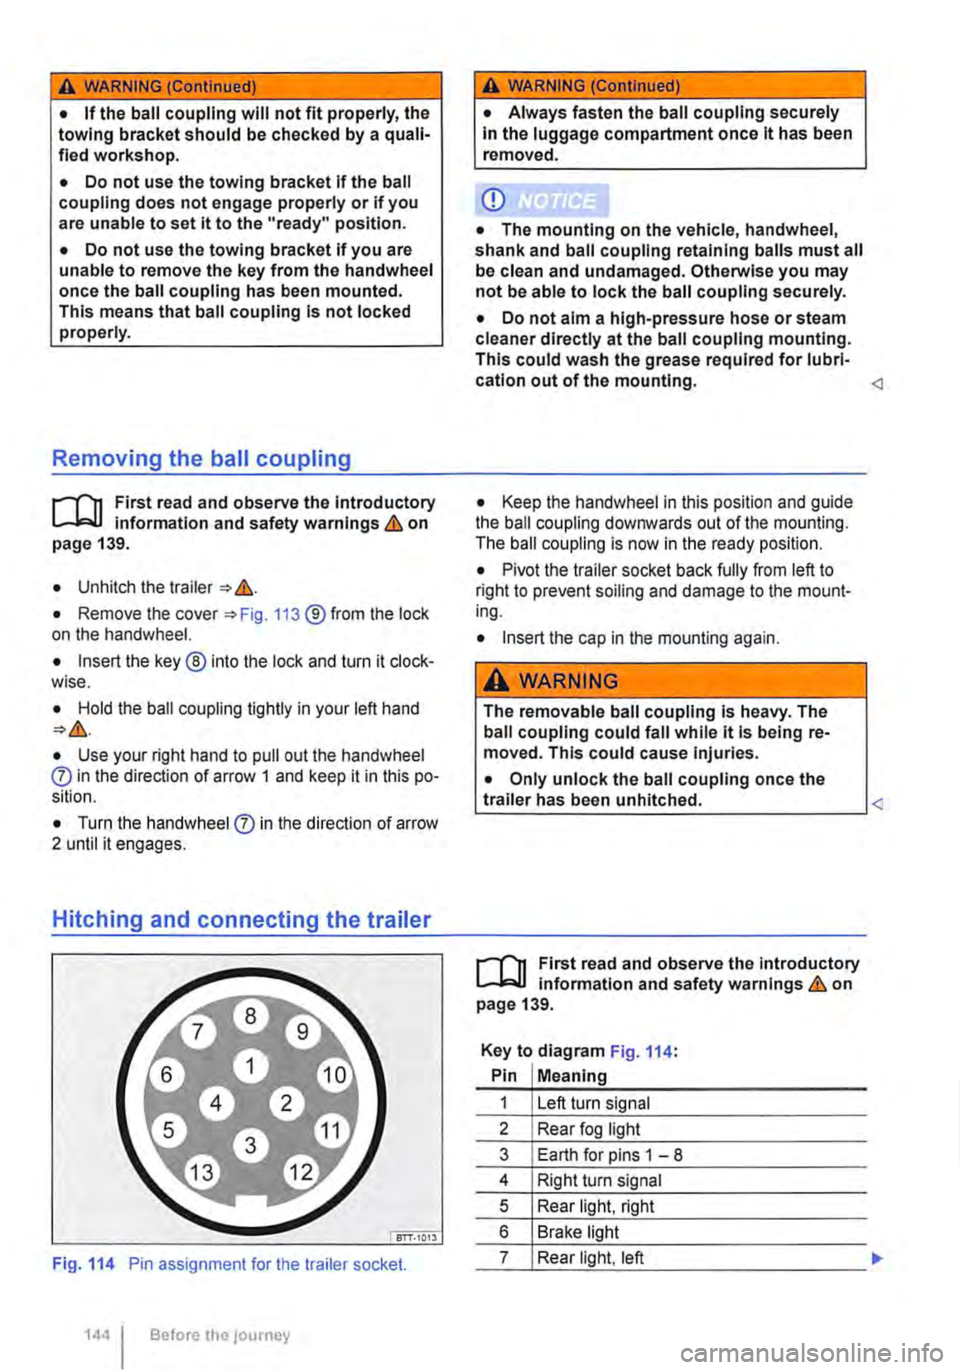
Hitching and connecting the trailer
Fig. 114 Pin assignment for the trailer socket.
1441 Before the journey
A WARNING (Continued)
• Always fasten the ball coupling securely In the luggage compartment once it has been removed.
CD
• The mounting on the vehicle, handwheel, shank and ball coupling retaining balls must all be clean and undamaged. Otherwise you may not be able to lock the ball coupling securely.
• Do not aim a high-pressure hose or steam cleaner directly at the ball coupling mounting. This could wash the grease required for lubri-cation out of the mounting.
• Pivot the trailer socket back fully from left to right to prevent soiling and damage to the mount-ing.
• Insert the cap in the mounting again.
A WARNING
The removable ball coupling Is heavy. The ball coupling could fall while it Is being re-moved. This could cause Injuries.
• Only unlock the ball coupling once the L-tr_a_ile_r_h_a_s __ be_e_n __ u_n_hi_tc_h_e_d_. ____________
r--T'n First read and observe the Introductory L-J.:.IJ information and safety warnings & on page 139.
Key to diagram Fig. 114:
Pin Meaning
1 Left turn signal
2 Rear fog light
3 Earth for pins 1 -8
4 Right turn signal
5 Rear light, right
6 Brake light
7 Rear light, left
Page 272 of 486
Parking
r--f"n First read and observe the Introductory L-J.:.lJ information and safety warnings & on page 269.
Please adhere to relevant legislation when stop-ping and parking your vehicle.
Stopping the vehicle
The steps should only be carried out in the speci-fied order.
• Stop the vehicle on a suitable surface &.
• Depress and hold the brake pedal until the en-gine has stopped.
• Apply the handbrake.
• With a DSG® dual clutch gearbox, move the se-lector lever to position P.
• Switch off the engine and take your foot off the brake pedal.
• Remove the vehicle key from the ignition lock.
• Turn the steering wheel slightly if necessary to engage the steering lock mechanism.
• With a manual gearbox, select the first gear for flat ground and uphill inclines, or the reverse gear for downhill inclines, and then release the clutch pedal 263.
• Please ensure that all occupants, in particular children, leave the vehicle.
• Take all vehicle keys with you when you leave the vehicle.
• Lock the vehicle.
Additional points for ascending and descending inclines
Before switching off the engine, turn the steering wheel so that the front wheels will roll against the kerb if the parked vehicle starts to move.
• When facing downhill, turn the wheels so that they face the kerb.
• When facing uphill, turn the wheels so that they face the centre of the road.
Information on the brakes
r--f"n First read and observe the Introductory L-J.:.lJ information and safety warnings & on page 269.
New brake pads cannot generate the full braking effect during the first 200 to 300 km and must first be "run in" &. However, you can compensate for
2721 While driv1ng
A WARNING
The components of the exhaust system be-come very hot. This can cause fires and seri-ous Injuries.
• Never park the vehicle where parts of the exhaust system can come Into contact with any Inflammable material underneath the ve-hicle, e.g. undergrowth, leaves, dry grass, split fuel.
CD
• To avoid unintentional movement when parking the vehicle, first apply the handbrake firmly and then remove your foot from the brake pedal.
• Always take care when driving in car parks with protruding kerbstones or bollards. Objects that protrude from the ground can damage the bumper and other components when parking the vehicle. In order to avoid any damage, stop the vehicle before the wheels can touch the bollards or kerbs.
• Drive carefully through dips in the road, over driveways, ramps, kerbstones and other objects. Low-lying vehicle components such as the bumper, spoiler and parts of the running gear, engine or exhaust system could be dam-aged.
• If the handbrake Is not applied fully when the vehicle Is stationary and the brake pedal Is released when then selector lever Is in posi-tion P, the vehicle may move a few centimetres forwards or backwards.
Page 273 of 486
heavy load on the brakes should be avoided. For example, when driving too close to the vehicle ahead.
The rate of wear of the brake pads depends to a great extent on the conditions under which the ve-hicle is operated and the way in which the vehicle is driven. With regular urban trips, short journeys and a sporty driving style, the brake pads must be checked by a qualified workshop more regularly than stated in the service schedule.
When driving with wet brakes, for example after driving through water, after heavy rainfall or after washing the vehicle, the braking effect may be de-layed as the brake discs will be wet, or possibly ic-ed up (in winter). The brakes must be "dried" as quickly as possible by careful braking at higher speed. Ensure that no vehicle behind you or no other road user is put at risk as a result of this ac-
Any salt layer accumulating on the discs and pads will delay the braking effect and increase the braking distance. If the brakes on the vehicle have not been applied for a long time on roads that have been gritted with salt, the layer of salt must be re-duced through careful braking &.
Corrosion on the brake discs and dirt in the brake pads are facilitated through long periods of inactivi-ty, low mileage and low load levels. With inactivity or low use levels for the brake pads as well as cor-rosion, Volkswagen Commercial Vehicles recom-mends that the brake discs and brake pads be cleaned by braking strongly several times from high speed. Ensure that no vehicle behind you or no other road user is put at risk as a result of this
Fault in the brake system
A brake circuit may have failed if you have to re-duce speed and the vehicle does not brake as nor-mal (sudden increase in braking distance). This will be indicated by the warning lamp m and in some cases a text message. Go to the nearest qualified workshop immediately to have the fault corrected. Drive at low speed when doing this and anticipate much longer braking distances and an increase in the pressure required on the pedal.
Brake servo
The brake serve will only function when the engine is running and reinforces the pressure applied by the driver on the brake pedal.
If the brake serve is not functioning or the vehicle is being towed, the brake pedal will have to be de-pressed more forcefully as the braking distance will be increased due to the lack of assistance for the brake system &.
A WARNING
New brake pads will not have the optimal braking effect when first fitted.
• New brake pads cannot generate the full braking effect during the first 300 km and must first be run In. A reduced braking effect can be Increased by applying more pressure to the brake pedal.
• You must drive particularly carefully when driving with new brake pads In order to re-duce the risk of accidents, serious Injuries and loss of control of the vehicle.
• Never drive too close to other vehicles when running in new brake pads, and never create a driving situation that will place a heavy load on the brakes.
A WARNING
Overheated brakes reduce the braking effect and considerably Increase the braking dis-tance.
• When driving downhill the brakes are placed under particular strain and become hot very quickly.
• Before driving down a long, steep gradi-ent, reduce speed and change to a lower gear or move the selector lever to a lower position. This will make use of the engine braking ef-fect and relieve the load on the brakes.
• Non-standard or damaged front spoilers could restrict the airflow to the brakes and cause them to overheat.
A WARNING
Wet brakes or brakes coated with ice or road salt react more slowly and require longer braking distances.
• Carefully apply the brakes to test them.
• Always dry brakes and clean off any coat-Ing of Ice and salt with a few cautious appli-cations of the brake when visibility, weather, road and traffic conditions permit.
A WARNING
Driving without the brake servo can consider-ably Increase the braking distance and thus cause accidents and serious Injuries.
• Never allow the vehicle to roll if the engine Is switched off.
Starting the engine, changing gear and parking 273
Page 280 of 486
Saving fuel
1/100 km
-10°C
+20 oc
L----------------tkm 5 15 25 30
en-o11S
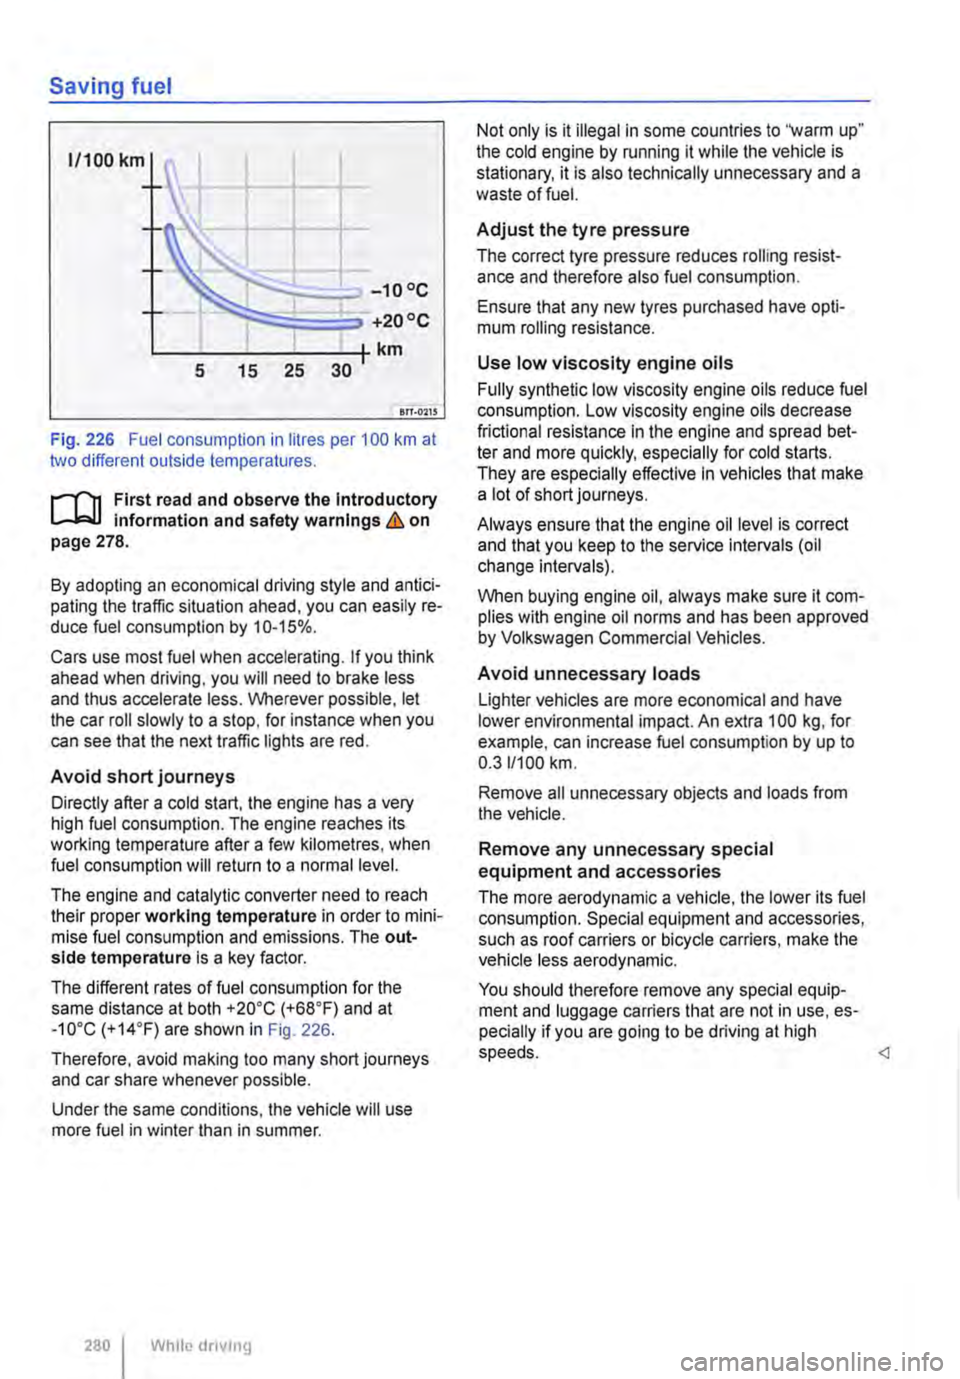
Fig. 226 Fuel consumption in litres per 100 km at two different outside temperatures.
r-1"'11 First read and observe the Introductory Information and safety warnings&. on page 278.
By adopting an economical driving style and antici-pating the traffic situation ahead, you can easily re-duce fuel consumption by 10-15%.
Cars use most fuel when accelerating. If you think ahead when driving, you will need to brake less and thus accelerate less. Wherever possible, let the car roll slowly to a stop, for instance when you can see that the next traffic lights are red.
Avoid short journeys
Directly after a cold start, the engine has a very high fuel consumption. The engine reaches its working temperature after a few kilometres, when fuel consumption will return to a normal level.
The engine and catalytic converter need to reach their proper working temperature in order to mini-mise fuel consumption and emissions. The out-side temperature is a key factor.
The different rates of fuel consumption for the same distance at both +20"C (+68"F) and at -10"C (+14"F) are shown in Fig. 226.
Therefore, avoid making too many short journeys and car share whenever possible.
Under the same conditions, the vehicle will use more fuel in winter than in summer.
280 I While dnvmg
Not only is it illegal in some countries to "warm up" the cold engine by running it while the vehicle is stationary, it is also technically unnecessary and a waste of fuel.
Adjust the tyre pressure
The correct tyre pressure reduces rolling resist-ance and therefore also fuel consumption.
Ensure that any new tyres purchased have opti-mum rolling resistance.
Use low viscosity engine oils
Fully synthetic low viscosity engine oils reduce fuel consumption. Low viscosity engine oils decrease frictional resistance in the engine and spread bet-ter and more quickly, especially for cold starts. They are especially effective In vehicles that make alotofshortjourneys.
Always ensure that the engine oil level is correct and that you keep to the service intervals (oil change intervals).
When buying engine oil, always make sure it com-plies with engine oil norms and has been approved by Volkswagen Commercial Vehicles.
Avoid unnecessary loads
Lighter vehicles are more economical and have lower environmental impact. An extra 100 kg, for example, can increase fuel consumption by up to 0.311100 km.
Remove all unnecessary objects and loads from the vehicle.
Remove any unnecessary special equipment and accessories
The more aerodynamic a vehicle, the lower its fuel consumption. Special equipment and accessories, such as roof carriers or bicycle carriers, make the vehicle less aerodynamic.
You should therefore remove any special equip-ment and luggage carriers that are not in use, es-pecially if you are going to be driving at high speeds.