2019 VOLKSWAGEN TRANSPORTER headlights
[x] Cancel search: headlightsPage 343 of 486

Capacities
r--('n First read and observe the introductory L-W.I information and safety warnings & on page 340.
Checks when filling the tank
r--r'n First read and observe the introductory L-W.I information and safety warnings & on page 340.
Checklist
Never carry out any work on the engine or in the engine compartment if you are not familiar with the necessary procedures and the general safety re-quirements or if the correct operating equipment, fluids and unsuitable tools are not available 350, Preparation for working in the engine compartment! The work should be carried out by a qualified workshop if you are uncertain. Please en-sure that the following are checked regular1y, pref-erably every time you fill the tank:
..( Windscreen washer fluid level 116
..( Engine oil level 353
Fuel
c:QJ Introduction
This chapter contains information on the following subjects:
Petrol
Diesel ...
344 345
Different engines require different fuels. The facto-ry-fitted sticker on the inside of the tank flap indi-cates the fuel type that is required for your particu-lar vehicle.
Volkswagen Commercial Vehicles recommends us-ing fuels with a low sulphur content or which are sulphur-free in order to reduce fuel consumption and prevent damage to the engine.
If the engine is not running smoothly or begins to judder, this can indicate poor or inadequate fuel quality, e.g. water in the fuel. If these symptoms appear, reduce the vehicle speed immediately and drive to the nearest qualified workshop at medium engine speeds, avoiding high engine loading. If these symptoms occur immediately after the vehi-
Fuel tank capacity
Approx. 80.0 I,
..( Engine coolant level 358
..( Brake fluid level 269
..( Tyre pressure 367
..( Vehicle lighting necessary for traffic safety:
-Turn signals
-Side lights, dipped beam headlights and main beam headlights
-Tail light cluster
-Brake lights
-Rear fog light 1 08
Information on changing bulbs 432.
cle has been refuelled, switch the engine off as soon as it is safe to do so and seek expert assis-tance. This can help to prevent further damage.
Additional information and warnings:
• Filling the tank 340
• Engine management system and exhaust puri-fication system 407
• Service schedule
A WARNING
Incorrect handling of fuel can cause explo-sions, fire, serious burns and other injuries.
• Fuel is highly explosive and inflammable.
• Never handle fuel near open flames, sparks or glowing matter (e.g. cigarettes).
• Keep naked flames, hot parts and sparks at a safe distance.
At the filling station 1343
Page 381 of 486

Washing the vehicle
r-f'n First read and observe the introductory Information and safety warnings & on page 380.
The longer substances such as insects, bird drop-pings, resinous tree sap, road dirt, industrial de-posits, tar, soot or road salt and other corrosive materials remain on the vehicle, the more damage they do to the paintwork. High temperatures (for in-stance in strong sunlight) accelerate the corrosion process. The underside of the vehicle should also be cleaned thoroughly and regularly.
Car washes
Please observe the signs on the automatic car wash. Before using an automatic car wash take the usual precautions, such as closing all windows and folding in the exterior mirrors, in order to avoid damage to the vehicle. You must consult the car wash operator if there are special parts on your ve-hicle such as spoilers, roof luggage carrier systems or radio aerials ::.CD.
The paint is so hard-wearing that the car can nor-mally be washed without problems in an automatic car wash. However, the effect on the paint de-pends to a large extent on the design of the car wash. Volkswagen Commercial Vehicles recom-mends the use of car washes without brushes.
To remove any wax residue from the windows and to stop wipers rubbing, please note the following points ::.page 382, Cleaning windows and exterior mirrors.
Washing the car by hand
When washing by hand, first soften the dirt with plenty of water and rinse off as well as possible.
Then clean the vehicle with a soft sponge, a glove or a brush using only light pressure. Start with the roof and work from the top to the bottom. Use a shampoo for very stubborn dirt only.
The sponge or glove should be wrung out thor-oughly at regular intervals.
Clean the wheels, sill panels etc. last. Use a differ-ent sponge for this purpose.
A WARNING
Parts of the vehicle with sharp edges can cause Injury.
• Protect your hands and arms from cuts on sharp parts, for example when cleaning the underbody or the inside of the wheel hous-lngs.
A WARNING
After the car has been washed, the braking effect could set in later than normal and ex-tend the braking distance as the brake discs and brake pads will be wet, or iced up In win-ter.
• You can "dry and de-ice" the brakes by performing careful braking manoeuvres. Make sure that you do not endanger any oth-er road users or violate any legal regulations when doing so.
CD
• The water should be no warmer than +so•c (+140.FJ.
• Do not wash the vehicle in direct sunlight in order to avoid damage to the vehicle palntwork.
• Never clean with insect sponges, rough kitchen sponges or similar products as these can damage the surface.
• Never clean the headlights with a dry cloth or sponge. Always use a wet cloth or sponge. lt is best to use soapy water.
• Washing the vehicle In cold weather: if the vehicle is rinsed with a hose, do not direct the water at the lock cylinders or the gaps around the doors, boot, or bonnet. The locks and seals could freeze.
CD
Observe the following guidelines before driving the vehicle into an automatic car wash in order to avoid damage to the vehicle:
• Ensure that the gap between the guide rails In the car wash is sufficient for the vehicle track. If the track is too narrow your wheels and tyres will be damaged.
• Switch off the rain sensor before driving the vehicle Into an automatic car wash.
• Check that the car wash is tall and wide enough for your vehicle.
• Fold In the exterior mirrors. Electrically fold-Ing exterior mirrors must be moved electrically. Do not fold them in and out by hand.
• In order to prevent damage to the palntwork on the bonnet, fold the wipers back onto the windscreen after drying the wiper blades. Do not drop the wipers onto the glass.
• Lock the tailgate to prevent it from opening accidentally In the car wash.
Page 411 of 486
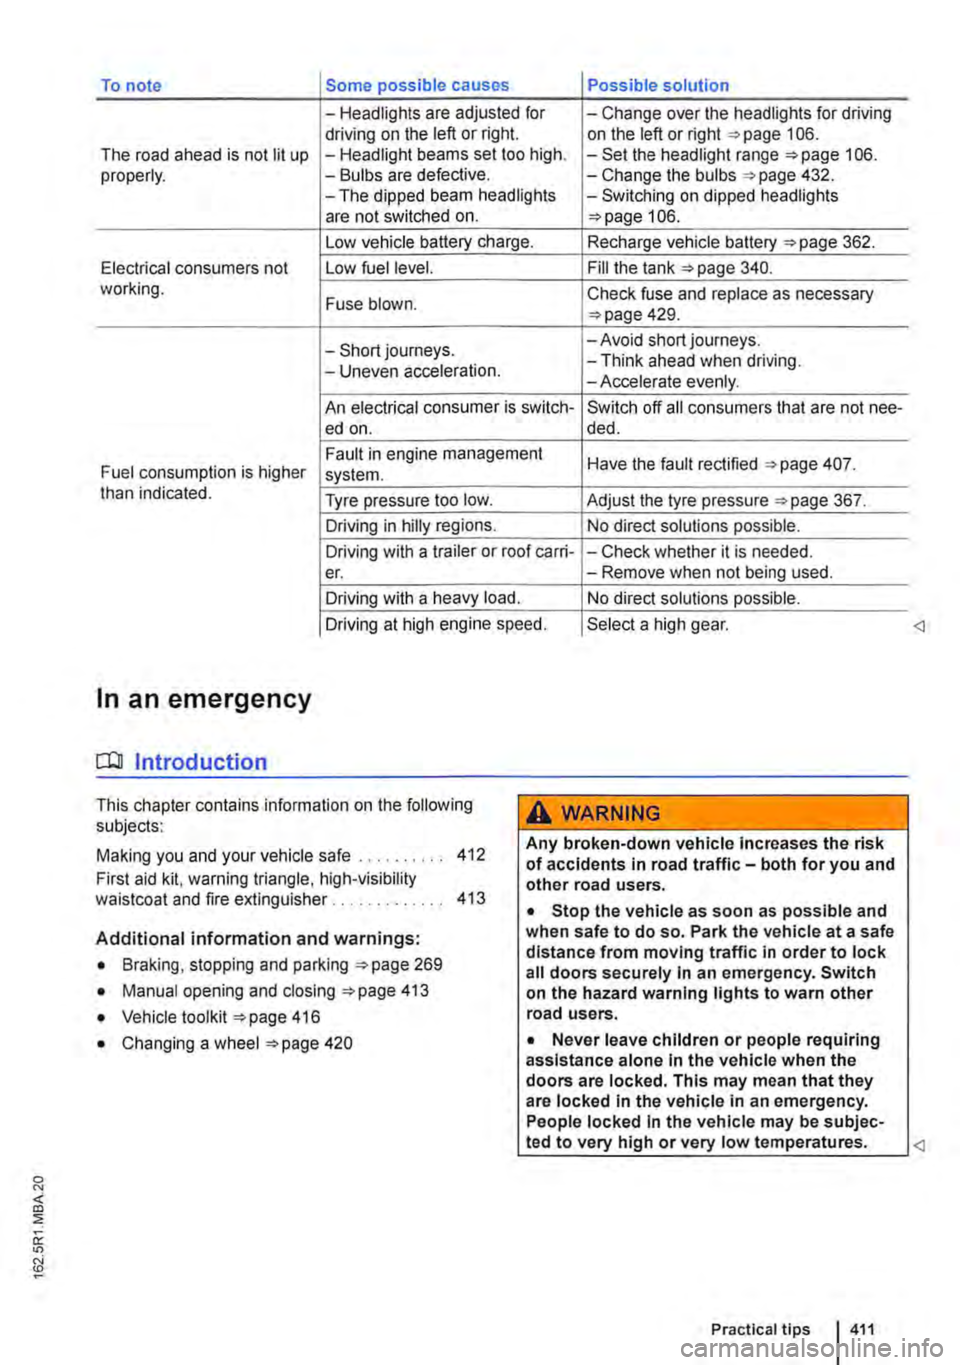
To note Some possible causes Possible solution
-Headlights are adjusted for -Change over the headlights for driving driving on the left or right. on the left or right 106. The road ahead is not lit up -Headlight beams set too high. -Set the headlight range 106. properly. -Bulbs are defective. -Change the bulbs 432. -The dipped beam headlights -Switching on dipped headlights are not switched on. 106.
Low vehicle battery charge. Recharge vehicle battery 362.
Electrical consumers not Low fuel level. Fill the tank 340. working. Fuse blown. Check fuse and replace as necessary 429.
-Short journeys. -Avoid short journeys.
-Uneven acceleration. -Think ahead when driving. -Accelerate evenly.
An electrical consumer is switch-Switch off all consumers that are not nee-ed on. de d.
Fault in engine management Have the fault rectified 407. Fuel consumption is higher system. than indicated. Tyre pressure too low. Adjust the tyre pressure 367.
Driving in hilly regions. No direct solutions possible.
Driving with a trailer or roof carri--Check whether it is needed. er. -Remove when not being used.
Driving with a heavy load. No direct solutions possible.
Driving at high engine speed. Select a high gear.
In an emergency
COl Introduction
This chapter contains information on the following subjects:
Making you and your vehicle safe . . 412
First aid kit. warning triangle, high-visibility waistcoat and fire extinguisher . . . . . . . . . . . . . 413
Additional information and warnings:
• Braking, stopping and parking 269
• Manual opening and closing 413
• Vehicle toolkit 416
• Changing a wheel 420
A WARNING
Any broken-down vehicle Increases the risk of accidents in road traffic-both for you and other road users.
• Stop the vehicle as soon as possible and when safe to do so. Park the vehicle at a safe distance from moving traffic In order to lock all doors securely In an emergency. Switch on the hazard warning lights to warn other road users.
• Never leave children or people requiring assistance alone In the vehicle when the doors are locked. This may mean that they are locked In the vehicle in an emergency. People locked In the vehicle may be subjec-
Page 432 of 486

Detecting a blown fuse
If the metal strip is melted this indicates that the fuse has blown 305.
Shine a torch onto the fuse. This will help you to spot the blown fuse more easily.
Changing a fuse
• If applicable, take the plastic pliers 306 G) out of the fuse box cover.
• For small fuses. push the catch on G) from above 306
• For larger fuses, push the catch G) onto the fuse from the side 306@
Changing bulbs
o::n Introduction
This chapter contains information on the following subjects:
Indicator lamp . . . . . . . . . . . . . . . . . . . . . . . . . 433
Information on changing bulbs . 433 LED lights on the vehicle . . . . . . . . . 434
Changing bulbs in H4 halogen headlights 435
Changing bulbs in H7 halogen headlights . . . 437
Changing bulbs in the LED headlights . . . 438
Changing the bulbs in the fog light . . . . . . . . . 439 Changing the bulbs in the tail light cluster on vehicles with tailgate . . . . . . . . . . . . . . . . . . . . . 440
Changing the bulbs in the tail light cluster on vehicles with wing doors .................. 441
Changing the bulbs in the LED tail light cluster . . . . . . . . . . . . . . . . . . . . . . . . . 442 Changing the side turn signal bulbs . . . . . . . . 443
Changing the vehicle bulbs requires considerable technical skill. Therefore if you do not feel confi-dent with the procedure. Volkswagen Commercial Vehicles recommends having the bulbs changed by a Volkswagen Commercial Vehicles dealership or other professional assistance. You must contact a qualified workshop if other vehicle parts around the lights need to be removed or LED lights need to be replaced.
You should keep a box with spare light bulbs for the lights that ensure the vehicle is roadworthy in the vehicle at all times. Spare bulbs are available from Volkswagen Commercial Vehicles dealers. In some countries it is a legal requirement to have these spare bulbs in the vehicle.
lt may be illegal to drive with a defective bulb in the exterior lighting.
4321 If and when
• Pull out the blown fuse.
• If the fuse has blown, replace it with a new fuse of the same amp rating (same colour and same markings) and same size
• Replace the cover.
CD
You can damage another position In the electri-cal system by using a fuse with a higher amp rating.
You can change the following bulbs yourself:
• Bulbs of the halogen headlights.
• Turn signal bulb in the LED headlights.
• Bulbs in non-LED tail light cluster.
• Turn signal and reversing light bulb in the LED tail light cluster.
• Bulb of turn signal repeater.
• Bulb of fog lights.
All LED lights in the vehicle should always be changed by an expert.
Additional bulb specifications
Some bulbs in headlights or In tail light clusters might have factory specifications that are different to standard bulbs. The designation is inscribed on the bulb, either on the glass part or on the base.
Additional information and warnings:
• Exterior views 5
• Lights and vision 106
• Preparation for working In the engine compart-ment 350
• Vehicle toolkit 416
• Fuses 429
A WARNING
Accidents can occur If roads are not suffi-ciently Illuminated and other road users have difficulty seeing the vehicle, or cannot see it atall. 11>
Page 435 of 486
Changing bulbs in H4 halogen headlights
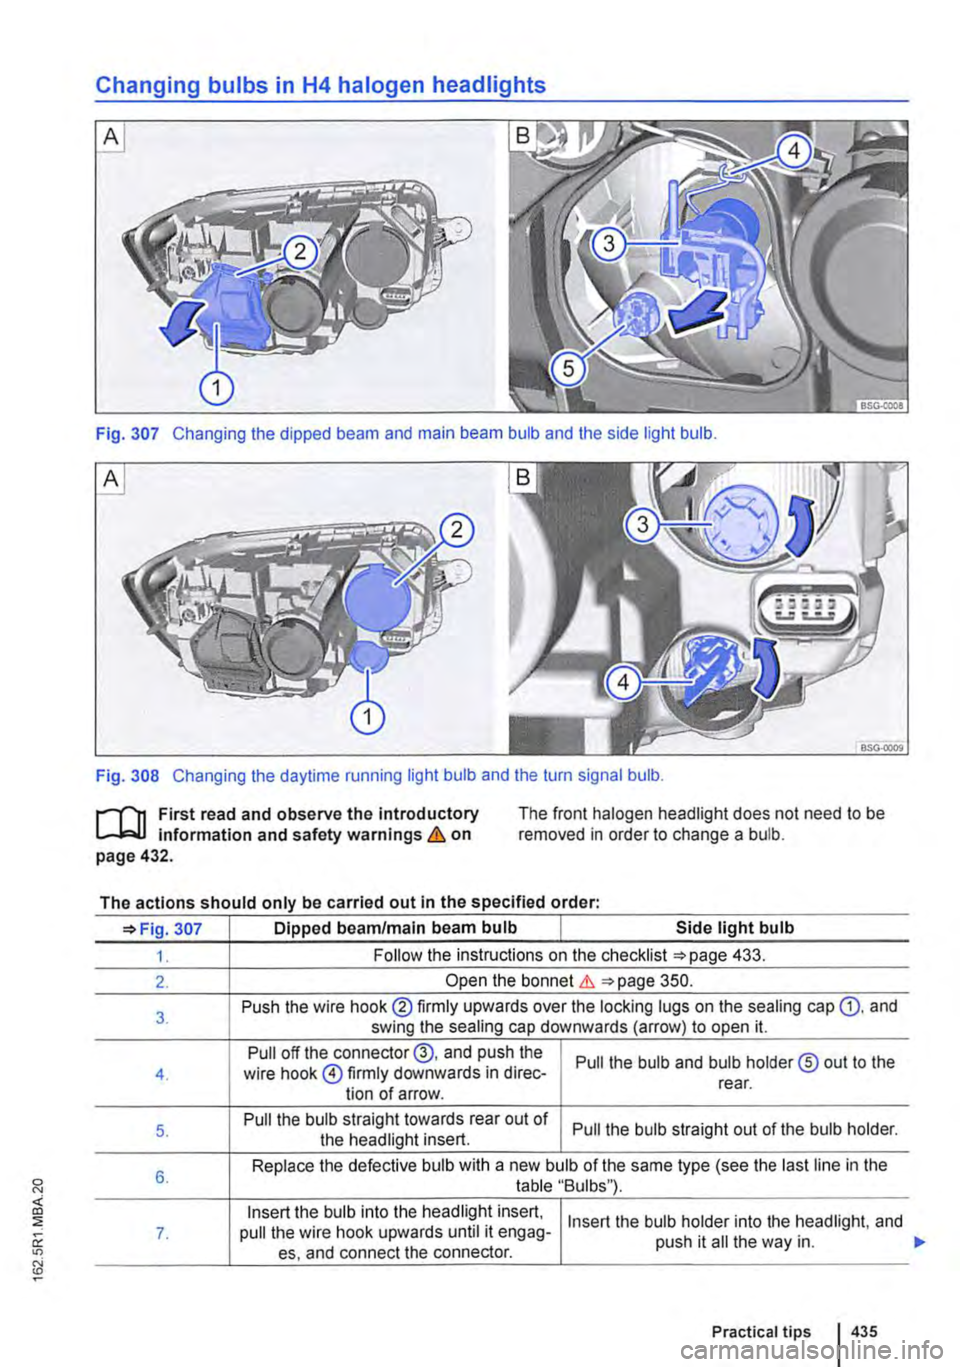
Fig. 307 Changing the dipped beam and main beam bulb and the side light bulb.
Fig. 308 Changing the daytime running light bulb and the turn signal bulb.
r-f"'n First read and observe the introductory L-J.::.l.l information and safety warnings & on page 432.
The front halogen headlight does not need to be removed in order to change a bulb.
The actions should only be carried out in the specified order:
307 Dipped beam/main beam bulb Side light bulb
1. Follow the instructions on the checklist 433.
2. Open the bonnet & 350.
3. Push the wire hook® firmly upwards over the locking lugs on the sealing cap Q). and swing the sealing cap downwards (arrow) to open it.
Pull off the connector@, and push the Pull the bulb and bulb holder® out to the 4. wire hook @firmly downwards in direc-tion of arrow. rear.
5. Pull the bulb straight towards rear out of Pull the bulb straight out of the bulb holder. the headlight insert.
6. Replace the defective bulb with a new bulb of the same type (see the last line in the table "Bulbs"}.
Insert the bulb into the headlight insert, Insert the bulb holder into the headlight, and 7. pull the wire hook upwards until it engag-push it ail the way in. es, and connect the connector.
Practical tips 435
Page 437 of 486
Changing bulbs in H7 halogen headlights
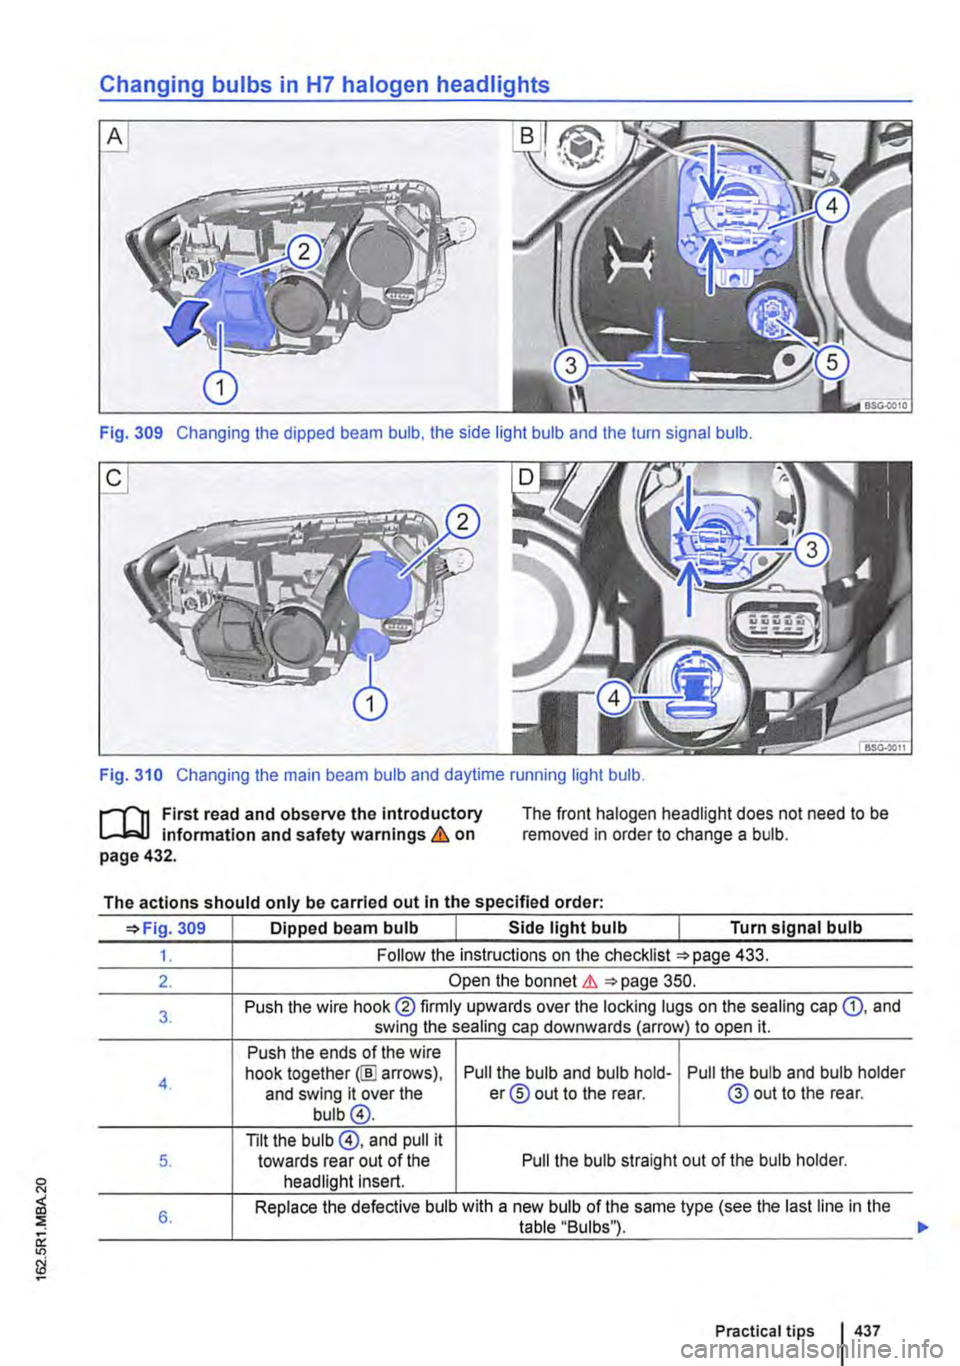
Fig. 309 Changing the dipped beam bulb, the side light bulb and the turn signal bulb.
Fig. 310 Changing the main beam bulb and daytime running light bulb.
l""""'('n First read and observe the introductory L-Jo:.Jl information and safety warnings & on page 432.
The front halogen headlight does not need to be removed in order to change a bulb.
The actions should only be carried out in the specified order:
=>Fig. 309 Dipped beam bulb Side light bulb Turn signal bulb
1. Follow the instructions on the checklist =>page 433.
2. Open the bonnet&. =>page 350.
3. Push the wire hook@ firmly upwards over the locking lugs on the sealing cap G), and swing the sealing cap downwards (arrow) to open it.
Push the ends of the wire
4. hook together@] arrows), Pull the bulb and bulb hold-Pull the bulb and bulb holder and swing it over the er® out to the rear. @out to the rear. bulb@.
Tilt the bulb @, and pull it 5. towards rear out of the Pull the bulb straight out of the bulb holder. headlight Insert.
6. Replace the defective bulb with a new bulb of the same type (see the last line in the table "Bulbs").
Practical tips I 437
Page 438 of 486
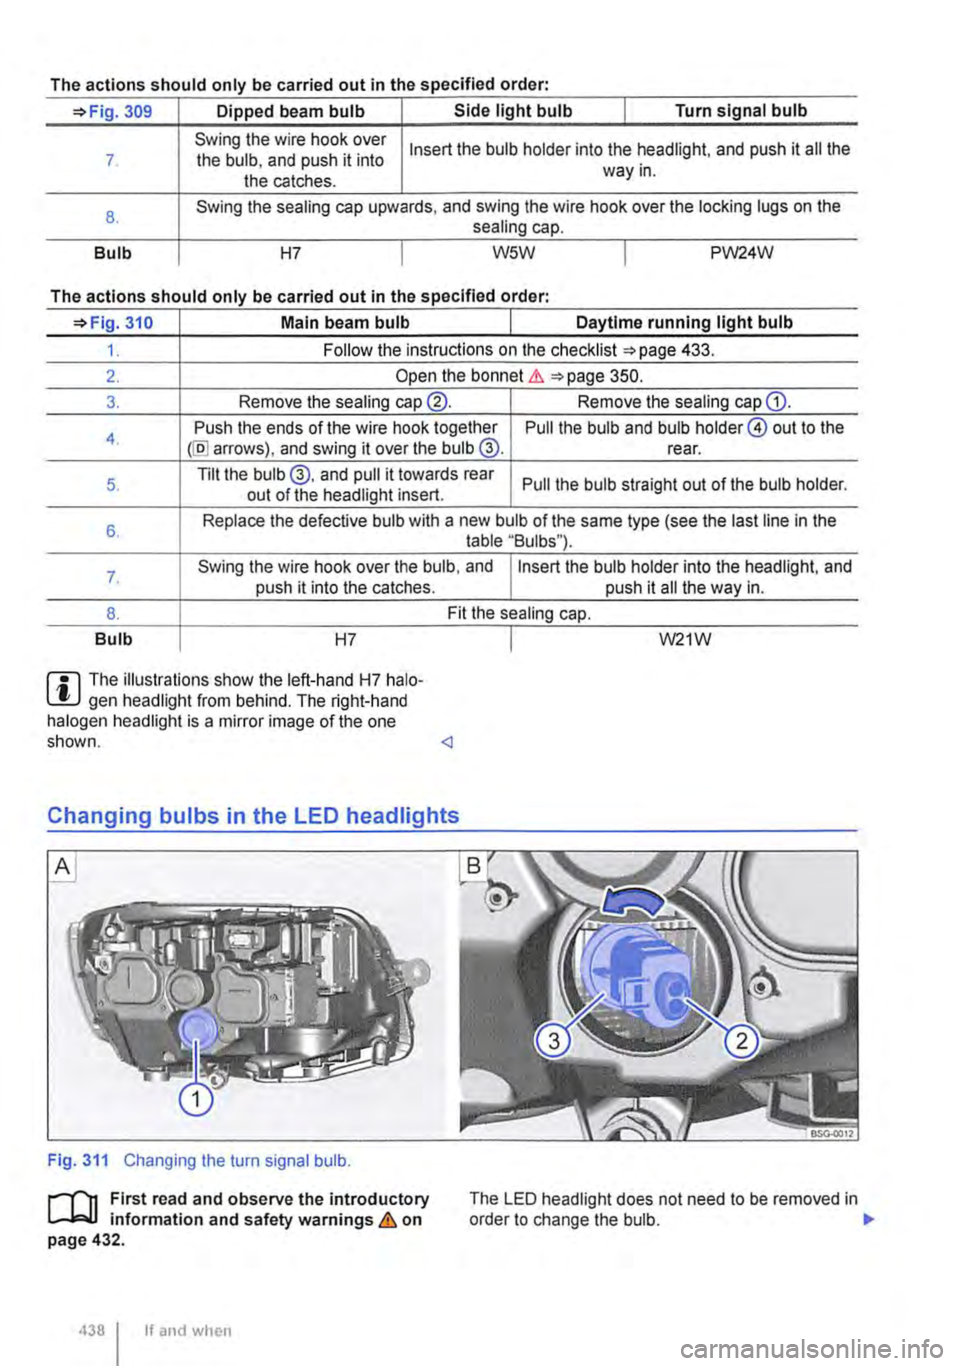
The actions should only be carried out in the specified order:
=>Fig. 309 Dipped beam bulb Side light bulb I Turn signal bulb
7
8.
Bulb
Swing the wire hook over the bulb, and push it into the catches.
Insert the bulb holder into the headlight, and push it all the way in.
Swing the sealing cap upwards, and swing the wire hook over the locking lugs on the sealing cap.
H7 I W5W I PW24W
The actions should only be carried out in the specified order·
=>Fig. 310 Main beam bulb Daytime running light bulb
1. Follow the instructions on the checklist =>page 433.
2. Open the bonnet Lh =>page 350.
3. Remove the sealing cap®. Remove the sealing cap G).
4. Push the ends of the wire hook together @I arrows), and swing it over the bulb @. Pull the bulb and bulb holder@ out to the rear.
5. Tilt the bulb@, and pull it towards rear Pull the bulb straight out of the bulb holder. out of the headlight insert.
6. Replace the defective bulb with a new bulb of the same type (see the last line in the table "Bulbs").
7. Swing the wire hook over the bulb, and Insert the bulb holder into the headlight, and push it into the catches. push it all the way in.
8. Fit the sealing cap.
Bulb H7
m The illustrations show the left-hand H7 halo-l!J gen headlight from behind. The right-hand halogen headlight is a mirror image of the one shown.
Fig. 311 Changing the turn signal bulb.
1"'"""111 First read and observe the introductory L-J,:.JJ information and safety warnings & on page 432.
438 I If and when
I W21W
The LED headlight does not need to be removed in order to change the bulb. .,..
Page 445 of 486
r'l11 First read and observe the Introductory L-J,:.,U Information and safety warnings & on page 443.
CD Vehicle with discharged battery that is being jump-started.
@ Vehicle with vehicle battery that is supplying power and jump-starting the other vehicle.
@ Suitable earth connection. A solid metal part that is firmly bolted to the engine block, or the engine block itself.
The discharged vehicle battery must be properly connected to the vehicle's electrical system.
The vehicles must not touch. Otherwise electricity could flow as soon as the positive terminals are connected.
Ensure that the battery clamps have good metal-to-metal contact with the battery terminals.
If the engine does not start immediately, switch off the starter after about 10 seconds and try again af-ter about half a minute.
The steps should only be carried out in the speci-fied order.
Attaching the jump leads
• Switch off the ignitions In both vehicles 257.
• If necessary, open the battery cover in the en-gine compartment 362.
• Connect one end of the red jump lead to the positive terminal 318 E) or 319 E) of the vehicle with the discharged battery CD &.
• Connect the other end of the red jump lead to the positive terminal E) In the vehicle providing as-sistance@.
• In vehicles without start/stop system: con-nect one end of the black jump lead to the negative terminal 0 in the vehicle providing assistance @ 318.
• In vehicles with start/stop system: connect one end of the black jump lead @to a suitable earth connection, to a solid metal part which is se-curely bolted onto the cylinder or to the cylinder block itself =:-Fig. 319.
• Connect the other end of the black jump lead @ to a solid metal component that is bolted firmly to the engine block of the vehicle with the flat bat-tery, to the engine block itself or, if necessary, to the screwed-in towing eye at the front. Do not con-nect it to a point near the battery CD &.
• Position the leads in such a way that they can-not come into contact with any moving parts in the engine compartment.
Starting the engine
• Start the engine of the vehicle which is provid-ing assistance and let it run at idle.
• Start the engine of the car with the discharged vehicle battery and wait two or three minutes until the engine is running "smoothly".
Removing the jump leads
• Before disconnecting the jump leads, switch off the dipped beam headlights If they are switched on.
• Turn on the heater blower and rear window heater in the vehicle battery with the discharged battery. This helps minimise the voltage peaks generated when the leads are disconnected.
• With the engines running, disconnect the jump leads in the exact reverse order to the instructions given above.
A WARNING
Jump starting the vehicle Incorrectly can cause the battery to explode, which can lead to serious injuries. Please note the following In order to reduce the risk of the battery ex-ploding:
• All work on the vehicle battery and the electrical system can cause serious chemical burns, fire or electric shocks. Always read the warnings and safety Information before carrying out any kind of work on the vehicle battery 362, Vehicle battery.
• Always wear suitable eye protection and never lean over the vehicle battery.
• Attach the connector cables In the correct order-the positive cable first, followed by the negative.
• Never connect the negative cable to parts of the fuel system or to the brake lines.
• The non-insulated parts of the battery clamps must not be allowed to touch. The jump lead attached to the positive vehicle battery terminal must not touch metal parts of the vehicle.
• Check the battery window using a torch If necessary. If the display Is light yellow or col-ourless, do not jump start the vehicle. Seek expert assistance.
• Avoid electrostatic discharge In the vicini-ty of the vehicle battery. The gas emitted from the vehicle battery could be Ignited by sparks.
• Do not use jump leads to start the engine If the vehicle battery Is damaged or if it is or has ever been frozen.