2019 VOLKSWAGEN T-ROC 0A and 11
[x] Cancel search: 0A and 11Page 300 of 502

ment floor until it is held in position by the side
restraints Fig. 148(close-up).
Closing the luggage compartment floor
Place the luggage compartment floor on the side supports
NOTICE
Never drop the luggage compartment floor; guide it slowly back down. The trims or the luggage
compartment floor could otherwise be damaged.
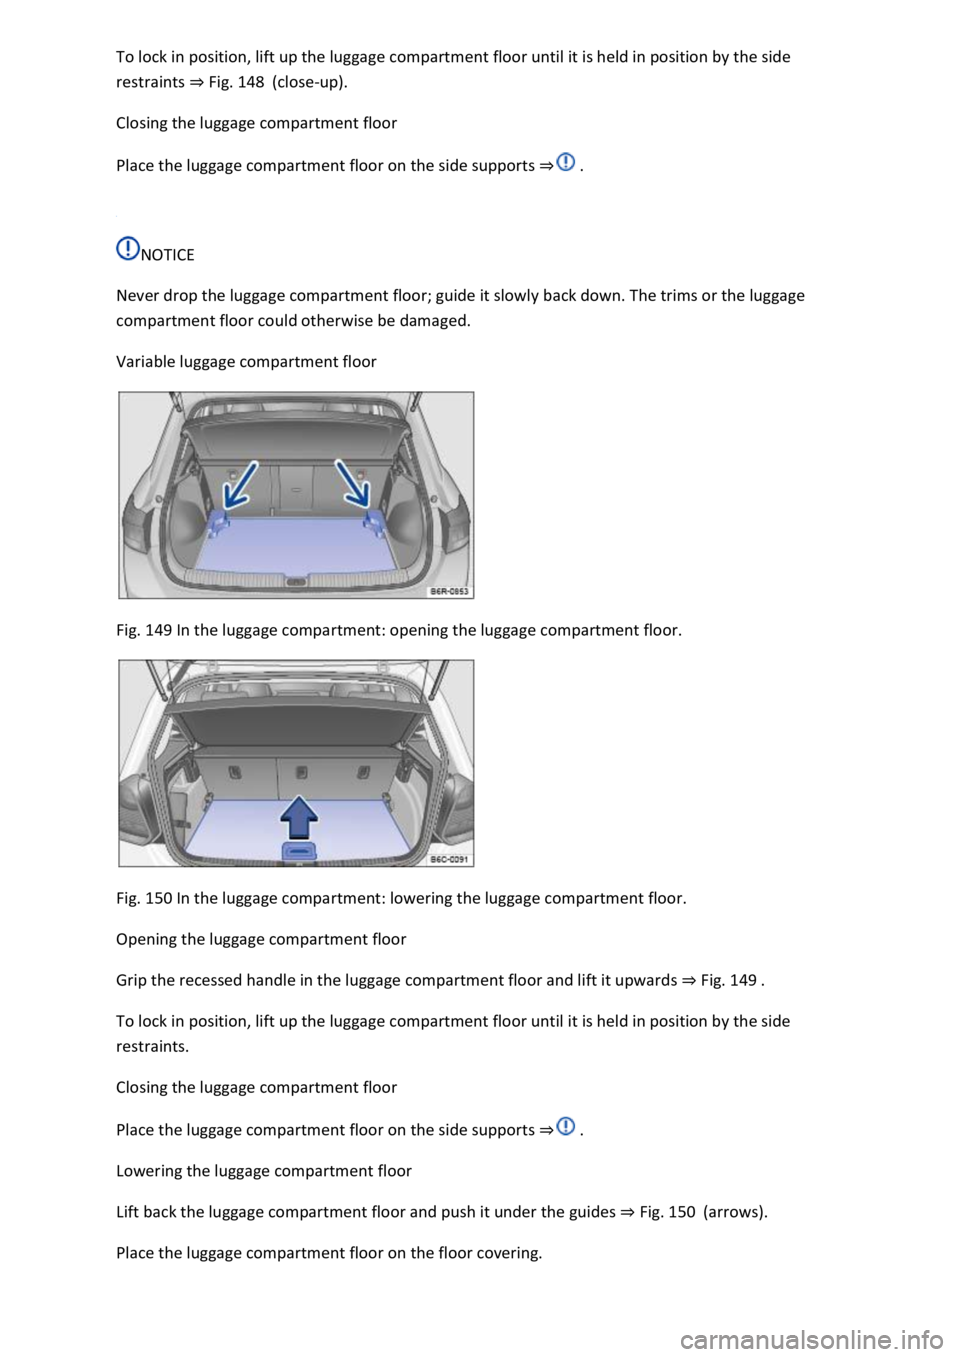
Variable luggage compartment floor
Fig. 149 In the luggage compartment: opening the luggage compartment floor.
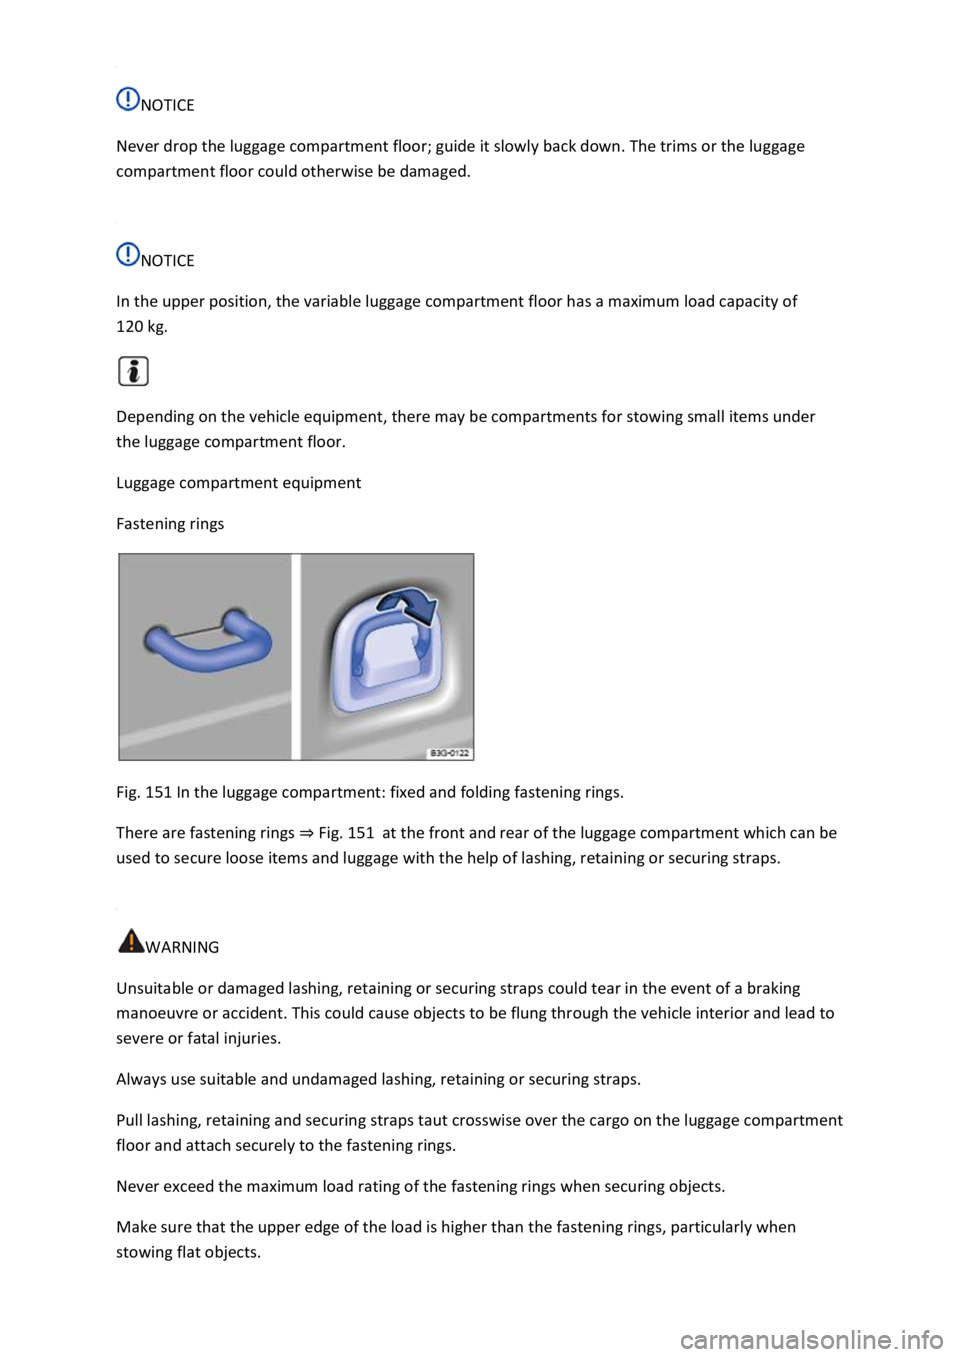
Fig. 150 In the luggage compartment: lowering the luggage compartment floor.
Opening the luggage compartment floor
Grip the recessed handle in the luggage compartment floor and lift it upwards Fig. 149
To lock in position, lift up the luggage compartment floor until it is held in position by the side
restraints.
Closing the luggage compartment floor
Place the luggage compartment floor on the side supports
Lowering the luggage compartment floor
Lift back the luggage compartment floor and push it under the guides Fig. 150(arrows).
Place the luggage compartment floor on the floor covering.
Page 301 of 502

NOTICE
Never drop the luggage compartment floor; guide it slowly back down. The trims or the luggage
compartment floor could otherwise be damaged.
NOTICE
In the upper position, the variable luggage compartment floor has a maximum load capacity of
120 kg.
Depending on the vehicle equipment, there may be compartments for stowing small items under
the luggage compartment floor.
Luggage compartment equipment
Fastening rings
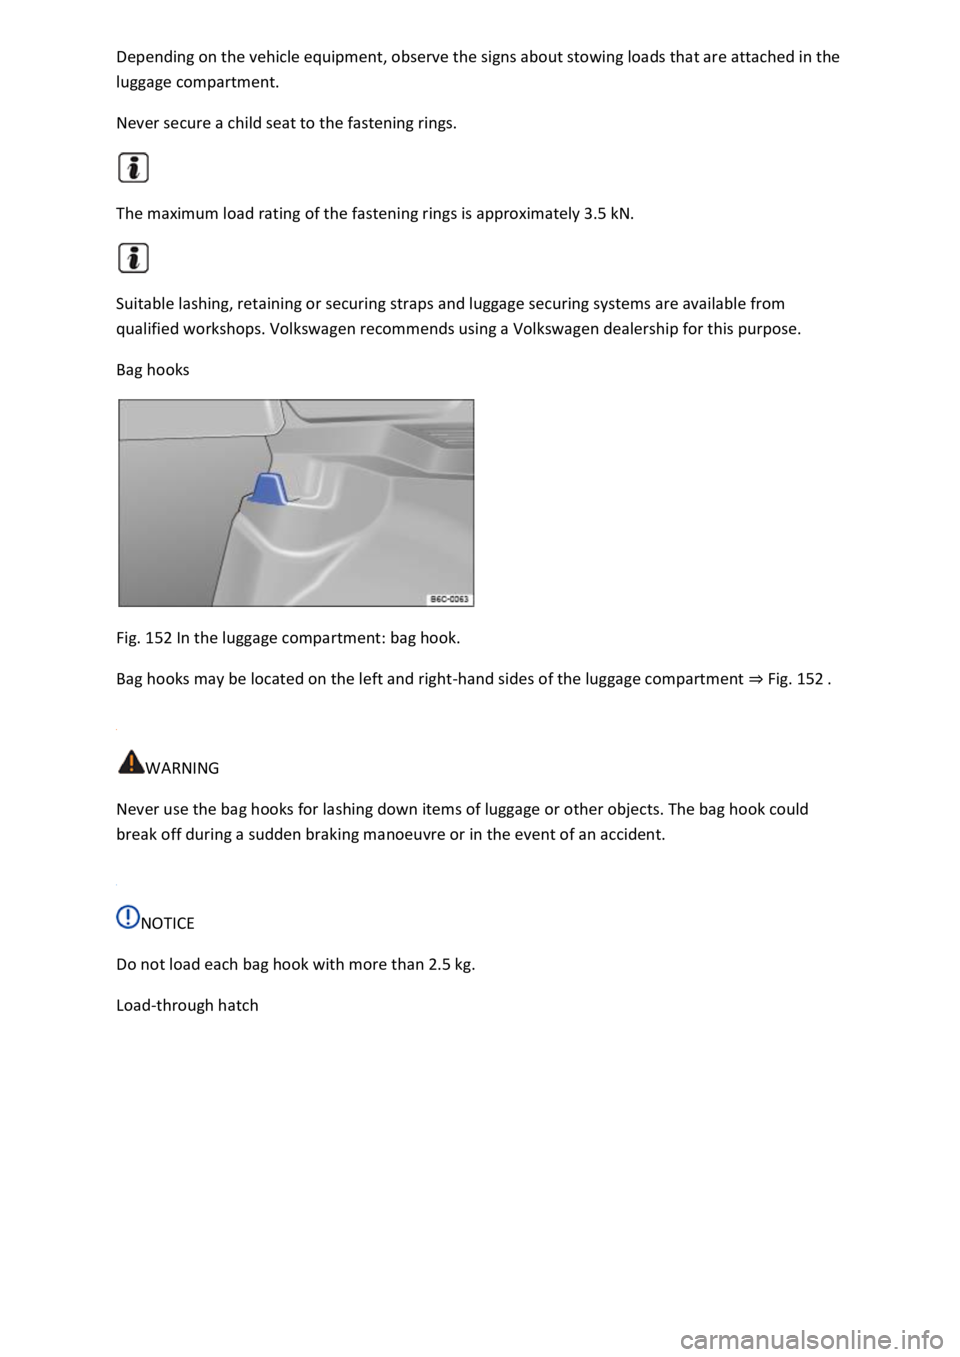
Fig. 151 In the luggage compartment: fixed and folding fastening rings.
There are fastening rings Fig. 151at the front and rear of the luggage compartment which can be
used to secure loose items and luggage with the help of lashing, retaining or securing straps.
WARNING
Unsuitable or damaged lashing, retaining or securing straps could tear in the event of a braking
manoeuvre or accident. This could cause objects to be flung through the vehicle interior and lead to
severe or fatal injuries.
Always use suitable and undamaged lashing, retaining or securing straps.
Pull lashing, retaining and securing straps taut crosswise over the cargo on the luggage compartment
floor and attach securely to the fastening rings.
Never exceed the maximum load rating of the fastening rings when securing objects.
Make sure that the upper edge of the load is higher than the fastening rings, particularly when
stowing flat objects.
Page 302 of 502

luggage compartment.
Never secure a child seat to the fastening rings.
The maximum load rating of the fastening rings is approximately 3.5 kN.
Suitable lashing, retaining or securing straps and luggage securing systems are available from
qualified workshops. Volkswagen recommends using a Volkswagen dealership for this purpose.
Bag hooks
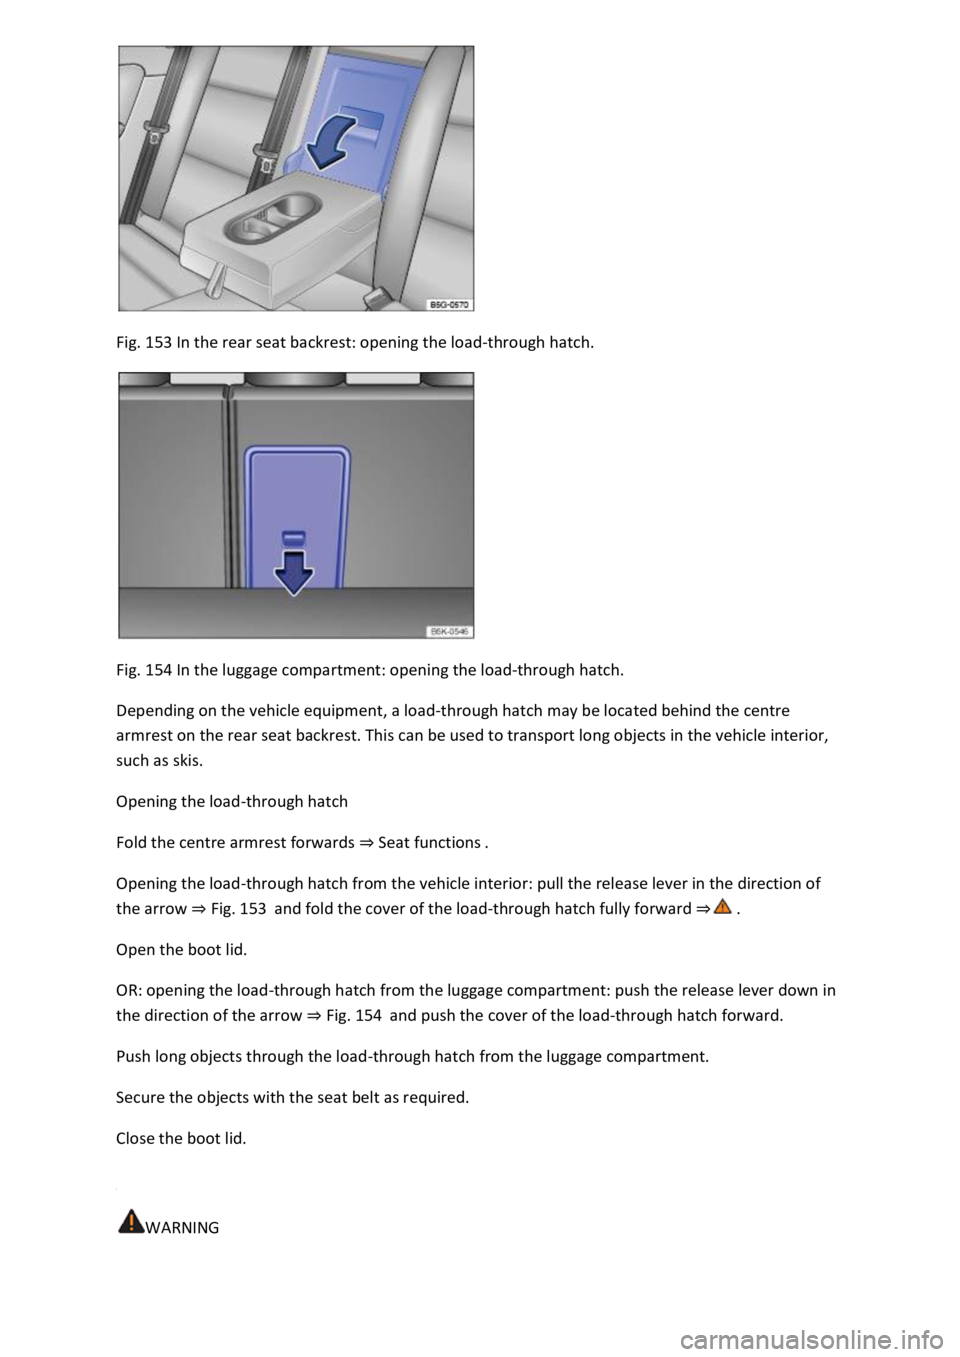
Fig. 152 In the luggage compartment: bag hook.
Bag hooks may be located on the left and right-hand sides of the luggage compartment Fig. 152
WARNING
Never use the bag hooks for lashing down items of luggage or other objects. The bag hook could
break off during a sudden braking manoeuvre or in the event of an accident.
NOTICE
Do not load each bag hook with more than 2.5 kg.
Load-through hatch
Page 303 of 502

Fig. 153 In the rear seat backrest: opening the load-through hatch.
Fig. 154 In the luggage compartment: opening the load-through hatch.
Depending on the vehicle equipment, a load-through hatch may be located behind the centre
armrest on the rear seat backrest. This can be used to transport long objects in the vehicle interior,
such as skis.
Opening the load-through hatch
Fold the centre armrest forwards Seat functions
Opening the load-through hatch from the vehicle interior: pull the release lever in the direction of
the arrow Fig. 153and fold the cover of the load-through hatch fully forward
Open the boot lid.
OR: opening the load-through hatch from the luggage compartment: push the release lever down in
the direction of the arrow Fig. 154and push the cover of the load-through hatch forward.
Push long objects through the load-through hatch from the luggage compartment.
Secure the objects with the seat belt as required.
Close the boot lid.
WARNING
Page 304 of 502

-through hatch is folded forwards or backwards carelessly or in an
uncontrolled way.
Never fold the load-through hatch forwards or backwards while the vehicle is in motion.
Ensure that the seat belt is not trapped or damaged when folding back the load-through hatch.
Always keep hands, fingers, feet and other body parts away from the swivel area when folding the
load-through hatch forwards and backwards.
The load-through hatch has not been secured properly if the red marking can still be seen on the
locking indicator. Always ensure that the red marking is never visible when the load-through hatch is
in the upright position.
Passengers (children in particular) must not use this seat if the load-through hatch is folded forward
or is not engaged securely into place.
Roof carrier
Introduction
This chapter contains information on the followingsubjects:
Securing roof carriers
Loading roof carriers
Notes on use
Depending on the model, the vehicle may be designed for fitting a roof carrier.
Roof carriers can be used to transport bulky items on the roof of the vehicle.
If you are unsure whether a roof carrier can be fitted on your vehicle, please contact a specialist
workshop. Volkswagen recommends using a Volkswagen dealership for this purpose.
Only roof carriers that have been approved by Volkswagen for the vehicle must be used.
If the vehicle is not approved for use with a roof carrier, do not use or retrofit a roof carrier.
WARNING
When transporting heavy or bulky objects on the roof carrier, the vehicle's handling will change due
to a shift in the centre of gravity and an increased susceptibility to crosswinds.
Always secure loads properly using suitable and undamaged lashing, retaining or securing straps.
Loads that are large, heavy, bulky, long or flat will have a negative effect on the vehicle
aerodynamics, centre of gravity and overall handling.
Avoid abrupt and sudden driving and braking manoeuvres.
Always adapt your speed and driving style to suit visibility, weather, road and traffic conditions.
Page 305 of 502

WARNING
A roof carrier that has not been approved for the vehicle or a roof carrier that is fitted to a vehicle
that is not approved for use with a roof carrier may cause accidents or injuries.
Use only roof carriers that have been approved by Volkswagen for your vehicle type.
Never use a roof carrier on a vehicle that has not been approved for use with a roof carrier.
A roof carrier that is fitted nevertheless may become loose whilst the vehicle is in motion and fall
from the vehicle roof.
NOTICE
Securing a roof carrier of any kind to a vehicle that is not approved for use with a roof carrier may
lead to severe damage to the vehicle.
Securing roof carriers
First read and observe the introductoryinformation and safety warnings
Special roof carriers must be used to transport luggage, bicycles, skis, surfboards or boats safely
Attaching the roof bars and load carrier
Mount roof bars to the roof railing according to the installation instructions provided.
Once you have fitted the roof bars, you can then secure the respective carrier system on them.
WARNING
Incorrectly attaching and using the roof bars and load carrier could cause the whole roof carrier to
fall off the roof. This could cause accidents and injuries.
Only use roof bars and load carriers when they are undamaged and fitted correctly.
Always fit roof bars and load carriers correctly. Always observe the installation instructions provided
by the manufacturer.
Attach the roof bars only at the specified mounting points.
Special roof carriers for items such as bicycles, skis, surfboards etc. should always be properly
installed. Always observe the installation instructions provided by the manufacturer.
Check that the roof carrier is secured before starting your journey and tighten as necessary after
driving a short distance. During a long trip, check all screw connections and fasteners at each stop.
Do not carry out any modifications or repairs to the roof bars or the load carrier.
Page 306 of 502

First read and observe the introductoryinformation and safety warnings
Maximum permitted roof load
The maximum permitted roof load is 75 kg.
The roof load limit refers to the combined weight of the roof carrier and the load carried on the roof
Make sure you are aware of the weight of the roof carrier system and the load to be transported.
Weigh the load if necessary.
However, you will not be able to carry the maximum permitted roof load if you are using a roof
carrier with a lower load rating. In this case, do not exceed the maximum weight limit for the load
carrier system which is specified in the manufacturer's installation instructions.
Distributing the load
Distribute the load evenly and secure it correctly
WARNING
Accidents and significant vehicle damage can occur if the maximum permitted roof load is exceeded.
Never exceed the stated roof load, the maximum permissible axle loads, and the permissible gross
vehicle weight for the vehicle.
Do not exceed the load rating of the roof carrier, even if the maximum roof load has not been
reached.
WARNING
Loose and incorrectly secured loads can fall off the roof carrier and cause accidents and injuries.
Always use suitable and undamaged lashing, retaining or securing straps.
NOTICE
When opening the boot lid, take care not to let it hit the roof load.
Notes on use
First read and observe the introductoryinformation and safety warnings
Remove the roof carrier in the following situations
The roof carrier is no longer needed.
Page 307 of 502

The vehicle height exceeds the required clearance height, e.g. in a garage.
NOTICE
Always remove the roof carrier before driving through an automatic car wash.
The height of the vehicle is changed by the installation of a roof carrier and the load secured to it.
Check and compare the height of the vehicle with clearance heights, e.g. for underpasses and garage
doors.
The roof carrier and its load must not obstruct you from opening and closing the glass roof and the
boot lid. The roof aerial must also remain unaffected.
Driving with a fitted roof carrier will increase air resistance and thus increase fuel consumption.
Trailer towing
Introduction
This chapter contains information on the followingsubjects:
Technical requirements
Fitting the removable ball head
Removing the ball head
Notes on towing a trailer
Loading the trailer
Driving with a trailer
Trailer stabilisation
Retrofitting a towing bracket
The vehicle can be used to tow a trailer if it has the required technical equipment for this. The
additional trailer load will affect the amount of wear, fuel consumption and performance of the
vehicle and, in certain circumstances, could shorten the service intervals.
Driving with a trailer not only places an extra load on the vehicle, but also requires increased
concentration on the part of the driver.
Vehicles with start/stop system
When using towing brackets that were not retrofitted by Volkswagen, the start/stop system must be
deactivated manually using the button in the centre console before towing a trailer, and it must
remain deactivated for as long as a trailer is being towed