2019 TOYOTA PROACE CITY VERSO mirror
[x] Cancel search: mirrorPage 2 of 272
2
■Overview
Labels 4
■Eco-driving
Eco-coaching 8
1Instruments
Instrument Panel 9Warning and indicator lamps 11Indicators 16Trip computer 21Setting the date and time 22
2Access
Electronic key with remote control function and built-in key, 23Back-up procedures 28Central locking / unlocking 31Doors 32General recommendations for the sliding side
doors 32Alarm 34Electric windows 36Tilting rear door windows 37
3Ease of use and comfort
General recommendations for the seats 38Front seats 38Steering wheel adjustment 41
Mirrors 41
Rear bench seat (row 2) 42Rear seats (row 2) 43Rear seats (row 3) 44Interior fittings 47Two-position luggage cover shelf (removable) 52Luggage cover (7-seat) 52Warning triangle 53Heating and Ventilation 54Heating 54Manual air conditioning 54Dual-zone automatic air conditioning 55Front demisting - defrosting 57Rear screen demisting - defrosting 58Rear heating and air conditioning 59Additional heating/ventilation system 59
4Lighting and visibility
Lighting control lever 63Direction indicators 64Automatic illumination of headlamps 64Daytime running lamps / Sidelamps 65Parking lamps 65
Automatic headlamp dipping 66Headlamp beam height adjustment 67Wiper control lever 67Changing a wiper blade 69Automatic wiping 70
5Safety
General safety recommendations 71Emergency or assistance call 71
Hazard warning lamps 74Horn 74Electronic stability control (ESC) 74Advanced Grip Control 76Hill Assist Descent Control 78Seat belts 79Airbags 81Child seats 84Deactivating the front passenger airbag 87ISOFIX child seats 90i-Size child seats 93Manual child lock 94Electric child lock 94
6Driving
Driving recommendations 95Starting/switching off the engine 97Manual parking brake 100Electric parking brake 101Hill start assist 1045-speed manual gearbox 1046-speed manual gearbox 105
Automatic gearbox 105Gear efficiency indicator 109Stop & Start 109Under-inflation detection 111Head-up display 11 3Driving and manoeuvring aids - General recommendations 11 4Speed Limit Recognition and Recommendation 11 6
Speed limiter 11 9
Page 5 of 272
5
Overview
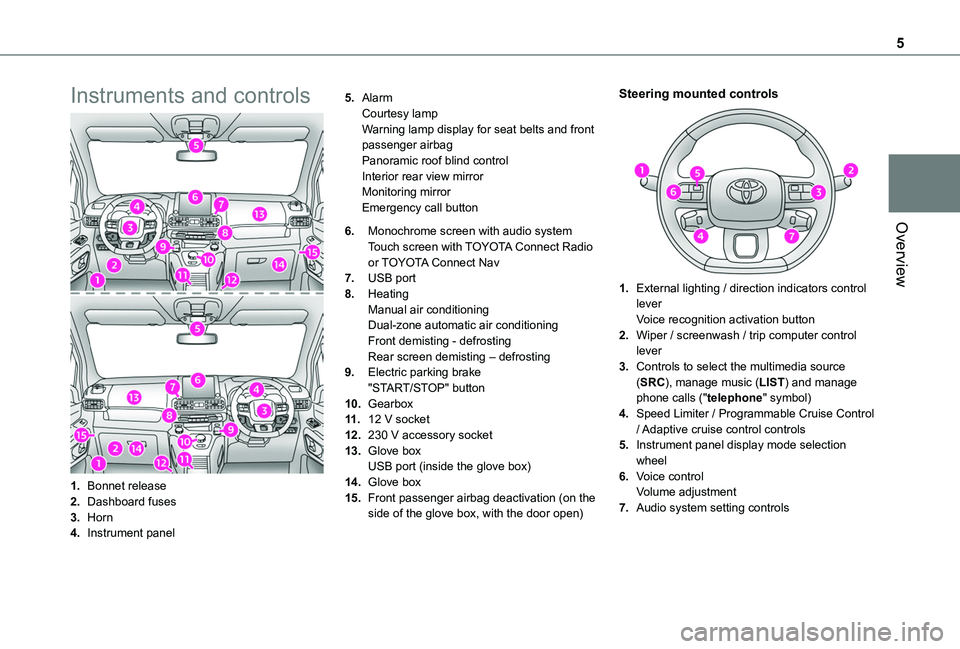
Instruments and controls
1.Bonnet release
2.Dashboard fuses
3.Horn
4.Instrument panel
5.AlarmCourtesy lampWarning lamp display for seat belts and front passenger airbagPanoramic roof blind controlInterior rear view mirrorMonitoring mirrorEmergency call button
6.Monochrome screen with audio system
Touch screen with TOYOTA Connect Radio or TOYOTA Connect Nav
7.USB port
8.HeatingManual air conditioningDual-zone automatic air conditioningFront demisting - defrostingRear screen demisting – defrosting
9.Electric parking brake"START/STOP" button
10.Gearbox
11 .12 V socket
12.230 V accessory socket
13.Glove boxUSB port (inside the glove box)
14.Glove box
15.Front passenger airbag deactivation (on the side of the glove box, with the door open)
Steering mounted controls
1.External lighting / direction indicators control leverVoice recognition activation button
2.Wiper / screenwash / trip computer control lever
3.Controls to select the multimedia source (SRC), manage music (LIST) and manage phone calls ("telephone" symbol)
4.Speed Limiter / Programmable Cruise Control / Adaptive cruise control controls
5.Instrument panel display mode selection wheel
6.Voice controlVolume adjustment
7.Audio system setting controls
Page 24 of 272
24
NOTIC E
If one of the doors or the boot is still open or if the electronic key for the Keyless Entry and Starting system has been left inside the vehicle, central locking will be disabled.However, if the vehicle is fitted with an alarm, it will be activated after 45 seconds.
NOTIC E
If the vehicle is unlocked but the doors or tailgate are not subsequently opened, the vehicle will automatically lock itself again after approximately 30 seconds. If the vehicle is fitted with an alarm, it will also be reactivated automatically.
NOTIC E
Automatic door mirror folding and unfolding can be deactivated by a TOYOTA dealer or a qualified workshop.
WARNI NG
As a safety measure, never leave the vehicle, even for a short time, without taking the
Keyless Entry and Starting system’s electronic key with you.Be aware of the risk of theft of the vehicle if the key is present in one of the defined areas while the vehicle is unlocked.
WARNI NG
To preserve the battery charge in the electronic key and the vehicle's battery, the "hands-free" functions are set to hibernation mode after 21 days without use. To restore these functions, press one of the remote control buttons or start the engine with the electronic key in the reader.For more information on starting with the Keyless Entry and Starting system, refer to the corresponding section.
NOTIC E
Electrical interferenceThe electronic key may not operate if close to certain electronic devices: telephone (switched on or on standby), laptop computer, strong magnetic fields, etc.
Locating the vehicle
This function helps you to spot your vehicle from a distance, with the vehicle locked:
– The direction indicators flash for approximately 10 seconds.– The courtesy lamps come on.► Press this button.
Remote lighting
Briefly pressing this button switches on the lighting remotely (sidelamps, dipped beam headlamps and number plate lamps).Pressing this button again before the end of the timed period cancels remote lighting.
Advice
WARNI NG
Remote controlThe remote control is a sensitive, high-frequency device; avoid handling it in your pocket, due to the risk of unintentionally unlocking the vehicle.Avoid pressing the remote control buttons while out of range of the vehicle, due to the risk of rendering the remote control inoperative. It would then be necessary to reset it.The remote control does not work when the key is in the ignition switch, even when the ignition is switched off.
Page 25 of 272
25
Access
2
WARNI NG
Anti-theft protectionDo not modify the electronic vehicle immobiliser, as this might result in malfunctions.For vehicles with a key ignition switch, remember to remove the key and turn the steering wheel to engage the steering lock.
WARNI NG
Locking the vehicleDriving with the doors locked could make it more difficult for the emergency services to enter the vehicle in an emergency.As a safety precaution, remove the key from the ignition or take the electronic key with you when leaving the vehicle, even for a short time.
NOTIC E
Purchasing a second-hand vehicleHave the key codes memorised by a TOYOTA dealer, to ensure that the keys in your possession are the only ones able to start the vehicle.
WARNI NG
Accumulations (water, dust, grime, salt, etc.) on the inner surface of the door handle may affect detection.If cleaning the inner surface of the door handle using a cloth does not restore detection, contact a TOYOTA dealer or a qualified workshop.A sudden splash of water (stream of water, high pressure jet washer, etc.) may be identified by the system as the desire to open the vehicle.
Unlocking
NOTIC E
Unlocking is signalled by rapid flashing of the direction indicators for a few seconds.Depending on version, the door mirrors unfold
and the alarm is deactivated.
With the key
► To completely unlock the vehicle, insert the key in the lock then turn it towards the front of the vehicle.► Then pull the handle to open the door.If fitted to your vehicle, the alarm is not deactivated. Opening a door will trigger the
alarm, which can be stopped by switching the ignition on.
Using the remote control
► Press this button to unlock the vehicle.
With the Keyless Entry and
Starting "on your person"
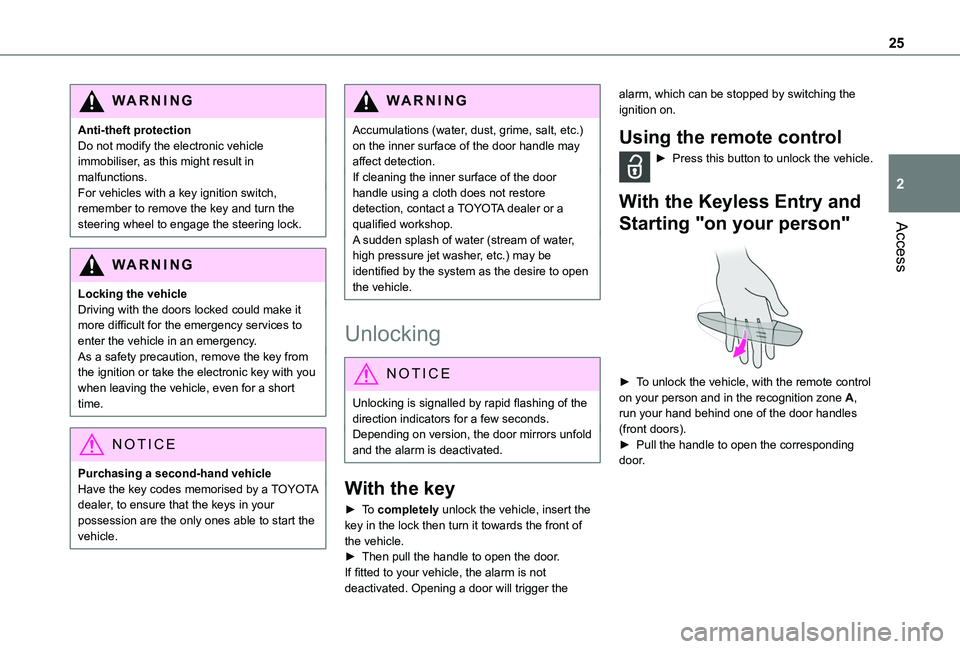
► To unlock the vehicle, with the remote control on your person and in the recognition zone A, run your hand behind one of the door handles (front doors).► Pull the handle to open the corresponding door.
Page 26 of 272
26
With side-hinged doors/tailgate
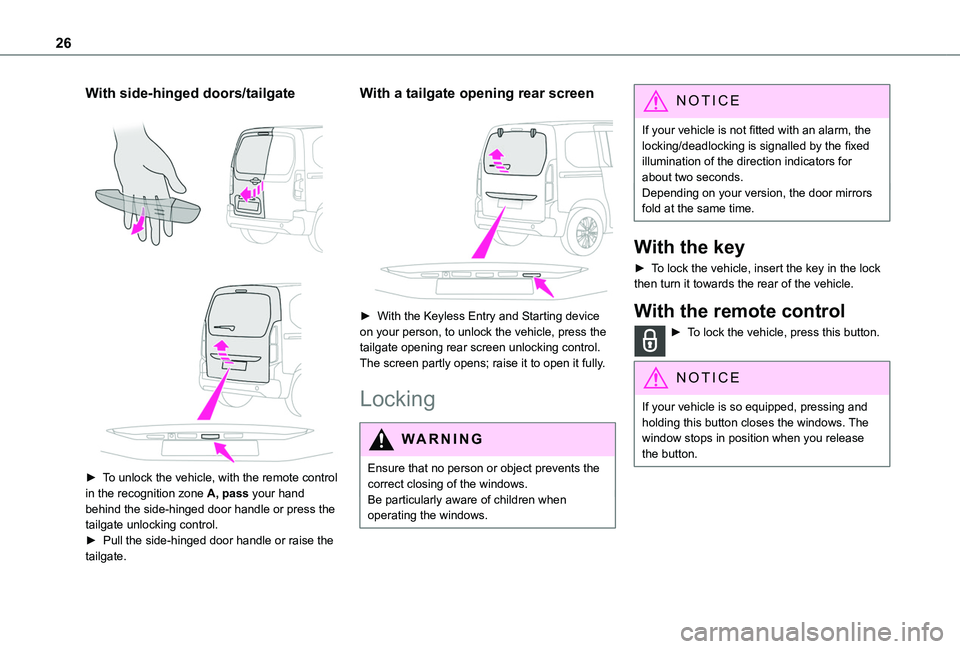
► To unlock the vehicle, with the remote control in the recognition zone A, pass your hand behind the side-hinged door handle or press the tailgate unlocking control. ► Pull the side-hinged door handle or raise the tailgate.
With a tailgate opening rear screen
► With the Keyless Entry and Starting device on your person, to unlock the vehicle, press the tailgate opening rear screen unlocking control. The screen partly opens; raise it to open it fully.
Locking
WARNI NG
Ensure that no person or object prevents the correct closing of the windows.Be particularly aware of children when operating the windows.
NOTIC E
If your vehicle is not fitted with an alarm, the locking/deadlocking is signalled by the fixed illumination of the direction indicators for about two seconds.Depending on your version, the door mirrors fold at the same time.
With the key
► To lock the vehicle, insert the key in the lock then turn it towards the rear of the vehicle.
With the remote control
► To lock the vehicle, press this button.
NOTIC E
If your vehicle is so equipped, pressing and holding this button closes the windows. The window stops in position when you release the button.
Page 27 of 272
27
Access
2
With the Keyless Entry and
Starting "on your person"
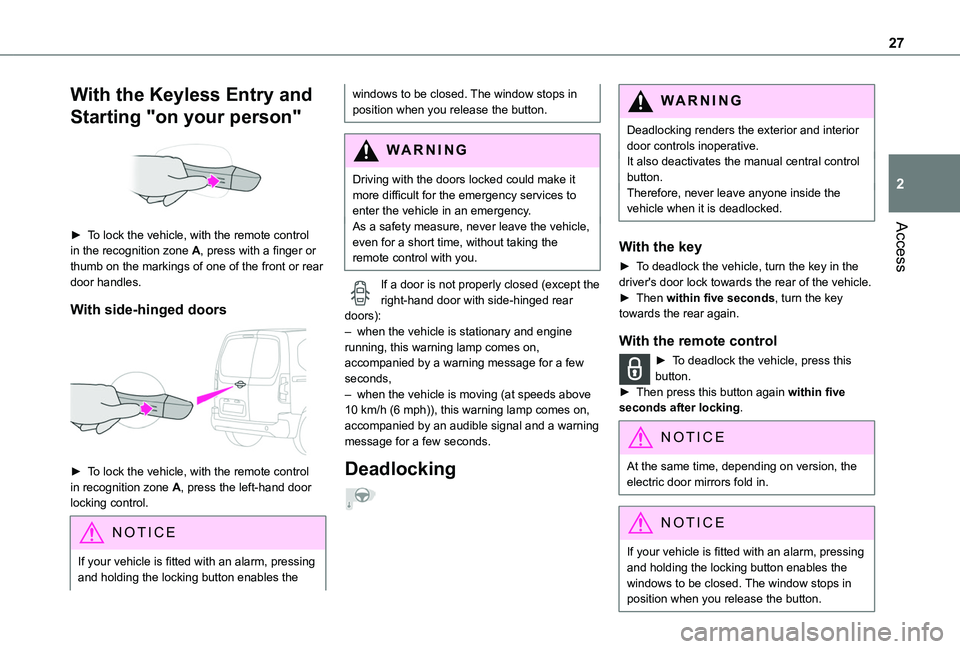
► To lock the vehicle, with the remote control in the recognition zone A, press with a finger or thumb on the markings of one of the front or rear door handles.
With side-hinged doors
► To lock the vehicle, with the remote control in recognition zone A, press the left-hand door locking control.
NOTIC E
If your vehicle is fitted with an alarm, pressing and holding the locking button enables the
windows to be closed. The window stops in position when you release the button.
WARNI NG
Driving with the doors locked could make it more difficult for the emergency services to enter the vehicle in an emergency.As a safety measure, never leave the vehicle, even for a short time, without taking the
remote control with you.
If a door is not properly closed (except the right-hand door with side-hinged rear doors):– when the vehicle is stationary and engine running, this warning lamp comes on, accompanied by a warning message for a few seconds, – when the vehicle is moving (at speeds above 10 km/h (6 mph)), this warning lamp comes on, accompanied by an audible signal and a warning message for a few seconds.
Deadlocking
WARNI NG
Deadlocking renders the exterior and interior door controls inoperative.It also deactivates the manual central control button.Therefore, never leave anyone inside the vehicle when it is deadlocked.
With the key
► To deadlock the vehicle, turn the key in the driver's door lock towards the rear of the vehicle.► Then within five seconds, turn the key towards the rear again.
With the remote control
► To deadlock the vehicle, press this button.► Then press this button again within five seconds after locking.
NOTIC E
At the same time, depending on version, the electric door mirrors fold in.
NOTIC E
If your vehicle is fitted with an alarm, pressing and holding the locking button enables the windows to be closed. The window stops in position when you release the button.
Page 31 of 272
31
Access
2
If the fault persists after reinitialisation, contact a TOYOTA dealer or a qualified workshop without delay.
Central locking / unlocking
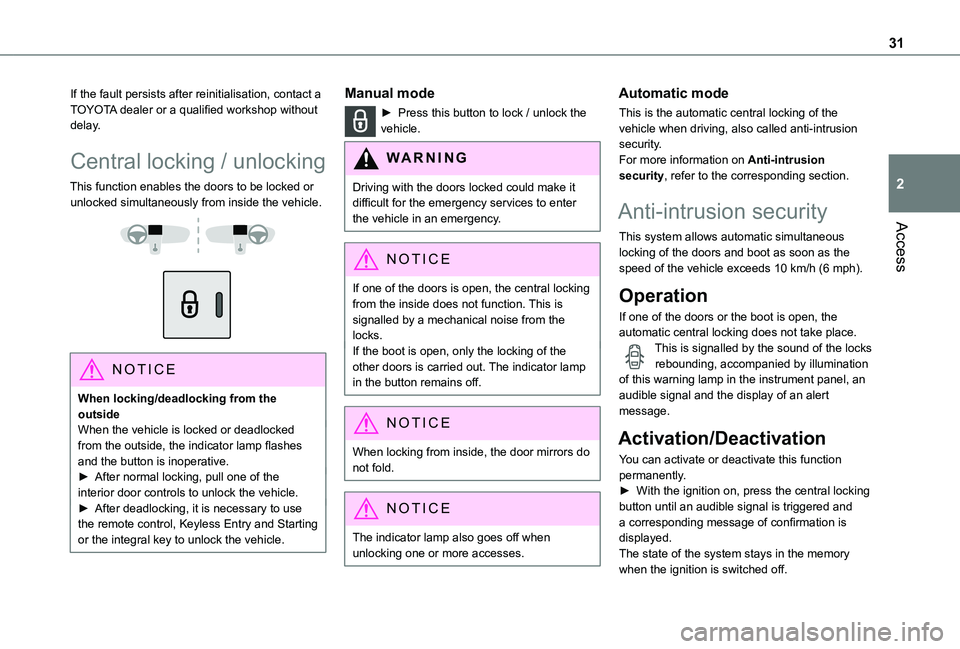
This function enables the doors to be locked or unlocked simultaneously from inside the vehicle.
NOTIC E
When locking/deadlocking from the outsideWhen the vehicle is locked or deadlocked from the outside, the indicator lamp flashes and the button is inoperative.► After normal locking, pull one of the interior door controls to unlock the vehicle.► After deadlocking, it is necessary to use the remote control, Keyless Entry and Starting or the integral key to unlock the vehicle.
Manual mode
► Press this button to lock / unlock the vehicle.
WARNI NG
Driving with the doors locked could make it difficult for the emergency services to enter the vehicle in an emergency.
NOTIC E
If one of the doors is open, the central locking from the inside does not function. This is signalled by a mechanical noise from the locks.If the boot is open, only the locking of the other doors is carried out. The indicator lamp in the button remains off.
NOTIC E
When locking from inside, the door mirrors do not fold.
NOTIC E
The indicator lamp also goes off when unlocking one or more accesses.
Automatic mode
This is the automatic central locking of the vehicle when driving, also called anti-intrusion security.For more information on Anti-intrusion security, refer to the corresponding section.
Anti-intrusion security
This system allows automatic simultaneous locking of the doors and boot as soon as the speed of the vehicle exceeds 10 km/h (6 mph).
Operation
If one of the doors or the boot is open, the automatic central locking does not take place.This is signalled by the sound of the locks rebounding, accompanied by illumination of this warning lamp in the instrument panel, an audible signal and the display of an alert message.
Activation/Deactivation
You can activate or deactivate this function permanently.► With the ignition on, press the central locking button until an audible signal is triggered and a corresponding message of confirmation is displayed.The state of the system stays in the memory when the ignition is switched off.
Page 38 of 272
38
General
recommendations for the
seats
WARNI NG
For safety reasons, seat adjustments must only be made when the vehicle is stationary.
WARNI NG
Folding or unfolding the seat backrests must only be done with the vehicle stationary.
WARNI NG
Before moving the seat backwards, ensure that there is no person or object that might prevent the full travel of the seat.There is a risk of trapping or pinching
passengers if present in the rear seats or of jamming the seat if large objects are placed on the floor behind the seat.
WARNI NG
Do not place hard or heavy objects on the backrests forming a table. They could become
dangerous projectiles in the event of sudden braking or a collision.– Do not remove a head restraint without stowing it; secure it to a support inside the vehicle.– Check that the seat belts remain accessible to the passenger and easy to fasten.– Passengers must never take their seat without adjusting and fastening their seat belt.– In row 3, be careful not to leave your feet under the row 2 seat while it is being tilted.– When a row 3 seat is in the fully folded position, ensure that the strap is correctly hooked to the Top Tether fixing of the row 2 backrest: risk of unexpected tipping of the seat.
WARNI NG
Before carrying out the manoeuvres, check that nothing and no one is obstructing the moving elements and their locking.
To avoid sudden folding, take care to hold the backrest and support it until it is horizontal.Never put your hand underneath the seat cushion to guide the seat downwards or upwards, you could get your fingers trapped. Place your hand on the grip/strap (depending on equipment) at the top of the seat cushion.
WARNI NG
Please note: an incorrectly latched backrest compromises the safety of passengers in the event of sudden braking or an impact.The contents of the boot may be thrown forward - risk of severe injury!
Front seats
Correct driving position
Before taking to the road and to make the most of the ergonomic layout of the instruments and controls, carry out these adjustments in the following order:– head restraint height.– seat backrest angle.– seat cushion height.– longitudinal seat position.– steering wheel height and reach.– rear view mirror and door mirrors.