2019 TOYOTA PROACE CITY VERSO mirror
[x] Cancel search: mirrorPage 116 of 272
11 6
NOTIC E
MaintenanceClean the bumpers and door mirrors and the field of vision of the cameras regularly.When washing your vehicle at high pressure, direct the spray from at least 30 cm (0 ft 11") away from the sensors and cameras.
WARNI NG
MatsThe use of mats not approved by TOYOTA may interfere with the operation of the speed limiter or cruise control.To avoid any risk of jamming the pedals:► ensure that the mat is secured correctly,► never fit one mat on top of another.
NOTIC E
Units of speed
Ensure that the units of speed displayed on the instrument panel (km/h or mph) are those for the country you are driving in.If this is not the case, when the vehicle is stationary, set the display to the required units of speed so that it complies with what is authorised locally.In case of doubt, contact a TOYOTA dealer or a qualified workshop.
Speed Limit Recognition
and Recommendation
Refer to the General recommendations on the use of driving and manoeuvring aids.
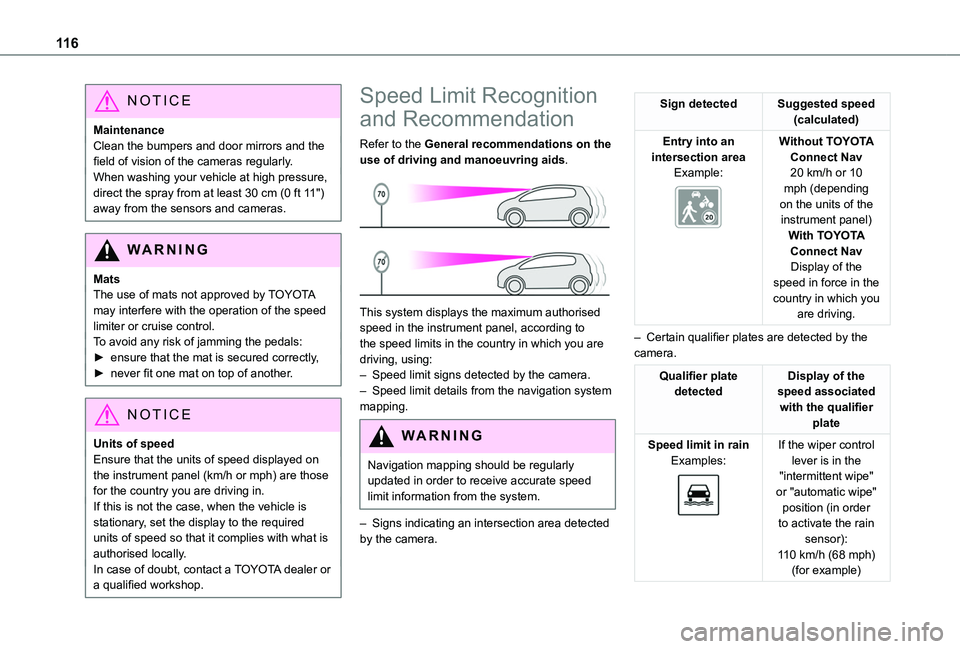
This system displays the maximum authorised speed in the instrument panel, according to the speed limits in the country in which you are driving, using:– Speed limit signs detected by the camera.– Speed limit details from the navigation system mapping.
WARNI NG
Navigation mapping should be regularly updated in order to receive accurate speed limit information from the system.
– Signs indicating an intersection area detected by the camera.
Sign detectedSuggested speed (calculated)
Entry into an intersection areaExample:
Without TOYOTA Connect Nav20 km/h or 10 mph (depending on the units of the instrument panel)With TOYOTA
Connect NavDisplay of the speed in force in the country in which you are driving.
– Certain qualifier plates are detected by the camera.
Qualifier plate detectedDisplay of the speed associated with the qualifier plate
Speed limit in rainExamples:
If the wiper control lever is in the "intermittent wipe" or "automatic wipe" position (in order to activate the rain sensor):
110 km/h (68 mph) (for example)
Page 134 of 272
, a warning message appears.If the dr")
134
– inactivity by the driver detected during correction.
NOTIC E
During a correction, if the driver is inactive (not holding the steering wheel for 10 seconds), a warning message appears.If the driver remains inactive (not holding the steering wheel for 2 more seconds), the
correction is interrupted.
WARNI NG
The following situations may interfere with the operation of the system or prevent it from working:– insufficient contrast between the road surface and the shoulders (e.g. shade),– lane markings worn, hidden (snow, mud) or multiple (roadworks, etc.),– running close to the vehicle in front (the lane markings may not be detected),– roads that are narrow, winding, etc.
Risk of undesirable operation
We recommend deactivating the system in the following driving situations:
– driving on damaged, unstable or very slippery (ice) road surfaces,– unfavourable weather conditions,– driving on a speed circuit,
– driving on a rolling road.
Deactivation / Activation
► Press this button to deactivate / reactivate the system at any time. Deactivation is signalled by the lighting of the indicator lamp in the button and this warning lamp in the instrument panel.The system is automatically reactivated every time the ignition is switched on.
Malfunction
In the event of a system malfunction, these warning lamps come on on the instrument panel, accompanied by an onscreen message and an audible signal.Have the system checked by a TOYOTA dealer or a qualified workshop.
Blind Spot Monitoring
System
Refer to the General recommendations on the use of driving and manoeuvring aids.
This system includes sensors, placed on the sides of the bumpers, and warns the driver of the potentially dangerous presence of another vehicle (car, truck, motorcycle) in the blind spot areas of their vehicle (areas hidden from the driver's field of vision).
A warning lamp appears in the door mirror on the side in question:– fixed, immediately, when being overtaken;
Page 136 of 272
.In particular, dri")
136
Contact a TOYOTA dealer or a qualified workshop to have the system checked.
NOTIC E
The system may suffer temporary interference in certain weather conditions (rain, hail, etc.).In particular, driving on a wet surface or moving from a dry area to a wet area can cause false alerts (for example, the presence
of a fog of water droplets in the blind spot angle is interpreted as a vehicle).In bad or wintry weather, ensure that the sensors are not covered by mud, ice or snow.Take care not to cover the warning zone in the door mirrors or the detection zones on the front and rear bumpers with adhesive labels or other objects; they may hamper correct operation of the system.
Active Blind Spot
Monitoring System
In addition to the fixed warning lamp in the door mirror on the side in question, a correction of trajectory will be felt if you attempt to cross a lane marking with the direction indicators on, to help you avoid a collision.This system is the combination of the Active Lane Departure Warning System and Blind Spot Monitoring System.
These two functions must be activated and in operation.The speed of the vehicle must be between 65 and 140 km/h (40 and 87 mph) inclusive.These functions are especially suitable for driving on motorways and main roads.For more information on the Active Lane Departure Warning System and Blind Spot Monitoring System, refer to the corresponding sections.
WARNI NG
This system is a driving aid which cannot, in any circumstances, replace the need for vigilance on the part of the driver.
Distraction detection
Refer to the General recommendations on the use of driving and manoeuvring aids.Take a break in case of feeling tired or at least every 2 hours.Depending on version, the function consists of just the "Coffee Break Alert" system, or of this combined with the "Driver Attention Warning" system.
WARNI NG
These systems are in no way designed to keep the driver awake or to prevent the driver from falling asleep at the wheel. It is the driver’s responsibility to stop if feeling tired.
Activation/Deactivation
The function is activated or deactivated via the vehicle configuration menu.The state of the system stays in the memory when the ignition is switched off.
Coffee Break Alert
The system triggers an alert as soon as it detects that the driver has not taken a break after two hours of driving at a speed above 65 km/h (40 mph).This alert is issued via the display of a message encouraging you to take a break, accompanied
by an audible signal.If the driver does not follow this advice, the alert is repeated hourly until the vehicle is stopped.The system resets itself if one of the following conditions is met:– engine running, the vehicle has been stationary for more than 15 minutes,– the ignition has been switched off for a few minutes,
Page 141 of 272
 to the view from above (zoom) as an obstacle is")
141
Driving
6
AUTO mode
This mode is activated by default.Using sensors in the rear bumper, the automatic view changes from the rear view (standard) to the view from above (zoom) as an obstacle is approached at the level of the red line (less than 30 cm (0 ft 11")) during a manoeuvre.
Standard view
The area behind the vehicle is displayed on the
screen.
The blue lines 1 represent the width of your vehicle, with the mirrors unfolded; their direction changes depending on the position of the steering wheel.The red line 2 represents a distance of 30 cm (0 ft 11") from the rear bumper; the two blue lines 3 and 4 represent 1 m and 2 m (3 ft 3" and 6 ft 6"), respectively.This view is available with AUTO mode or in the view selection menu.
Zoom view
The camera records the vehicle's surroundings during the manoeuvre in order to create a view from above the rear of the vehicle in its near surroundings, allowing the vehicle to be manoeuvred around obstacles nearby.This view is available with AUTO mode or in the view selection menu.
NOTIC E
Obstacles may appear further away than they actually are in reality.It is important to check the sides of the vehicle during the manoeuvre, using the mirrors.The rear parking sensors also provide information on the vehicle's surroundings.
180° view
The 180° view facilitates reversing out of a parking bay, making it possible to see the approach of vehicles, pedestrians and cyclists.This view is not recommended for carrying out a
complete manoeuvre.
Page 177 of 272
Functions
F110Wireless smartphone charger, interior electrochrome rear view mirror.
F415Horn.
F620Screenwash pump.
F71012 V socket (rear).
F1030Elec")
177
In the event of a breakdown
8
Fuse No.Rating (A)Functions
F110Wireless smartphone charger, interior electrochrome rear view mirror.
F415Horn.
F620Screenwash pump.
F71012 V socket (rear).
F1030Electric locks module.
F1310Telematics and radio controls.
F145Alarm, advanced telematic unit.
F193Trailer interface unit.
F235Generic trailer interface unit.
F275Additional heating.
F2920Audio system, touch screen.
Fuse No.Rating (A)Functions
F3115Audio system (as an accessory).
F321512 V socket (front).
F345Mirror control.
F365USB port.
Engine compartment fuses
The fusebox is placed in the engine compartment near the battery.
Access to the fuses
► Release the two latches A.► Remove the cover.► Change the fuse.
► When you have finished, close the cover carefully then engage the two latches A, to ensure correct sealing of the fusebox.
Fuse No.Rating(A)Functions
F1615Front foglamp.
F1810Right-hand main beam headlamp.
F1910Left-hand main beam headlamp.
F2940Windscreen wipers.
Page 184 of 272

184
Vehicle length
L1L2
AOverall length4,4034,753
BOverall heightWithout roof bars1,800 to 1,8071,812 to 1,818
With roof bars1,837 to 1,8441,843 to 1,849
CWheelbase2,7852,975
DFront overhang892
ERear overhang726886
FWidth inc. mirrorsFolded1,921
Unfolded2,107
GFront track width1,553
HRear track width1,567
Page 203 of 272

203
TOYOTA Connect Radio
11
TOYOTA Connect Radio
Multimedia audio system -
Applications - Bluetooth®
telephone
NOTIC E
The functions and settings described vary
according to the vehicle version and configuration.
WARNI NG
For safety reasons and because they require sustained attention by the driver, the following operations must be carried out with the vehicle stationary and the ignition on:– Pairing the smartphone with the system in Bluetooth mode.– Using the smartphone.– Connection to the CarPlay®, MirrorLinkTM or Android Auto applications (certain applications interrupt their display while the vehicle is moving).– Changing the system settings and configuration.
NOTIC E
The system is protected in such a way that it will only operate in the vehicle.The Energy Economy Mode message is displayed when the system is about to enter the corresponding mode.
First steps
With the engine running, a press mutes the sound.With the ignition off, a press turns the system on.Increase or decrease the volume using the wheel or the "plus" or "minus" buttons (depending on the equipment).Use the buttons on either side of or below the touch screen for access to the menus, then press the virtual buttons in the touch screen.Depending on the model, use the "Source" or "Menu" buttons on the left of the touch screen for access to the menus, then press the virtual
buttons in the touch screen.At all times it is possible to display the rolling menus by pressing the screen briefly with three fingers.All of the touch areas of the screen are white.For pages with multiple tabs at the bottom of the screen, it is possible to switch between pages either by tapping the tab for the desired page, or by using a finger, sliding the pages to the left or to the right.
Press in the grey zone to go back up a level or to confirm.Press the back arrow to go back a level or confirm.
WARNI NG
The touch screen is of the "capacitive" type.To clean the screen, use a soft, non-abrasive cloth (e.g. spectacles cloth) with no additional
product.Do not use sharp objects on the screen.Do not touch the screen with wet hands.
Certain information is displayed permanently in the upper bar of the touch screen:– Air conditioning status information (depending on version), and direct access to the corresponding menu.– Radio Media and Telephone menu status information.– Privacy status information.– Access to the touch screen and digital instrument panel settings.Audio source selection (depending on equipment):– FM/DAB/AM radio stations (depending on equipment).– Telephone connected via Bluetooth and Bluetooth multimedia broadcast (streaming).– USB Memory stick.– Media player connected via the auxiliary socket (depending on equipment).
Page 205 of 272
: updat")
205
TOYOTA Connect Radio
11
Short press: confirm a selection; if nothing selected, access to presets.Radio: display the list of stations.Media: display the list of tracks.Radio (press and hold): update the list of stations received.
Menus
Applications
Access configurable equipment.
Radio Media
Select an audio source or radio station.
Telephone
Connect a mobile phone via Bluetooth®.Run certain applications on a smartphone connected via MirrorLinkTM, CarPlay® or Android Auto.
Settings
Configure a personal profile and/or configure the sound (balance, ambience, etc.) and the display (language, units, date, time, etc.).
Driving
Activate, deactivate or configure certain vehicle functions.