2019 TOYOTA PROACE CITY VERSO dashboard
[x] Cancel search: dashboardPage 5 of 272
5
Overview
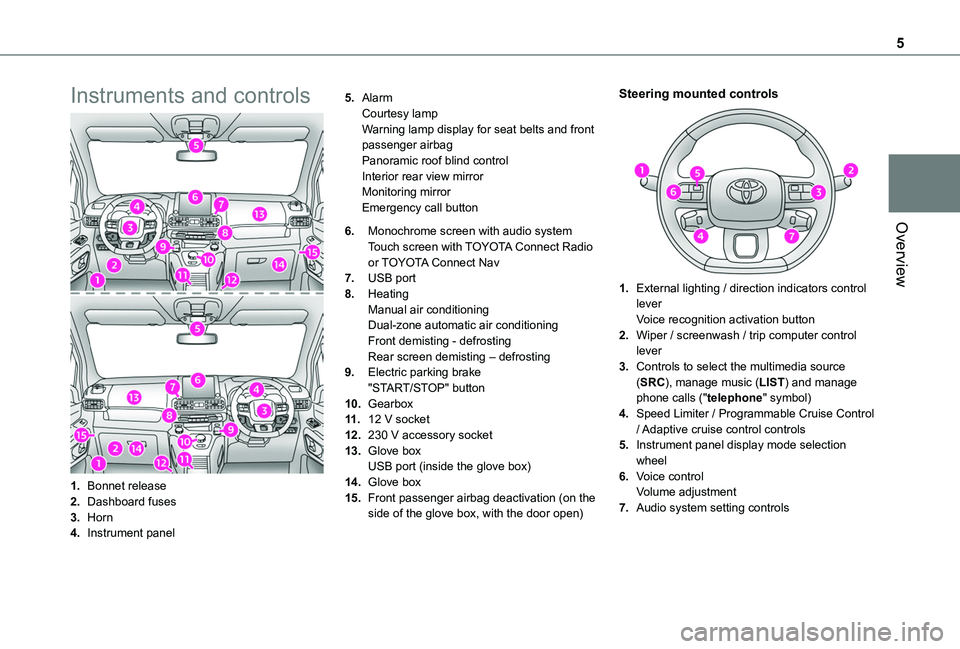
Instruments and controls
1.Bonnet release
2.Dashboard fuses
3.Horn
4.Instrument panel
5.AlarmCourtesy lampWarning lamp display for seat belts and front passenger airbagPanoramic roof blind controlInterior rear view mirrorMonitoring mirrorEmergency call button
6.Monochrome screen with audio system
Touch screen with TOYOTA Connect Radio or TOYOTA Connect Nav
7.USB port
8.HeatingManual air conditioningDual-zone automatic air conditioningFront demisting - defrostingRear screen demisting – defrosting
9.Electric parking brake"START/STOP" button
10.Gearbox
11 .12 V socket
12.230 V accessory socket
13.Glove boxUSB port (inside the glove box)
14.Glove box
15.Front passenger airbag deactivation (on the side of the glove box, with the door open)
Steering mounted controls
1.External lighting / direction indicators control leverVoice recognition activation button
2.Wiper / screenwash / trip computer control lever
3.Controls to select the multimedia source (SRC), manage music (LIST) and manage phone calls ("telephone" symbol)
4.Speed Limiter / Programmable Cruise Control / Adaptive cruise control controls
5.Instrument panel display mode selection wheel
6.Voice controlVolume adjustment
7.Audio system setting controls
Page 54 of 272
54
Heating and Ventilation
Advice
NOTIC E
Using the ventilation and air conditioning system► To ensure that air is distributed evenly,
keep the external air intake grilles at the base of the windscreen, the nozzles, the vents, the air outlets and the air extractor in the boot free from obstructions.► Do not cover the sunshine sensor located on the dashboard; this sensor is used to regulate the automatic air conditioning system.► Operate the air conditioning system for at least 5 to 10 minutes once or twice a month to keep it in perfect working order.► If the system does not produce cold air, switch it off and contact a TOYOTA dealer or a qualified workshop.When towing the maximum load on a steep gradient in high temperatures, switching off the air conditioning increases the available engine power, enhancing the towing capacity.
WARNI NG
Avoid driving for too long with the ventilation off or with prolonged operation of interior air
recirculation. Risk of misting and deterioration of the air quality!
If the interior temperature is very high after the vehicle has stood for a long time in the sunshine, air the passenger compartment for a few moments.Put the air flow control at a setting high
enough to quickly change the air in the passenger compartment.
NOTIC E
Condensation created by the air conditioning results in a discharge of water underneath the vehicle. This is perfectly normal.
NOTIC E
Servicing the ventilation and air conditioning system► Ensure that the passenger compartment filter is in good condition and have the filter elements replaced regularly.We recommend using a composite passenger compartment filter. Thanks to its special active additive, this type of filter helps to purify the air breathed by the occupants and keep the passenger compartment clean (by reducing
allergic symptoms, unpleasant odours and greasy deposits).► To ensure correct operation of the air conditioning system, have it checked according to the recommendations in the Maintenance and Warranty Guide.
NOTIC E
Stop & StartThe heating and air conditioning systems only operate when the engine is running.Temporarily deactivate the Stop & Start system to maintain a comfortable temperature in the passenger compartment.For more information on the Stop & Start, refer to the corresponding section.
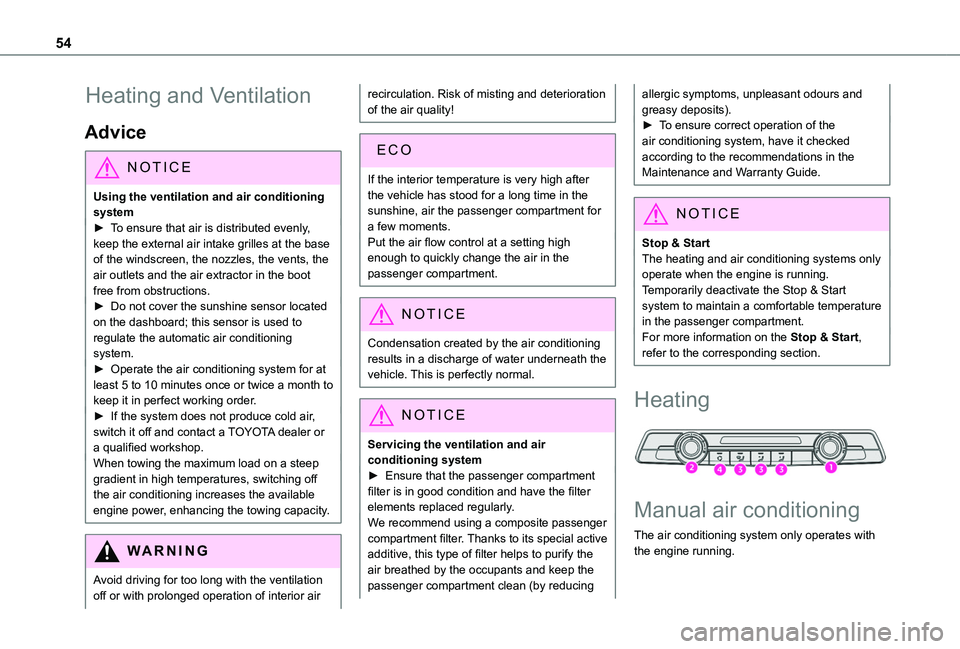
Heating
Manual air conditioning
The air conditioning system only operates with the engine running.
Page 65 of 272
65
Lighting and visibility
4
Malfunction
In the event of a malfunction of the sunshine sensor, the lighting comes on and this warning lamp is displayed in the instrument panel, accompanied by an audible signal and/or a message.Contact a TOYOTA dealer or a qualified workshop.
WARNI NG
In fog or snow, the sunshine sensor may detect sufficient light. In this case, the lighting will not come on automatically.Do not cover the sunshine sensor, located on the dashboard or at the top of the windscreen behind the rear view mirror (depending on equipment); the associated functions would no longer be controlled.
Daytime running lamps /
Sidelamps
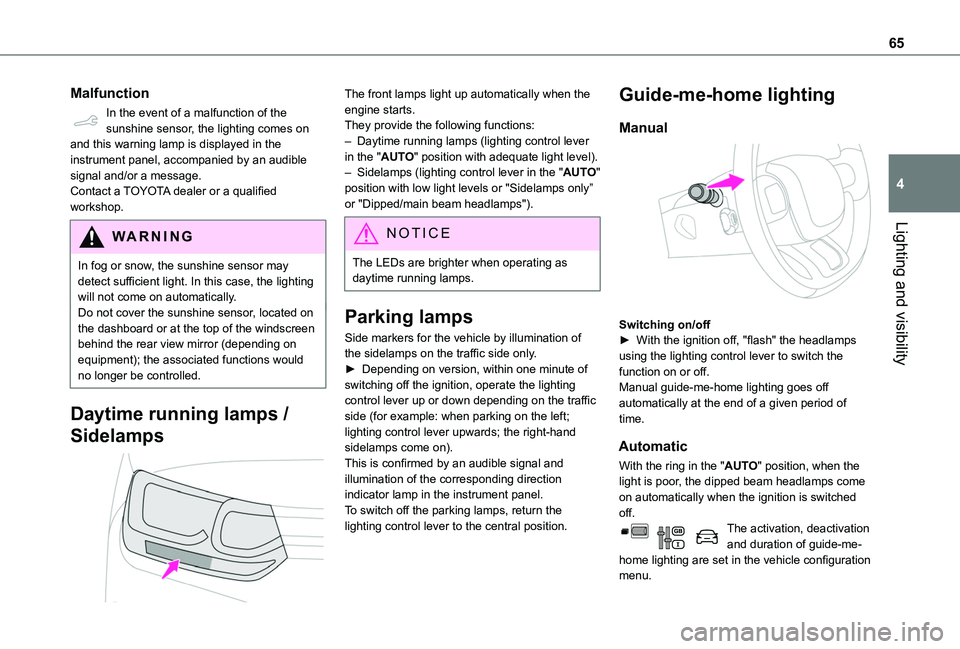
The front lamps light up automatically when the engine starts.They provide the following functions:– Daytime running lamps (lighting control lever in the "AUTO" position with adequate light level).– Sidelamps (lighting control lever in the "AUTO" position with low light levels or "Sidelamps only” or "Dipped/main beam headlamps").
NOTIC E
The LEDs are brighter when operating as daytime running lamps.
Parking lamps
Side markers for the vehicle by illumination of the sidelamps on the traffic side only.► Depending on version, within one minute of switching off the ignition, operate the lighting control lever up or down depending on the traffic side (for example: when parking on the left; lighting control lever upwards; the right-hand sidelamps come on).This is confirmed by an audible signal and illumination of the corresponding direction indicator lamp in the instrument panel.To switch off the parking lamps, return the lighting control lever to the central position.
Guide-me-home lighting
Manual
Switching on/off► With the ignition off, "flash" the headlamps using the lighting control lever to switch the function on or off.Manual guide-me-home lighting goes off automatically at the end of a given period of time.
Automatic
With the ring in the "AUTO" position, when the light is poor, the dipped beam headlamps come on automatically when the ignition is switched off.The activation, deactivation and duration of guide-me-home lighting are set in the vehicle configuration menu.
Page 82 of 272
82
immediately after the impact, the airbags deflate rapidly so that they do not hinder visibility or the exit of the occupants,– in the case of a minor or rear impact or in certain rollover conditions, the airbags may not be deployed; the seat belt alone contributes towards ensuring your protection in these situations.
WARNI NG
The airbags do not operate when the ignition is switched off.This equipment will only deploy once. If a second impact occurs (during the same or a subsequent accident), the airbag will not be deployed again.
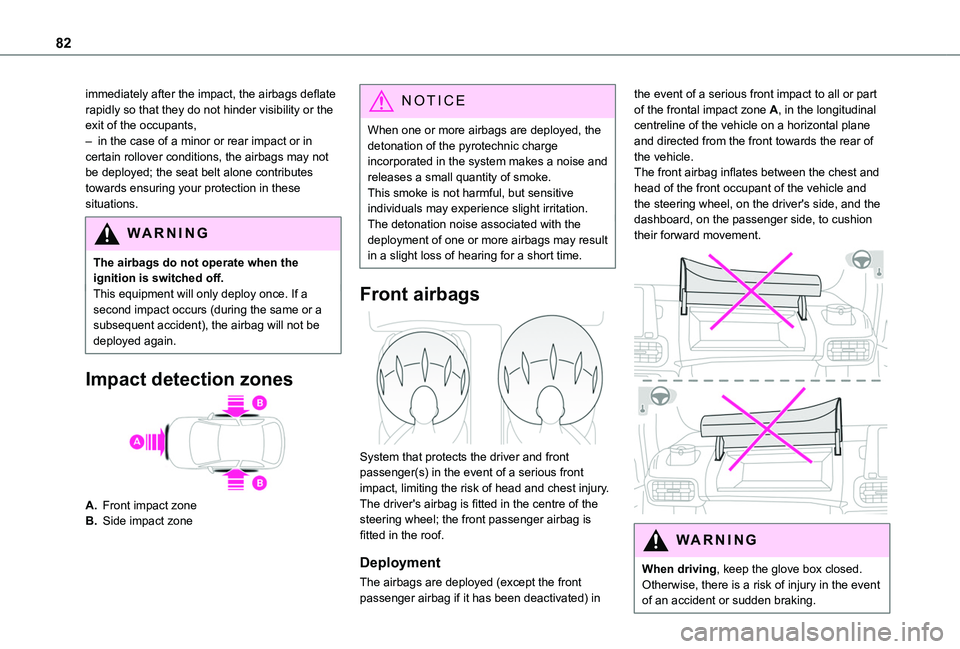
Impact detection zones
A.Front impact zone
B.Side impact zone
NOTIC E
When one or more airbags are deployed, the detonation of the pyrotechnic charge incorporated in the system makes a noise and releases a small quantity of smoke.This smoke is not harmful, but sensitive individuals may experience slight irritation.The detonation noise associated with the deployment of one or more airbags may result in a slight loss of hearing for a short time.
Front airbags
System that protects the driver and front passenger(s) in the event of a serious front impact, limiting the risk of head and chest injury.The driver's airbag is fitted in the centre of the steering wheel; the front passenger airbag is fitted in the roof.
Deployment
The airbags are deployed (except the front passenger airbag if it has been deactivated) in
the event of a serious front impact to all or part of the frontal impact zone A, in the longitudinal centreline of the vehicle on a horizontal plane and directed from the front towards the rear of the vehicle.The front airbag inflates between the chest and head of the front occupant of the vehicle and the steering wheel, on the driver's side, and the dashboard, on the passenger side, to cushion their forward movement.
WARNI NG
When driving, keep the glove box closed. Otherwise, there is a risk of injury in the event of an accident or sudden braking.
Page 84 of 272
84
All work on the airbag systems must only be performed by a TOYOTA dealer or a qualified workshop.Even if all of the precautions mentioned are observed, a risk of injury or of minor burns to the head, chest or arms cannot be ruled out when an airbag is deployed. The airbag inflates almost instantly (within a few milliseconds) then deflates within the same time discharging the hot gas via openings provided for this purpose.
WARNI NG
Front airbagsDo not drive holding the steering wheel by its spokes or resting your hands on the centre part of the wheel.Passengers must not place their feet on the dashboard.Do not smoke as deployment of the airbags can cause burns or the risk of injury from a
cigarette or pipe.Never remove or pierce the steering wheel or hit it violently.Do not fix or attach anything to the steering wheel or dashboard, as this could cause injuries when the airbags are deployed.
WARNI NG
Lateral airbagsUse only approved covers on the seats, compatible with the deployment of the lateral airbags. For information on the range of seat covers suitable for your vehicle, contact a TOYOTA dealer.Do not fix or attach anything to the seat backrests (clothes, etc.), as this could cause injuries to the thorax or arm when the lateral airbag is deployed.Do not sit with the upper part of the body any nearer to the door than necessary.The vehicle's front door panels include side impact sensors.A damaged door or any unauthorised or incorrectly executed work (modification or repair) on the front doors or their interior trim could compromise the operation of these sensors - risk of malfunction of the lateral airbags!Such work must only be done by a TOYOTA
dealer or a qualified workshop.
WARNI NG
Curtain airbagsDo not fix or attach anything to the roof, as this could cause head injuries when the curtain airbag is deployed.Do not remove the grab handles installed on the roof, as they play a part in securing the curtain airbags.
Child seats
NOTIC E
The regulations on carrying children are specific to each country. Refer to the legislation in force in your country.
For maximum safety, please observe the following recommendations:– In accordance with European regulations, all children under the age of 12 or less than 150 cm (4 ft 11”) tall must travel in approved child seats suited to their weight, on seats fitted with a seat belt or ISOFIX mountings.– Statistically, the safest seats in your vehicle for carrying children are the rear seats.– Children weighing less than 9 kg (20 lb) must travel in the "rear facing" position, whether in the front or rear of the vehicle.
Page 162 of 272
162
NOTIC E
When washing the vehicle at an automatic roller-brush car wash, be sure to lock the doors and, depending on version, remove the electronic key.When using a pressure washer, hold the lance at least 30 cm (0 ft 11") from the vehicle (particularly when cleaning areas containing chipped paint, sensors or seals).Promptly clean up any stains containing chemicals liable to damage the vehicle's paint (including tree resin, bird droppings, insect secretions, pollen and tar).If justified by the environment, clean the vehicle more frequently to remove salty deposits (in coastal areas), soot (in industrial estates) and mud (in wet or cold areas). These substances can be highly corrosive.Contact a TOYOTA dealer or a qualified workshop if you require advice on removing stubborn stains requiring special products (such as tar or insect removers).
Preferably, have paint touch-ups performed by a TOYOTA dealer or a qualified workshop.
Interior
WARNI NG
When washing the vehicle, never use a water hose or high-pressure washer to clean the interior.Liquids carried in cups or other open containers can spill, presenting a risk of damage if they come into contact with the
controls in the dashboard and centre console. Take care!
Bodywork
High-gloss paint
WARNI NG
Do not use abrasive products or solvents, petrol or oil to clean the bodywork.Never use an abrasive sponge to clean stubborn stains. Risk of scratching the paintwork!Do not apply polish in strong sunshine, or to plastic or rubber parts.
NOTIC E
Use a soft sponge and soapy water or a pH neutral product.Gently wipe the bodywork with a clean microfibre cloth.Apply polish with the vehicle clean and dry.Comply with the instructions for use stated on the product.
Decals
(Depending on version)
WARNI NG
Do not use a high pressure washer to clean the vehicle. Risk of damaging or detaching the decals!
NOTIC E
Use a high-flow hose at a temperature between 25°C and 40°C.Sweep the jet of water across the surface to be cleaned, perpendicular to it.Rinse the vehicle with demineralised water.
Page 176 of 272
176
► Take the tweezers from their housing.
Changing a fuse
Before changing a fuse:► Identify the cause of the fault and fix it.► Stop all power consumption.► Immobilise the vehicle and switch the ignition off.► Identify the defective fuse using the current allocation tables and diagrams.To replace a fuse, it is essential to:► Use the special tweezers to extract the fuse from its housing and check the condition of its filament.► Always replace the failed fuse with a fuse of the same rating (same colour); use of a different rating may cause malfunctions - risk of fire!If the fault recurs after replacing a fuse, have the electrical system checked by a TOYOTA dealer or a qualified workshop.
NOTIC E
The fuse allocation tables and the corresponding diagrams are available from a TOYOTA dealer or from a qualified workshop.
WARNI NG
The replacement of a fuse not shown in the allocation tables may cause a serious malfunction of your vehicle. Contact a TOYOTA dealer or a qualified workshop.
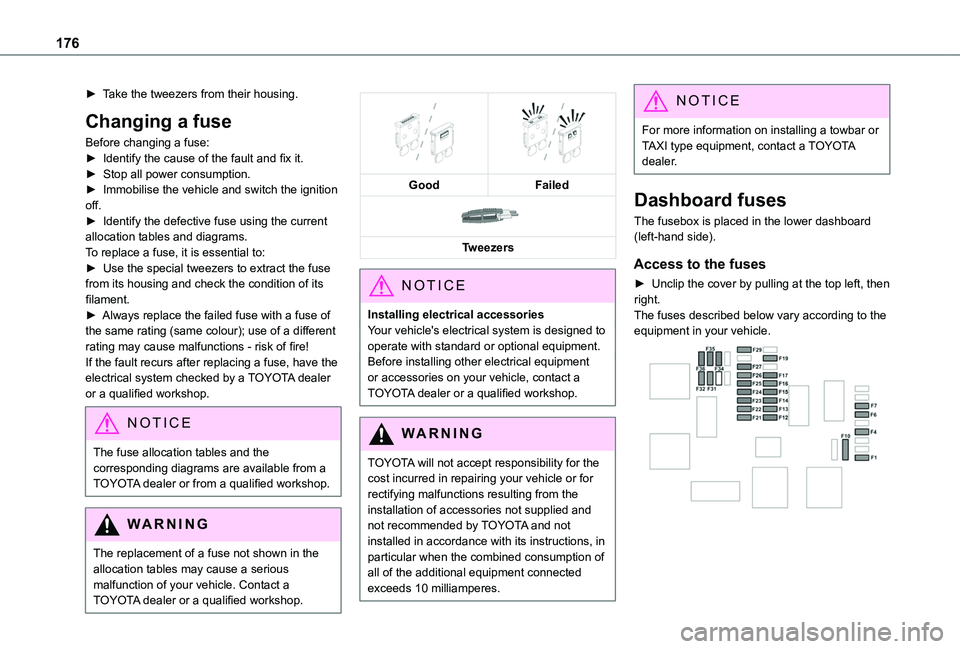
GoodFailed
Tweezers
NOTIC E
Installing electrical accessoriesYour vehicle's electrical system is designed to operate with standard or optional equipment.Before installing other electrical equipment or accessories on your vehicle, contact a TOYOTA dealer or a qualified workshop.
WARNI NG
TOYOTA will not accept responsibility for the cost incurred in repairing your vehicle or for rectifying malfunctions resulting from the installation of accessories not supplied and not recommended by TOYOTA and not installed in accordance with its instructions, in
particular when the combined consumption of all of the additional equipment connected exceeds 10 milliamperes.
NOTIC E
For more information on installing a towbar or TAXI type equipment, contact a TOYOTA dealer.
Dashboard fuses
The fusebox is placed in the lower dashboard (left-hand side).
Access to the fuses
► Unclip the cover by pulling at the top left, then right.The fuses described below vary according to the equipment in your vehicle.
Page 189 of 272
189
Technical data
9
Identification markings
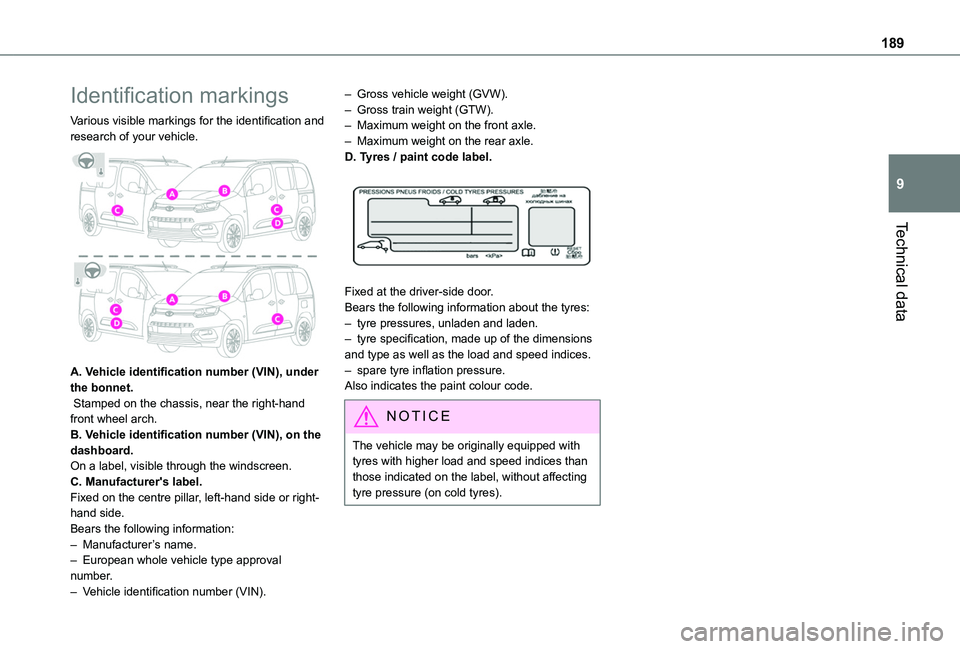
Various visible markings for the identification and research of your vehicle.
A. Vehicle identification number (VIN), under the bonnet. Stamped on the chassis, near the right-hand front wheel arch.B. Vehicle identification number (VIN), on the dashboard.On a label, visible through the windscreen.C. Manufacturer's label.Fixed on the centre pillar, left-hand side or right-hand side.Bears the following information:– Manufacturer’s name.
– European whole vehicle type approval number.– Vehicle identification number (VIN).
– Gross vehicle weight (GVW).– Gross train weight (GTW).– Maximum weight on the front axle.– Maximum weight on the rear axle.D. Tyres / paint code label.
Fixed at the driver-side door.Bears the following information about the tyres:– tyre pressures, unladen and laden.– tyre specification, made up of the dimensions and type as well as the load and speed indices.– spare tyre inflation pressure.Also indicates the paint colour code.
NOTIC E
The vehicle may be originally equipped with tyres with higher load and speed indices than those indicated on the label, without affecting tyre pressure (on cold tyres).