Page 1 of 20
www.toyota.com/owners
CUSTOMER EXPERIENCE CENTER
1- 8 0 0 - 3 31- 4 3 31
Printed in U.S.A. 6/18
18-MKG -11932
2 0 19
QUICK REFERENCE GUIDE
TOUCH SCREEN DISPL AY AUDIO
AND DISPLAY AUDIO WITH NAVIGATION
86
Page 2 of 20
TABLE OF CONTENTS
BUTTON OVERVIEW 2
SETTINGS 2
VOICE COMMAND 2
POWER/VOLUME 2
TOUCH-SCREEN 2
TUNE/SEEK 2
MEDIA 2
PHONE 2
PAIRING BLUETOOTH
® PHONE FOR THE FIRST TIME 3-4
SWITCHING AUDIO SOURCE - NON-NAVIGATION UNITS 5
VOICE TRAINING 5
SWITCHING AUDIO SOURCE - NAVIGATION UNITS 6
SETTING HOME DESTINATION 6
PRESETTING A STATION 7
EQUALIZER(EQ) 7
AHA
® 8-9
INSTALLING THE AHA® APPLICATION 8
SWITCHING TO AHA® MODE 8
CONNECTING FOR AHA® 9
CONNECTING AN IPHONE® 9
NAVIGATION: DESTINATION INPUT BY ADDRESS 10-11
NAVIGATION: DESTINATION INPUT BY VOICE RECOGNITION 11
NAVIGATION: DESTINATION INPUT – POI BY NAME 12
NAVIGATION: DESTINATION INPUT – POI BY CATEGORY 13-14
NAVIGATION: ROUTE OPTIONS 15
18
45673a0_17-MKG-10927_QRG_Cover_DisplayAudioNav_1_0F_lm.indd 28/15/17 12:01 PM
Page 3 of 20

2
– use your finger to control
selected functions.
– press this button to start the voice command
system, press and hold to cancel.
– press to turn radio on/off, turn to adjust volume.
– press this button to access function settings to customize your audio system.
a. Language, system volume, Equalizer(EQ) and more can all be adjusted in Settings.
Non-Navigation units – press this button to access the Audio screens to select AM/
FM/BT/iPod/USB/Aha Audio.
Navigation units – press this button to access the Navigation Map screen, press again
while on the Map screen for the Audio screens to select
AM/FM/BT/iPod/USB/Aha Audio. – press this button to access Bluetooth
®1 system, register a new phone or access
phone contacts. – these buttons allow you to tune up or down to select radio station or access a desir ed
track.
BUTTON OVERVIEW
1 The Bluetooth® word mark and logos are registered trademarks owned by\
Bluetooth SIG, Inc. and any use of such marks by
Toyota is under license. Other trademarks and trade names are those of th\
eir respective owners. The phones on toyota.com
have been tested for Bluetooth® wireless technology compatibility wit\
h Toyota vehicles. Performance will vary based on phone
software version, coverage and your wireless carrier.
Be sure to obey traffic regulations and maintain awareness of road and traffic conditions at all times.
MEDIA
TUNE/SEEK
TOUCH-SCREEN
POWER/VOLUME VOICE COMMAND
SETTINGS
PHONE
Page 4 of 20

3
PAIRING BLUETOOTH® PHONE FOR THE FIRST TIME
Touch Screen Display Audio and Display Audio with Navigation1
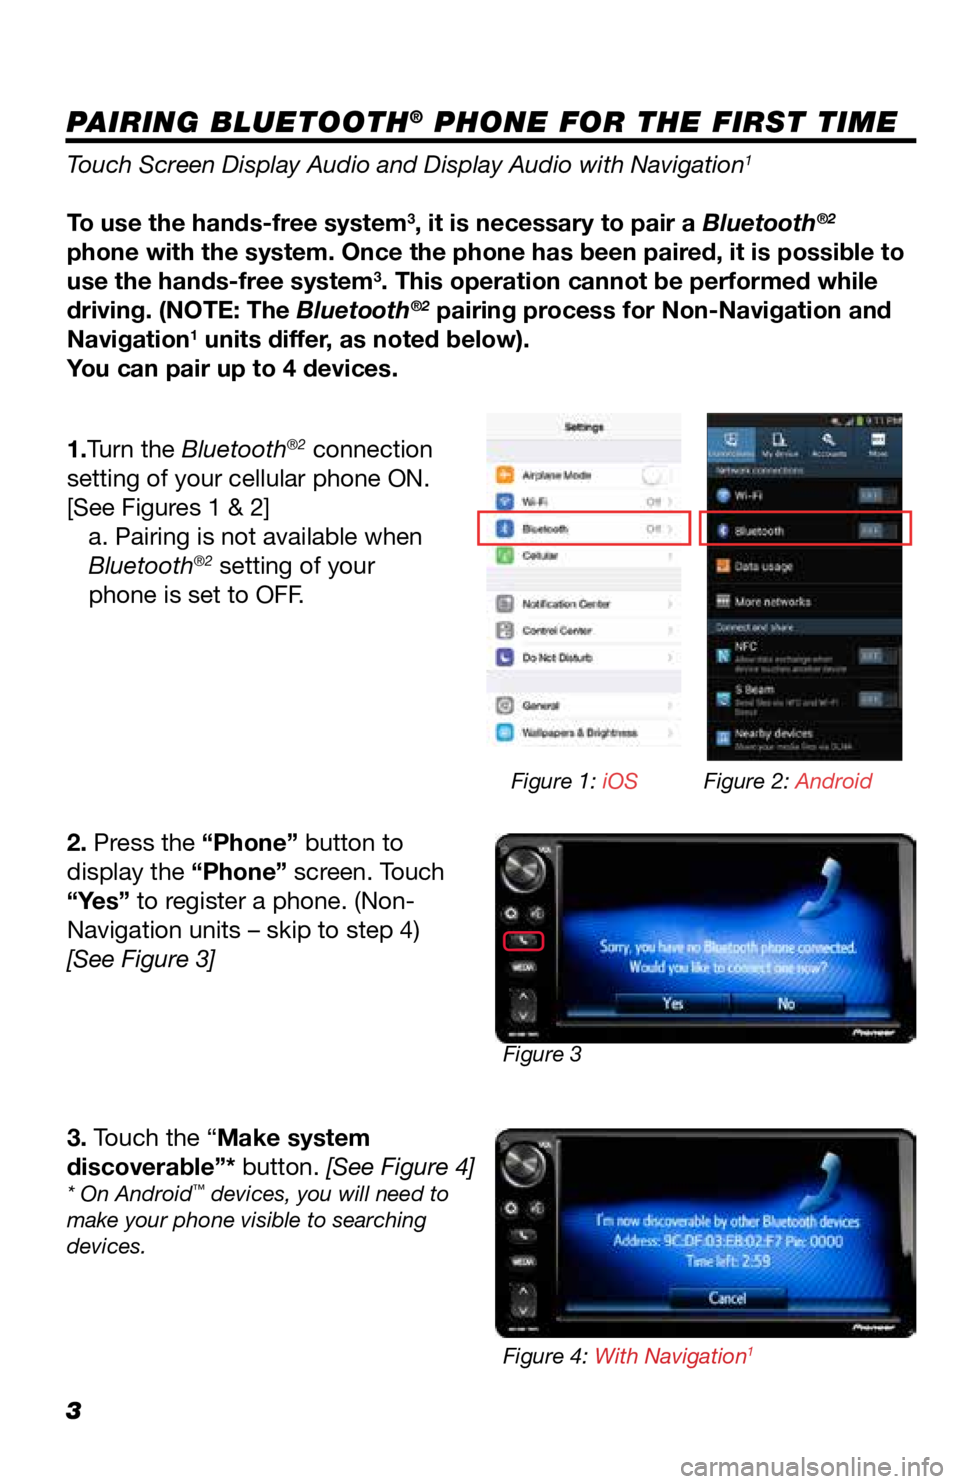
To use the hands-free system3, it is necessary to pair a Bluetooth®2
phone with the system. Once the phone has been paired, it is possible to
use the hands-free system
3. This operation cannot be performed while
driving. (NOTE: The Bluetooth®2 pairing process for Non-Navigation and
Navigation1 units differ, as noted below).
You can pair up to 4 devices.
1.Turn the Bluetooth
®2 connection
setting of your cellular phone ON.
[See Figures 1 & 2] a. Pairing is not available when
Bluetooth
®2 setting of your
phone is set to OFF.
2. Press the “Phone” button to
display the “Phone” screen. Touch
“Yes” to register a phone. (Non-
Navigation units – skip to step 4)
[See Figure 3]
3. Touch the “Make system
discoverable”* button. [See Figure 4]
* On Android™ devices, you will need to
make your phone visible to searching
devices.
Figure 3 Figure 1: iOS
Figure 2: Android
Figure 4: With Navigation
1
Page 5 of 20

4
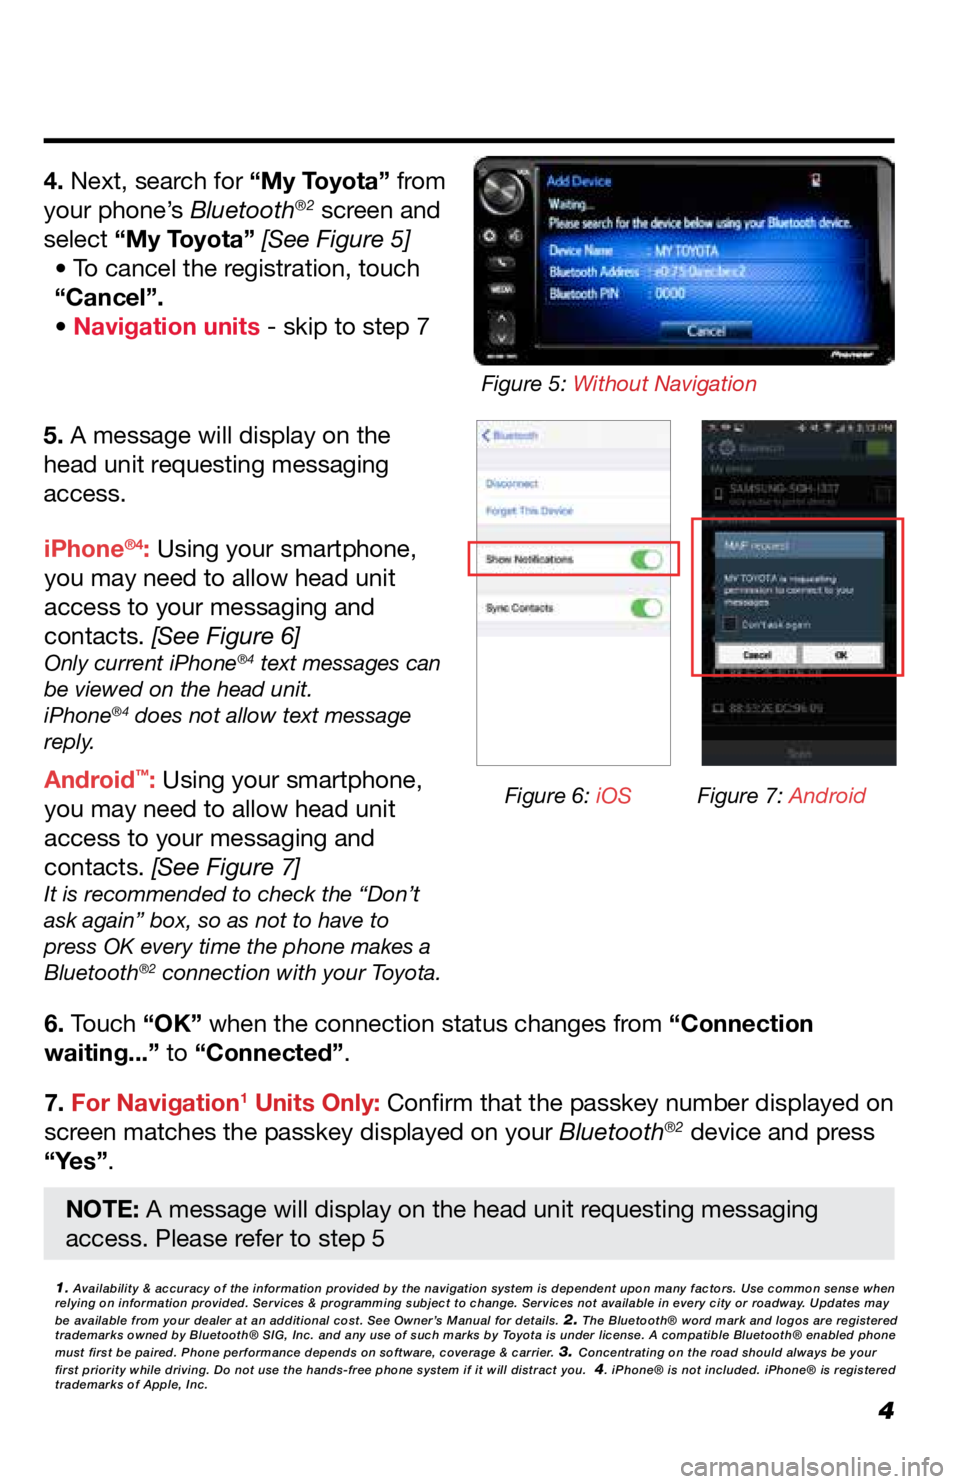
5. A message will display on the
head unit requesting messaging
access.
6. Touch “OK” when the connection status changes from “Connection
waiting...” to “Connected”.
7. For Navigation
1 Units Only: Confirm that the passkey number displayed on
screen matches the passkey displayed on your Bluetooth®2 device and press
“Yes”. iPhone
®4: Using your smartphone,
you may need to allow head unit
access to your messaging and
contacts. [See Figure 6]
Only current iPhone®4 text messages can
be viewed on the head unit.
iPhone
®4 does not allow text message
reply.
Android™: Using your smartphone,
you may need to allow head unit
access to your messaging and
contacts. [See Figure 7]
It is recommended to check the “Don’t
ask again” box, so as not to have to
press OK every time the phone makes a
Bluetooth
®2 connection with your Toyota.
4. Next, search for “My Toyota” from
your phone’s Bluetooth®2 screen and
select “My Toyota” [See Figure 5] • To cancel the registration, touch
“Cancel”.
• Navigation units - skip to step 7
1. Availability & accuracy of the information provided by the navigation sys\
tem is dependent upon many factors. Use common sense when
relying on information provided. Services & programming subject to change. Services not available in every city or roadway. Updates may
be available from your dealer at an additional cost. See Owner’s Manual for details.
2. The Bluetooth® word mark and logos are registered
trademarks owned by Bluetooth® SIG, Inc. and any use of such marks by\
Toyota is under license. A compatible Bluetooth® enabled phone
must first be paired. Phone performance depends on software, coverage & \
carrier.
3. Concentrating on the road should always be your
first priority while driving. Do not use the hands-free phone system if \
it will distract you. 4. iPhone® is not included. iPhone® is registered
trademarks of Apple, Inc.
Figure 6: iOS Figure 7: Android
Figure 5: Without Navigation
NOTE: A message will display on the head unit requesting messaging
access. Please refer to step 5
Page 6 of 20

5
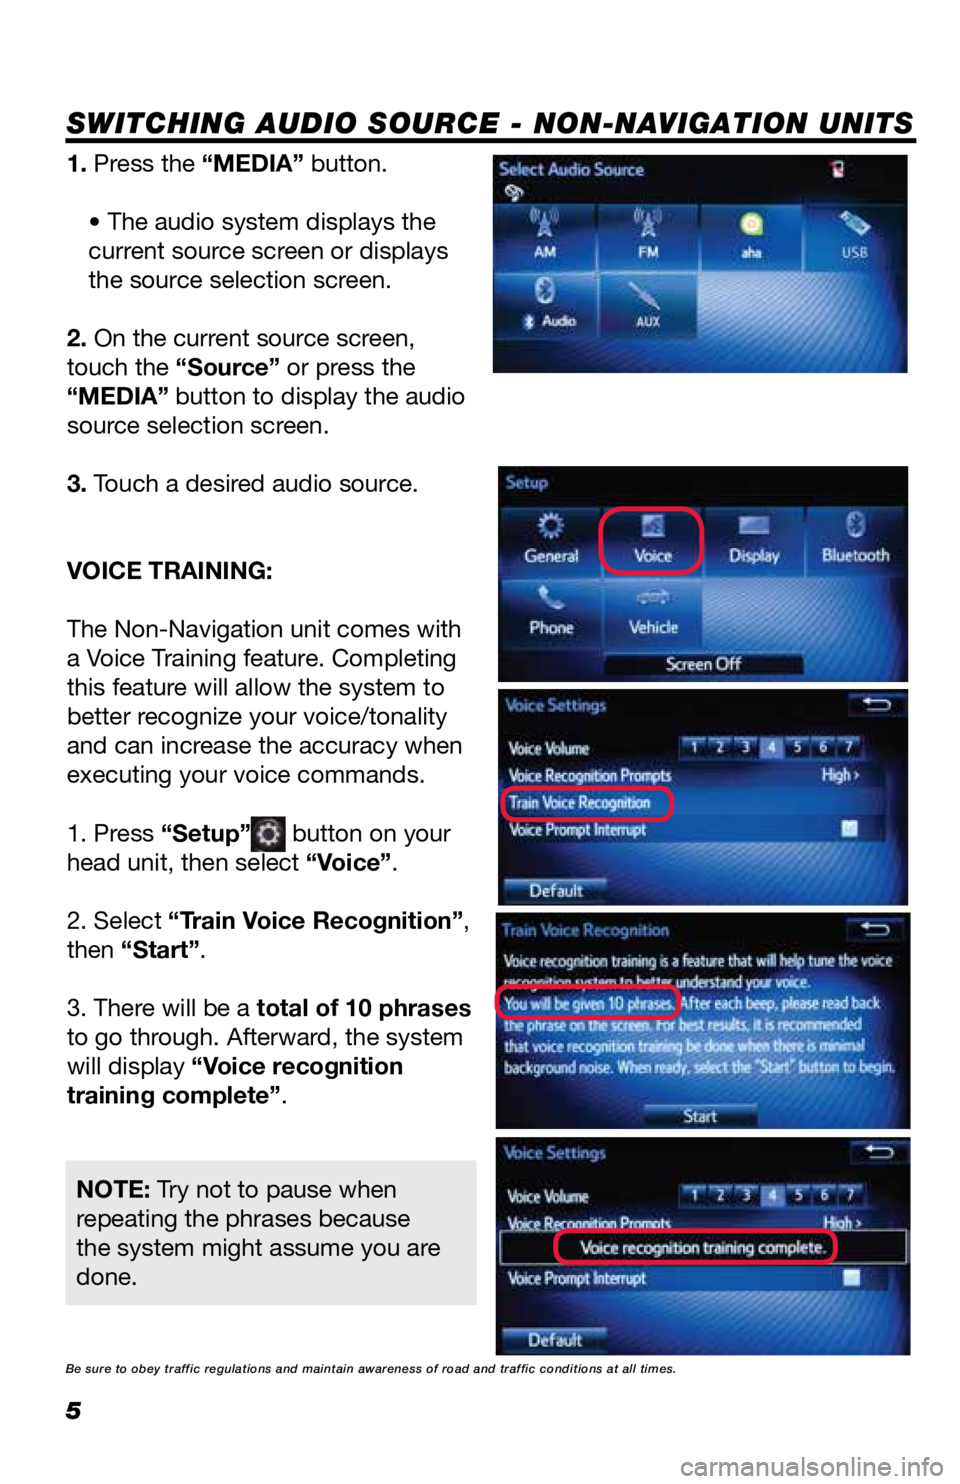
SWITCHING AUDIO SOURCE - NON-NAVIGATION UNITS
1. Press the “MEDIA” button.• The audio system displays the
current source screen or displays
the source selection screen.
2. On the current source screen,
touch the “Source” or press the
“MEDIA” button to display the audio
source selection screen.
3. Touch a desired audio source.
VOICE TRAINING:
The Non-Navigation unit comes with
a Voice Training feature. Completing
this feature will allow the system to
better recognize your voice/tonality
and can increase the accuracy when
executing your voice commands.
1. Press “Setup”
button on your
head unit, then select “Voice”.
2. Select “Train Voice Recognition”,
then “Start”.
3. There will be a total of 10 phrases
to go through. Afterward, the system
will display “Voice recognition
training complete”.
NOTE: Try not to pause when
repeating the phrases because
the system might assume you are
done.
Be sure to obey traffic regulations and maintain awareness of road and t\
raffic conditions at all times.
Page 7 of 20
6
SWITCHING AUDIO SOURCE - NAVIGATION UNITS
1. Press the “MEDIA” button.• The screen will switch over to the
navigation map.
• Press the “MEDIA” button again.
2. Touch a desired audio source.
SETTING HOME DESTINATION:
1. Press the “MEDIA” button.
2. Select the “Navigation” button.
3. Select “Home”.
4. System will ask if you would like to
set a Home address, select “Yes”.
5. Select the desired options on how
the home destination should be input.
NOTE: We suggest using a location
near your home as your home
destination, rather than your actual
home address.
Be sure to obey traffic regulations and maintain awareness of road and t\
raffic conditions at all times.
Page 8 of 20

7
PRESETTING A STATION
EQUALIZER(EQ)
1. Tune to the desired station.
2. Touch “(add new)”. • To change the preset station to a
current one, touch and hold the
preset station. Skip steps 3 and 4.
3. Touch “Yes” when the confirmation
screen appears.
4. Touch “OK”.
EQ can be selected by touching the
“Sound” icon.
There are three stored equalizer
curves that you can easily recall at
any time.
Here is a list of the equalizer curves:
POWERFUL is a curve in which
low- and high-pitched sounds are
boosted.
NATURAL is a curve in which low-
and high-pitched sounds are slightly
boosted.
VOCAL is a curve in which the
midrange, which is the human vocal
range, is boosted.
To change settings, press “EQ”
button again.
Be sure to obey traffic regulations and maintain awareness of road and t\
raffic conditions at all times.
(For both Non-Navigation and Navigation Units)
Radio mode has a preset function, which can store up to 18 stations
from any of the AM or FM stations.
EQ is a modified DSP (Digital Signal Processing) system that provides a
customized sound for your vehicle.