Page 5 of 20

4
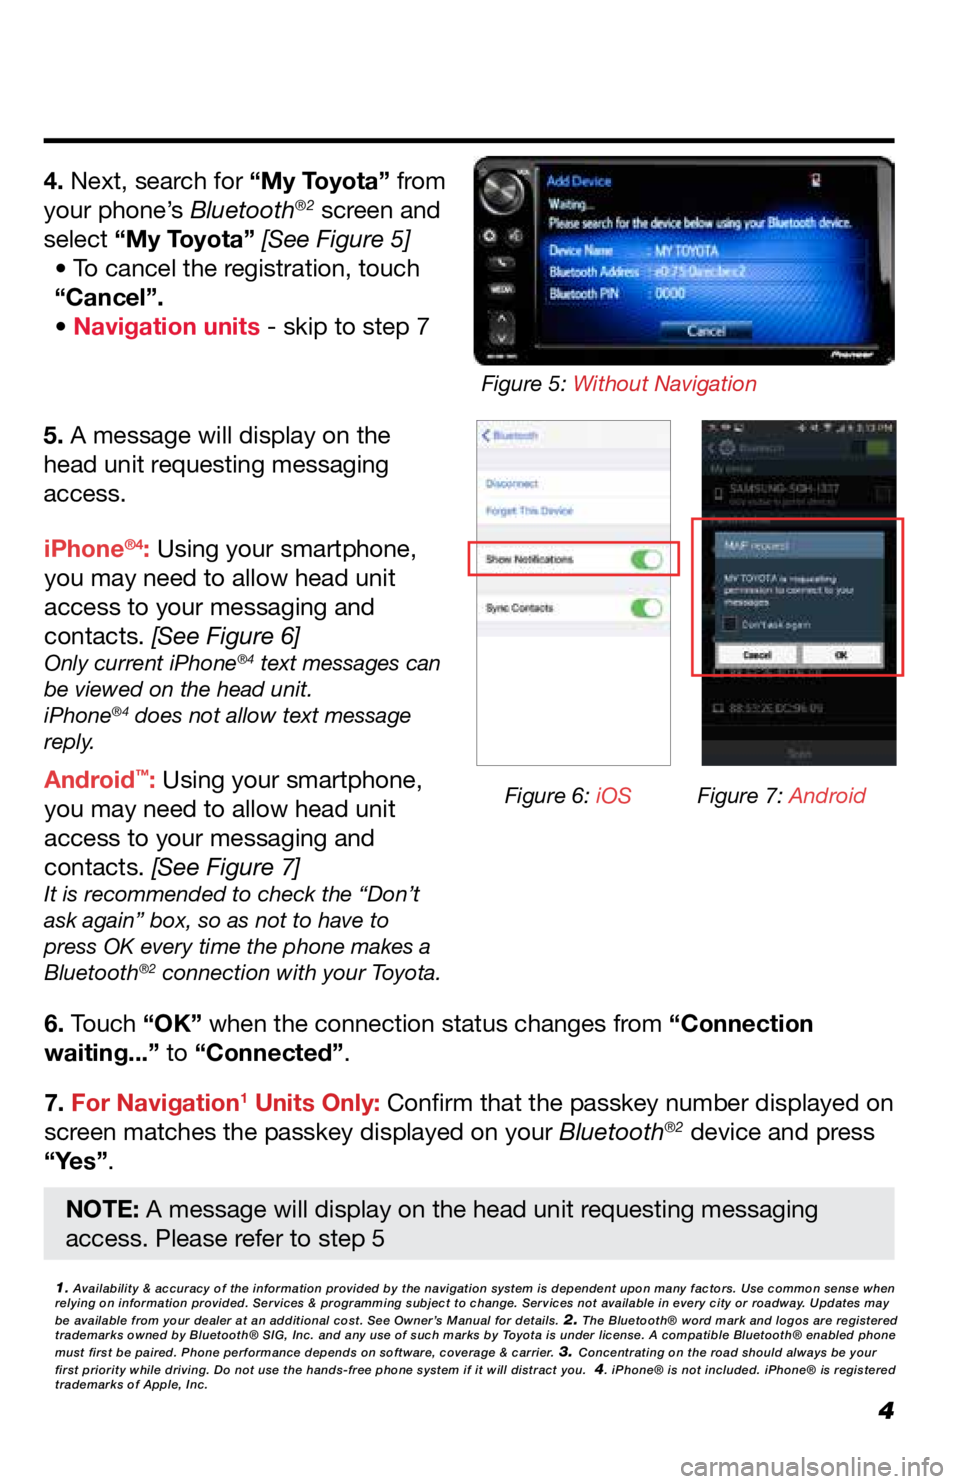
5. A message will display on the
head unit requesting messaging
access.
6. Touch “OK” when the connection status changes from “Connection
waiting...” to “Connected”.
7. For Navigation
1 Units Only: Confirm that the passkey number displayed on
screen matches the passkey displayed on your Bluetooth®2 device and press
“Yes”. iPhone
®4: Using your smartphone,
you may need to allow head unit
access to your messaging and
contacts. [See Figure 6]
Only current iPhone®4 text messages can
be viewed on the head unit.
iPhone
®4 does not allow text message
reply.
Android™: Using your smartphone,
you may need to allow head unit
access to your messaging and
contacts. [See Figure 7]
It is recommended to check the “Don’t
ask again” box, so as not to have to
press OK every time the phone makes a
Bluetooth
®2 connection with your Toyota.
4. Next, search for “My Toyota” from
your phone’s Bluetooth®2 screen and
select “My Toyota” [See Figure 5] • To cancel the registration, touch
“Cancel”.
• Navigation units - skip to step 7
1. Availability & accuracy of the information provided by the navigation sys\
tem is dependent upon many factors. Use common sense when
relying on information provided. Services & programming subject to change. Services not available in every city or roadway. Updates may
be available from your dealer at an additional cost. See Owner’s Manual for details.
2. The Bluetooth® word mark and logos are registered
trademarks owned by Bluetooth® SIG, Inc. and any use of such marks by\
Toyota is under license. A compatible Bluetooth® enabled phone
must first be paired. Phone performance depends on software, coverage & \
carrier.
3. Concentrating on the road should always be your
first priority while driving. Do not use the hands-free phone system if \
it will distract you. 4. iPhone® is not included. iPhone® is registered
trademarks of Apple, Inc.
Figure 6: iOS Figure 7: Android
Figure 5: Without Navigation
NOTE: A message will display on the head unit requesting messaging
access. Please refer to step 5
Page 8 of 20

7
PRESETTING A STATION
EQUALIZER(EQ)
1. Tune to the desired station.
2. Touch “(add new)”. • To change the preset station to a
current one, touch and hold the
preset station. Skip steps 3 and 4.
3. Touch “Yes” when the confirmation
screen appears.
4. Touch “OK”.
EQ can be selected by touching the
“Sound” icon.
There are three stored equalizer
curves that you can easily recall at
any time.
Here is a list of the equalizer curves:
POWERFUL is a curve in which
low- and high-pitched sounds are
boosted.
NATURAL is a curve in which low-
and high-pitched sounds are slightly
boosted.
VOCAL is a curve in which the
midrange, which is the human vocal
range, is boosted.
To change settings, press “EQ”
button again.
Be sure to obey traffic regulations and maintain awareness of road and t\
raffic conditions at all times.
(For both Non-Navigation and Navigation Units)
Radio mode has a preset function, which can store up to 18 stations
from any of the AM or FM stations.
EQ is a modified DSP (Digital Signal Processing) system that provides a
customized sound for your vehicle.
Page 16 of 20
15
NAVIGATION: ROUTE OPTIONS
1. Press the button.2. Select “Navigation”.
3. Select “Route preferences”.
“Show route alternatives” and “Make a round trip” cannot be selected at
the same time.
Select “Show route alternatives” to display the 3 routes (fastest, shortest
and ecological) on the map after route calculation. 4. Select the desired item.
“Availability & accuracy of the information provided by the navigation sys\
tem is dependent upon many factors. Use common sense
when relying on information provided. Services & programming subject to change. Services not available in every city or roadway.
Updates may be available from your dealer at an additional cost. See Own\
er’s Manual for details.”
INFORMATION