Page 13 of 224
Getting More Keys
If you lose a key or require an additional one,
contact Tesla. Model X can recognize up to
eight keys.
When ordering a new key for Model X, take all
available keys with you for reprogramming.
Opening Doors from the Interior
To open a front door, pull the interior door handle toward you.
You can also use the touchscreen to open and
close doors when inside Model X. TouchControls > Quick Controls , then choose the
door you want to open or close. In addition, if Model X is equipped with the premium
upgrades package, when you press the brake
pedal, the driver
Page 15 of 224

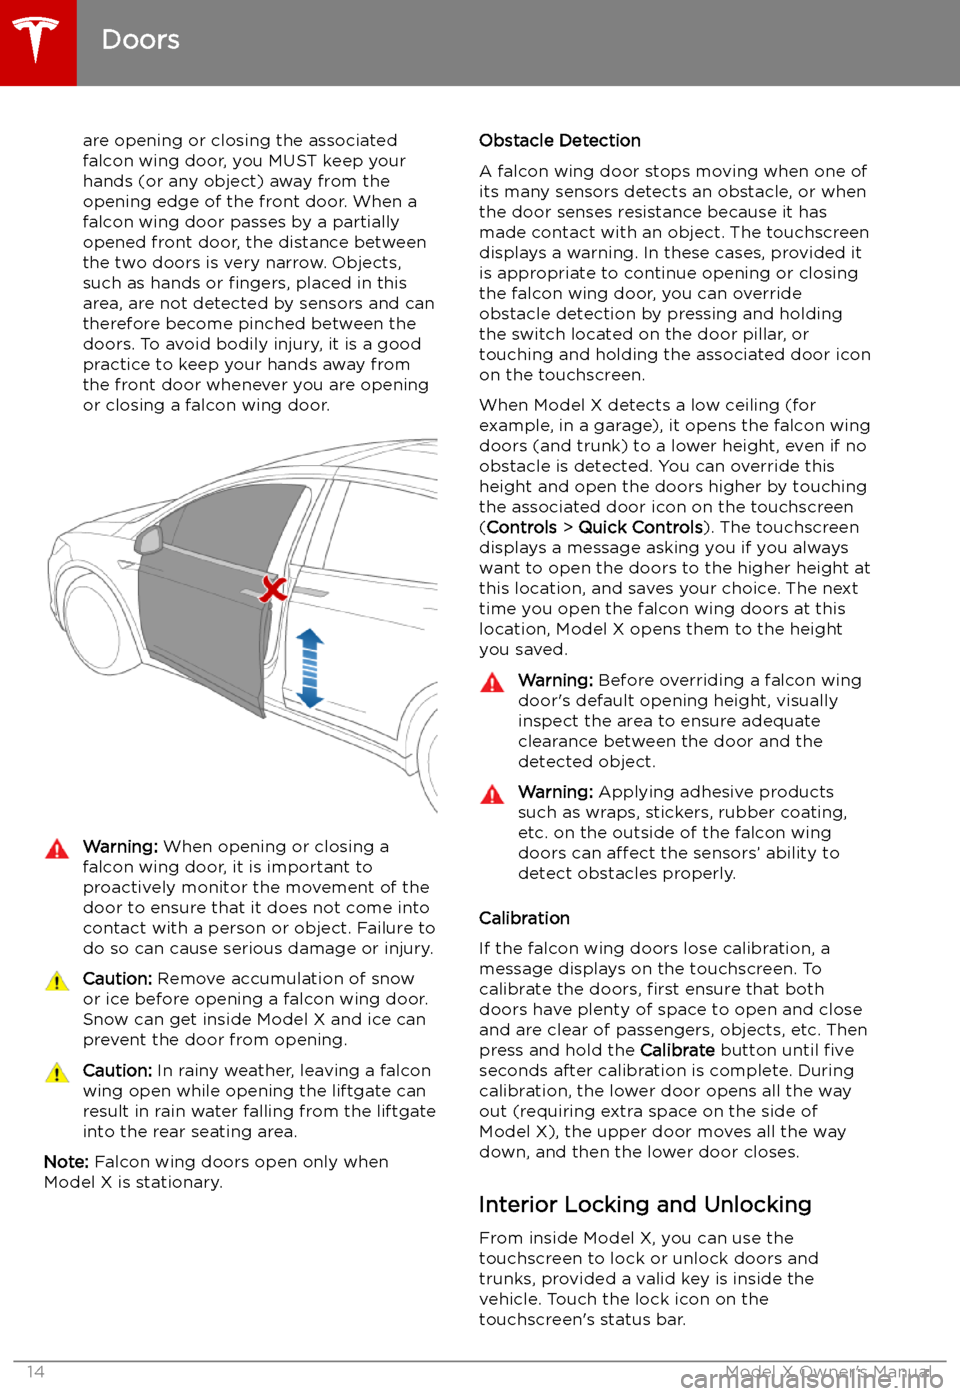
are opening or closing the associatedfalcon wing door, you MUST keep your
hands (or any object) away from the opening edge of the front door. When a falcon wing door passes by a partially
opened front door, the distance between
the two doors is very narrow. Objects,
such as hands or fingers, placed in this
area, are not detected by sensors and can
therefore become pinched between the
doors. To avoid bodily injury, it is a good practice to keep your hands away from
the front door whenever you are opening
or closing a falcon wing door.Warning: When opening or closing a
falcon wing door, it is important to
proactively monitor the movement of the door to ensure that it does not come into
contact with a person or object. Failure to
do so can cause serious damage or injury.Caution: Remove accumulation of snow
or ice before opening a falcon wing door.
Snow can get inside Model X and ice can
prevent the door from opening.Caution: In rainy weather, leaving a falcon
wing open while opening the liftgate can
result in rain water falling from the liftgate
into the rear seating area.
Note: Falcon wing doors open only when
Model X is stationary.
Obstacle Detection
A falcon wing door stops moving when one of
its many sensors detects an obstacle, or when
the door senses resistance because it has made contact with an object. The touchscreen
displays a warning. In these cases, provided it
is appropriate to continue opening or closing
the falcon wing door, you can override obstacle detection by pressing and holding
the switch located on the door pillar, or
touching and holding the associated door icon on the touchscreen.
When Model X detects a low ceiling (for
example, in a garage), it opens the falcon wing
doors (and trunk) to a lower height, even if no
obstacle is detected. You can override this height and open the doors higher by touching
the associated door icon on the touchscreen
( Controls > Quick Controls ). The touchscreen
displays a message asking you if you always
want to open the doors to the higher height at
this location, and saves your choice. The next
time you open the falcon wing doors at this
location, Model X opens them to the height you saved.Warning: Before overriding a falcon wing
door
Page 16 of 224
When you stop Model X and engage the Park
gear, you can choose whether you want doors to unlock or remain locked. To do so, touchControls > Vehicle > Unlock on Park . When
enabled, doors automatically unlock when you
engage the Park gear.
You can also unlock doors by pressing the
Park button on the end of the gear selector a second time (for example, after pressing it one
time to engage the Park gear).
Note: If a door or trunk is still open when you
lock Model X, it locks when you close it.
Door Unlock Mode You can choose to unlock only the driver
Page 20 of 224
Adjusting the Opening Height
You can adjust the opening height of the
powered liftgate to make it easier to reach:
1. Open the liftgate, then manually lower or
raise it to the desired opening height.
2. Press and hold the button on the
underside of the liftgate for two seconds
until you hear a confirmation chime.
3.Confirm that you have set it to the desired
height by closing the liftgate, then
reopening it.
Accessing the Cargo Area To access the cargo area inside the Model X
rear trunk, push down on the ridged portion of the handle of the cargo cover and then pull
up. You can then adjust the position of the
cargo cover or completely remove it from
Model X.
Caution: Never load more than 175 lbs (80
kg) on the rear load
Page 23 of 224

Interior Storage and Electronics
Glove Box
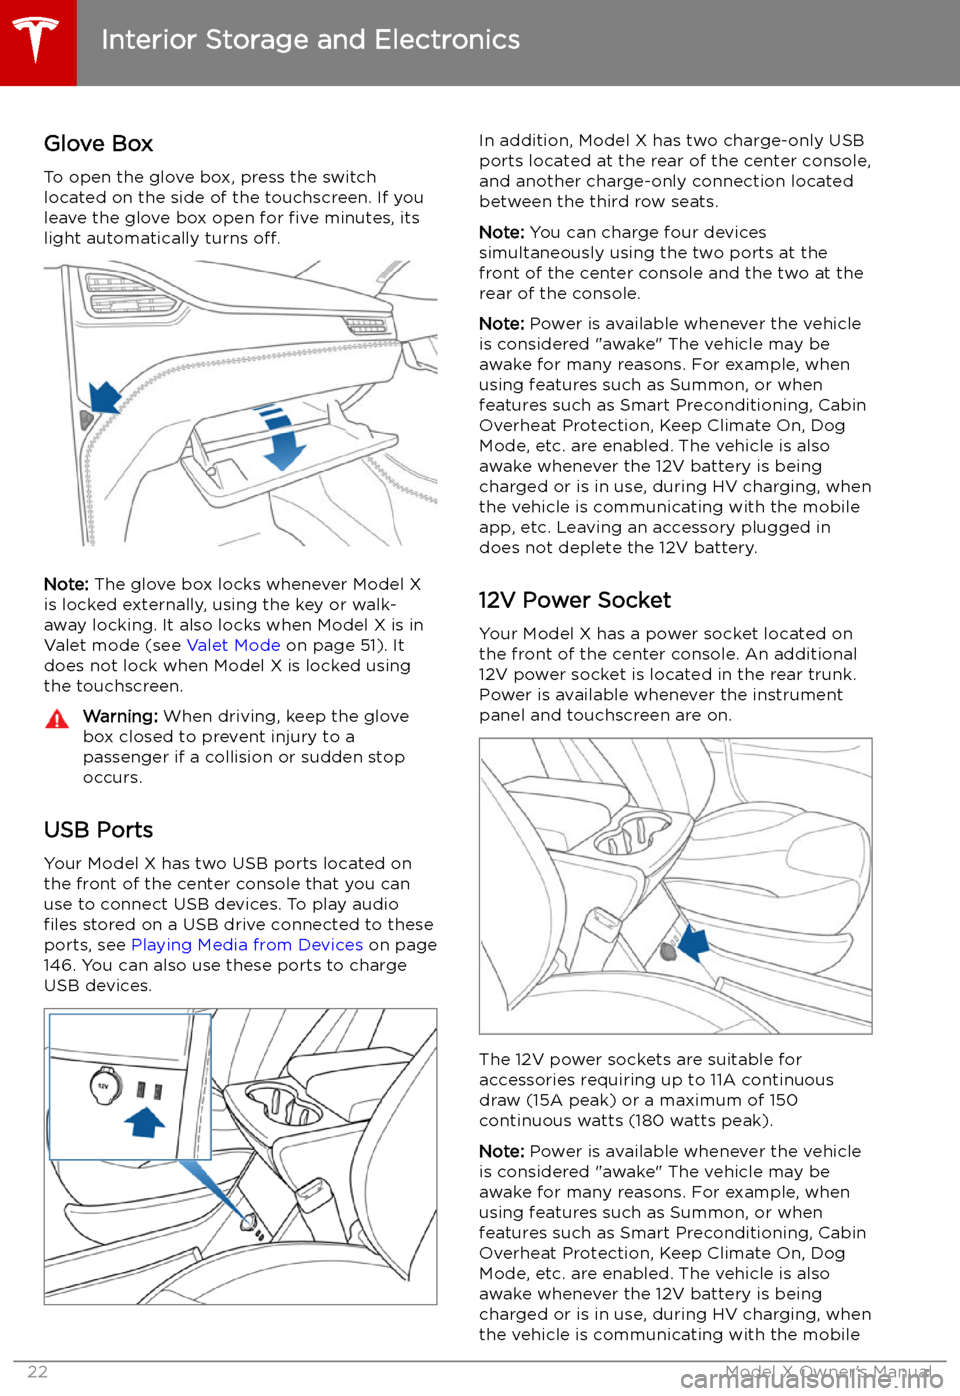
To open the glove box, press the switch located on the side of the touchscreen. If you
leave the glove box open for five minutes, its
light automatically turns off.
Note: The glove box locks whenever Model X
is locked externally, using the key or walk-
away locking. It also locks when Model X is in Valet mode (see Valet Mode on page 51). It
does not lock when Model X is locked using
the touchscreen.
Warning: When driving, keep the glove
box closed to prevent injury to a
passenger if a collision or sudden stop
occurs.
USB Ports
Your Model X has two USB ports located onthe front of the center console that you can
use to connect USB devices. To play audio files stored on a USB drive connected to these
ports, see Playing Media from Devices on page
146. You can also use these ports to charge
USB devices.
In addition, Model X has two charge-only USB
ports located at the rear of the center console,
and another charge-only connection located
between the third row seats.
Note: You can charge four devices
simultaneously using the two ports at the
front of the center console and the two at the
rear of the console.
Note: Power is available whenever the vehicle
is considered "awake" The vehicle may be awake for many reasons. For example, when
using features such as Summon, or when
features such as Smart Preconditioning, Cabin Overheat Protection, Keep Climate On, Dog
Mode, etc. are enabled. The vehicle is alsoawake whenever the 12V battery is beingcharged or is in use, during HV charging, whenthe vehicle is communicating with the mobile
app, etc. Leaving an accessory plugged in
does not deplete the 12V battery.
12V Power Socket Your Model X has a power socket located on
the front of the center console. An additional
12V power socket is located in the rear trunk.
Power is available whenever the instrument
panel and touchscreen are on.
The 12V power sockets are suitable for
accessories requiring up to 11A continuous
draw (15A peak) or a maximum of 150
continuous watts (180 watts peak).
Note: Power is available whenever the vehicle
is considered "awake" The vehicle may be awake for many reasons. For example, when
using features such as Summon, or when features such as Smart Preconditioning, Cabin
Overheat Protection, Keep Climate On, Dog Mode, etc. are enabled. The vehicle is alsoawake whenever the 12V battery is beingcharged or is in use, during HV charging, when
the vehicle is communicating with the mobile
Interior Storage and Electronics
22Model X Owner
Page 28 of 224
serious injuries in a collision, as you could
slide under the lap belt or be propelled into the seat belt. Ensure your seat back
is reclined no more than 30 degrees when
the vehicle is moving.Adjusting Second Row Monopost
Seats
A Model X equipped with monopost seats can
accommodate two or three passengers in the
second row, depending on the option chosen
at time of purchase. There are two ways to
adjust the position of these seats:
Page 29 of 224

1.Move seat forward/backward (up/down
on the control) and adjust the backrest
(left/right on the control).
2. Move seat forward/backward.
3. Adjust backrest.
Note: The backrest locks into position when
you release the lever. If a backrest is not
locked into position when a driving gear is engaged, the instrument panel displays analert for the unlocked backrest. Adjust the
backrest again, ensuring it locks into position.Warning: Riding in a moving vehicle with
the seat back reclined can result in
serious injuries in a collision, as you could
slide under the lap belt or be propelled into the seat belt. Ensure the backs of
occupied seats are reclined no more than 30 degrees when the vehicle is moving.Adjusting Second Row Seat Backs
(Bench Seats)
If your Model X is equipped with two seating
rows, the second row bench seats can
accommodate up to three passengers. Use the
mechanical adjustment lever located at the side of each outboard seating position toadjust the seat backs. A bench seat is split
60/40 so the adjustment lever on the left side
moves the seat backs for both the left and
center seats, whereas the lever on the right
side moves the rightmost seat back only.
While pulling and holding the lever, move the
seat back to the desired position, and then
release the lever. When returning a seat back
to its upright position, try moving it forward or
back to ensure it is securely latched into
position.Warning: Riding in a moving vehicle with
the seat back reclined can result in
serious injuries in a collision, as you could
slide under the lap belt or be propelled into the seat belt. Ensure the backs of
occupied seats are reclined no more than 30 degrees when the vehicle is moving.
Front and Rear Seats
28Model X Owner
Page 41 of 224
Bench Seats:
In the second row, install ISOFIX child safety
seats in the outboard seating positions only.
Use only a seat belt retained seat in the center
position.
Note: If Model X is equipped with two seats in
the second row, both seats support the use of
ISOFIX child safety seats.
Monopost Seats:
Child Safety Seats
40Model X Owner