Page 88 of 224

Towing and Accessories
The towing package allows you to tow a trailer
with your Model X. It also allows you to carry skis, snowboards, bicycles, etc. by attaching
an accessory carrier to the hitch.
Carrying Accessories The Model X towing package has a 50 mm ball
coupling that can support an accessory
carrier.
The ball coupling is designed to support vertical loads of up to 54 kg. When carrying
bicycles or other items on the Model X hitch, always check to ensure that the maximum
weight is not exceeded. When calculating
weight, remember to include the weight of the
accessory carrier. For example, assuming the
carrier weighs 14 kg, the weight threshold is sufficient for carrying two bicycles weighing
approximately 20 kg each, or four bicycles
weighing approximately 10 kg each.
Caution: The Model X hitch is designed to
support up to 54 kg. Exceeding this
maximum weight can cause significant
damage.Caution: Do not attempt to install a
carrier on a Model X that is not equipped
with the towing package. Doing so can
cause significant damage.
To install and use an accessory carrier, the tow
hitch must be connected (see Connecting the
Tow Hitch on page 93). Then follow the
instructions provided with your accessory
carrier. Observe all regulations and legal requirements in your state/region that apply
to carrying accessories.
The Model X towing package includes the
wiring necessary for using an accessory carrier
equipped with lights (see Electrical
Connections on page 95). The package also
includes Trailer Mode software (see Trailer
Mode on page 90).
When you connect an accessory
carrier
Page 112 of 224
always include the use of the HOV lane,
whenever it exists.Warning: Even when Navigate on
Autopilot deactivates at off-ramps,
Autosteer remains active. Always be
prepared to take appropriate actions such
as stopping at red lights and stop signs, and yielding to other road users.Warning: Navigate on Autopilot may not
always attempt to exit at an off-ramp,
even when the exit is determined by the
navigation route. Always remain alert and
be prepared to manually steer onto the
off-ramp, or make a required lane change.
You can cancel Navigate on Autopilot at any
time by touching the Navigate on Autopilot
button on the map
Page 131 of 224
DisplayManually control the brightness and the DAY (light background) or NIGHT
(dark background) setting of the touchscreen and instrument panel. When
set to AUTO, the brightness changes automatically between day and night
brightness based on ambient lighting conditions.
Brightness : Drag the slider to manually control the brightness level of the
displays. When Auto brightness is on, the displays are further adjusted
based on both the surroundings and by learning your preferences (it
remembers the type of manual adjustments you make).
SCREEN CLEAN MODE : Disable the touchscreen momentarily for cleaning
purposes.
You can also customize how units are displayed:
Page 154 of 224
Security Settings
About the Security System
If Model X does not detect a key nearby and a
locked door or trunk is opened, an alarm sounds and the headlights and turn signals
Page 165 of 224
Charging Instructions
Opening the Charge Port The charge port is located on the left side of
Model X, behind a door that is part of the rear
tail light assembly. Before charging, park
Model X to ensure that the charge cable easily reaches the charge port.
With Model X unlocked (or a recognized key is
within range) and in Park, press and release
the button on the Tesla charge cable to open the charge port door.
You can also open the charge port door using
any of these methods:
Page 166 of 224

If the charge port light turns red while
charging, a fault is detected. Check the instrument panel or touchscreen for a
message describing the fault. A fault can
occur due to something as common as a power outage. If a power outage occurs,
charging resumes automatically when power
is restored.
Note: When charging, particularly at high
currents, the refrigerant compressor and fan
operate as needed to keep the Battery cool.
Therefore, it is normal to hear sounds during charging.
Note: Air conditioning performance is
generally not affected by charging. However,
under certain circumstances (for example, you
are charging at high currents during a
particularly warm day), the air coming from
the vents may not be as cool as expected and
a message displays on the instrument panel.
This is normal behavior and ensures that the Battery stays within an optimum temperature
range while charging to support longevity and
optimum performance.Warning: Never spray liquid at a high
velocity (for example, if using a pressure
washer) towards the charge port while
charging. Failure to follow these
instructions can result in serious injury or
damage to the vehicle, charging
equipment, or property.
Stopping Charging
Stop charging at any time by disconnecting
the charge cable or touching Stop Charging
on the touchscreen.
Note: To prevent unauthorized unplugging of
the charge cable, the charge cable latch remains locked and Model X must be unlockedor able to recognize your key before you can
disconnect the charge cable.
To disconnect the charge cable:
1. Press and hold the button on the
connector handle to release the latch.
Alternatively, unlock the vehicle by
opening a door, using a key fob, or
touching Stop Charging on the
touchscreen. These methods unlock the
charge port as well.
2. Pull the connector from the charge port.
3. Push the charge port door closed.
Note: If Model X is equipped with a motorized
charge port door, it automatically closes shortly after you remove the charge cable.
Caution: Tesla strongly recommends
leaving Model X plugged in when not in use. This maintains the Battery at the
optimum level of charge.
Manually Releasing Charge Cable
If the usual methods for releasing a charge
cable from the charge port (using the charge
handle release button, touchscreen, or mobile
app) do not work, carefully follow these steps:
1. Ensure that Model X is not actively
charging by displaying the charging
screen on the touchscreen. If necessary,
touch Stop Charging .
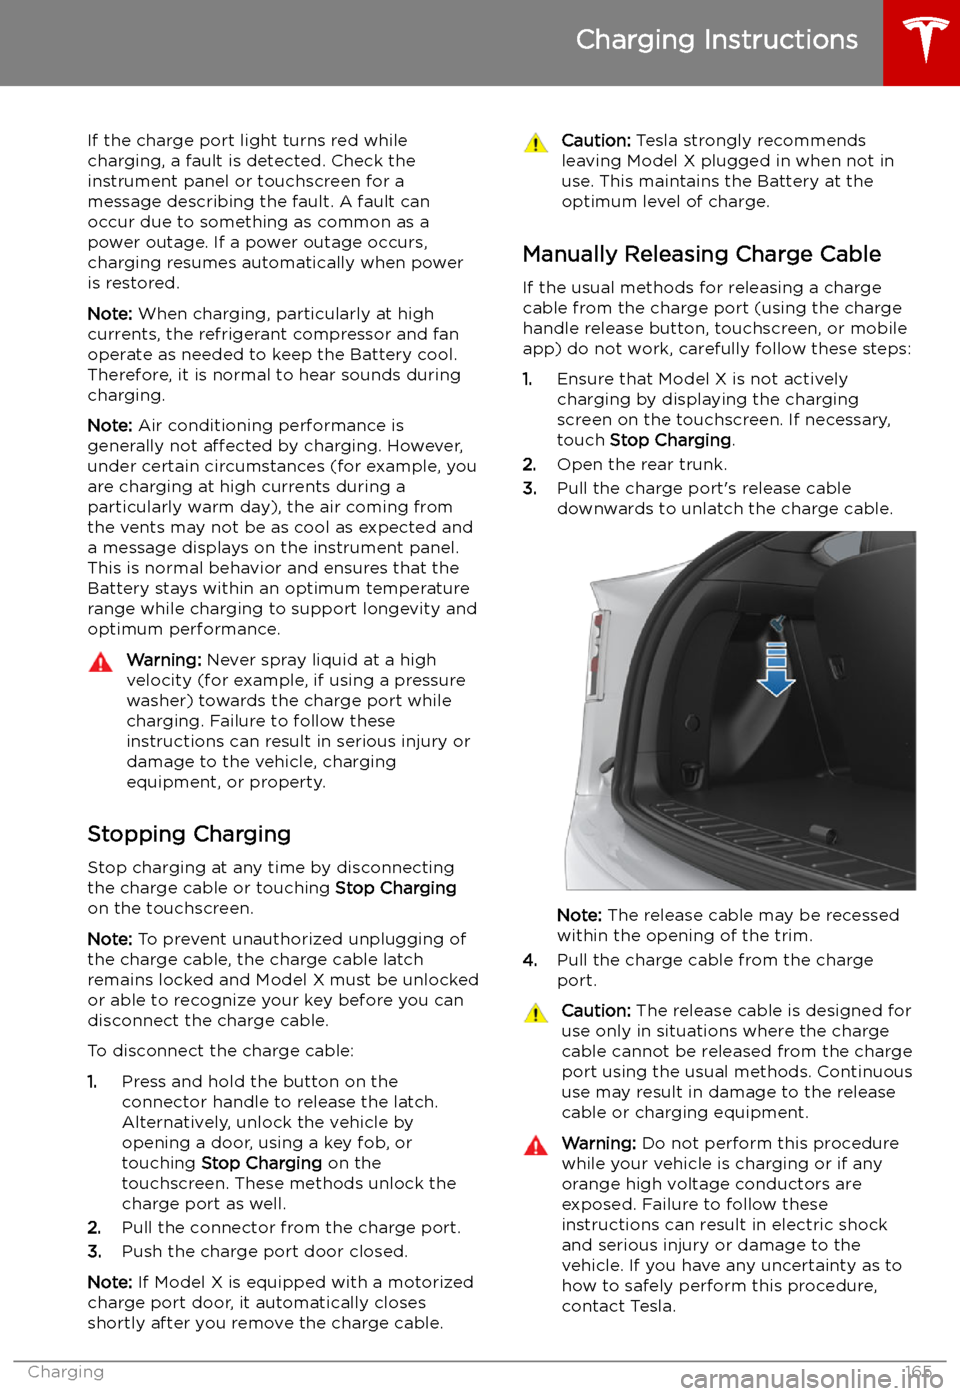
2. Open the rear trunk.
3. Pull the charge port
Page 167 of 224
Warning: Do not attempt to remove the
charge cable at the same exact time as
you begin to pull the release cable.
Always pull the release cable down and
hold it before you begin to remove the
charge cable from the charge port.
Failure to follow these instructions can
result in electric shock and serious injury.
Charge Port Light
Page 169 of 224

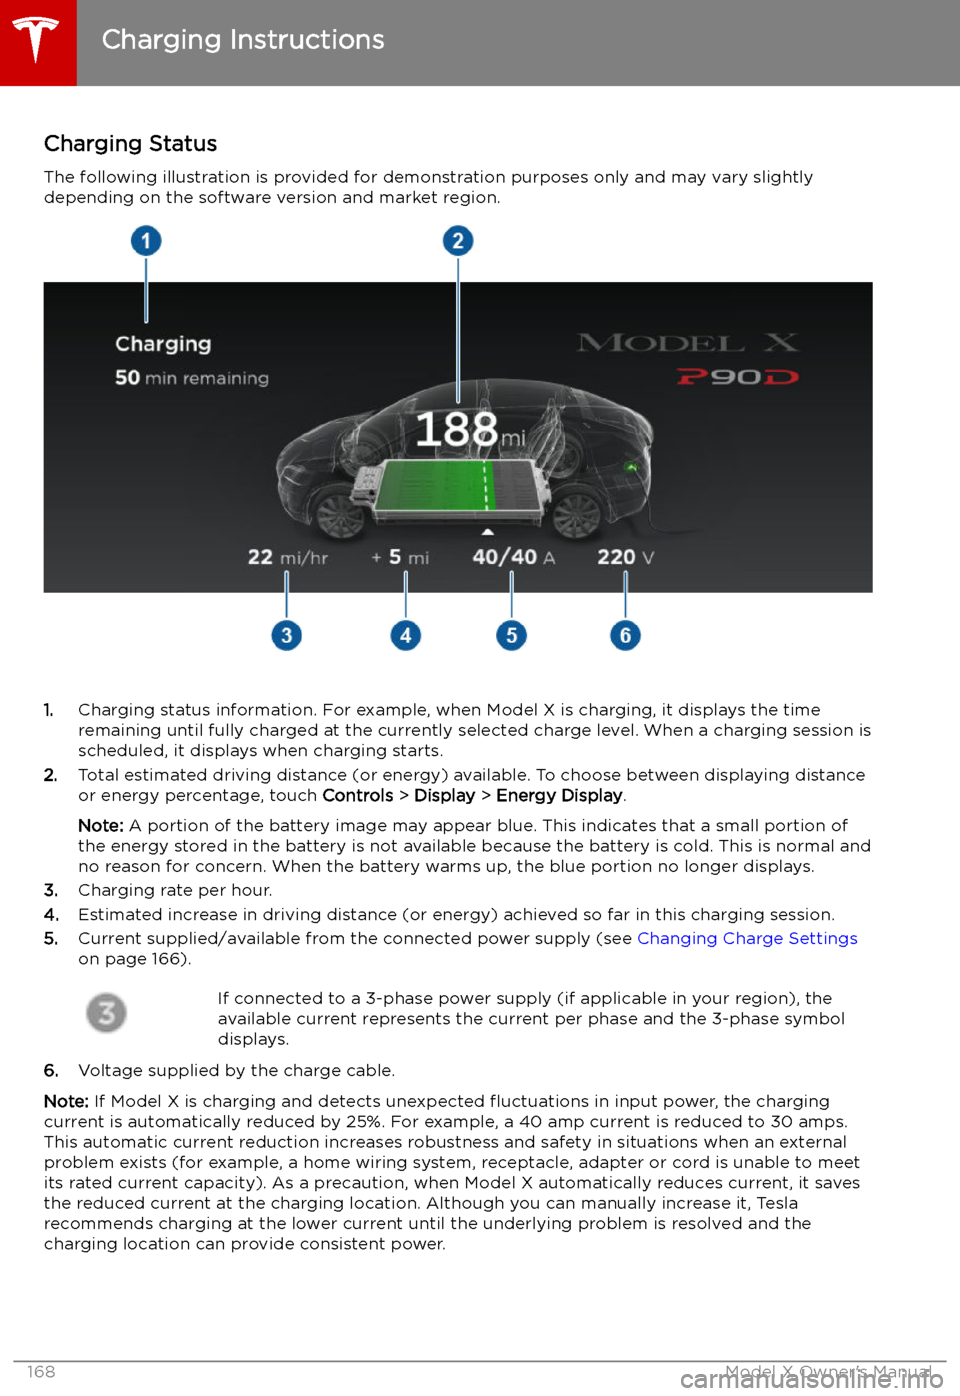
Charging Status
The following illustration is provided for demonstration purposes only and may vary slightly
depending on the software version and market region.
1. Charging status information. For example, when Model X is charging, it displays the time
remaining until fully charged at the currently selected charge level. When a charging session is
scheduled, it displays when charging starts.
2. Total estimated driving distance (or energy) available. To choose between displaying distance
or energy percentage, touch Controls > Display > Energy Display .
Note: A portion of the battery image may appear blue. This indicates that a small portion of
the energy stored in the battery is not available because the battery is cold. This is normal and
no reason for concern. When the battery warms up, the blue portion no longer displays.
3. Charging rate per hour.
4. Estimated increase in driving distance (or energy) achieved so far in this charging session.
5. Current supplied/available from the connected power supply (see Changing Charge Settings
on page 166).
If connected to a 3-phase power supply (if applicable in your region), the
available current represents the current per phase and the 3-phase symbol
displays.
6. Voltage supplied by the charge cable.
Note: If Model X is charging and detects unexpected