Page 56 of 207
Lights
Controlling Lights Touch Controls > Lights on the touchscreen to
control the lights.
In addition to the lights that you can control
from the touchscreen, Model S has
convenience lights that turn on and off
automatically based on what you are doing. For example, you will notice interior lights,marker lights, tail lights, door handle lights,
and puddle lights that turn on when you unlock Model S, when you open a door, and
when you shift into Park. They turn off
automatically after a minute or two or when
you shift into a driving gear or lock Model S.
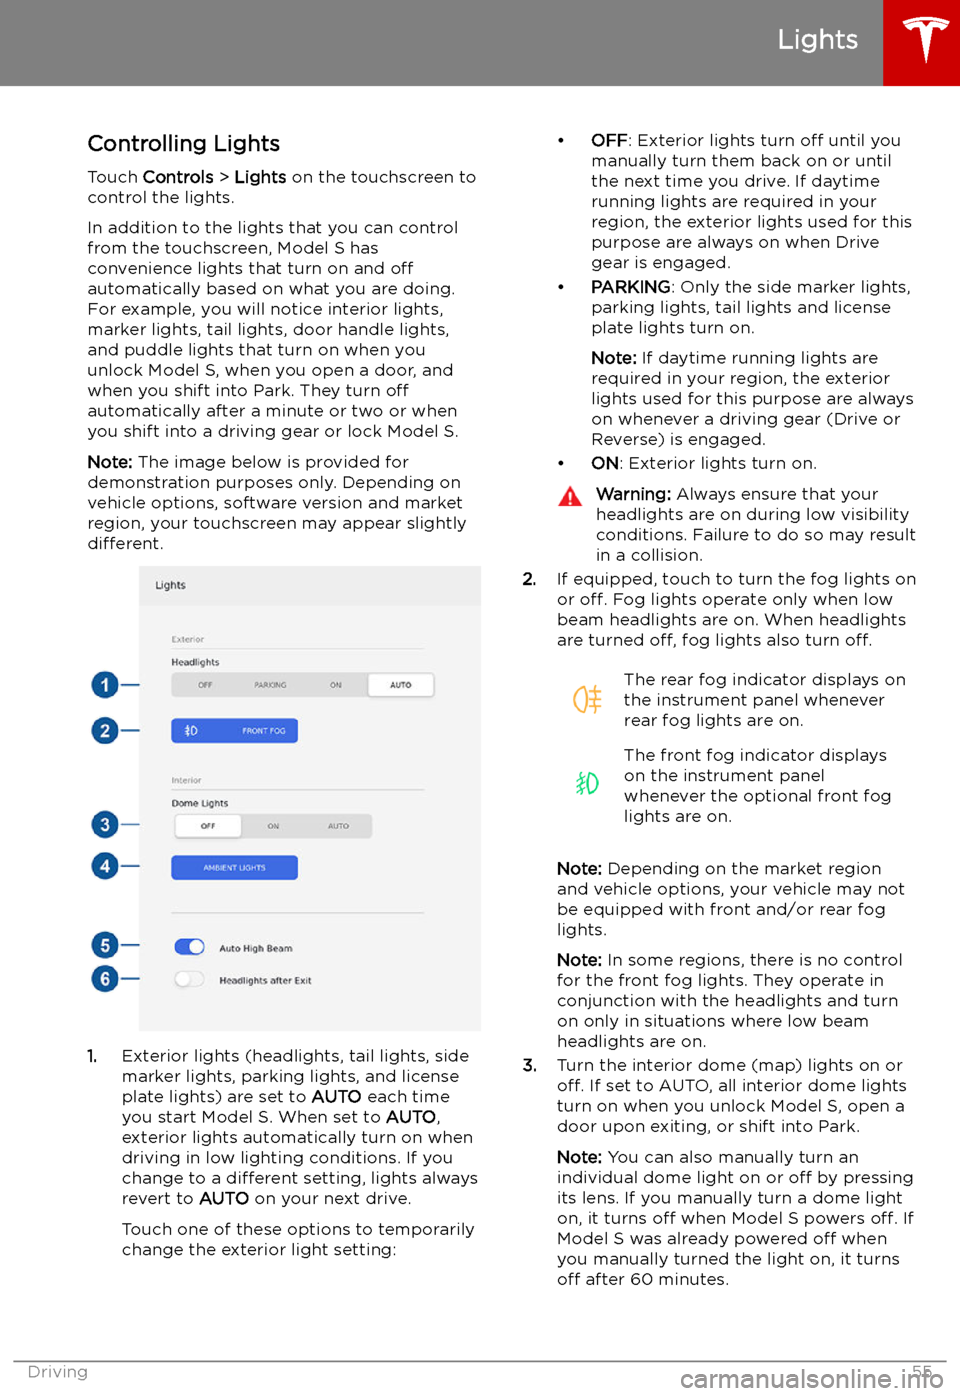
Note: The image below is provided for
demonstration purposes only. Depending on vehicle options, software version and market
region, your touchscreen may appear slightly
different.
1. Exterior lights (headlights, tail lights, side
marker lights, parking lights, and license
plate lights) are set to AUTO each time
you start Model S. When set to AUTO,
exterior lights automatically turn on when
driving in low lighting conditions. If you
change to a different setting, lights always
revert to AUTO on your next drive.
Touch one of these options to temporarily
change the exterior light setting:
Page 64 of 207
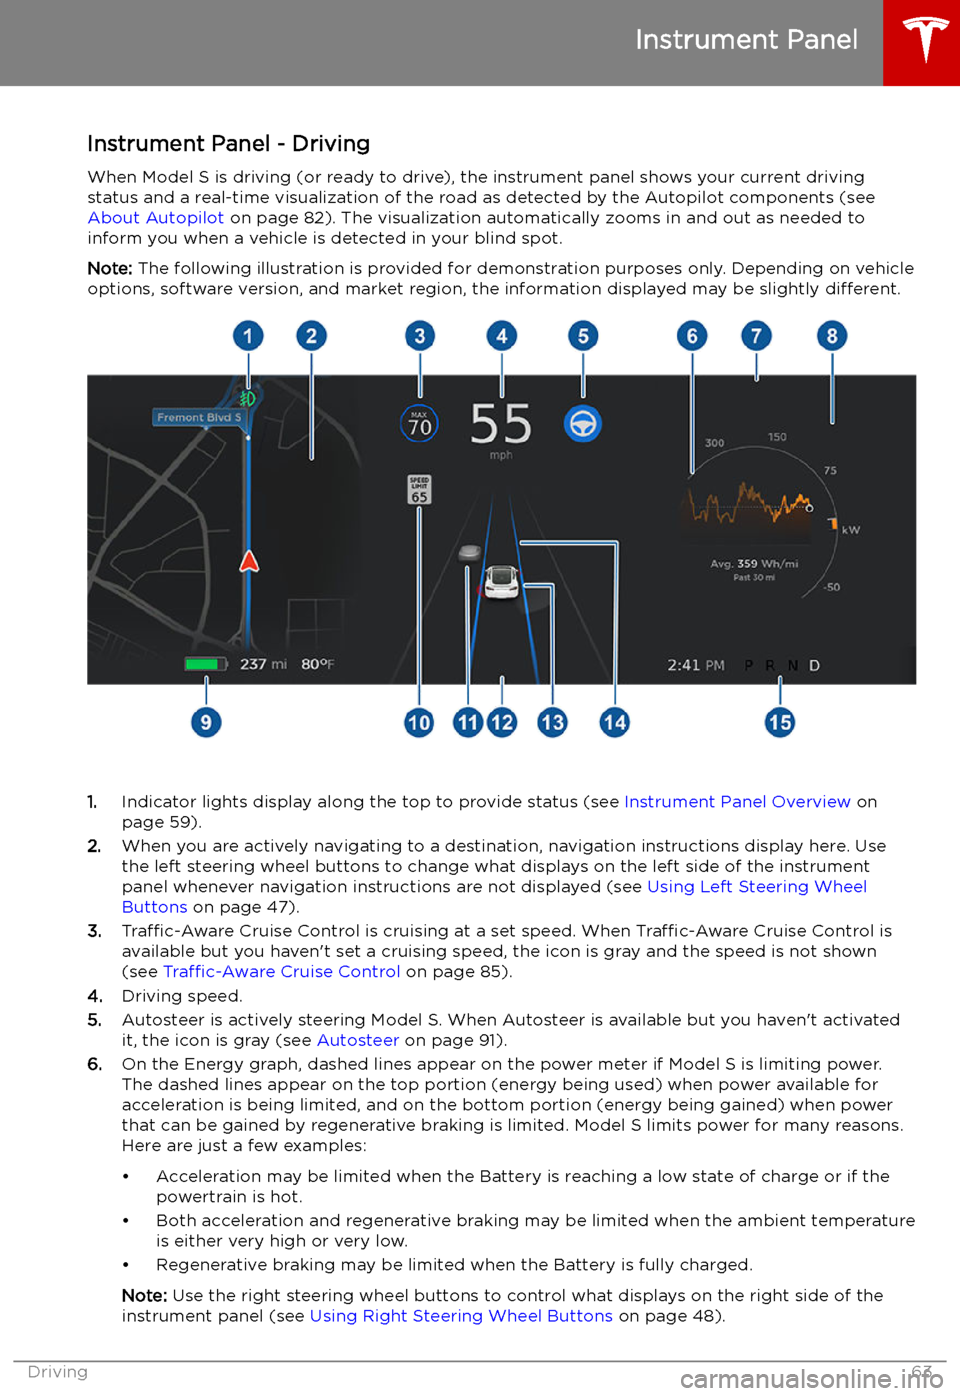
Instrument Panel - DrivingWhen Model S is driving (or ready to drive), the instrument panel shows your current drivingstatus and a real-time visualization of the road as detected by the Autopilot components (see
About Autopilot on page 82). The visualization automatically zooms in and out as needed to
inform you when a vehicle is detected in your blind spot.
Note: The following illustration is provided for demonstration purposes only. Depending on vehicle
options, software version, and market region, the information displayed may be slightly different.
1.Indicator lights display along the top to provide status (see Instrument Panel Overview on
page 59).
2. When you are actively navigating to a destination, navigation instructions display here. Use
the left steering wheel buttons to change what displays on the left side of the instrument
panel whenever navigation instructions are not displayed (see Using Left Steering Wheel
Buttons on page 47).
3. Traffic-Aware Cruise Control is cruising at a set speed. When Traffic-Aware Cruise Control is
available but you haven
Page 69 of 207
Note: If regenerative braking is aggressively
slowing Model S (such as when your foot is
completely off the accelerator pedal at
highway speeds), the brake lights turn on to
alert others that you are slowing down.Warning: In snowy or icy conditions
Model S may experience traction loss
during regenerative braking, particularly
when in the Standard setting and/or not
using winter tires. Tesla recommends
using the Low setting (see To Set the
Regenerative Braking Level on page 68)
in snowy or icy conditions to help
maintain vehicle stability.
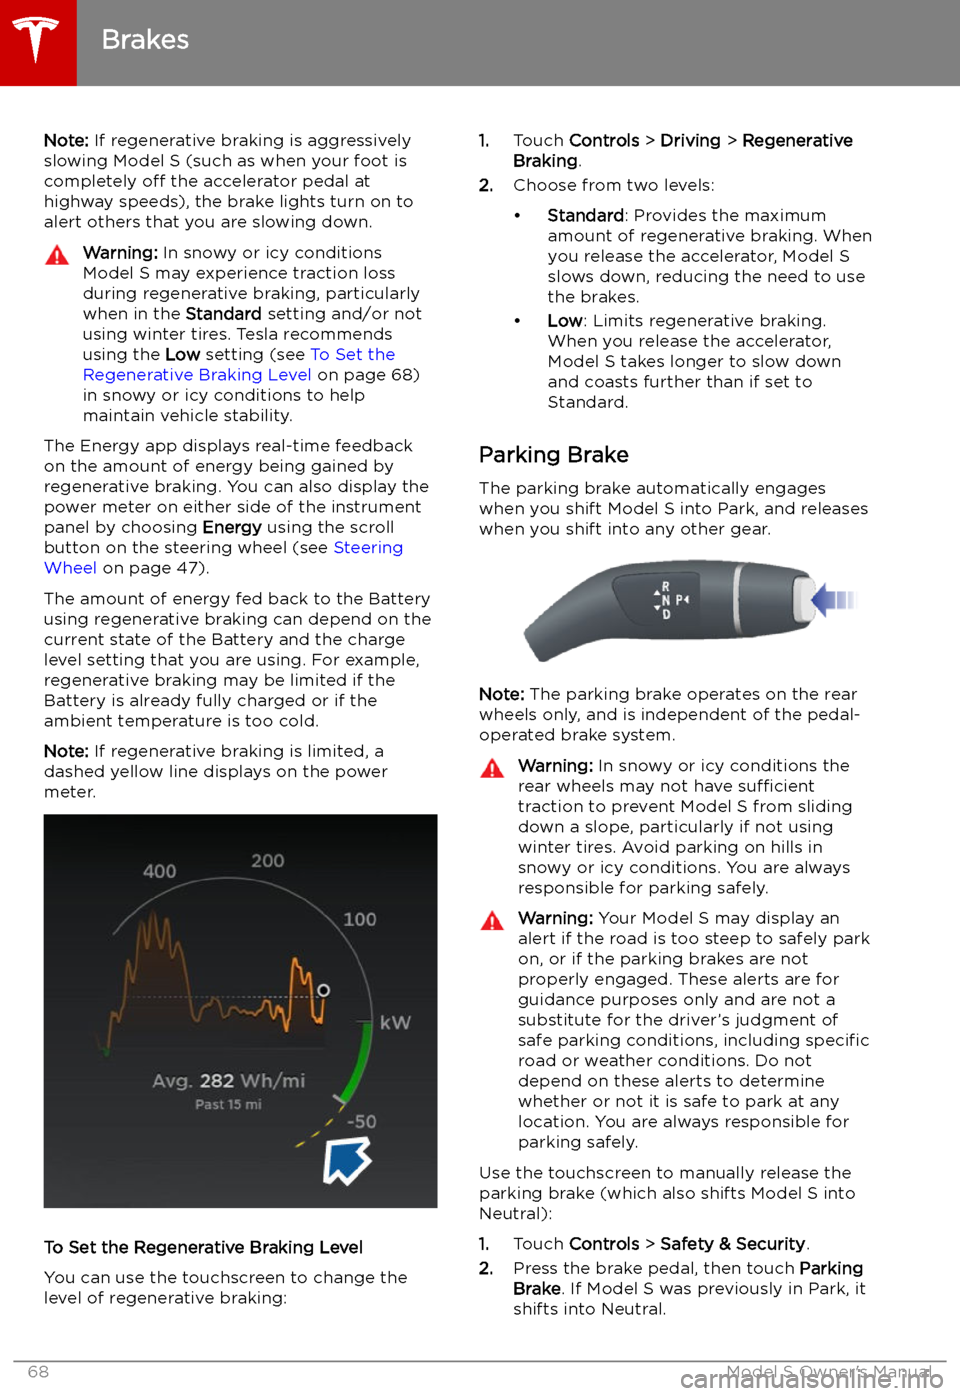
The Energy app displays real-time feedback
on the amount of energy being gained by
regenerative braking. You can also display the
power meter on either side of the instrument
panel by choosing Energy using the scroll
button on the steering wheel (see Steering
Wheel on page 47).
The amount of energy fed back to the Battery using regenerative braking can depend on thecurrent state of the Battery and the charge
level setting that you are using. For example,
regenerative braking may be limited if the Battery is already fully charged or if the
ambient temperature is too cold.
Note: If regenerative braking is limited, a
dashed yellow line displays on the power
meter.
To Set the Regenerative Braking Level
You can use the touchscreen to change the
level of regenerative braking:
1. Touch Controls > Driving > Regenerative
Braking .
2. Choose from two levels:
Page 97 of 207
always include the use of the HOV lane,
whenever it exists.Warning: Even when Navigate on
Autopilot deactivates at off-ramps,
Autosteer remains active. Always be
prepared to take appropriate actions such
as stopping at red lights and stop signs, and yielding to other road users.Warning: Navigate on Autopilot may not
always attempt to exit at an off-ramp,
even when the exit is determined by the
navigation route. Always remain alert and
be prepared to manually steer onto the
off-ramp, or make a required lane change.
You can cancel Navigate on Autopilot at any
time by touching the Navigate on Autopilot
button on the map
Page 128 of 207
If Navigate on Autopilot is enabled, you canturn it on for the navigation route by touchingNavigate on Autopilot in the turn-by-turn
direction list. Navigate on Autopilot is an
extension of Autosteer that automatically
changes lanes and steers Model S onto the
appropriate exit(s) when navigating on
controlled access roads (such as freeways).
For details, see Navigate on Autopilot on page
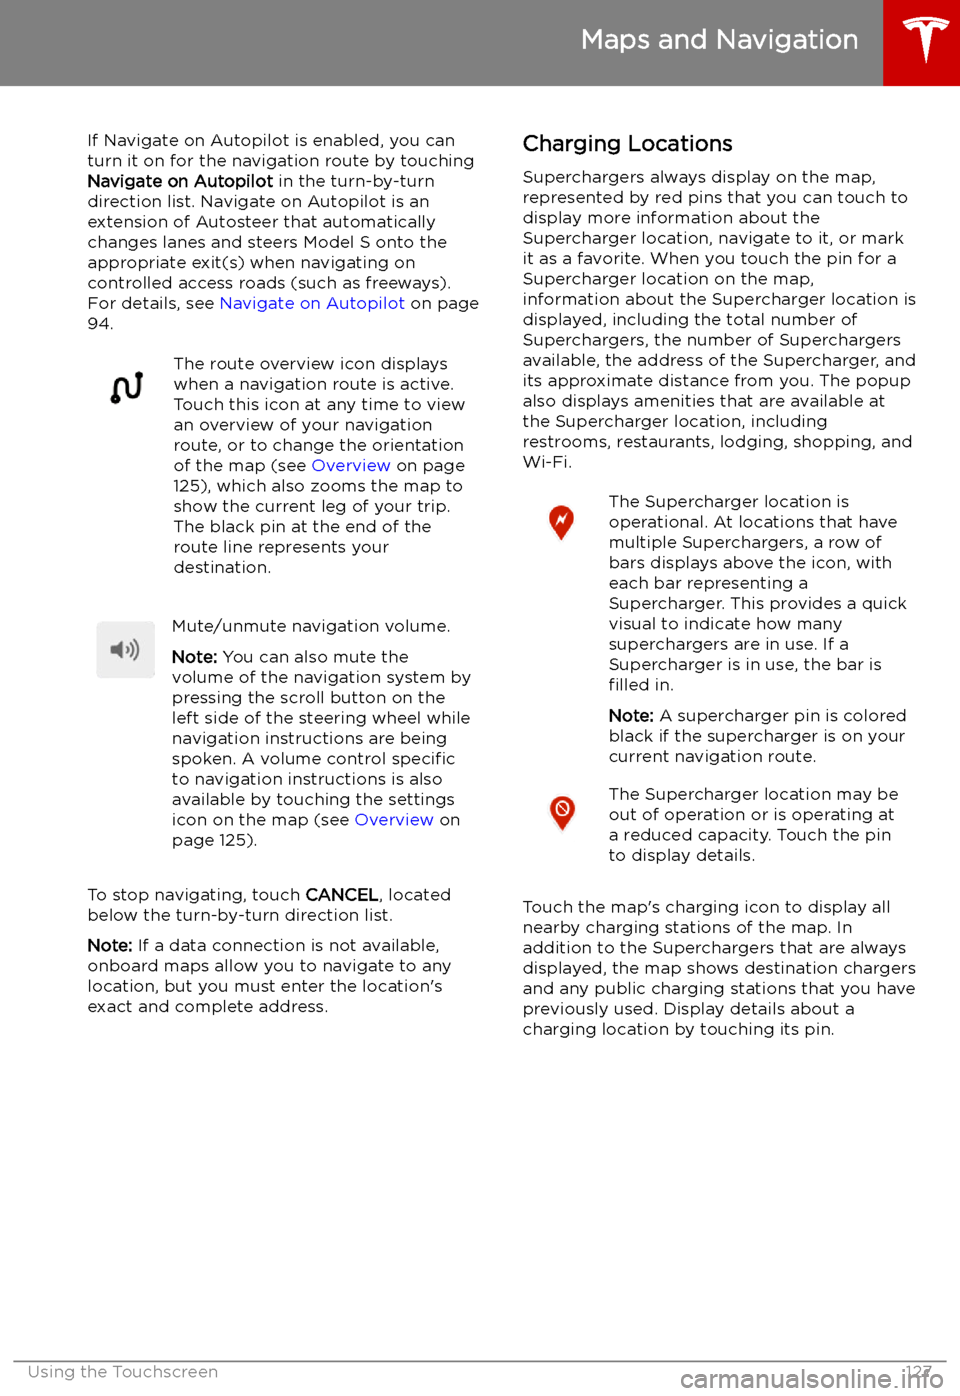
94.The route overview icon displays
when a navigation route is active.
Touch this icon at any time to view
an overview of your navigation
route, or to change the orientation
of the map (see Overview on page
125), which also zooms the map to
show the current leg of your trip.
The black pin at the end of the
route line represents your
destination.Mute/unmute navigation volume.
Note: You can also mute the
volume of the navigation system by
pressing the scroll button on the
left side of the steering wheel while
navigation instructions are being
spoken. A volume control specific
to navigation instructions is also
available by touching the settings
icon on the map (see Overview on
page 125).
To stop navigating, touch CANCEL, located
below the turn-by-turn direction list.
Note: If a data connection is not available,
onboard maps allow you to navigate to any location, but you must enter the location
Page 153 of 207
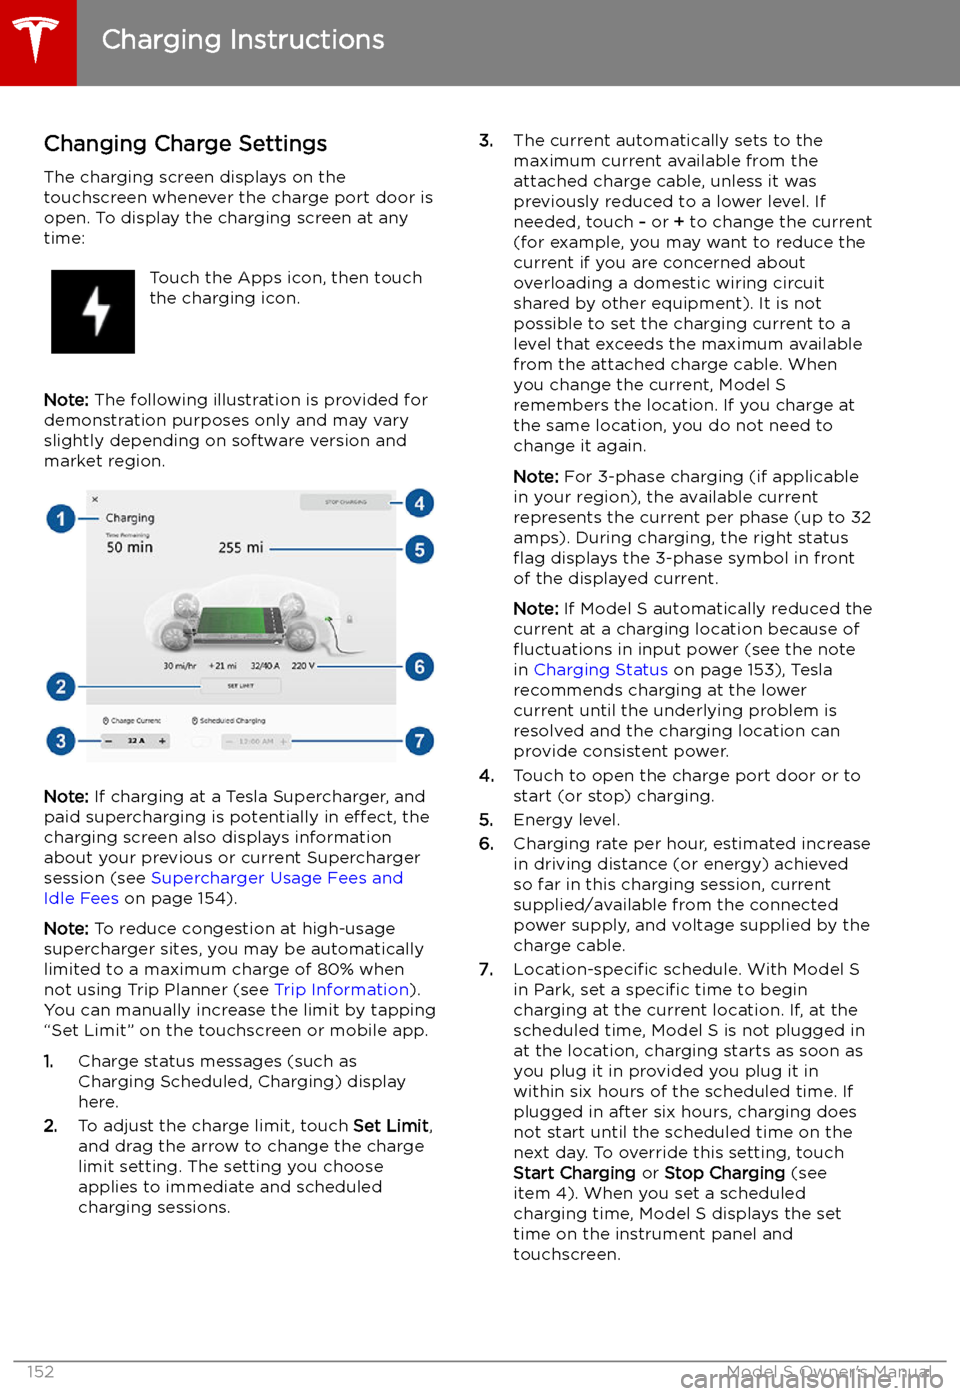
Changing Charge SettingsThe charging screen displays on thetouchscreen whenever the charge port door is
open. To display the charging screen at any
time:Touch the Apps icon, then touch
the charging icon.
Note: The following illustration is provided for
demonstration purposes only and may vary
slightly depending on software version and
market region.
Note: If charging at a Tesla Supercharger, and
paid supercharging is potentially in effect, the
charging screen also displays information
about your previous or current Supercharger
session (see Supercharger Usage Fees and
Idle Fees on page 154).
Note: To reduce congestion at high-usage
supercharger sites, you may be automatically
limited to a maximum charge of 80% when not using Trip Planner (see Trip Information).
You can manually increase the limit by tapping
“Set Limit” on the touchscreen or mobile app.
1. Charge status messages (such as
Charging Scheduled, Charging) display
here.
2. To adjust the charge limit, touch Set Limit,
and drag the arrow to change the charge
limit setting. The setting you choose
applies to immediate and scheduled
charging sessions.
3. The current automatically sets to the
maximum current available from the
attached charge cable, unless it was
previously reduced to a lower level. If
needed, touch - or + to change the current
(for example, you may want to reduce the
current if you are concerned about
overloading a domestic wiring circuit
shared by other equipment). It is not
possible to set the charging current to a
level that exceeds the maximum available
from the attached charge cable. When
you change the current, Model S
remembers the location. If you charge at
the same location, you do not need to change it again.
Note: For 3-phase charging (if applicable
in your region), the available current
represents the current per phase (up to 32 amps). During charging, the right status