2019 Peugeot Partner tail lamp
[x] Cancel search: tail lampPage 17 of 312

15
90°CMaximum coolant
temperature Fixed (warning
lamp or LED), and
needle in the red
zone (depending on
ve r s i o n). The temperature of the cooling
system is too high.
Carry out (1), then wait until the engine has cooled
down before topping up the coolant, if necessary. If
the problem persists, carry out (2).
Battery charge Fixed. The battery charging circuit has
a fault (dirty or loose terminals,
slack or cut alternator belt, etc.). Clean and retighten the terminals. If the warning lamp
does not go off when the engine is started, carry out
(2).
Power steering Fixed. The power steering has a fault. Drive carefully at moderate speed, then carry out (3).
Seat belt not
fastened/
unfastened Fixed or flashing
accompanied by an
audible signal. A seat belt has not been
fastened or has been unfastened
(depending on version).
Door open Fixed, associated with
a message identifying
the access.
An audible signal
supplements the alert
if the speed is higher
than 6
mph (10 km/h).A door, the boot, the tailgate or
the tailgate screen is still open
(depending on version).
Close the access.
If your vehicle is equipped with a right-hand hinged
door, its opening will not
be indicated by this warning
lamp.
Warning/indicator lamp
StateCause Actions/Observations
Automatic
electronic parking
brake Fixed.
The electric parking brake is
applied.
1
Instruments
Page 45 of 312

43
If a door is not properly closed (except
the right-hand door with side-hinged
rear doors):
-
v
ehicle stationary and engine
running, this warning lamp comes
on, accompanied by an alert
message for a few seconds,
-
v
ehicle moving (speed above
6
mph (10 km/h)), this warning
lamp comes on, accompanied
by an audible signal and an alert
message for a few seconds.
Deadlocking
With the key
F To deadlock the vehicle, insert the key in the lock then turn it towards the rear.
F
Then within five seconds , turn the key
towards the rear again.
Deadlocking renders the exterior and
interior door controls inoperative.
It also deactivates the manual central
control button.
Therefore, never leave anyone inside the
vehicle when it is deadlocked.
With the remote control
F To deadlock the vehicle, press this button.
F
Then within five seconds after
locking , press this button again.
Depending on the version you have, the
electric door mirrors fold at the same time.
With the Keyless Entry and
Starting "on your person"
With side-hinged doors/tailgate
F To lock the vehicle, with the remote control in the recognition zone A , press with a
finger or thumb on the markings of one of
the front or rear door handles.
F
T
o deadlock the vehicle, press the marking
again within five seconds.
If your vehicle is so equipped,
pressing and holding the locking
controls allows the windows to
be closed. If you release the
button, the window stops.
Driving with the doors locked could make
it more difficult for the emergency ser vices
to enter the vehicle in an emergency.
As a safety measure (with children on
board), never leave the vehicle without
taking your remote control with you, even
for a short period.
F
T
o lock the vehicle, with the remote control
in recognition zone A , press the left-hand
door/tailgate locking control.
2
Access
Page 47 of 312

45
If your vehicle has an alarm, it will not be
deactivated/activated on unlocking/locking
the vehicle.
Opening a door will trigger the alarm,
which can be stopped by switching the
ignition on.
To deadlock the vehicle, turn the key again
within five seconds of locking.
Locking of one part of the vehicle
(front passenger door/sliding
side door/side-hinged doors)
Changing the battery
If the battery is flat, you will be
informed by lighting of this warning
lamp in the instrument panel, an
audible signal and a message in the
screen.
F
W
ith a sliding side door
or side-hinged
doors , if fitted to your vehicle, check that
the electric child lock is not activated.
F
O
pen the door.
Front passenger door Sliding side door F
R
emove the cap located on the edge of the
d o o r.
F
I
nsert the integral key into the latch (without
forcing) and then turn the assembly.
F
R
emove the key and refit the cap.
F
C
lose the door(s) and check from the
outside that the vehicle is locked correctly.
Side-hinged doors
Unlocking of one part of the
vehicle (front passenger door/
sliding side door/side-hinged
doors)
F Use the interior opening handle.
or
F
With side-hinged doors , insert the integral
key in the (left-hand) door lock, then turn it.
For more information on the Child lock
on a sliding side door or side-hinged
doors , refer to the corresponding section.
Unlocking the tailgate
If the battery is flat and your vehicle is
equipped with a tailgate and a Multi-Flex
bench seat, you cannot access the inside
of the loading area.
You have to replace the battery in order to
be able to access it again.
For more information on the 12
V batter y,
refer to the corresponding section.
F
F
rom inside the vehicle, insert a small
screwdriver into hole A of the lock to unlock
the tailgate.
F
M
ove the latch to the left.
2
Access
Page 86 of 312

84
Courtesy lamp
Automatic switching
on/of fIndividual reading lampIf fitted to the vehicle, these are
switched on and off by means of a
manual switch.
With the ignition on, operate the
corresponding switch.
The front courtesy lamp comes on when the
key is removed from the ignition switch.
All of the courtesy lamps come on when
the vehicle is unlocked, when one of the
corresponding doors is opened and when
locating the vehicle using the remote control.
They go off gradually after the ignition is
switched on and when the vehicle is locked.
Take care not to put anything in contact
with the courtesy lamp.
Ty p e 1
Permanently on, ignition on. Lights up when one of the front or
rear doors is opened.
Permanently off.
Ty p e 2
Front: comes on when one of
the front or rear doors is opened
(sliding side door and depending
on equipment, left-hand side-
hinged door or tailgate).
Permanently on, ignition on.
Permanently off.
Ease of use and comfort
Page 116 of 312

114
Manual child lock
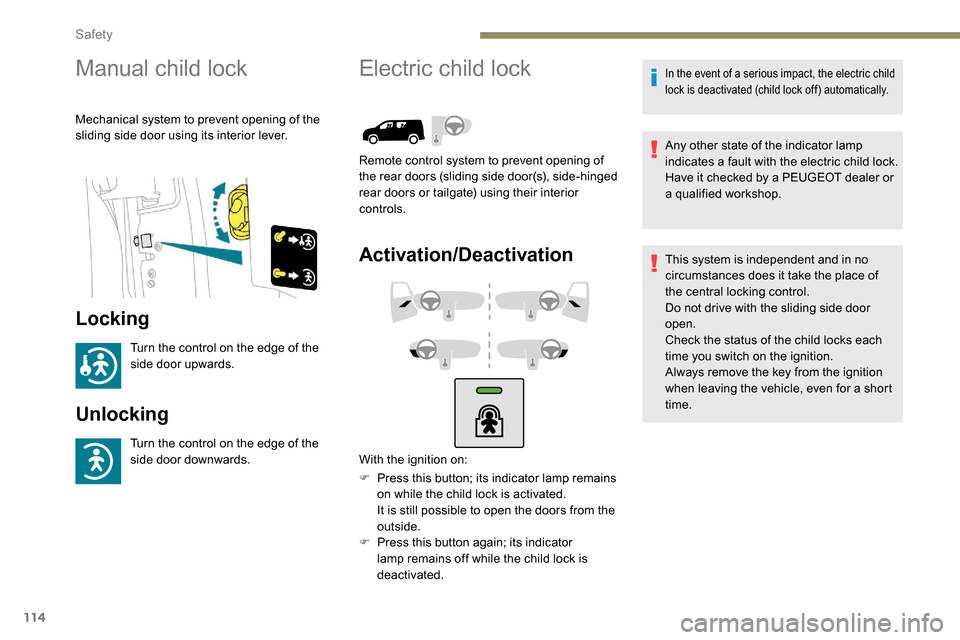
Mechanical system to prevent opening of the
sliding side door using its interior lever.
Locking
Turn the control on the edge of the
side door upwards.
Unlocking
Turn the control on the edge of the
side door downwards.
Electric child lock
Remote control system to prevent opening of
the rear doors (sliding side door(s), side-hinged
rear doors or tailgate) using their interior
controls.
Activation/Deactivation
F Press this button; its indicator lamp remains on while the child lock is activated.
It is still possible to open the doors from the
outside.
F
P
ress this button again; its indicator
lamp remains off while the child lock is
deactivated.
In the event of a serious impact, the electric child
lock is deactivated (child lock off) automatically.
Any other state of the indicator lamp
indicates a fault with the electric child lock.
Have it checked by a PEUGEOT dealer or
a qualified workshop.
This system is independent and in no
circumstances does it take the place of
the central locking control.
Do not drive with the sliding side door
open.
Check the status of the child locks each
time you switch on the ignition.
Always remove the key from the ignition
when leaving the vehicle, even for a short
time.
With the ignition on:
Safety
Page 190 of 312

188
Details of the tool kit
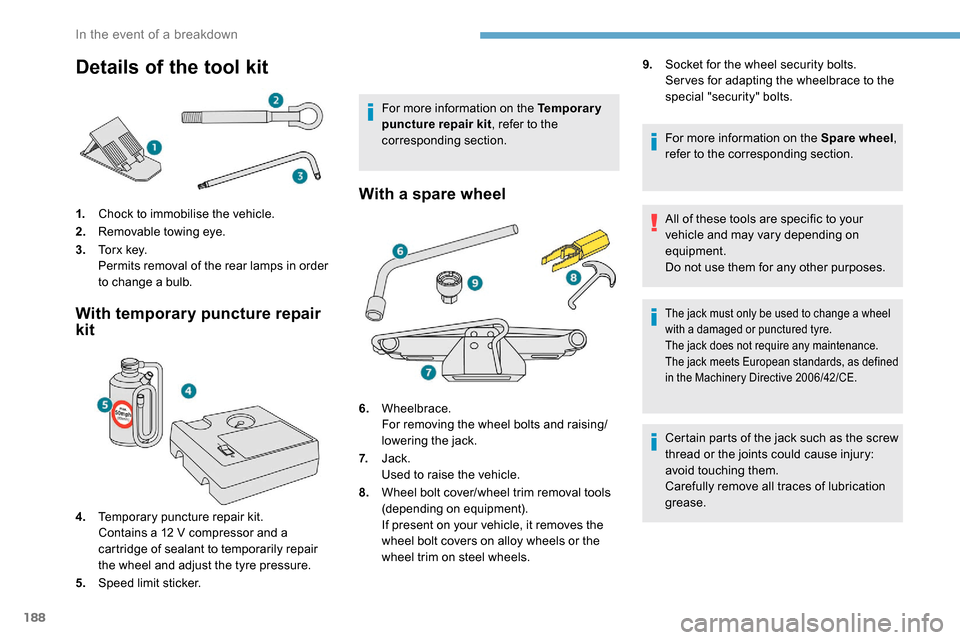
1.Chock to immobilise the vehicle.
2. Removable towing eye.
3. To r x k e y.
Permits removal of the rear lamps in order
to change a bulb.
With temporary puncture repair
kit
4.Temporary puncture repair kit.
Contains a 12
V compressor and a
cartridge of sealant to temporarily repair
the wheel and adjust the tyre pressure.
5. Speed limit sticker. For more information on the Temporary
puncture repair kit
, refer to the
corresponding section.
With a spare wheel
6. Wheelbrace.
For removing the wheel bolts and raising/
lowering the jack.
7. Jack.
Used to raise the vehicle.
8. Wheel bolt cover/wheel trim removal tools
(depending on equipment).
If present on your vehicle, it removes the
wheel bolt covers on alloy wheels or the
wheel trim on steel wheels. 9.
Socket for the wheel security bolts.
Ser ves for adapting the wheelbrace to the
special "security" bolts.
For more information on the Spare wheel ,
refer to the corresponding section.
All of these tools are specific to your
vehicle and may vary depending on
equipment.
Do not use them for any other purposes.
The jack must only be used to change a wheel
with a damaged or punctured tyre.
The jack does not require any maintenance.
The jack meets European standards, as defined
in the Machinery Directive 2006/42/CE.
Certain parts of the jack such as the screw
thread or the joints could cause injury:
avoid touching them.
Carefully remove all traces of lubrication
grease.
In the event of a breakdown
Page 194 of 312

192
Access to the spare wheel
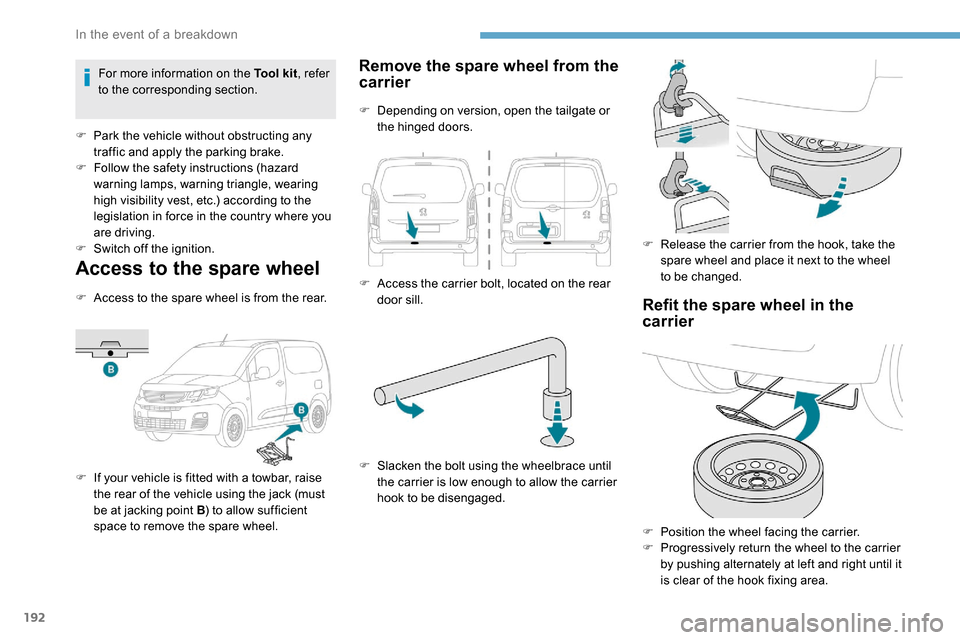
F Access to the spare wheel is from the rear.
F
I
f your vehicle is fitted with a towbar, raise
the rear of the vehicle using the jack (must
be at jacking point B ) to allow sufficient
space to remove the spare wheel.
Remove the spare wheel from the
carrier
F Depending on version, open the tailgate or the hinged doors.
F
A
ccess the carrier bolt, located on the rear
door sill.
F
S
lacken the bolt using the wheelbrace until
the carrier is low enough to allow the carrier
hook to be disengaged. F
R
elease the carrier from the hook, take the
spare wheel and place it next to the wheel
to be changed.
Refit the spare wheel in the
carrier
F Position the wheel facing the carrier.
F P rogressively return the wheel to the carrier
by pushing alternately at left and right until it
is clear of the hook fixing area.
For more information on the Tool kit
, refer
to the corresponding section.
F
P
ark the vehicle without obstructing any
traffic and apply the parking brake.
F
F
ollow the safety instructions (hazard
warning lamps, warning triangle, wearing
high visibility vest, etc.) according to the
legislation in force in the country where you
are driving.
F
S
witch off the ignition.
In the event of a breakdown
Page 201 of 312

199
Front foglamps
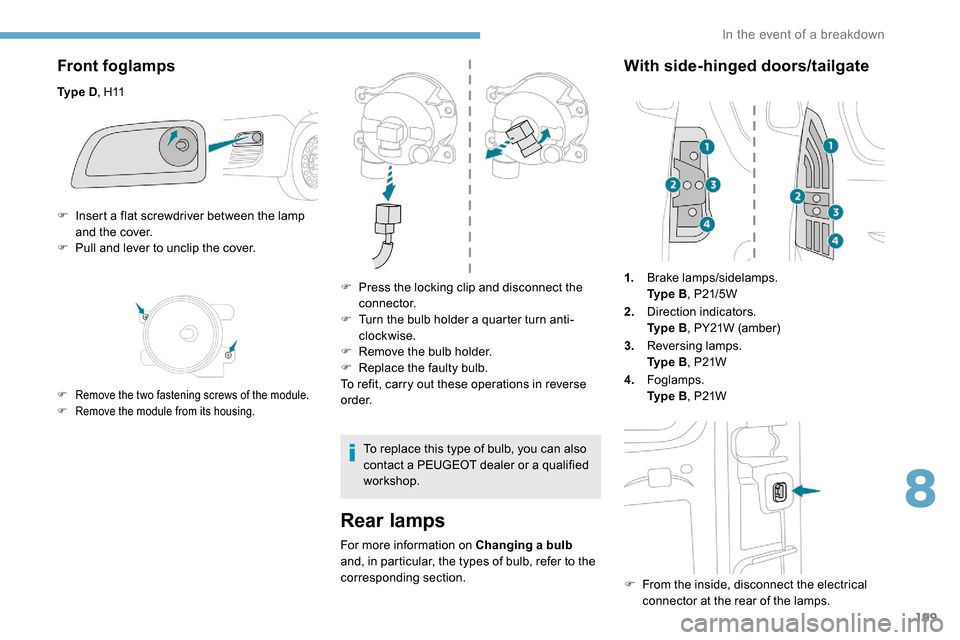
Ty p e D, H11
Rear lamps
For more information on Changing a bulb
and, in particular, the types of bulb, refer to the
corresponding section.
With side-hinged doors/tailgate
1. Brake lamps/sidelamps.
Ty p e
B, P21/5W
2. Direction indicators.
Ty p e
B, PY21W (amber)
3. Reversing lamps.
Ty p e
B, P21W
4. Foglamps.
Ty p e
B, P21W
F
F
rom the inside, disconnect the electrical
connector at the rear of the lamps.
F
I
nsert a flat screwdriver between the lamp
and the cover.
F
P
ull and lever to unclip the cover.
F Remove the two fastening screws of the module.
F
R emove the module from its housing.
F Press the locking clip and disconnect the connector.
F
T
urn the bulb holder a quarter turn anti-
clockwise.
F
R
emove the bulb holder.
F
R
eplace the faulty bulb.
To refit, carry out these operations in reverse
o r d e r.
To replace this type of bulb, you can also
contact a PEUGEOT dealer or a qualified
workshop.
8
In the event of a breakdown