2019 Peugeot Partner instrument panel
[x] Cancel search: instrument panelPage 178 of 312
176
ON
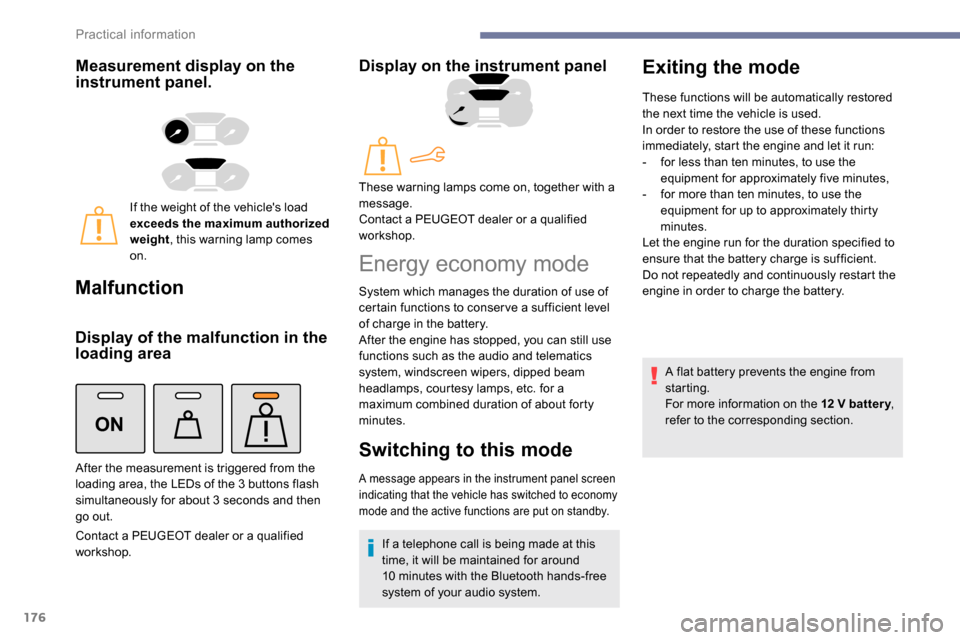
Measurement display on the
instrument panel.
If the weight of the vehicle's load
exceeds the maximum authorized
weight, this warning lamp comes
on.
Malfunction
Display of the malfunction in the
loading area
Contact a PEUGEOT dealer or a qualified
workshop.
Display on the instrument panel
After the measurement is triggered from the
loading area, the LEDs of the 3 buttons flash
simultaneously for about 3
seconds and then
go out. These warning lamps come on, together with a
message.
Contact a PEUGEOT dealer or a qualified
workshop.
Energy economy mode
System which manages the duration of use of
certain functions to conser ve a sufficient level
of charge in the battery.
After the engine has stopped, you can still use
functions such as the audio and telematics
system,
windscreen wipers, dipped beam
headlamps,
courtesy lamps, etc. for a
maximum combined duration of about forty
minutes.
Switching to this mode
A message appears in the instrument panel screen
indicating that the vehicle has switched to economy
mode and the active functions are put on standby.
If a telephone call is being made at this
time, it will be maintained for around
10
minutes with the Bluetooth hands-free
system of your audio system.
Exiting the mode
These functions will be automatically restored
the next time the vehicle is used.
In order to restore the use of these functions
immediately, start the engine and let it run:
-
f
or less than ten minutes, to use the
equipment for approximately five minutes,
-
f
or more than ten minutes, to use the
equipment for up to approximately thirty
minutes.
Let the engine run for the duration specified to
ensure that the battery charge is sufficient.
Do not repeatedly and continuously restart the
engine in order to charge the battery.
A flat battery prevents the engine from
starting.
For more information on the 12
V batter y,
refer to the corresponding section.
Practical information
Page 181 of 312
179
The diesel circuit is under very high
pressure.
All work on this circuit must be carried out
only by a PEUGEOT dealer or a qualified
workshop.
Checking levels
Check all of these levels regularly, in line with
the manufacturer's service schedule. Top them
up if necessary, unless other wise indicated.
If a level drops significantly, have the
corresponding system checked by a PEUGEOT
dealer or a qualified workshop.The fluids must comply with the
manufacturer's recommendations and with
the vehicle's engine.
Take care when working under the bonnet,
as certain areas of the engine may be
extremely hot (risk of burns) and the
cooling fan could start at any time (even
with the ignition off).
Used products
Avoid prolonged contact of used oil or
fluids with the skin.
Most of these fluids are harmful to health
or indeed very corrosive.Do not discard used oil or fluids into
sewers or onto the ground.
Take used oil to a PEUGEOT dealer or
a qualified workshop and dispose of it in
the containers reser ved for this purpose.
Engine oil level
The check is carried out either when
the ignition is switched on using the oil
level indicator in the instrument panel
for vehicles equipped with an electric
gauge, or using the dipstick.
To ensure that the reading is correct, your
vehicle must be parked on a level sur face
with the engine stopped for more than
30
minutes.
It is normal to top up the oil level between
two ser vices (or oil changes). PEUGEOT
recommends that you check the level, and top
up if necessary, every 3,000
miles (5,000 km).
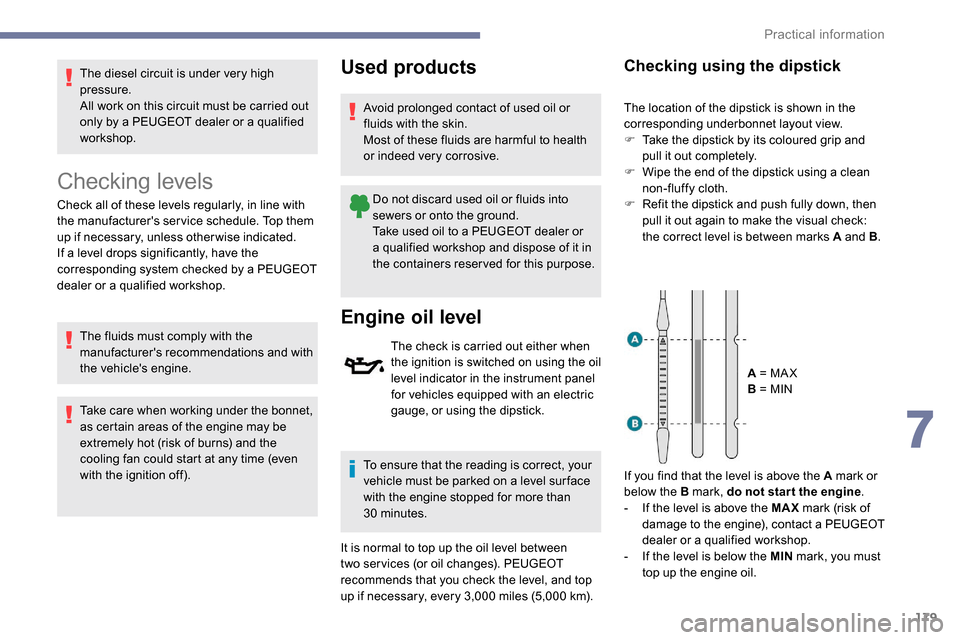
Checking using the dipstick
The location of the dipstick is shown in the
corresponding underbonnet layout view.
F
T
ake the dipstick by its coloured grip and
pull it out completely.
F
W
ipe the end of the dipstick using a clean
non-fluffy cloth.
F
R
efit the dipstick and push fully down, then
pull it out again to make the visual check:
the correct level is between marks A and B .
A = MA X
B = MIN
If you find that the level is above the A mark or
below the B mark, do not star t the engine .
-
I
f the level is above the MAX mark (risk of
damage to the engine), contact a PEUGEOT
dealer or a qualified workshop.
-
I
f the level is below the MIN mark, you must
top up the engine oil.
7
Practical information
Page 182 of 312

180
Oil grade
Before topping up the oil or changing the oil,
check that the oil is the correct grade for your
engine and conforms to the manufacturer's
recommendations.
Topping up the engine oil level
The location of the oil filler cap is shown in the
corresponding underbonnet layout view.
F
U
nscrew the oil filler cap to access the filler
opening.
F
A
dd oil in small quantities, avoiding any
spills on engine components (risk of fire).
F
W
ait a few minutes before checking the
level again using the dipstick.
F
A
dd more oil if necessary.
F
A
fter checking the level, carefully refit the oil
filler cap and the dipstick in its tube.
After topping up the oil, the check when
switching on the ignition with the oil level
indicator in the instrument panel is not
valid during the 30
minutes after topping
up.
Engine oil change
In order to maintain the reliability of the engine
and emissions control system, never use
additives in the engine oil.
Brake fluid level
The brake fluid level should be close
to the "MA X" mark. If it is not, check
the brake pad wear.
Changing the fluid
Refer to the manufacturer's service schedule
for details of the inter val for this operation.
Fluid specification
This fluid must conform to the manufacturer's
recommendations.
Coolant level
Check the coolant level regularly.
It is normal to top up this fluid
between two services.
The check and top-up must only be done with
the engine cold.
A low coolant level presents a risk of serious
damage to your engine.
The level of this fluid should be close to the
"MA X" mark but should never exceed it.
If the level is close to or below the "MIN" mark,
it is essential to top up.
When the engine is hot, the temperature of this
fluid is regulated by the cooling fan.
In addition, as the cooling system is pressurised,
wait at least one hour after switching off the
engine before carrying out any operation.
To avoid the risk of scalding when you need to
top up in an emergency, wrap a cloth around the
cap and unscrew the cap by two turns to allow
the pressure to drop.
Once the pressure has dropped, remove the cap
and top up to the required level.
The cooling fan may star t after
switching off the engine: take care
with articles and clothing that might be
caught by the fan blades.
Fluid specification
The fluid must conform to the manufacturer's
recommendations.
Screenwash fluid level
Top up to the required level when
necessary.
Tank capacity:
-
5
.3
litres for the "very cold climate"
versions.
-
2
.2
litres for other versions.
Practical information
Page 195 of 312
193
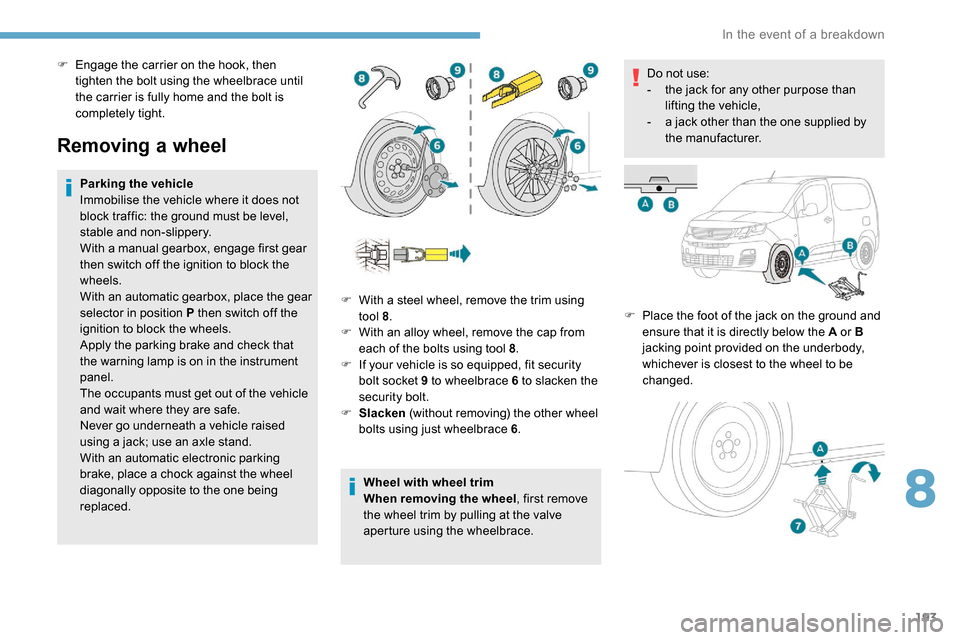
Removing a wheel
Parking the vehicle
Immobilise the vehicle where it does not
block traffic: the ground must be level,
stable and non-slippery.
With a manual gearbox, engage first gear
then switch off the ignition to block the
wheels.
With an automatic gearbox, place the gear
selector in position P then switch off the
ignition to block the wheels.
Apply the parking brake and check that
the warning lamp is on in the instrument
panel.
The occupants must get out of the vehicle
and wait where they are safe.
Never go underneath a vehicle raised
using a jack; use an axle stand.
With an automatic electronic parking
brake, place a chock against the wheel
diagonally opposite to the one being
replaced.Wheel with wheel trim
When removing the wheel
, first remove
the wheel trim by pulling at the valve
aperture using the wheelbrace. Do not use:
-
t
he jack for any other purpose than
lifting the vehicle,
-
a j
ack other than the one supplied by
the manufacturer.
F
P
lace the foot of the jack on the ground and
ensure that it is directly below the A or B
jacking point provided on the underbody,
whichever is closest to the wheel to be
changed.
F
W
ith a steel wheel, remove the trim using
tool 8 .
F
W
ith an alloy wheel, remove the cap from
each of the bolts using tool 8 .
F
I
f your vehicle is so equipped, fit security
bolt socket 9 to wheelbrace 6 to slacken the
security bolt.
F
S
lacken (without removing) the other wheel
bolts using just wheelbrace 6 .
F
E
ngage the carrier on the hook, then
tighten the bolt using the wheelbrace until
the carrier is fully home and the bolt is
completely tight.
8
In the event of a breakdown
Page 240 of 312

2
First steps
With the engine running, a press
mutes the sound.
With the ignition off, a press turns
the system on.
Increase or decrease the volume using
the wheel or the "plus" or "minus" buttons
(depending on the equipment).
Use the buttons on either side of or below the
touch screen for access to the menus, then
press the virtual buttons in the touch screen.
Depending on the model, use the "Source" or
"Menu" buttons on the left of the touch screen
for access to the menus, then press the virtual
buttons in the touch screen.
You can display the menus at any time by
pressing the screen briefly with three fingers.
All of the touch areas of the screen are white.
For pages with multiple tabs at the bottom of
the screen, you can switch between pages
either by tapping the tab for the desired page,
or by using a finger, sliding the pages to the left
or to the right.
Press in the grey zone to go back a level or
confirm. The touch screen is of the "capacitive"
type.
To clean the screen, use a soft, non-
abrasive cloth (e.g. spectacles cloth) with
no additional product.
Do not use sharp objects on the screen.
Do not touch the screen with wet hands.
Certain information is displayed permanently in
the upper banner of the touch screen:
-
R
epeat of the air conditioning information
(depending on version), and direct access to
the corresponding menu.
-
R
eminder of the Radio Media and
Telephone menu information.
-
R
eminder of the privacy information.
-
A
ccess to the Settings of the touch screen
and digital instrument panel. Selection of the sound source (depending on
equipment):
-
F M/DAB/AM radio stations (depending on
equipment).
-
T
elephone connected via Bluetooth and
Bluetooth multimedia broadcast (streaming).
-
U
SB memory stick.
-
M
edia player connected via the auxiliary
socket (depending on equipment).
-
C
D player (depending on equipment).
In the "Settings" menu you can create
a profile for just one person or a group
of people with common points, with the
possibility of entering a multitude of
settings (radio presets, audio settings,
ambiences, etc.); these settings are taken
into account automatically.
Press the back arrow to go back a level or
confirm.
PEUGEOT Connect Radio
Page 254 of 312
16
Press the "OPTIONS" button to go to the
secondary page.
Press "Ring volume " to display the
volume bar.
Press the arrows or move the cursor
to set the ring volume.
Settings
Profile settings
As a safety measure and because it
requires the sustained attention of the
driver, changes to settings must only be
done with the vehicle stationary .
Press Settings to display the
primary page.
Press " Profiles ".
Select " Profile 1 " or "Profile 2 " or "Profile 3 "
or " Common profile ".
Press this button to enter a name for
the profile using the virtual keypad.
Press " OK" to save. Press the back arrow to confirm.
Press this button to activate the
profile.
Press the back arrow again to
confirm.
Press this button to initialise the
profile selected.
Adjusting the brightness
Press Settings
to display the
primary page.
Press Brightness .
Move the cursor to adjust the
brightness of the screen and/or of
the instrument panel (according to
ve r s i o n).
Press in the grey zone to confirm.
Modifying system settings
Press Settings to display the
primary page. Press "
Configuration " to go to the
secondary page.
Press " System configuration ".
Press the " Units" tab to change the units of
distance, fuel consumption and temperature.
Press the " Factory settings " tab to return to
the initial settings.
Returning the system to factory settings
activates the English language by default
(depending on version).
Press the " System info " tab to display the
versions of the different modules installed in
the system.
Press the " Privacy" tab,
or Press Settings to display the
primary page.
Press " Privacy " to activate or
deactivate the privacy data mode.
PEUGEOT Connect Radio
Page 255 of 312
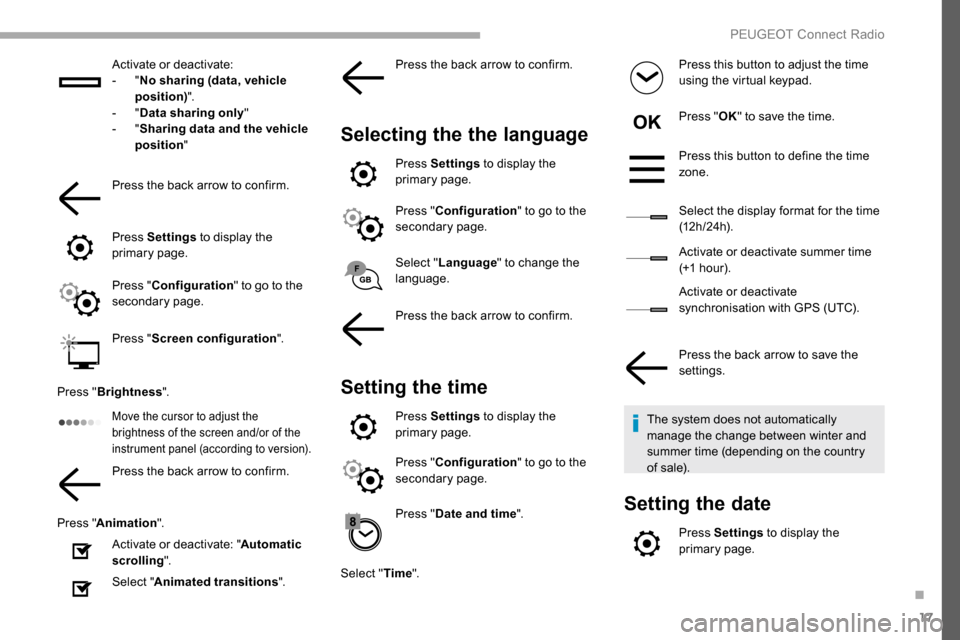
17
Activate or deactivate:
- "No sharing (data, vehicle
position) ".
-
"Data sharing only "
-
"Sharing data and the vehicle
position "
Press the back arrow to confirm.
Press Settings to display the
primary page.
Press " Configuration " to go to the
secondary page.
Press " Screen configuration ".
Press " Brightness ".
Move the cursor to adjust the
brightness of the screen and/or of the
instrument panel (according to version).
Press the back arrow to confirm.
Press " Animation ".
Activate or deactivate: " Automatic
scrolling ".
Select " Animated transitions ".Press the back arrow to confirm.
Selecting the the language
Press Settings
to display the
primary page.
Press " Configuration " to go to the
secondary page.
Select " Language " to change the
language.
Press the back arrow to confirm.
Setting the time
Press Settings to display the
primary page.
Press " Configuration " to go to the
secondary page.
Press " Date and time ".
Select " Time". Press this button to adjust the time
using the virtual keypad.
Press "
OK" to save the time.
Press this button to define the time
zone.
Select the display format for the time
(12 h / 24 h).
Activate or deactivate summer time
(+1 hour).
Activate or deactivate
synchronisation with GPS (UTC).
Press the back arrow to save the
settings.
The system does not automatically
manage the change between winter and
summer time (depending on the country
of sale).
Setting the date
Press Settings to display the
primary page.
.
PEUGEOT Connect Radio
Page 262 of 312

2
First steps
With the engine running, a press
mutes the sound.
With the ignition off, a press turns
the system on.
Increase or decrease the volume using
the wheel or the "plus" or "minus" buttons
(depending on the equipment).
Use the menu buttons on either side of or
below the touch screen for access to the
menus, then press the virtual buttons in the
touch screen.
Depending on the model, use the "Source"
or "Menu" buttons to access the menus, then
press the virtual buttons in the touch screen.
You can display the menus at any time by
pressing the screen briefly with three fingers.
All of the touch areas of the screen are white.
Press the back arrow to go back a level.
Press "OK" to confirm. The touch screen is of the "capacitive"
type.
To clean the screen, use a soft, non-
abrasive cloth (e.g. spectacles cloth) with
no additional product.
Do not use sharp objects on the screen.
Do not touch the screen with wet hands.
Certain information is displayed permanently
in the side bars or in the upper bar of the touch
screen (depending on equipment):
-
R
epeat of the air conditioning information
(depending on version), and direct access to
the corresponding menu.
-
G
o directly to the selection of the audio
source, to the list of radio stations (or list of
titles depending on the source).
-
G
o to the "Notifications" of messages,
emails, map updates and, depending on the
services, the navigation notifications.
-
G
o to the settings for the touch screen and
the digital instrument panel. Selection of the sound source (depending on
equipment):
-
F
M/DAB/AM radio stations (depending on
equipment).
-
T
elephone connected via Bluetooth and
Bluetooth multimedia broadcast (streaming).
-
U
SB memory stick.
-
M
edia player connected via the auxiliary
socket (depending on equipment).
-
C
D Player (depending on equipment).
-
V
ideo (depending on equipment).
PEUGEOT Connect Nav