2019 Peugeot Partner Screen wash
[x] Cancel search: Screen washPage 164 of 312

162
With audio system or touch screen
The deactivation or activation
is carried out via the vehicle
configuration menu.
The state of the system stays in the memory
when the ignition is switched off. The rear parking sensors system will
be deactivated automatically if a trailer
or bicycle carrier is connected to a
towing device installed in line with the
manufacturer's recommendations.
In this case, the outline of a trailer is
displayed at the rear of the image of the
vehicle.
The parking sensors are deactivated while the
Park Assist system is measuring a space.
For more information on the Park Assist , refer
to the corresponding section.
Operating limits Maintenance
recommendations
In bad or wintry weather, ensure that the
sensors are not covered with mud, ice or
snow. When reverse gear is engaged, an
audible signal (long beep) indicates that
the sensors may be dirty.
-
C
ertain obstacles located in the sensors’
blind spots may not be detected or no
longer be detected during the manoeuvre.
-
S
ounds such as those emitted by noisy
vehicles and machinery (e.g. lorries,
pneumatic drills, etc.) may inter fere with the
vehicle's sensors. High pressure jet wash
When washing your vehicle, keep the
lance at least 12 inches (30
cm) away from
the sensors.
Deactivation/Activation
Without audio system
F To deactivate or activate the system, press this button.
The indicator lamp is lit when the system is
deactivated .
The objects memorised during the
manoeuvre will no longer be stored after
switching off the ignition.
-
C
ertain materials (fabrics) absorb sound
waves: pedestrians may not be detected.
-
A
ccumulated snow or dead leaves on the
road sur face can inter fere with the vehicle's
sensors.
-
A f
ront or rear impact to the vehicle can
distort the settings of the sensors, which is
not always detected by the system: distance
measurements may be incorrect.
-
T
he tilting of the vehicle if the boot is
very loaded can affect the distance
measurements.
-
T
he sensors may be affected by poor
weather conditions (heavy rain, thick fog,
snowfall, etc.).
Driving
Page 166 of 312
164
Maintenance
recommendations
In bad or wintry weather, ensure that the
camera is not covered by mud, frost or snow.
Check the cleanliness of the camera lens
regularly.
If necessary, clean the camera with a soft, dry
cloth.
When washing the vehicle using a high-
pressure jet, keep the spray directed at least
30 cm away from the camera.
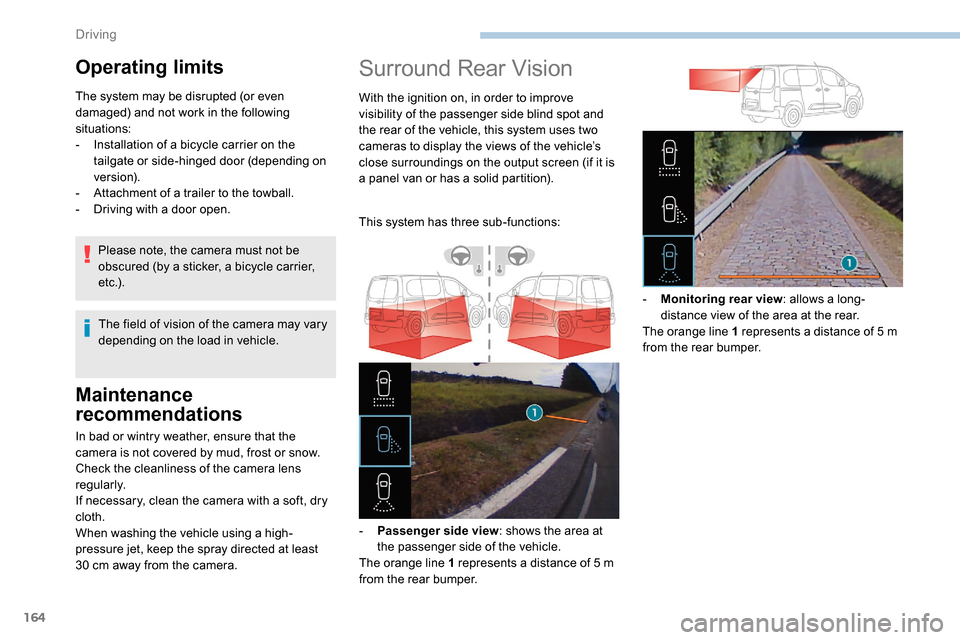
Surround Rear Vision
With the ignition on, in order to improve
visibility of the passenger side blind spot and
the rear of the vehicle, this system uses two
cameras to display the views of the vehicle’s
close surroundings on the output screen (if it is
a panel van or has a solid partition).
This system has three sub-functions:
-
P
assenger side view : shows the area at
the passenger side of the vehicle.
The orange line 1 represents a distance of 5
m
from the rear bumper. -
M
onitoring rear view: allows a long-
distance view of the area at the rear.
The orange line 1 represents a distance of 5
m
from the rear bumper.
Operating limits
The system may be disrupted (or even
damaged) and not work in the following
situations:
-
I
nstallation of a bicycle carrier on the
tailgate or side-hinged door (depending on
ve r s i o n).
-
A
ttachment of a trailer to the towball.
-
D
riving with a door open.
The field of vision of the camera may vary
depending on the load in vehicle.
Please note, the camera must not be
obscured (by a sticker, a bicycle carrier,
e t c .) .
Driving
Page 169 of 312

167
If a trailer is attached to the towball,
when reverse gear is engaged the visual
reversing aid will no longer work until the
trailer is disconnected. The monitoring
rear view becomes the default view.
If the system develops a malfunction, go
to a PEUGEOT dealer to avoid any safety
problems.
Maintenance
recommendations
In bad or wintry weather, ensure that the
sensors and cameras are not covered with
mud, ice or snow.
Check the cleanliness of the camera lenses
regularly.
If necessary, clean the cameras with a soft, dry
cloth.
When washing your vehicle at high-pressure,
direct the spray from at least 30
cm away from
the cameras and parking sensors.
Under-inflation detection
This system automatically monitors the tyre
pressure while driving.
The system monitors the pressure in all four
tyres, once the vehicle is moving.
It compares the information given by the
wheel speed sensors with reference values,
which must be reinitialised after ever y tyre
pressure adjustment or wheel change .
The system triggers an alert as soon as it
detects a drop in the pressure of one or more
tyres.
The tyre under-inflation detection system
does not replace the need for vigilance on
the part of the driver.
This system still requires you to check
the tyre inflation pressures (including
the spare wheel) every month as well as
before a long journey.
Driving with under-inflated tyres impairs
handling, extends braking distances and
causes early tyre wear, particularly in
adverse conditions (heavy loads, high
speeds, long journeys). Driving with under-inflated tyres
increases fuel consumption.
The tyre pressure specifications for your
vehicle can be found on the tyre pressure
label.
For more information on the
Identification markings , refer to the
corresponding section.
Tyre pressures should be checked when
the tyres are "cold" (vehicle stopped for
1
hour or after a journey of less than
6
miles (10 km) at moderate speeds).
Other wise (when hot), add 0.3
bar to the
pressures shown on the label.
Snow chains
The system does not have to be
reinitialised after fitting or removing snow
chains.
Under-inflation alert
This warning is indicated by fixed
illumination of the warning lamp, an
audible signal and, depending on
the equipment installed, a message
displayed on the screen.
6
Driving
Page 180 of 312

178
Engines
Petrol
Diesel
The location of the interior bonnet release
lever prevents opening of the bonnet when
the left-hand front door is shut.
When the engine is hot, handle the
exterior safety catch and the stay with
care (risk of burns), using the protected
area.
When the bonnet is open, take care not to
damage the safety catch.
Do not open the bonnet under very windy
conditions.
The cooling fan may star t after
switching off the engine: take care
with articles and clothing that might be
caught by the fan blades.
Opening
F Open the left-hand front door.F
P
ull the release lever, located at the bottom
of the door aperture, towards you.
F
L
ift the safety catch and raise the bonnet.
F
U
nclip the stay
from its housing
and place it in the
support slot to hold
the bonnet open.
Closing
F Take the stay out of the support slot.
F C lip the stay in its housing.
F
L
ower the bonnet and release it near the
end of its travel.
F
P
ull on the bonnet to check that it is fully
latched.
Because of the presence of electrical
equipment under the bonnet, it is
recommended that exposure to water
(rain, washing, etc.) be limited. These engines are examples provided as a
guide.
The locations of the dipstick and engine oil filler
cap may vary.
1.
Screenwash fluid reservoir.
2. Engine coolant reservoir.
3. Brake fluid reser voir.
4. Battery.
5. Fusebox.
6. A i r f i l t e r.
7. Engine oil dipstick.
8. Engine oil filler cap.
Practical information
Page 182 of 312

180
Oil grade
Before topping up the oil or changing the oil,
check that the oil is the correct grade for your
engine and conforms to the manufacturer's
recommendations.
Topping up the engine oil level
The location of the oil filler cap is shown in the
corresponding underbonnet layout view.
F
U
nscrew the oil filler cap to access the filler
opening.
F
A
dd oil in small quantities, avoiding any
spills on engine components (risk of fire).
F
W
ait a few minutes before checking the
level again using the dipstick.
F
A
dd more oil if necessary.
F
A
fter checking the level, carefully refit the oil
filler cap and the dipstick in its tube.
After topping up the oil, the check when
switching on the ignition with the oil level
indicator in the instrument panel is not
valid during the 30
minutes after topping
up.
Engine oil change
In order to maintain the reliability of the engine
and emissions control system, never use
additives in the engine oil.
Brake fluid level
The brake fluid level should be close
to the "MA X" mark. If it is not, check
the brake pad wear.
Changing the fluid
Refer to the manufacturer's service schedule
for details of the inter val for this operation.
Fluid specification
This fluid must conform to the manufacturer's
recommendations.
Coolant level
Check the coolant level regularly.
It is normal to top up this fluid
between two services.
The check and top-up must only be done with
the engine cold.
A low coolant level presents a risk of serious
damage to your engine.
The level of this fluid should be close to the
"MA X" mark but should never exceed it.
If the level is close to or below the "MIN" mark,
it is essential to top up.
When the engine is hot, the temperature of this
fluid is regulated by the cooling fan.
In addition, as the cooling system is pressurised,
wait at least one hour after switching off the
engine before carrying out any operation.
To avoid the risk of scalding when you need to
top up in an emergency, wrap a cloth around the
cap and unscrew the cap by two turns to allow
the pressure to drop.
Once the pressure has dropped, remove the cap
and top up to the required level.
The cooling fan may star t after
switching off the engine: take care
with articles and clothing that might be
caught by the fan blades.
Fluid specification
The fluid must conform to the manufacturer's
recommendations.
Screenwash fluid level
Top up to the required level when
necessary.
Tank capacity:
-
5
.3
litres for the "very cold climate"
versions.
-
2
.2
litres for other versions.
Practical information
Page 183 of 312

181
Fluid specification
The screenwash fluid must be topped up with a
ready for use mix.
In winter (temperatures below zero), a fluid with
antifreeze must be used that is appropriate for
the prevailing conditions, in order to preser ve
the elements of the system (pump, tank, ducts,
e t c .) .
Filling with pure water is prohibited under all
circumstances (risk of freezing, limestone
deposits, etc.).
Diesel fuel additive level
(Diesel with particle filter)
The additive reser voir low level
is indicated by fixed illumination
of one of these warning lamps,
accompanied by an audible signal
and a message that the particle filter
additive level is too low.
To p p i n g u p
This additive must be topped up without delay
by a PEUGEOT dealer or a qualified workshop.
AdBlue level
An alert is triggered once the reser ve level is
reached.
To avoid the vehicle being immobilised as per
regulations, you must top up with AdBlue.
For more information on AdBlue and the SCR
system, and in particular topping it up, refer to
the corresponding section.
Checks
Unless otherwise indicated, check these
components in accordance with the
manufacturer's service schedule and according
to your engine.
Other wise, have them checked by a PEUGEOT
dealer or a qualified workshop.
12 V battery
The battery does not require any maintenance.
However, check regularly that the terminals
are correctly tightened (versions without quick
release terminals) and that the connections
are clean.
For more information on the precautions
to take before starting work on the 12 V
battery , refer to the corresponding
section. Versions equipped with Stop & Start are
fitted with a 12
V lead-acid battery of
specific technology and specification.
Its replacement should be carried out
only by a PEUGEOT dealer or a qualified
workshop.
Air filter
Depending on the environment
(e.g. dusty atmosphere) and the
use of the vehicle (e.g. city driving),
replace it twice as often if
necessary .
Passenger compartment filter
Depending on the environment
(e.g. dusty atmosphere) and the
use of the vehicle (e.g. city driving),
replace it twice as often if
necessary.
A clogged passenger compartment
filter may have an adverse effect on
the per formance of the air conditioning
system and generate undesirable odours.
7
Practical information
Page 204 of 312

202
Fuse No.Rating (A) Functions
F1 10Wireless smartphone charger, electrochrome interior mirror.
F4 15Horn.
F6 20Screenwash pump.
F7 1012
V socket (rear).
F10 30Electric locks module.
F13 10Telematics and radio controls.
F14 5Alarm, overload indicator, advanced telematic unit.
F19 3Trailer inter face unit.
F22 3Surround Rear Vision display screen.
F23 5Generic trailer interface unit.
F27 5Additional heating.
F29 20Audio system, touch screen.
F32 1512
V socket (front).
F34 5Mirrors control.
F36 5USB port.
For more information on installing a
towbar or equipment of the TA XI type,
contact a PEUGEOT dealer.
Dashboard fuses
The fusebox is placed in the lower dashboard
(left-hand side).
Access to the fuses
F Unclip the cover by pulling at the top left,
then right.
The fuses described below vary according to
the equipment in your vehicle.
In the event of a breakdown
Page 205 of 312

203
Engine compartment fuses
The fusebox is placed in the engine
compartment near the battery.
Access to the fuses
F Release the two latches A.
F R emove the cover.
F
C
hange the fuse.
F
W
hen you have finished, close the cover
carefully then engage the two latches A , to
ensure correct sealing of the fusebox. Fuse
No. Rating
(A) Functions
F16 15Front foglamp.
F18 10
Right-hand main beam headlamp.
F19 10Left-hand main
beam headlamp.
F29 40Windscreen wipers.
12 V battery
Procedure for starting the engine using another
battery or charging a discharged battery.
Lead-acid starter
batteries
Batteries contain harmful substances
such as sulphuric acid and lead.
They must be disposed of in accordance
with regulations and must not, in any
circumstances, be discarded with
household waste.
Take used remote control batteries and
vehicle batteries to a special collection
point.
Protect your eyes and face before
handling the battery.
All operations on the battery must be
carried out in a well ventilated area and
away from naked flames and sources of
sparks, so as to avoid the risk of explosion
or fire.
Wash your hands afterwards.
Versions equipped with Stop & Start are
fitted with a 12
V lead-acid battery of
specific technology and specification.
Its replacement should be carried out
only by a PEUGEOT dealer or a qualified
workshop.
8
In the event of a breakdown