2019 Peugeot Partner ABS
[x] Cancel search: ABSPage 12 of 312

10
Activation/Deactivation
F To deactivate or activate this mode, press this button.
The indicator lamp is illuminated when the
system is activated.
Eco-coaching
This function provides the driver with advice
and information, in order to help adopt a more
economical and environmentally friendly
driving style.
Display in the instrument panel
Display on the touch screen
The 4 " Tr i p", "Air conditioning ",
" Maintenance " and "Driving " tabs provide
you with advice in order to optimise your
driving style.
Information relating to the driving style can
also appear in real time.
The " Report " tab assesses your driving style
on a daily basis and gives an overall score
over the entire week.
You have the option, at any time, to reset this
report by pressing " Reset". With PEUGEOT Connect Radio
F
I
n the "
Applications " menu,
select " Eco-coaching ".
With PEUGEOT Connect Nav F
I
n the "
Applications " menu,
then the " Vehicle Apps " tab,
select " Eco-coaching ".
By selecting the "
Eco-coaching"
tab of the central display in the
matrix instrument panel, you can
assess your driving in real time
with the braking and acceleration
i n d i c a t o r.
Eco mode
This mode allows you to optimise heating
and air conditioning settings to reduce fuel
consumption. It takes into account parameters such
as optimisation of braking, acceleration
management, gear changes, tyre inflation, use
of the heating/air conditioning functions, etc.
Eco-driving
Page 20 of 312

18
Diesel engine pre-
heatingFixed.
The period of
illumination depends on
the climatic conditions.The ignition is on.Wait until the warning lamp goes off before starting.
If the engine does not start, switch the ignition off and
then on, wait until the indicator lamp goes off again,
then start the engine.
Warning/indicator lamp
StateCause Actions/Observations
Under-inflation Fixed, accompanied
by an audible signal
and a message. The pressure in one or more
wheels is too low.
Check the pressure of the tyres as soon as possible.
Reinitialise the detection system after adjusting the
pressure.
+ Under-inflation
warning lamp flashing
then fixed and Ser vice
warning lamp fixed.The system is faulty: tyre
pressures are no longer
monitored.
As soon as possible, check the pressure of the tyres
and carry out (3).
Anti-lock braking
system (ABS) Fixed.
The anti-lock braking system has
a fault. The vehicle retains conventional braking.
Drive carefully at moderate speed, then carry out (3).
Distance Alert/
Active Safety Brake Fixed, accompanied
by the display of a
message. The system has been deactivated
via the vehicle configuration
menu.
Flashing. The system is operating. The vehicle brakes briefly so as to reduce the speed of
collision with the vehicle ahead.
Fixed, accompanied
by a message and an
audible signal. The system has a fault.
Carry out (3).
Instruments
Page 56 of 312

54
If an opening (door, boot or bonnet) is not
closed properly, the vehicle is not locked
but the exterior perimeter monitoring will
be activated after 45 seconds at the same
time as the interior volumetric and anti-tilt
monitoring.Locking the vehicle
with exterior perimeter
monitoring only
Deactivate the interior volumetric and anti-tilt
monitoring to avoid unwanted triggering of the
alarm in certain cases such as:
-
l
eaving a pet in the vehicle,
-
l
eaving a window or sunroof partially open,
-
w
ashing your vehicle,
-
c
hanging a wheel,
-
h
aving your vehicle towed,
-
t
ransport by ship.
Triggering of the alarm
This is indicated by sounding of the siren
and flashing of the direction indicators for
30
seconds.
Depending on the country of sale, certain
monitoring functions remain active until the alarm
has been triggered eleven times consecutively.
When the vehicle is unlocked using the remote
control or the "
K
eyless Entry and Starting"
system, rapid flashing of the red indicator lamp
in the button informs you that the alarm was
triggered during your absence. When the ignition
is switched on, the flashing stops immediately.
Deactivation
F Press the unlocking button on the remote control.
or
F
U
nlock the vehicle with the Keyless Entry
and Starting system.
The monitoring system is deactivated: the
indicator lamp in the button goes off and the
direction indicators flash for about 2
seconds.
When the vehicle automatically locks
itself again (as happens if a door or the
boot is not opened within 30
seconds of
unlocking), the monitoring system is also
reactivated automatically.
Deactivating the interior
volumetric and anti-tilt
monitoring
F Switch off the ignition and within 10 s econds
press the alarm button until its red indicator
lamp is on fixed.
F
G
et out of the vehicle.
F
I
mmediately lock the vehicle using the
remote control or the "Keyless Entry and
Starting" system.
Only the exterior perimeter monitoring is
activated; the red indicator lamp in the button
flashes every second.
To be taken into account, the deactivation
must be carried out every time the ignition
is switched off.
Reactivating the interior
volumetric and anti-tilt monitoring
F Deactivate the perimeter monitoring by unlocking the vehicle with the remote
control or the Keyless Entry and Starting
system.
The indicator lamp in the button goes off.
F
R
eactivate all monitoring by locking the
vehicle with the remote control or the
Keyless Entry and Starting system.
The red indicator lamp in the button once again
flashes every second.
Access
Page 75 of 312

73
The upper stops may be adjusted if:
- A g reat deal of effort is needed to
move the upper latches A and B .
-
T
here is noise while driving, caused by
excessive free play.
During locking of the partition behind the
row 2 or row 1 seats, an engagement
noise tells you that the upper latches are
closed.
A visible mark and a coloured mark show
you the position of the latches.
The partition must not be moved with the
latches out – Risk of scratches or damage
to the plastic trims!
The partition must never be removed to
convert the vehicle from a commercial
vehicle to a private vehicle.
This would pose a risk to the safety of
users due to the absence of a child lock
on the boot door (obligatory on private
vehicles).Opening/closing the hatch
F Open/close the hatch using the lock.
F U se the stay to keep it in the open position.
Always close the hatch and straighten the
backrest of the outer passenger seat(s)
(depending on the position of the partition)
if you are not carrying any long loads.
Positioning the protective
cover
The protective cover must be installed
each time the backrest of the outer seat
is folded down and the partition hatch is
open.
Do not allow any passenger to sit in the
row 1 outer seat if the backrest of the
outer seat behind it in row 2 is folded down
and the hatch is open.
Do not allow any passenger to sit in the
row 2 central seat if the backrest of the
outer seat is folded down and the hatch
is open.
Avoid placing any load on the crossbar of
the hatch threshold. If possible, place the
load on the folded backrests of the seats.
3
Ease of use and comfort
Page 99 of 312

97
To reactivate geolocation, simultaneously press
the "Peugeot Connect SOS" and "Peugeot
Connect Assistance" buttons again, followed
by a press on "Peugeot Connect Assistance"
to confirm.If you purchased your vehicle outside the
PEUGEOT dealer network, we invite you
to have a dealer check the configuration of
these ser vices and, if desired, modify it to
suit your wishes. In a multilingual country,
configuration is possible in the official
national language of your choice.
For technical reasons and, in particular,
to improve the quality of PEUGEOT
CONNECT ser vices to customers, the
manufacturer reser ves the right to carry
out updates to the vehicle's on-board
telematic system.
You can deactivate geolocation by
simultaneously pressing the "Peugeot Connect
SOS" and "Peugeot Connect Assistance"
buttons, followed by pressing "Peugeot
Connect Assistance" to confirm.
If you benefit from the Peugeot Connect
Packs offer with the SOS and assistance
pack included, there are additional
ser vices available to you in your personal
space, via the website for your country.
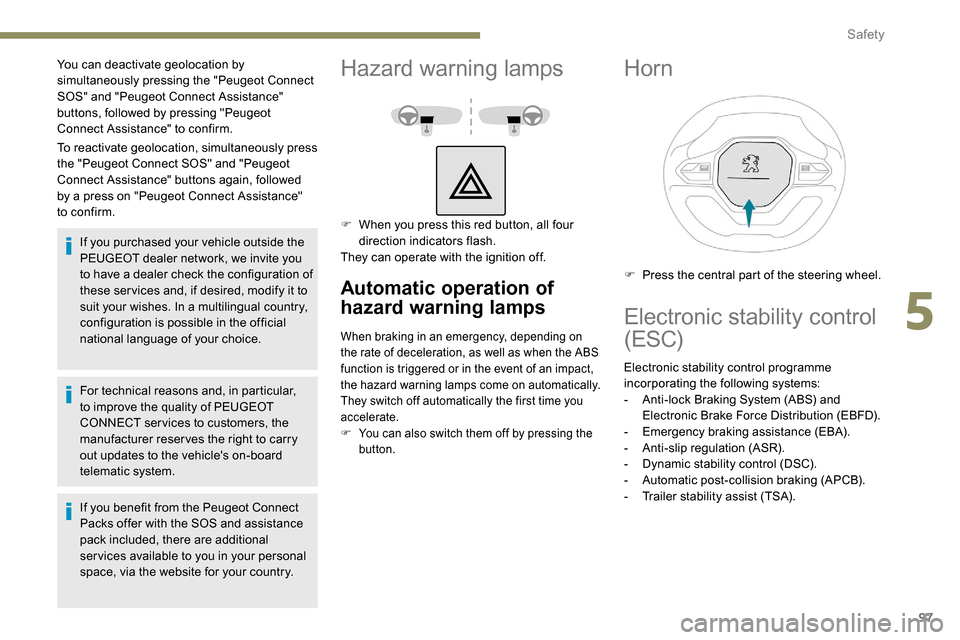
Hazard warning lamps
F When you press this red button, all four direction indicators flash.
They can operate with the ignition off.
Automatic operation of
hazard warning lamps
When braking in an emergency, depending on
the rate of deceleration, as well as when the ABS
function is triggered or in the event of an impact,
the hazard warning lamps come on automatically.
They switch off automatically the first time you
accelerate.
F
Y
ou can also switch them off by pressing the
button.
Horn
F Press the central part of the steering wheel.
Electronic stability control
(ESC)
Electronic stability control programme
incorporating the following systems:
-
A
nti-lock Braking System (ABS) and
Electronic Brake Force Distribution (EBFD).
-
E
mergency braking assistance (EBA).
-
A
nti-slip regulation (ASR).
-
D
ynamic stability control (DSC).
-
A
utomatic post-collision braking (APCB).
-
T
railer stability assist (TSA).
5
Safety
Page 100 of 312

98
Definitions
Anti-lock braking system (ABS)
and electronic brake force
distribution (EBFD)
These systems improve the stability and
manoeuvrability of your vehicle when braking
and contribute towards improved control in
corners, in particular on poor or slippery road
surfaces.
The ABS prevents wheel lock in the event of
emergency braking.
The electronic brake force distribution system
manages the braking pressure wheel by wheel.
Emergency braking assistance
(EBA)
In an emergency, this system enables you to
reach the optimum braking pressure more
quickly and therefore reduce the stopping
distance.
It is triggered in relation to the speed at which
the brake pedal is pressed. This is felt by a
reduction in the resistance of the pedal and an
increase in braking efficiency.
Anti-slip regulation (ASR)
This system optimises traction in order to
avoid wheel slip by acting on the brakes of
the driving wheels and on the engine. It also
improves the directional stability of the vehicle
on acceleration.
Dynamic stability control (DSC)
If there is a difference between the path
followed by the vehicle and that required by the
driver, this system monitors each wheel and
automatically acts on the brake of one or more
wheels and on the engine to return the vehicle
to the required path, within the limits of the laws
of physics.
Trailer stability assist (TSA)
This system allows control of the vehicle to be
retained when towing a trailer, so as to avoid
the risk of snaking.
Anti-lock braking system
(ABS) and electronic brake
force distribution (EBFD)
The fixed illumination of this warning
lamp signals that there is a fault with
the ABS.Illumination of this warning lamp,
coupled with the STOP
and ABS
warning lamps, accompanied by
the display of a message and an
audible signal, signals that there is a
fault with the electronic brake force
distribution (EBFD).
Normal operation of the ABS may make
itself felt by slight vibrations of the brake
pedal.
When braking in an emergency, press
very firmly and maintain this pressure.
When changing wheels (tyres and rims),
ensure that these are approved for your
vehicle.
After an impact, have these systems
checked by a PEUGEOT dealer or a
qualified workshop.
The vehicle retains conventional braking. Drive
carefully at moderate speed.
Contact a PEUGEOT dealer or a qualified
workshop as soon as possible.
You must stop as soon as it is safe to do so.
Call a PEUGEOT dealer or a qualified
workshop.
Safety
Page 126 of 312

124
With an automatic gearbox, mode P is
automatically selected when the ignition is
switched off. The wheels are blocked.
For further information on the Automatic
gearbox, particularly in relation to leaving
the vehicle in free-wheeling mode, refer to
the corresponding section.
With an automatic gearbox, when mode
N is engaged, the opening of the driver's
door will cause an audible signal to sound.
It will stop when you close the driver's
door again.
Deactivating automatic
operation
In some situations, for example when it is
extremely cold or during towing (caravan,
recovery), it may be necessary to deactivate
automatic operation of the system. F
P
ush and hold the control lever in the
release direction for at least 10 seconds and
no more than 15 seconds.
F
R
elease the control lever.
F
P
ress and hold the brake pedal.
F
P
ull the control lever in the application
direction for 2
seconds.
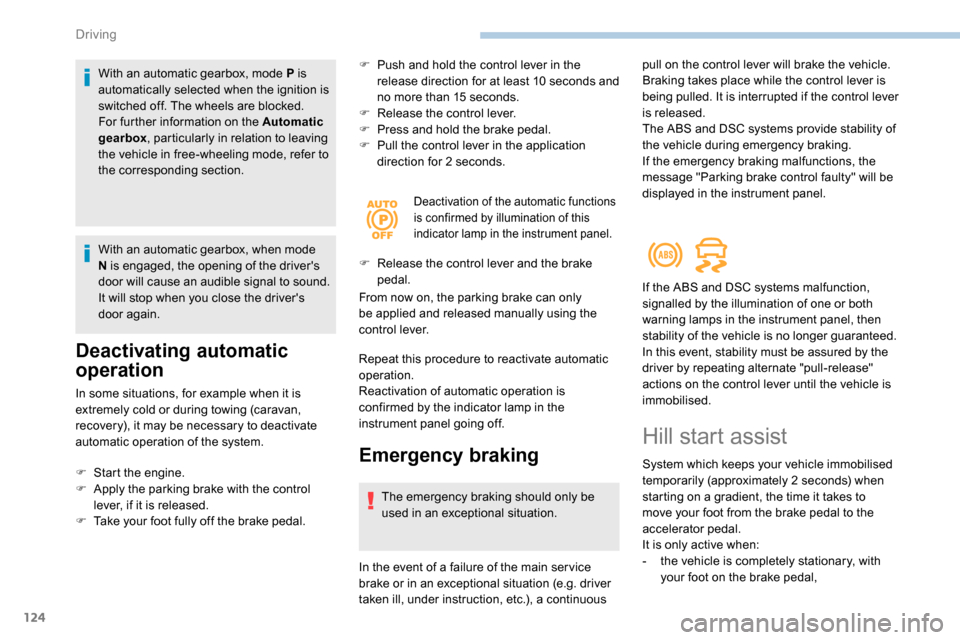
Deactivation of the automatic functions
is confirmed by illumination of this
indicator lamp in the instrument panel.
F Release the control lever and the brake
pedal.
From now on, the parking brake can only
be applied and released manually using the
control lever.
Repeat this procedure to reactivate automatic
operation.
Reactivation of automatic operation is
confirmed by the indicator lamp in the
instrument panel going off.
Emergency braking
The emergency braking should only be
used in an exceptional situation.
F
S
tart the engine.
F
A
pply the parking brake with the control
lever, if it is released.
F
T
ake your foot fully off the brake pedal.
In the event of a failure of the main ser vice
brake or in an exceptional situation (e.g. driver
taken ill, under instruction, etc.), a continuous pull on the control lever will brake the vehicle.
Braking takes place while the control lever is
being pulled. It is interrupted if the control lever
is released.
The ABS and DSC systems provide stability of
the vehicle during emergency braking.
If the emergency braking malfunctions, the
message "Parking brake control faulty" will be
displayed in the instrument panel.
If the ABS and DSC systems malfunction,
signalled by the illumination of one or both
warning lamps in the instrument panel, then
stability of the vehicle is no longer guaranteed.
In this event, stability must be assured by the
driver by repeating alternate "pull-release"
actions on the control lever until the vehicle is
immobilised.
Hill start assist
System which keeps your vehicle immobilised
temporarily (approximately 2
seconds) when
starting on a gradient, the time it takes to
move your foot from the brake pedal to the
accelerator pedal.
It is only active when:
-
t
he vehicle is completely stationary, with
your foot on the brake pedal,
Driving
Page 145 of 312

143
The brake lamps illuminate as soon as
the braking system is activated with
deceleration of the vehicle.
This system is a driving aid that cannot,
in any circumstances, replace the need to
obser ve speed limits and safety distances,
nor the need for vigilance on the part of
the driver.
Some vehicles present on the road may
not be properly seen or may be poorly
interpreted by the camera (e.g. a lorry),
which may lead to a poor assessment
of the distances and lead to the vehicle
inappropriately accelerating or braking.
The driver must be ready at all times to
retake control of their vehicle by keeping
both hands on the steering wheel and
keeping the feet near the brake and
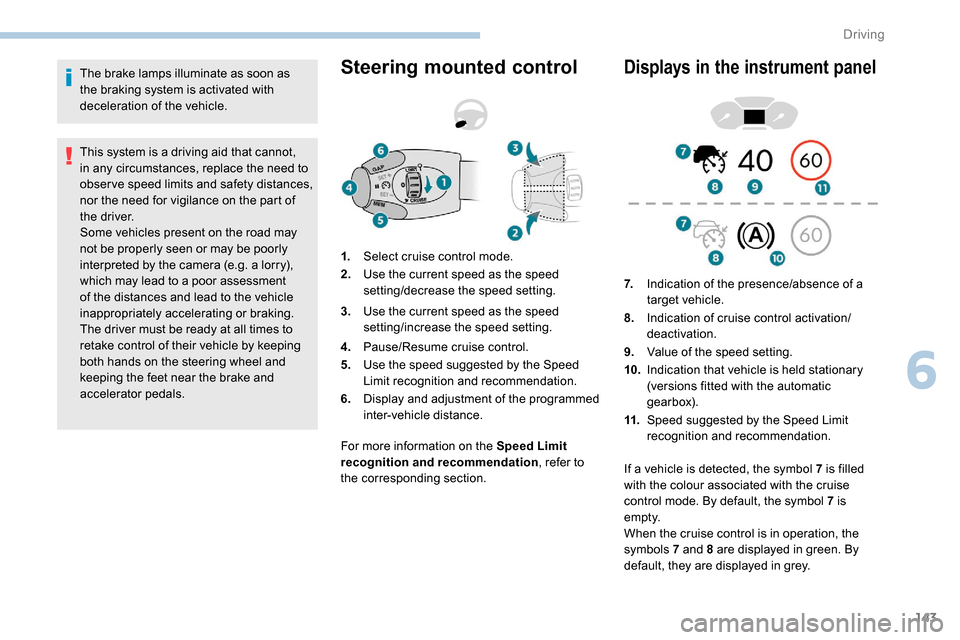
accelerator pedals.Steering mounted control
For more information on the Speed Limit
recognition and recommendation, refer to
the corresponding section.
Displays in the instrument panel
1. Select cruise control mode.
2. Use the current speed as the speed
setting/decrease the speed setting.
3. Use the current speed as the speed
setting/increase the speed setting.
4. Pause/Resume cruise control.
5. Use the speed suggested by the Speed
Limit recognition and recommendation.
6. Display and adjustment of the programmed
inter-vehicle distance. 7.
Indication of the presence/absence of a
target vehicle.
8. Indication of cruise control activation/
deactivation.
9. Value of the speed setting.
10. Indication that vehicle is held stationary
(versions fitted with the automatic
gearbox).
11. Speed suggested by the Speed Limit
recognition and recommendation.
If a vehicle is detected, the symbol 7
is filled
with the colour associated with the cruise
control mode. By default, the symbol 7 is
e m pt y.
When the cruise control is in operation, the
symbols 7 and 8 are displayed in green. By
default, they are displayed in grey.
6
Driving