2019 Peugeot Partner Automatic
[x] Cancel search: AutomaticPage 187 of 312

185
cannot be discounted: do not inhale the fluid.
Ammonia vapour has an irritant effect on mucous
membranes (eyes, nose and throat).
Keep AdBlue® out of reach of children, in
its original container or bottle.
Procedure
Before starting the top up procedure, ensure
that the vehicle is parked on a flat and level
sur face.
In winter, check that the temperature of the
vehicle is above -11°C. If not, due to freezing,
the AdBlue
® cannot be poured into the tank.
Park your vehicle somewhere warmer for a few
hours before topping up.
In the event of an AdBlue
® breakdown,
confirmed by the message "Add AdBlue:
Starting impossible", you must top up with
at least 5
litres.
Never pour AdBlue
® into the Diesel fuel
tank. If any AdBlue
® is splashed, or if there are
any spillages on the side of the body, rinse
immediately with cold water or wipe with a
damp cloth.
If the fluid has crystallised, clean it off
using a sponge and hot water.
Access to the AdBlue® tank
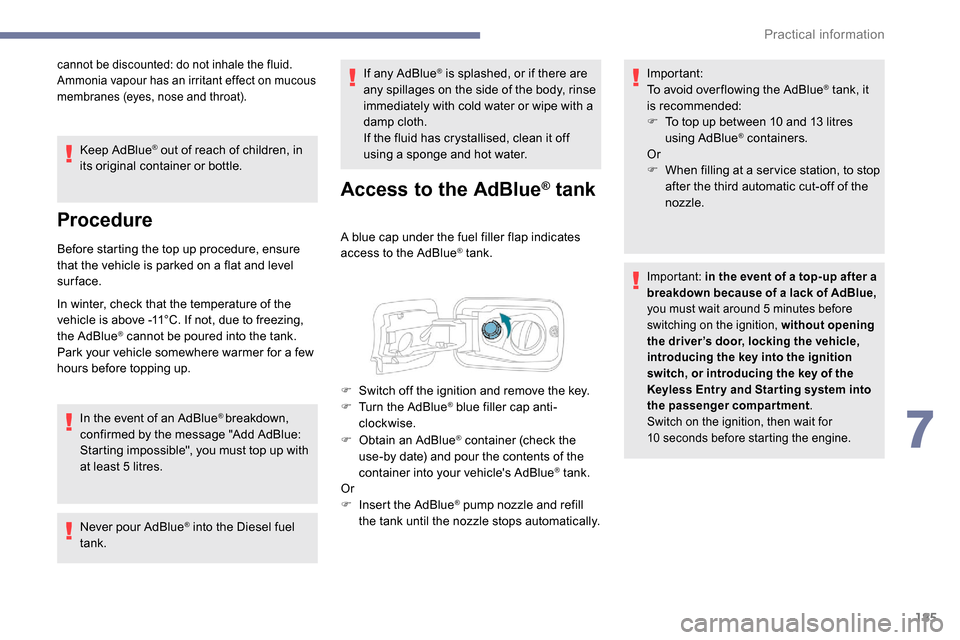
A blue cap under the fuel filler flap indicates
access to the AdBlue® tank.
F
O
btain an AdBlue
® container (check the
use-by date) and pour the contents of the
container into your vehicle's AdBlue
® tank.
Or
F
I
nsert the AdBlue
® pump nozzle and refill
the tank until the nozzle stops automatically. Important:
To avoid over flowing the AdBlue
® tank, it
i
s recommended:
F
T
o top up between 10 and 13
litres
using AdBlue
® containers.
Or
F
W
hen filling at a ser vice station, to stop
after the third automatic cut-off of the
nozzle.
Important: in the event of a top-up after a
breakdown because of a lack of AdBlue,
you must wait around 5
minutes before
switching on the ignition, without opening
the driver’s door, locking the vehicle,
introducing the key into the ignition
switch, or introducing the key of the
K
eyless Entr y and Star ting system into
the passenger compartment.
Switch on the ignition, then wait for
10
seconds before starting the engine.
F Switch off the ignition and remove the key.
F T urn the AdBlue® blue filler cap anti-
clockwise.
7
Practical information
Page 188 of 312

186
Advice on care
General recommendations on the care and maintenance of your vehicle are given in the warranty
and maintenance record.Observe the following recommendations to
avoid damaging your vehicle:
-
D
o not clean your headlamps with a dry
or abrasive cloth, nor with detergent or
solvent products. Use a sponge and
soapy water or a pH neutral product.
-
W
hen using a high-pressure washer on
stubborn dirt, avoid prolonged use on the
headlamps, the lamps and their edges to
avoid damaging their lacquer finish and
seals.
-
N
ever use an abrasive sponge to clean
persistent dirt, as this may scratch the
paint sur face. Use a soft cloth with soapy
water instead.
-
W
hen washing your vehicle, never clean
the interior with a water jet.
-
W
hen washing your vehicle in an
automatic roller-brush car wash, be sure
to lock your doors and, depending on
version, remove the key. -
N
ever use high-pressure washing to
clean the engine compartment, in order
to avoid damaging the electrical units.
-
L
iquids carried in an open vessel (e.g.
a cup or mug) could be spilt, presenting
a risk of damage on contact with the
controls in the dashboard and centre
console. Be careful.
Depending on version, in order to avoid
damaging or unpeeling the stickers on the
bodywork, you are strongly advised against
using high-pressure cleaners to wash your
vehicle. It is recommended that you wash
it using a high-flow water jet and rinse the
vehicle down using demineralised water.
Only a microfibre cloth is recommended for
wiping your vehicle; it must be clean and
used gently.
It is always preferable to have paint repairs carried out by a PEUGEOT dealer or a qualified
workshop.
Practical information
Page 195 of 312

193
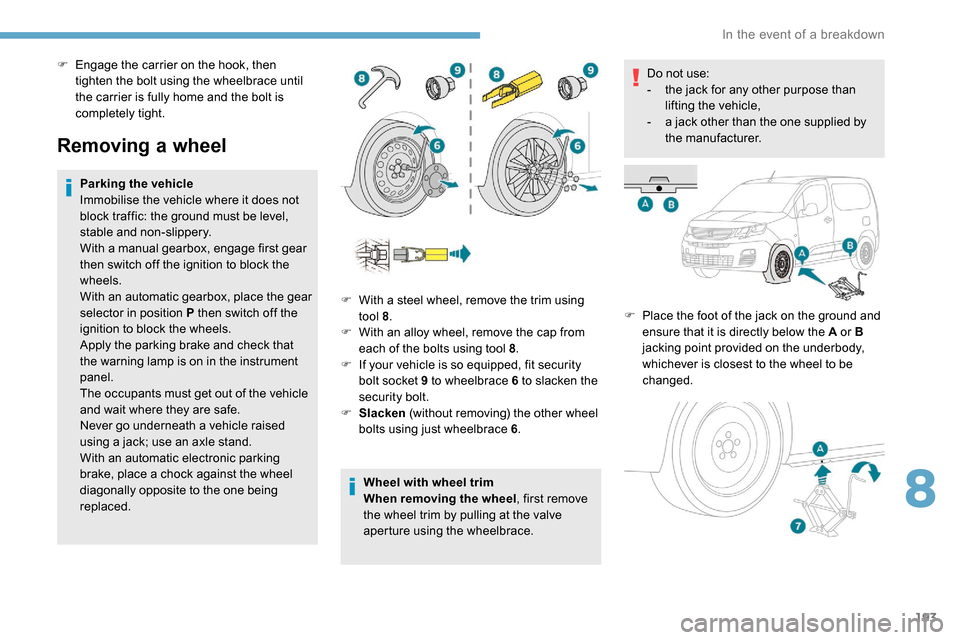
Removing a wheel
Parking the vehicle
Immobilise the vehicle where it does not
block traffic: the ground must be level,
stable and non-slippery.
With a manual gearbox, engage first gear
then switch off the ignition to block the
wheels.
With an automatic gearbox, place the gear
selector in position P then switch off the
ignition to block the wheels.
Apply the parking brake and check that
the warning lamp is on in the instrument
panel.
The occupants must get out of the vehicle
and wait where they are safe.
Never go underneath a vehicle raised
using a jack; use an axle stand.
With an automatic electronic parking
brake, place a chock against the wheel
diagonally opposite to the one being
replaced.Wheel with wheel trim
When removing the wheel
, first remove
the wheel trim by pulling at the valve
aperture using the wheelbrace. Do not use:
-
t
he jack for any other purpose than
lifting the vehicle,
-
a j
ack other than the one supplied by
the manufacturer.
F
P
lace the foot of the jack on the ground and
ensure that it is directly below the A or B
jacking point provided on the underbody,
whichever is closest to the wheel to be
changed.
F
W
ith a steel wheel, remove the trim using
tool 8 .
F
W
ith an alloy wheel, remove the cap from
each of the bolts using tool 8 .
F
I
f your vehicle is so equipped, fit security
bolt socket 9 to wheelbrace 6 to slacken the
security bolt.
F
S
lacken (without removing) the other wheel
bolts using just wheelbrace 6 .
F
E
ngage the carrier on the hook, then
tighten the bolt using the wheelbrace until
the carrier is fully home and the bolt is
completely tight.
8
In the event of a breakdown
Page 209 of 312

207
With a manual gearbox, move the gear
lever into neutral.
With an automatic gearbox, place the gear
selector into position N.
Failure to adhere to this instruction
may lead to damage to braking system
components and the lack of braking
assistance on restarting the engine.
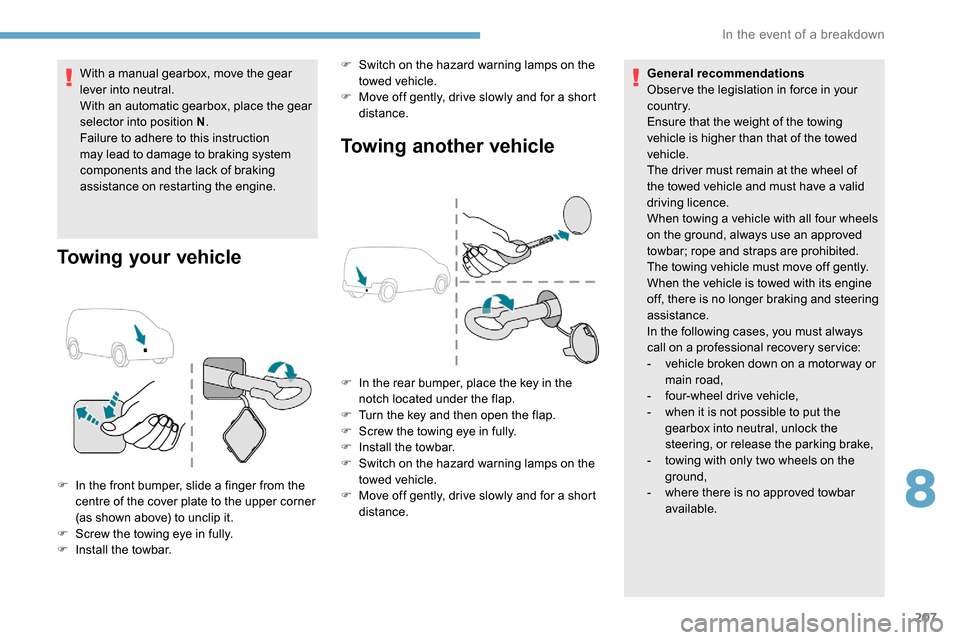
Towing your vehicle Towing another vehicle
F In the front bumper, slide a finger from the
centre of the cover plate to the upper corner
(as shown above) to unclip it.
F
S
crew the towing eye in fully.
F
I
nstall the towbar. F
S
witch on the hazard warning lamps on the
towed vehicle.
F
M
ove off gently, drive slowly and for a short
distance. General recommendations
Obser ve the legislation in force in your
c o u nt r y.
Ensure that the weight of the towing
vehicle is higher than that of the towed
vehicle.
The driver must remain at the wheel of
the towed vehicle and must have a valid
driving licence.
When towing a vehicle with all four wheels
on the ground, always use an approved
towbar; rope and straps are prohibited.
The towing vehicle must move off gently.
When the vehicle is towed with its engine
off, there is no longer braking and steering
assistance.
In the following cases, you must always
call on a professional recovery ser vice:
-
v
ehicle broken down on a motor way or
main road,
-
f
our-wheel drive vehicle,
-
w
hen it is not possible to put the
gearbox into neutral, unlock the
steering, or release the parking brake,
-
t
owing with only two wheels on the
ground,
- w here there is no approved towbar
available.
F
I
n the rear bumper, place the key in the
notch located under the flap.
F
T
urn the key and then open the flap.
F
S
crew the towing eye in fully.
F
I
nstall the towbar.
F
S
witch on the hazard warning lamps on the
towed vehicle.
F M ove off gently, drive slowly and for a short
distance.
8
In the event of a breakdown
Page 214 of 312

212
Engines and towed loads – PETROL EURO 6.2
EnginePureTech 110
S&S BVM6 PureTech 130 S&S EAT8
Gearbox Manual 6-speedAutomatic 8-speed
Code EB2ADT MB6
STTD – TBC EB2ADTS ATN8 STTD
Length Standard (L1) Standard (L1)Standard (L1)
(increased payload) Long (L2)
Model code 2 seats
EU H N PJ - G
3 seats EU H N PJ - H
Cubic capacity (cm
3) 1,1 9 91,1 9 9
Max. power: EC standard (kW) 8196
Fuel UnleadedUnleaded
Braked trailer (within the GTW limit) on
a 12% slope (kg) 2-3 seats
1, 20 01,3 0 0 9001,1 5 0
Unbraked trailer (kg) 2-3 seats680690 690 720
Maximum authorised nose/towball
weight (kg) 2-3 seats
74747474
Technical data
Page 218 of 312

216
Engines and towed loads – DIESEL EURO 6.2
EngineBlueHDi 130 S&S BVM6BlueHDi 130 S&S EAT8
Gearbox Manual 6-speedAutomatic 8-speed
Code DV5RC ML6 STTDDV5RC ATN8 STTD
Length Standard
( L1) Standard
( L1)
(increased payload) Long (L2)
Standard
( L1) Standard
( L1)
(increased payload) Long (L2)
Model code 2 seats
EFYHZJ-GEFYHZJ-JEFYHZR-G EFYHZR-J
3 seats EFYHZJ-HEFYHZJ-K EFYHZR-H EFYHZR-K
Cubic capacity (cm
3) 1,49 91,49 9
Max. power: EC standard (kW) 9696
Fuel DieselDiesel
Braked trailer (within the GTW limit) on
a 12% slope (kg) 2-3 seats
1,5 0 0 1, 20 0 1, 20 0 1,3 5 0 1,0001,1 5 0
Unbraked trailer (kg) 2-3 seats710720 74 0720 720 750
Maximum authorised nose/towball
weight (kg) 2-3 seats
74 74 74 74 74 74
Technical data
Page 222 of 312

2
First steps
Press: On/Off.
Rotate: adjust volume.
Short press: change audio source
(radio; USB; AUX (if equipment
connected); CD; streaming).
Long press: display the Telephone
menu (if a telephone is connected).
Adjust audio settings:
Front/rear fader; left/right balance;
bass/treble; loudness; audio
ambience.
Activation/Deactivation of automatic
volume adjustment (linked to the
speed of the vehicle).
Radio:
Short press: display the list of radio
stations.
Long press: update the list.
Media:
Short press: display the list of
folders.
Long press: display the available
sorting options. Select the screen display mode,
between:
Date; Audio functions; Trip
computer; Telephone.
Confirm or display contextual menu.
Buttons 1 to 6.
Short press: select the preset radio
station.
Long press: preset a radio station.
Radio:
Automatic step by step search up/
down for radio stations.
Media:
Select previous/next CD, USB,
streaming track.
Scroll in a list.
Radio:
Manual step by step search up/down
for radio stations.
Select previous/next MP3 folder.
Media:
Select previous/next folder/genre/
artist/playlist on the USB device.
Scroll in a list.
Abandon the current operation.
Go up one level (menu or folder).
Access to the main menu.
Activate/Deactivate TA function
(traffic announcements).
Long press: select type of
announcement.
Selection of FM/DAB/AM
wavebands.
Steering mounted controls
Steering mounted controls –
Ty p e 1
Radio:
Select the previous/next preset radio
station.
Select the previous/next item in a
menu or a list.
Media:
Select the previous/next track.
Select the previous/next item in a
menu or a list.
Bluetooth® audio system
Page 224 of 312

4
Radio:
Select the previous/next preset radio
station.
Select the previous/next item in a
menu or a list.
Media:
Select the previous/next track.
Select the previous/next item in a
menu or a list.
Press the thumbwheel: confirm.
Menus
Depending on version."Multimedia ": Media settings, Radio
settings.
" Telephone ": Call, Directory
management, Telephone
management, Hang up.
" Trip computer ".
" Maintenance ": Diagnosis, Warning
log, etc. "
Connections ": Manage
connections, search for devices.
" Personalisation-configuration ":
Define the vehicle parameters,
Choice of language, Display
configuration, Choice of units, Date
and time adjustment.
Press the " MENU" button.
Move from one menu to another.
Enter a menu.
Radio
Selecting a station
Press the SOURCE button
repeatedly and select the radio.
Press this button to select a
waveband (FM/AM/DAB). Press one of the buttons for an
automatic search for radio stations.
Press one of the buttons to carry out
a manual search up/down for radio
frequencies.
Press this button to display the list of
stations received locally.
To update this list, press for more
than two seconds. The sound is cut
while updating.
RDS
The external environment (hills, buildings,
tunnels, basement car parks, etc.) may
block reception, including in RDS mode.
This is a normal effect of the way in
which radio waves are transmitted and
does not indicate any failure of the audio
equipment.
If RDS is not available, the RDS symbol
appears struck out in the screen.
Bluetooth® audio system