2019 Peugeot Partner Foglamp
[x] Cancel search: FoglampPage 10 of 312

8
As a passenger, if you avoid connecting your
multimedia devices (film, music, video game
etc.), you will contribute towards limiting the
consumption of electrical energy, and so of
fuel.
Disconnect your portable devices before
leaving the vehicle.
Eco- driving
Eco-driving is a range of everyday practices that allow the motorist to optimise their fuel consumption and CO2 emissions.
Optimise the use of your
gearbox
With a manual gearbox, move off gently and
change up without waiting. While accelerating,
change up early.
With an automatic gearbox, give preference
to automatic mode and avoid pressing the
accelerator pedal heavily or suddenly.
The gear shift indicator invites you to engage
the most suitable gear: as soon as the
indication is displayed in the instrument panel,
follow it straight away.
For vehicles fitted with an automatic gearbox,
this indicator appears only in manual mode.
Drive smoothly
Maintain a safe distance between vehicles,
use engine braking rather than the
brake pedal, and press the accelerator
progressively. These practices contribute
towards a reduction in fuel consumption and
CO
2 emissions and also help reduce the
background traffic noise.
If your vehicle has cruise control, make use of
the system at speeds above 18
mph (40 km/h)
when the traffic is flowing well.
Control the use of your electrical
equipment
Before moving off, if the passenger
compartment is too warm, ventilate it by opening
the windows and air vents before using the air
conditioning.
Above 31
mph (50 km/h), close the windows and
leave the air vents open.
Consider using equipment that can help keep
the temperature in the passenger compartment
down (sunroof blind and window blinds...).
Switch off the headlamps and front foglamps
when the ambient light level does not require
their use.
Avoid running the engine before moving off,
particularly in winter; your vehicle will warm up
much faster while driving.
Unless it has automatic regulation, switch off
the air conditioning as soon as the desired
temperature has been reached.
Switch off the demisting and defrosting controls,
if these are not automatically managed.
Switch off the heated seat as soon as possible.
Eco-driving
Page 27 of 312

25
Warning/indicator lampStateCause Actions/Observations
+
+ Malfunction
(with automatic
electronic parking
brake)
Fixed, accompanied
by the message
"Parking brake fault".
The parking brake is faulty:
manual and automatic functions
may not be working. When stationary, to immobilise your vehicle:
F
P
ull and hold the control lever for approximately 7
to 15
seconds, until the warning lamp comes on in
the instrument panel.
If this procedure does not work, make your vehicle
safe:
F
P
ark on a level sur face.
F
W
ith a manual gearbox, engage a gear.
F
W
ith an automatic gearbox, select P, then put the
supplied chocks against one of the wheels.
Then carry out (2).
Rear foglamp Fixed. The lamp is on.
+
Malfunction of the
braking systems
(with Post Collision
Safety Brake
(APCB)) Fixed.
Carry out (3) quickly.
+ Fault concerning
the airbags or
pyrotechnic
pretensioning
systems (with Post
Collision Safety
Brake (APCB)) Fixed.
Carry out (3) quickly.
1
Instruments
Page 28 of 312

26
Warning/indicator lampStateCause Actions/Observations
Green warning/indicator lamps
Stop & Star tFixed.When the vehicle stops the Stop & Start puts
the engine into STOP mode.
Flashing
temporarily. STOP mode is momentarily unavailable or
START mode is automatically triggered.
Hill Assist Descent
Control Fixed.
The system has been activated, but the
conditions for regulation are not met (gradient,
speed too high, gear engaged).
Flashing The function is starting regulation. The vehicle is being braked; the brake lamps
come on during the descent.
Eco mode Fixed.ECO mode is active. Certain parameters are adjusted with a view
to reducing fuel consumption.
Automatic wiping Fixed.Automatic windscreen wiping is activated.
Front foglamps Fixed.The front foglamps are on.
Sidelamps Fixed.The lamps are on.
Direction
indicators Direction
indicators with
audible signal.The direction indicators are on.
Instruments
Page 87 of 312

85
Lighting control stalk
Selection of main lighting
mode
Turn the ring to align the desired symbol with
the marking.Automatic illumination of headlamps/
daytime running lamps.
Sidelamps only.
Dipped or main beam headlamps.
Operation of the selected lighting is
confirmed by the illumination of the
corresponding indicator lamp. In some weather conditions (e.g. low
temperature or humidity), the presence
of misting on the internal sur face of the
glass of the headlamps and rear lamps is
normal; it disappears after the lamps have
been on for a few minutes.
Headlamp dipping
In "
AUTO " mode and when the sidelamps
are on, the driver can flash the main beam
headlamps by pulling the lever.
Foglamp selection ring
Rear foglamps
Pull the stalk to switch between dipped and
main beam headlamps. They operate with the sidelamps on.
F
R
otate the ring for wards to switch them on
and rear wards to switch them off.
When the lighting is switched off automatically
(" AUTO " position), the foglamps and the dipped
beam headlamps will remain on.
With front and rear foglamps
They operate with the dipped beam
headlamps on, in manual or auto
mode.
4
Lighting and visibility
Page 88 of 312

86
Turn the ring:
F o nce for wards to switch on the front
foglamps,
F
f
or wards a second time to switch on the rear
foglamps,
F
o
nce backwards to switch off the rear
foglamps,
F
b
ackwards a second time to switch off the
front foglamps.
If the lamps are switched off automatically
(" AUTO " position) or the dipped beams are
switched off manually, the foglamps and
sidelamps remain on.
F
T
urn the ring backwards to switch off the
foglamps, the sidelamps will then switch off.
When the lighting is left on
An audible signal when a front door is
opened warns the driver that the vehicle's
exterior lighting is on, with the ignition off
and in manual lighting mode.
In this case, switching off the lighting
stops the audible signal.
The lighting goes off when you switch off
the ignition, but you can always switch it
on again using the lighting control stalk. Travelling abroad
If using your vehicle in a country that
drives on the other side of the road, the
headlamps must be adjusted to avoid
dazzling on-coming drivers.
Contact a PEUGEOT dealer or a qualified
workshop.
In good or rainy weather, by both day and
night, use of the front foglamps and the
rear foglamps are prohibited. In these
situations, the power of their beams may
dazzle other drivers. They should only be
used in fog or falling snow.
In these weather conditions, it is your
responsibility to switch on the foglamps
and dipped headlamps manually as the
sunshine sensor may detect sufficient
light.
Switch off the front and rear foglamps
when they are no longer necessary.
Never look too closely at the luminous
beam of LED headlamps: risk of serious
eye injury.Direction indicators
(flashers)
Three flashes
F Press briefly upwards or downwards,
without going beyond the point of
resistance; the direction indicators will flash
3 times.
Automatic illumination of
headlamps
When a low level of ambient light is detected
by a sunshine sensor, the number plate lamps,
sidelamps and dipped beam headlamps are
switched on automatically, without any action
on the part of the driver. They may also come F
L
eft: lower the lighting control stalk passing
the point of resistance.
F
R
ight: raise the lighting control stalk passing
the point of resistance.
Lighting and visibility
Page 92 of 312

90
The system may suffer inter ference or not
work correctly:
-
u
nder poor visibility conditions (snow,
heavy rain, etc.),
-
i
f the windscreen is dirty, misted or
obscured (by a sticker, etc.) in front of
the camera,
-
i
f the vehicle is facing highly reflective
signs.
When the system detects thick fog, it
temporarily deactivates the function.
The system is not able to detect:
-
r
oad users that do not have their own
lighting, such as pedestrians,
-
v
ehicles whose lighting is obscured
(for example: vehicles running behind a
safety barrier on a motor way),
-
v
ehicles at the top or bottom of a
steep slope, on winding roads, on
crossroads.Cornering lighting
If fitted to your vehicle, this system makes use
of the beam from a front foglamp to illuminate
the inside of a bend, when the main or dipped
beam headlamps are on and the vehicle speed
is below 25
mph (40 km/h) (urban driving,
winding road, junctions, parking manoeuvres,
e t c .) .
Without cornering lighting With cornering lighting
Switching on
This system starts:
-
w hen the corresponding direction indicator
is switched on,
or
-
f
rom a certain angle of rotation of the
steering wheel.
Switching off
The system does not operate:
- b elow a certain angle of rotation of the
steering wheel,
-
a
bove 25 mph (40 km/h),
-
w
hen reverse gear is engaged.
Lighting and visibility
Page 199 of 312

197
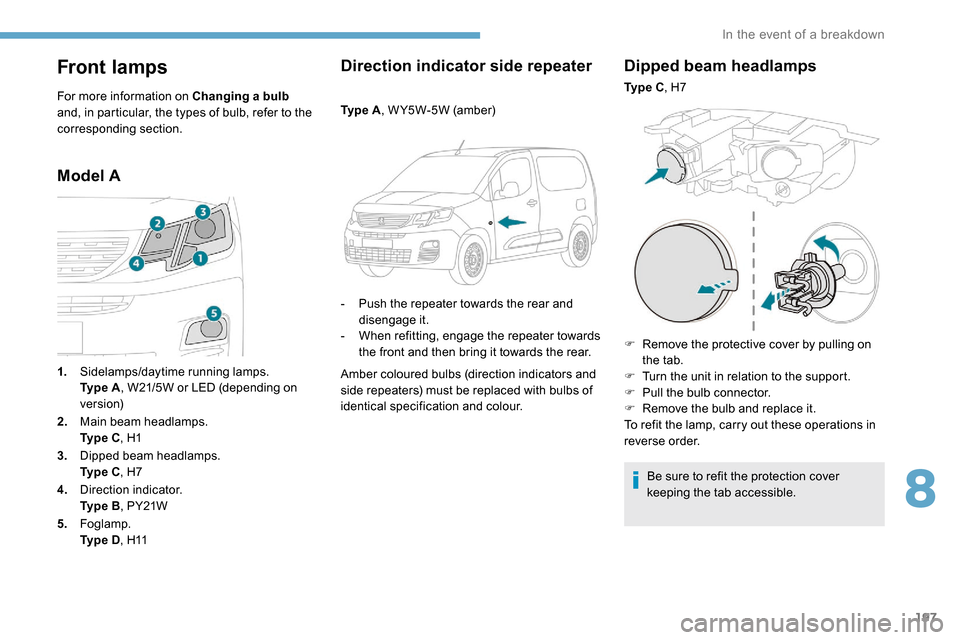
Front lamps
For more information on Changing a bulb
and, in particular, the types of bulb, refer to the
corresponding section.
Model A Direction indicator side repeater
Ty p e A
, W Y5W-5W (amber)
-
P
ush the repeater towards the rear and
disengage it.
-
W
hen refitting, engage the repeater towards
the front and then bring it towards the rear.
Amber coloured bulbs (direction indicators and
side repeaters) must be replaced with bulbs of
identical specification and colour.
Dipped beam headlamps
Ty p e C , H7
F
R
emove the protective cover by pulling on
the tab.
F
T
urn the unit in relation to the support.
F
P
ull the bulb connector.
F
R
emove the bulb and replace it.
To refit the lamp, carry out these operations in
reverse order.
Be sure to refit the protection cover
keeping the tab accessible.
1.
Sidelamps/daytime running lamps.
Ty p e
A , W21/5W or LED (depending on
ve r s i o n)
2. Main beam headlamps.
Ty p e
C , H1
3. Dipped beam headlamps.
Ty p e
C , H7
4. Direction indicator.
Ty p e
B , PY21W
5. Foglamp.
Ty p e
D , H11
8
In the event of a breakdown
Page 201 of 312

199
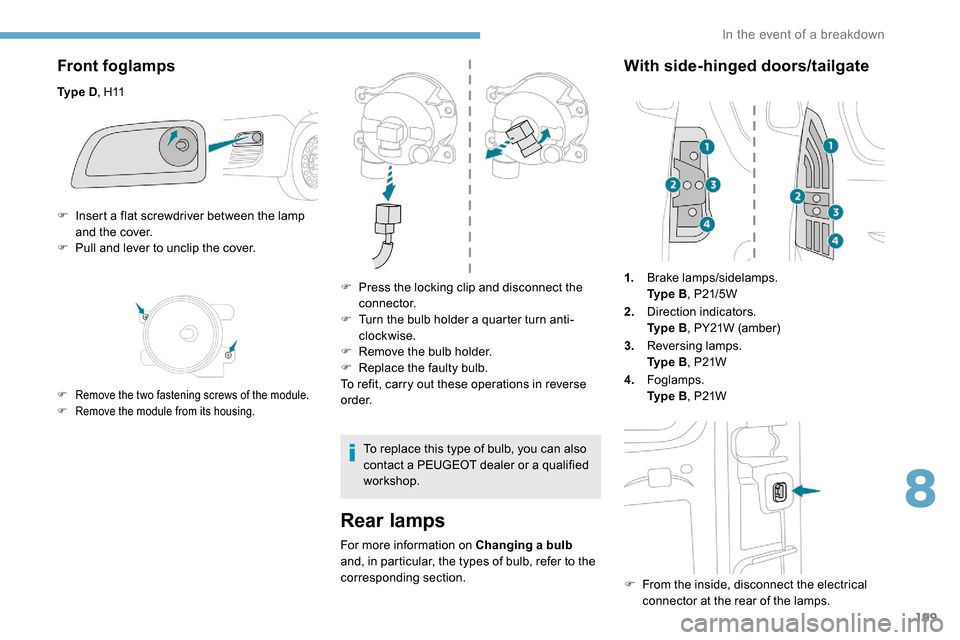
Front foglamps
Ty p e D, H11
Rear lamps
For more information on Changing a bulb
and, in particular, the types of bulb, refer to the
corresponding section.
With side-hinged doors/tailgate
1. Brake lamps/sidelamps.
Ty p e
B, P21/5W
2. Direction indicators.
Ty p e
B, PY21W (amber)
3. Reversing lamps.
Ty p e
B, P21W
4. Foglamps.
Ty p e
B, P21W
F
F
rom the inside, disconnect the electrical
connector at the rear of the lamps.
F
I
nsert a flat screwdriver between the lamp
and the cover.
F
P
ull and lever to unclip the cover.
F Remove the two fastening screws of the module.
F
R emove the module from its housing.
F Press the locking clip and disconnect the connector.
F
T
urn the bulb holder a quarter turn anti-
clockwise.
F
R
emove the bulb holder.
F
R
eplace the faulty bulb.
To refit, carry out these operations in reverse
o r d e r.
To replace this type of bulb, you can also
contact a PEUGEOT dealer or a qualified
workshop.
8
In the event of a breakdown