2019 Peugeot 508 remove seats
[x] Cancel search: remove seatsPage 9 of 320

7
Limit the causes of excess
consumption
Spread loads throughout the vehicle; place
the heaviest items at the back of the boot, as
close as possible to the rear seats.
Limit the loads carried in the vehicle and
reduce wind resistance (roof bars, roof rack,
bicycle carrier, trailer, etc.). Preferably, use a
roof box.
Remove roof bars and roof racks after use.
At the end of winter, remove snow tyres and
refit your summer tyres.
Observe the recommendations
on maintenance
Check the tyre pressures regularly, when cold,
referring to the label in the door aperture,
driver's side.
Carry out this check in particular:
-
b
efore a long journey,
-
a
t each change of season,
-
a
fter a long period out of use.
Do not forget the spare wheel and the tyres on
any trailer or caravan. Have your vehicle ser viced regularly (engine
oil, oil filter, air filter, cabin filter, etc.) and
obser ve the schedule of operations in the
manufacturer's service schedule.
When filling the tank, do not continue after the
3
rd cut-off of the nozzle to avoid over flow.
At the wheel of your new vehicle, it is only
after the first 1,900 miles (3,000 kilometres)
that you will see the fuel consumption settle
down to a consistent average. With a BlueHDi Diesel engine, if the SCR
system is faulty, your vehicle becomes
polluting. As soon as possible, visit a
PEUGEOT dealer or a qualified workshop to
make your vehicle’s level of nitrogen oxides
emissions compliant to the standard.
.
Eco-driving
Page 59 of 320

57
If your vehicle has electric door mirrors,
the ignition must be on to adjust them.
When driving
Maintain a good driving position and hold the
steering wheel with both hands at the "quarter
to three" position, so that you can quickly reach
the controls on and near the steering wheel.Never adjust the seats or steering wheel
when driving.
Always keep your feet on the floor.
Front seats
Front head restraints
Adjusting the height
The adjustment is correct when the upper
edge of the head restraint is level with the
top of the head.
Removing a head restraint
F Pull the head restraint up as far as it will go.
F P ress the lug A to release the head restraint
and remove it completely.
F
S
tow the head restraint securely.
Refitting a head restraint
F Introduce the head restraint rods into the guides in the seat backrest.
F
P
ush the head restraint down as far as it will go.
F
P
ress the lug A to free the head restraint and
push it down.
F
A
djust the height of the head restraint.
Never drive with the head restraints
removed; they should be in place and
correctly adjusted for the occupant of the
seat.
Upwards:
F
p
ull the head restraint up to the desired
position; the head restraint can be felt to
click into position.
Downwards:
F
p
ress and hold button B and push the head
restraint down to the desired position.
Seats with manual adjustments
For safety reasons, only adjust seats
when the vehicle is stationary.
Longitudinal
F Raise the control bar and slide the seat forwards or backwards.
F
R
elease the bar to lock the seat in position
on one of the runners.
Before moving the seat backwards,
ensure that there is nothing that might
prevent the full travel of the seat.
There is a risk of trapping or pinching
passengers if present in the rear seats
or jamming the seat if large objects are
placed on the floor behind the seat.
Height
F Pull the control upwards to raise or push it downwards to lower, as many times as
necessary to obtain the position required.
3
Ease of use and comfort
Page 65 of 320

63
Rear seats
Rear head restraints
The rear head restraints can be removed.
To remove a head restraint:
F
f
irst tilt the corresponding backrest,
F
p
ull the head restraint as far up as it will go,
F
p
ress the lug A to release the head restraint
and remove it completely,
F
s
tow the head restraint.
When a seat is not occupied, the head restraint
must be in the low position to improve rear visibility:
F press the lug A to release the head restraint
and push it fully down.
When there is a passenger in the rear, the head
restraint must be in the high position to improve
comfort and safety:
F
r
aise the head restraint up to the desired notch.
Never drive with passengers seated at
the rear when the head restraints are
removed; they must be in place and in the
high position.
The head restraint for the centre seat
and those for the outer seats are not
interchangeable.
Folding the backrests
Folding or unfolding the seat backrests must
only be done with the vehicle stationary.
First steps:
F
l
ower the head restraints of the backrests,
or even remove them when carrying heavy
loads,
F
i
f necessary, move the front seats for ward,
F
f
old away the rear armrest,
F
c
heck that nothing and no one might
inter fere with the folding of the backrests
(clothing, luggage, etc.),
F
c
heck that the outer seat belts are lying flat
correctly on the backrests. When the backrest is released, the red
indicator in the release grip is visible.
From the passenger
compartment
To refit a head restraint:
F i
nsert the head restraint rods into the guides in
the corresponding seat backrest,
F
p
ush the head restraint down as far as it will go,
F
p
ress the lug A to free the head restraint and
push it down.
F Press the backrest release grip 1 .
F
G
uide backrest 3 down to the horizontal
position.
3
Ease of use and comfort
Page 84 of 320

82
To remove the part A:
F N ote the mounting direction.
F
U
nclip the rear mounting 1 on each side.
F
U
nclip the front mounting 2 on each side.
This tray can be raised only in one direction.
To refit it, proceed in the reverse order. When sharp deceleration occurs, objects
placed on the load space cover can turn
into projectiles.
Load space cover
(SW)
AccessTo reel in
Removal
To remove the part B
:
F U nclip the two side mountings 3 .
F
P
ull the load space cover for wards to
extract the two rear mountings 4 from the
frame.
To refit it, proceed in the reverse order.
F
P
ush the handle down, the load space cover
automatically rises along the boot pillars. F
P
ull the handle towards you, the load space
cover will automatically roll up.
The moving part A
can be folded against the
backrests of the rear seats.
F Compress control B and lift the load space
cover on the right then on the left to remove it.
Ease of use and comfort
Page 85 of 320

83
Installation
F Position the left-hand end of the load space cover roller in its location 1 behind the rear
left seat.
F
C
ompress the roller control B and put the
roller in place in its location 2 on the right.
F
R
elease the control to secure the load
space cover.
F
U
nreel it to its fastening on the rear pillars.
High load retaining net
(SW)
It offers protection to the occupants when
very sharp braking occurs.
Row 1
F Fold down the rear seats.
F R emove the rear head restraints.
F
P
osition the net's roller above the two rails
(located on the back of the folded rear seats).
F
S
lide the two rails B in the grooves A and
push the roller from left to right to secure it.
F
U
nroll the net without stretching it.
F
P
osition one of the ends of the net's metal
bar in the corresponding upper fixing 1 .
F
C
ompress the net's metal bar, then pull it
to position the other end in the other upper
fixing 1 .
F
C
heck that the net is attached securely and
properly extended.
Hooked onto the special upper and lower
fixings, this removable net allows the use of the
entire loading volume up to the roof:
-
b
ehind the front seats (row 1) when the rear
seats are folded,
-
b
ehind the rear seats (row 2) when the load
space cover is removed.
When sharp deceleration occurs, objects
placed on the load space cover can turn
into projectiles.
Never reposition the rear seats while the net's
roller is attached to the folded backrests.
3
Ease of use and comfort
Page 86 of 320

84
Row 2
F Reel in then remove the load space cover.
F F old down the rear seats.
F
P
osition the left-hand end of the net’s
roller in the side support 3 by reaching
from the left-hand side of the passenger
compartment.
F
P
osition the right-hand end of the net’s
roller in the side support 4 by reaching
from the right-hand side of the passenger
compartment.
F
P
ress each side to lock in the roller; the red
indicators must not be visible.
F
U
nroll the net from the boot.
F
P
osition one of the ends of the net's metal
bar in the corresponding upper fixing 2 .
F
C
ompress the net's metal bar, then pull it
to position the other end in the other upper
fixing 2 .
12 V accessory socket
F To connect a 12 V accessory (max. power:
120 W), remove the cap and connect an
appropriate adaptor.
F
S
witch on the ignition.
The connection of an electrical device
not approved by PEUGEOT, such as a
USB charger, may adversely affect the
operation of vehicle electrical systems,
causing faults such as poor radio
reception or inter ference with displays in
the screens.
Stowing rings
Hatchback To move one of the movable rings:
F
W
hile pressing the button, slide the ring into
its track.
F
O
nce in the desired position, release the
button to lock it.
F
C
heck that the net is attached securely and
properly extended.
F
S
traighten the rear seats and lock them in
place.
SW
The boot has four stowing rings to secure
luggage using different types of retaining nets.
For the SW, two of the rings are fixed and the
other two are movable in tracks.
For more information on the various nets,
contact a PEUGEOT dealer.
Ease of use and comfort
Page 112 of 320

110
General points relating to
child seats
The regulations on carrying children are
specific to each country. Refer to the
legislation in force in your country.
For maximum safety, please obser ve the
following recommendations:
-
I
n accordance with European regulations,
all children under the age of 12 or less
than one and a half metres tall must
travel in approved child seats suited to
their weight , on seats fitted with a seat belt
or ISOFIX mountings.
-
S
tatistically, the safest seats in your
vehicle for carr ying children are the rear
seats.
-
A c
hild weighing less than 9 kg must
travel in the "rear ward facing" position
both in the front and in the rear.
It is recommended that children travel on
the rear seats of your vehicle:
-
"rearward facing " up to the age of 3,
-
"forward facing " over the age of 3. Ensure that the seat belt is positioned and
tightened correctly.
For child seats with a support leg, ensure
that the support leg is in firm and steady
contact with the floor.
At the front: if necessary, adjust the
passenger seat.
At the rear: if necessary, adjust the
relevant front seat.
Remove and stow the head restraint
before installing a child seat with backrest
on a passenger seat.
Refit the head restraint once the child seat
has been removed.
Advice
The incorrect installation of a child seat in
a vehicle compromises the protection of
the child in the event of an accident.
Ensure that there is no seat belt or seat
belt buckle under the child seat, as this
could destabilise it.
Remember to fasten the seat belts or
the child seat harness keeping the slack
relative to the child's body to a minimum,
even for short journeys.
When installing a child seat using the seat
belt, ensure that the seat belt is tightened
correctly on the child seat and that it
secures the child seat firmly on the seat
of your vehicle. If your passenger seat is
adjustable, move it forwards if necessary.
The head restraint must be removed
before installing a child seat with a
backrest on a passenger seat.
Ensure that the head restraint is stored or
attached securely to prevent it from being
thrown around the vehicle in the event
of sharp braking. Refit the head restraint
when the child seat is removed.
Safety
Page 118 of 320
116
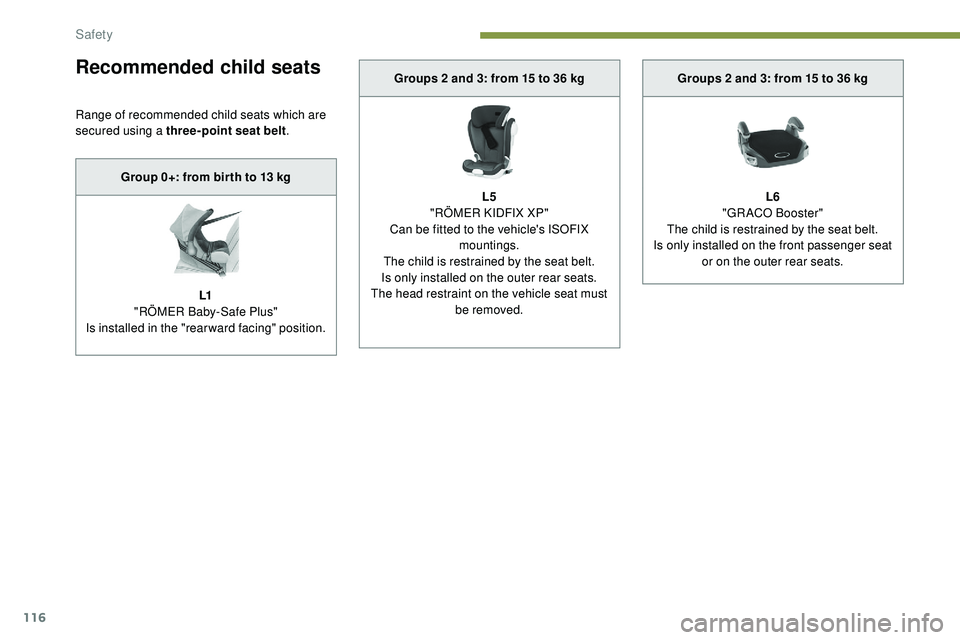
Recommended child seats
Range of recommended child seats which are
secured using a three-point seat belt.
Group 0+: from bir th to 13 kg
L1
"RÖMER Baby-Safe Plus"
Is installed in the "rearward facing" position. Groups 2 and 3: from 15 to 36 kg
L5
"RÖMER KIDFIX XP"
Can be fitted to the vehicle's ISOFIX mountings.
The child is restrained by the seat belt.
Is only installed on the outer rear seats.
The head restraint on the vehicle seat must be removed. Groups 2 and 3: from 15 to 36 kg
L6
"GRACO Booster"
The child is restrained by the seat belt.
Is only installed on the front passenger seat or on the outer rear seats.
Safety