2019 Peugeot 508 lock
[x] Cancel search: lockPage 91 of 320

89
Automatic illumination of
headlamps
When the ring is at the "AUTO" position and
a low level of ambient light is detected by a
sunshine sensor, the number plate lamps,
side
lamps and dipped beam headlamps are
switched on automatically, without any action
on the part of the driver. They can also come
on if rain is detected, at the same time as
automatic operation of the windscreen wipers.
As soon as the brightness returns to a
sufficient level or after the windscreen wipers
are switched off, the lamps are switched off
automatically.
Operating fault
In the event of a malfunction of the
sunshine sensor, the lighting comes
on, this warning lamp is displayed in
the instrument panel accompanied by
an audible signal and/or a message.
Contact a PEUGEOT dealer or a
qualified workshop.
Do not cover the sunshine sensor,
combined with the rain sensor and located
at the top centre of the windscreen behind
the rear view mirror; the associated
functions would no longer be controlled. In fog or snow, the sunshine sensor may
detect sufficient light. In this case, the
lighting will not come on automatically.
Guide-me-home lighting
Automatic
With the ring in the "
AUTO" position, if the
brightness is low, the dipped beam headlamps
come on automatically when the ignition is
switched off.
Manual
Switching on/off
F W ith the ignition off, "flash" the headlamps
using the lighting control stalk to switch the
function on/off.
Manual guide-me-home lighting goes off
automatically at the end of a given period of time.
Automatic exterior welcome
lighting
With the "Automatic illumination of headlamps"
function activated, under low ambient light, the
sidelamps, dipped beam headlamps and door
mirror spotlamps come on automatically when
the vehicle is unlocked.
Activation, deactivation and
the duration of the exterior
welcome lighting are set in the
Driving/Vehicle menu of the touch
screen.
The activation, deactivation
and the duration of the guide-
me-home lighting are set in the
Driving
/Vehicle menu of the touch
screen.
4
Lighting and visibility
Page 92 of 320
90
Door mirror spotlamps
Switching on
The spotlamps come on automatically:
-
w
hen you unlock the vehicle,
-
o
n opening a door,
-
w
hen a request to locate the vehicle is
received from the remote control.
They also come on with the exterior welcome
lighting and the guide-me-home lighting.
Switching off
They go off automatically after 30 seconds.
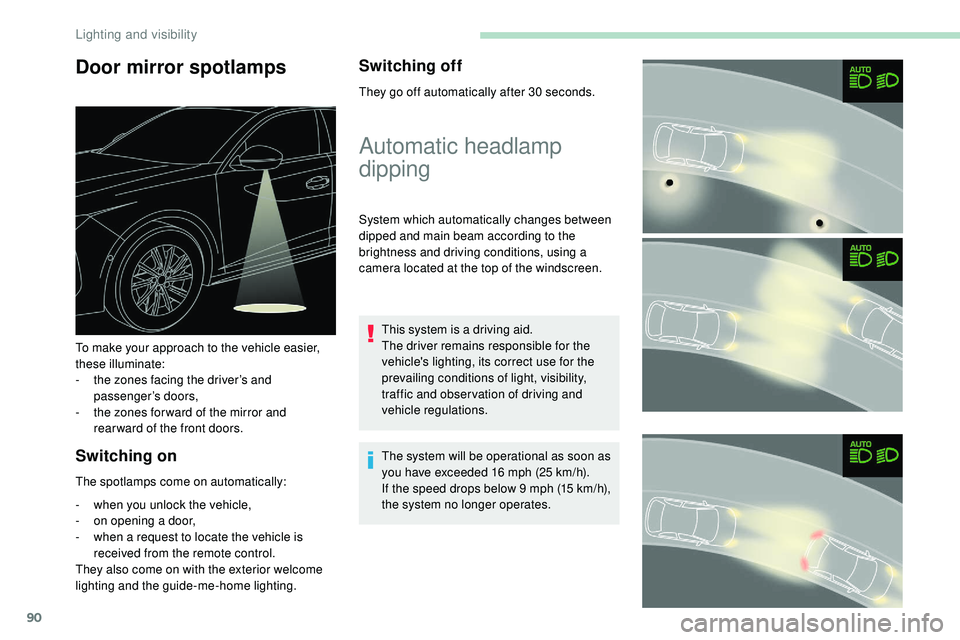
To make your approach to the vehicle easier,
these illuminate:
-
t
he zones facing the driver’s and
passenger’s doors,
-
t
he zones for ward of the mirror and
rear ward of the front doors.
Automatic headlamp
dipping
System which automatically changes between
dipped and main beam according to the
brightness and driving conditions, using a
camera located at the top of the windscreen.
This system is a driving aid.
The driver remains responsible for the
vehicle's lighting, its correct use for the
prevailing conditions of light, visibility,
traffic and obser vation of driving and
vehicle regulations.
The system will be operational as soon as
you have exceeded 16 mph (25
km/h).
If the speed drops below 9 mph (15
km/h),
the system no longer operates.
Lighting and visibility
Page 102 of 320

100
The system’s fault does not prevent the
vehicle from being driven.
Peugeot Connect
Assistance
** According to the geographic coverage of "Peugeot Connect SOS", "Peugeot
Connect Assistance" and the official national
language chosen by the owner of the vehicle.
The list of countries covered and PEUGEOT
CONNECT services is available from dealers
or on the website for your country. Press this button for more than
2
seconds to request assistance
if the vehicle breaks down.
A voice message confirms that the call has
been made**.
Geolocation
To reactivate geolocation, simultaneously press
the "Peugeot Connect SOS" and "Peugeot
Connect Assistance" buttons again, followed
by a press on "Peugeot Connect Assistance"
to confirm. If you purchased your vehicle outside the
PEUGEOT dealer network, we invite you
to have a dealer check the configuration of
these ser vices and, if desired, modify it to
suit your wishes. In a multilingual country,
configuration is possible in the official
national language of your choice.
For technical reasons and, in particular,
to improve the quality of PEUGEOT
CONNECT ser vices to customers, the
manufacturer reser ves the right to carry
out updates to the vehicle's on-board
telematic system. If you benefit from the Peugeot Connect
Packs offer with the SOS and assistance
pack included, there are additional
ser vices available to you in your personal
space, via the website for your country.
Pressing this button again immediately cancels
the request.
The cancellation is confirmed by a voice
message.
Electronic stability control
(ESC)
Definitions
You can deactivate geolocation by
simultaneously pressing the "Peugeot Connect
SOS" and "Peugeot Connect Assistance"
buttons, followed by pressing "Peugeot
Connect Assistance" to confirm. Electronic stability control comprising the
following systems:
-
A
nti-lock Braking System (ABS) and
Electronic Brake Force Distribution (EBFD).
-
E
mergency braking assistance (EBA).
-
A
nti-slip regulation (ASR).
-
D
ynamic stability control (DSC).
-
T
railer stability assist (TSA).
Anti-lock braking system (ABS)
and electronic brake force
distribution (EBFD)
These systems improve the stability and
manoeuvrability of your vehicle when braking
and contribute towards improved control in
corners, in particular on poor or slippery road
surfaces.
The ABS prevents wheel lock in the event of
emergency braking.
The EBFD manages the braking pressure
wheel by wheel.
Safety
Page 103 of 320

101
Anti-lock braking system
(ABS) and electronic brake
force distribution (EBFD)
The fixed illumination of this warning
lamp signals that there is a fault with
the ABS.
Emergency braking assistance
(EBA)
In an emergency, this system enables you to
reach the optimum braking pressure more
quickly and therefore reduce the stopping
distance.
It is triggered in relation to the speed at which
the brake pedal is pressed. This is felt by a
reduction in the resistance of the pedal and an
increase in braking efficiency.
Anti-slip regulation (ASR)
This system optimises traction in order to
avoid wheel slip by acting on the brakes of
the driving wheels and on the engine. It also
improves the directional stability of the vehicle
on acceleration.
Dynamic stability control (DSC)
If there is a difference between the path
followed by the vehicle and that required by the
driver, this system monitors each wheel and
automatically acts on the brake of one or more
wheels and on the engine to return the vehicle
to the required path, within the limits of the laws
of physics.
Trailer stability assist (TSA)
This system allows control of the vehicle to be
retained when towing a trailer, so as to avoid
the risk of snaking.The vehicle retains conventional braking. Drive
carefully at moderate speed.
Contact a PEUGEOT dealer or a qualified
workshop as soon as possible.
Illumination of this warning lamp,
linked with the STOP and ABS
warning lamps, accompanied by
the display of a message and an
audible signal, signals that there is a
fault with the electronic brake force
distribution (EBFD).
You must stop as soon as it is safe to do so.
Call on a PEUGEOT dealer or a qualified
workshop.
Normal operation of the ABS may make
itself felt by slight vibrations of the brake
pedal.
When braking in an emergency, press
very firmly and maintain this pressure. When changing wheels (tyres and rims),
ensure that these are approved for your
vehicle.
After an impact, have these systems
checked by a PEUGEOT dealer or a
qualified workshop.
Anti-slip regulation (ASR)/
Dynamic stability control
(DSC)
Operation
These systems are activated automatically
every time the vehicle is started.
They come into operation in the event of a
problem with grip or trajectory.
This is indicated by flashing of this
warning lamp in the instrument panel.
Deactivation
In exceptional conditions (starting a vehicle
which is bogged down, stuck in snow, on soft
ground, etc.), it may be advisable to deactivate
the ASR system, so that the wheels can turn
freely and regain grip.
Reactivate the system when grip conditions
allow.
5
Safety
Page 106 of 320
104
Fastening
F Pull the strap, then insert the tongue in the buckle.
F
C
heck that the seat belt is fastened
correctly by pulling the strap.
Unfastening
F Press the red button on the buckle.
F G uide the seat belt as it is reeled in.
Seat belt not fastened/
unfastened warning lamp(s)
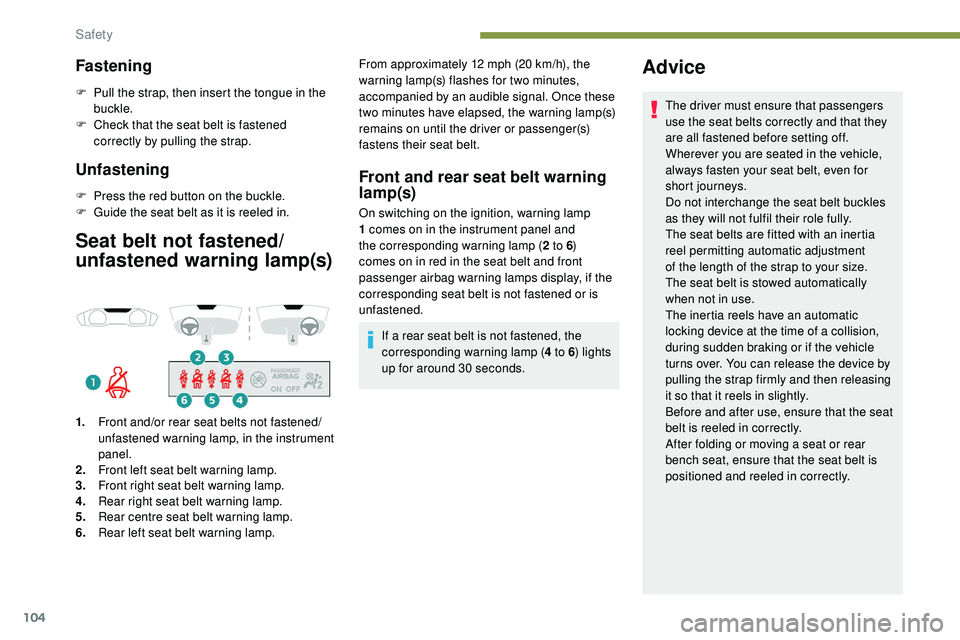
1.Front and/or rear seat belts not fastened/
unfastened warning lamp, in the instrument
panel.
2. Front left seat belt warning lamp.
3. Front right seat belt warning lamp.
4. Rear right seat belt warning lamp.
5. Rear centre seat belt warning lamp.
6. Rear left seat belt warning lamp. From approximately 12 mph (20
km/h), the
warning lamp(s) flashes for two minutes,
accompanied by an audible signal. Once these
two minutes have elapsed, the warning lamp(s)
remains on until the driver or passenger(s)
fastens their seat belt.
Front and rear seat belt warning
lamp(s)
On switching on the ignition, warning lamp
1 comes on in the instrument panel and
the corresponding warning lamp ( 2 to 6)
comes on in red in the seat belt and front
passenger airbag warning lamps display, if the
corresponding seat belt is not fastened or is
unfastened.
If a rear seat belt is not fastened, the
corresponding warning lamp ( 4 to 6) lights
up for around 30 seconds.
Advice
The driver must ensure that passengers
use the seat belts correctly and that they
are all fastened before setting off.
Wherever you are seated in the vehicle,
always fasten your seat belt, even for
short journeys.
Do not interchange the seat belt buckles
as they will not fulfil their role fully.
The seat belts are fitted with an inertia
reel permitting automatic adjustment
of the length of the strap to your size.
The
seat belt is stowed automatically
when not in use.
The inertia reels have an automatic
locking device at the time of a collision,
during sudden braking or if the vehicle
turns over. You can release the device by
pulling the strap firmly and then releasing
it so that it reels in slightly.
Before and after use, ensure that the seat
belt is reeled in correctly.
After folding or moving a seat or rear
bench seat, ensure that the seat belt is
positioned and reeled in correctly.
Safety
Page 113 of 320
111
Children at the rear
At rear seating positions, always leave
sufficient space between the front seat
and:
-
a "
rear ward facing" child seat,
-
t
he child's feet for a child seat fitted
"forward facing".
To do this, move the front seat for wards
and, if necessary, straighten its backrest.
For optimal installation of the "forward
facing" child seat, verify that its backrest is
as close as possible to the backrest of the
vehicle seat, if possible in contact with it.
Children at the front
The legislation on carrying children on the
front passenger seat is specific to each
country. Refer to the legislation in force in
the country in which you are driving.
Deactivate the front passenger airbag
when a "rear ward facing" child seat is
installed on the front passenger seats.
Other wise, there is a risk of serious or
fatal injury to the child if the airbag is
deployed. Installing a booster seat (height adjuster)
The chest part of the seat belt must be
positioned on the child's shoulder without
touching the neck.
Ensure that the lap part of the seat belt
passes correctly over the child's thighs.
We recommend using a booster seat with
a backrest, equipped with a belt guide at
shoulder level.
Additional protections
To prevent accidental opening of the doors
and rear windows, use the child lock.
Take care not to open the rear windows by
more than one third.
To protect young children from the rays
of the sun, fit side blinds on the rear
windows.
As a safety precaution, do not leave:
-
a c
hild or children alone and
unattended in a vehicle,
-
a c
hild or an animal in a vehicle
which is exposed to the sun, with the
windows closed,
-
t
he keys within reach of children inside
the vehicle.Child seat at the rear
"Rearward facing"
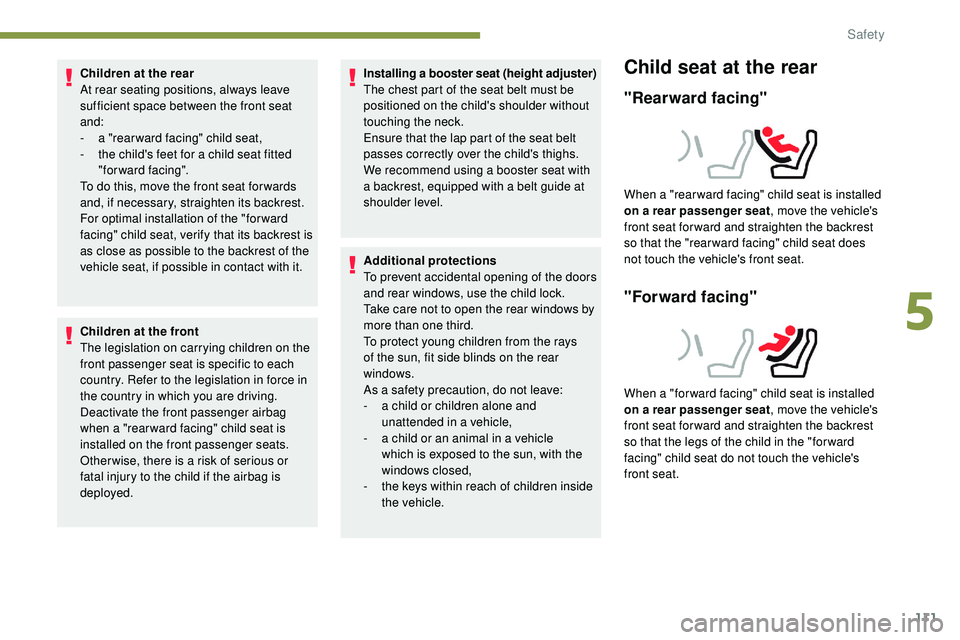
When a "rear ward facing" child seat is installed
on a rear passenger seat , move the vehicle's
front seat for ward and straighten the backrest
so that the "rear ward facing" child seat does
not touch the vehicle's front seat.
"Forward facing"
When a "for ward facing" child seat is installed
on a rear passenger seat , move the vehicle's
front seat for ward and straighten the backrest
so that the legs of the child in the "for ward
facing" child seat do not touch the vehicle's
front seat.
5
Safety
Page 124 of 320
122
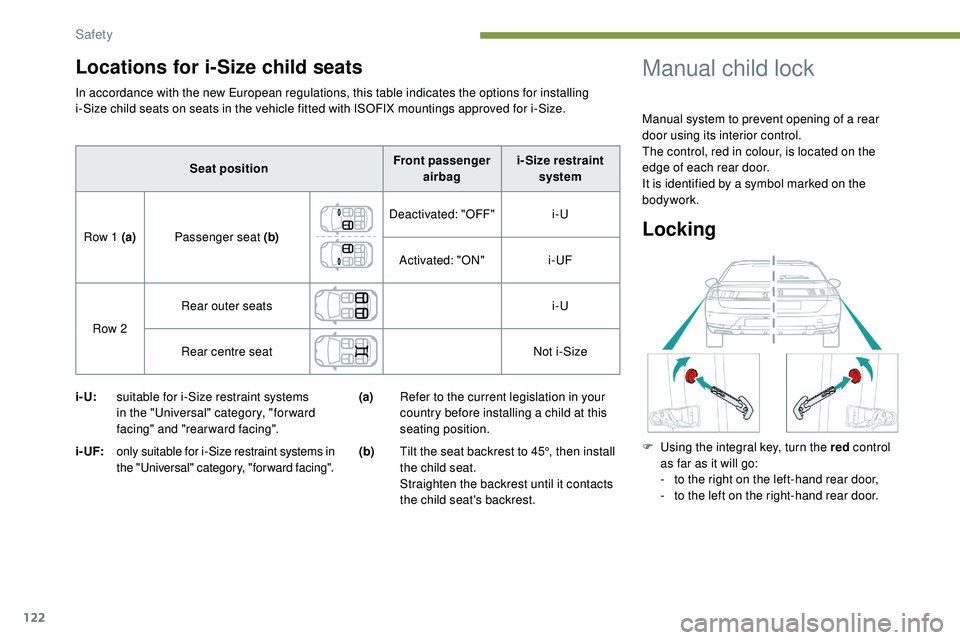
In accordance with the new European regulations, this table indicates the options for installing
i-Size child seats on seats in the vehicle fitted with ISOFIX mountings approved for i-Size.
i- U:suitable for i-Size restraint systems
in the "Universal" category, "forward
facing" and "rearward facing".
i - UF:
only suitable for i-Size restraint systems in
the "Universal" category, "forward facing".
(a) Refer to the current legislation in your
country before installing a child at this
seating position.
(b) Tilt the seat backrest to 45°, then install
the child seat.
Straighten the backrest until it contacts
the child seat's backrest.
Manual child lock
Manual system to prevent opening of a rear
door using its interior control.
The control, red in colour, is located on the
edge of each rear door.
It is identified by a symbol marked on the
bodywork.
Locking
F Using the integral key, turn the red control
as far as it will go:
-
t
o the right on the left-hand rear door,
-
t
o the left on the right-hand rear door.
Seat position
Front passenger
airbag i- Size restraint
system
Row 1 (a) Passenger seat (b) Deactivated: "OFF"
i-U
Activated: "ON" i-UF
Row 2 Rear outer seats
i-U
Rear centre seat Not i-Size
Locations for i-Size child seats
Safety
Page 125 of 320
123
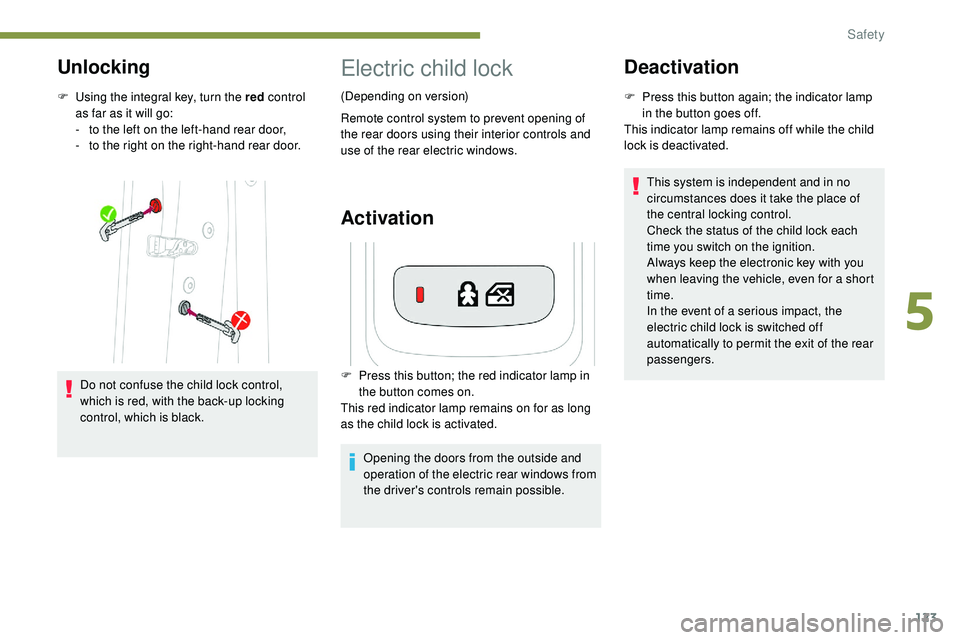
Unlocking
F Using the integral key, turn the red control
as far as it will go:
-
t
o the left on the left-hand rear door,
-
t
o the right on the right-hand rear door.
Do not confuse the child lock control,
which is red, with the back-up locking
control, which is black.
Electric child lock
(Depending on version)
Remote control system to prevent opening of
the rear doors using their interior controls and
use of the rear electric windows.
Activation
F Press this button; the red indicator lamp in the button comes on.
This red indicator lamp remains on for as long
as the child lock is activated.
Opening the doors from the outside and
operation of the electric rear windows from
the driver's controls remain possible.
Deactivation
F Press this button again; the indicator lamp in the button goes off.
This indicator lamp remains off while the child
lock is deactivated.
This system is independent and in no
circumstances does it take the place of
the central locking control.
Check the status of the child lock each
time you switch on the ignition.
Always keep the electronic key with you
when leaving the vehicle, even for a short
time.
In the event of a serious impact, the
electric child lock is switched off
automatically to permit the exit of the rear
passengers.
5
Safety