2019 Peugeot 508 ECU
[x] Cancel search: ECUPage 219 of 320

217
F Remove the valve cap from the tyre to be repaired, and place it in a clean area.
F
C
heck that the compressor switch is at
position " O".
F
F
ully uncoil the electric cable, stowed under
the compressor.
F
C
onnect the compressor's electric plug to
the vehicle's 12
V socket.
Only the 12
V sockets located at the front
of the vehicle and in the boot can be
used to power the compressor.
The 12
V socket located at the back of
the centre console is not suitable for this
purpose. F
A ffix the speed limit sticker.
The speed limit sticker must be secured to
the interior of the vehicle in the area close
to the driver, to remind the driver that a
wheel is in temporary use.
F
S
witch on the ignition.If a pressure of 2 bars is not reached
after about 7 minutes, this indicates
that the tyre is not repairable; contact a
PEUGEOT dealer or a qualified workshop
for assistance.
F
T
urn the switch to position "O".
F
D
isconnect the compressor's electric plug
from the vehicle's 12
V socket.
F
R
eplace the cap on the valve.
F
R
emove the kit.
F
R
emove and then store the bottle of sealant.
F
C
onnect the hose from the bottle of sealant
to the valve of the tyre to be repaired and
tighten firmly. The tyre inflation pressures are given on
this label.F
S tart the compressor by turning the switch
to position " l" until the pressure of the tyre
reaches 2 bars. The sealant product is
injected under pressure into the tyre; do not
disconnect the pipe from the valve during
this operation (risk of blowback).
8
In the event of a breakdown
Page 223 of 320

221
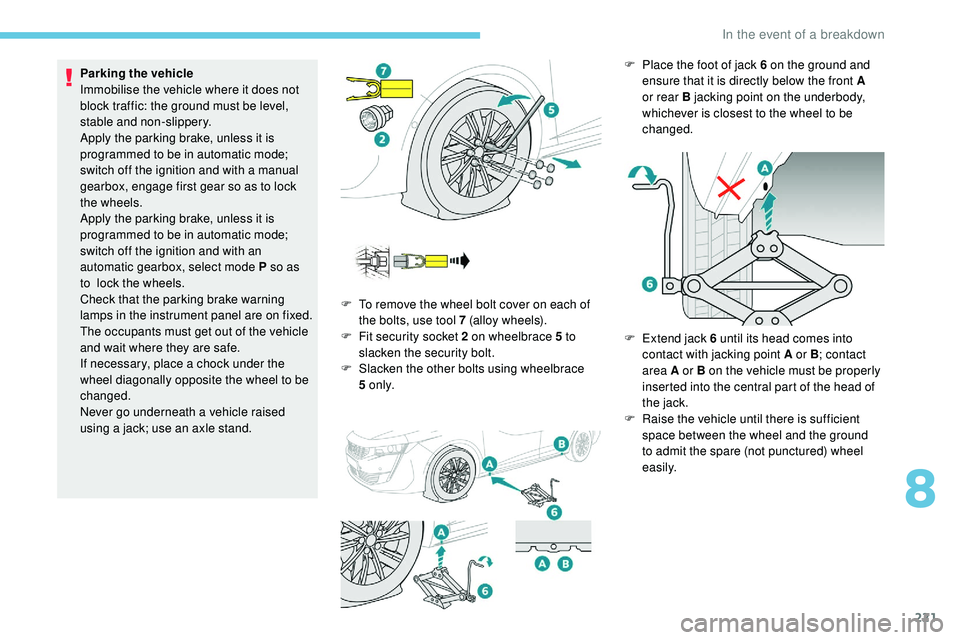
Parking the vehicle
Immobilise the vehicle where it does not
block traffic: the ground must be level,
stable and non-slippery.
Apply the parking brake, unless it is
programmed to be in automatic mode;
switch off the ignition and with a manual
gearbox, engage first gear so as to lock
the wheels.
Apply the parking brake, unless it is
programmed to be in automatic mode;
switch off the ignition and with an
automatic gearbox, select mode P so as
to lock the wheels.
Check that the parking brake warning
lamps in the instrument panel are on fixed.
The occupants must get out of the vehicle
and wait where they are safe.
If necessary, place a chock under the
wheel diagonally opposite the wheel to be
changed.
Never go underneath a vehicle raised
using a jack; use an axle stand. F
T
o remove the wheel bolt cover on each of
the bolts, use tool 7 (alloy wheels).
F
F
it security socket 2 on wheelbrace 5 to
slacken the security bolt.
F
S
lacken the other bolts using wheelbrace
5
o n l y.F
P lace the foot of jack 6 on the ground and
ensure that it is directly below the front A
or rear B jacking point on the underbody,
whichever is closest to the wheel to be
changed.
F
E
xtend jack 6 until its head comes into
contact with jacking point A or B ; contact
area A or B on the vehicle must be properly
inserted into the central part of the head of
the jack.
F
Ra
ise the vehicle until there is sufficient
space between the wheel and the ground
to admit the spare (not punctured) wheel
easily.
8
In the event of a breakdown
Page 224 of 320

222
Ensure that the jack is stable. If the
ground is slippery or loose, the jack may
slip or drop – risk of injury!
Position the jack strictly at one of the
jacking points, A or B, under the vehicle,
ensuring that the head of the jack is
centred under the contact area on the
vehicle. Other wise, there is a risk of
damage to the vehicle and/or the jack
collapsing – risk of injury!
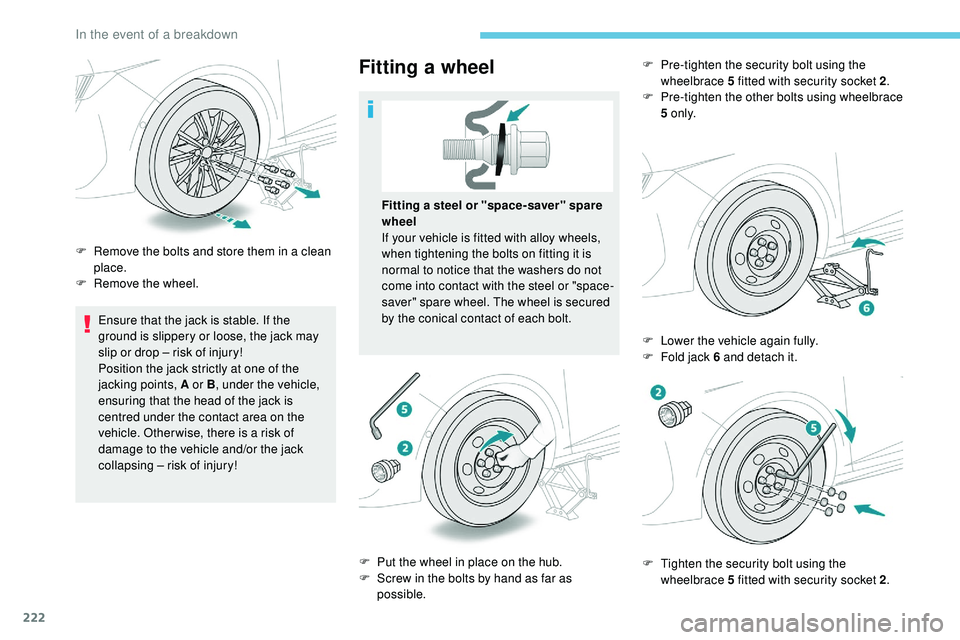
Fitting a wheel
F Remove the bolts and store them in a clean place.
F
R
emove the wheel. Fitting a steel or "space-saver" spare
wheel
If your vehicle is fitted with alloy wheels,
when tightening the bolts on fitting it is
normal to notice that the washers do not
come into contact with the steel or "space-
saver" spare wheel. The wheel is secured
by the conical contact of each bolt.
F
P
ut the wheel in place on the hub.
F
S
crew in the bolts by hand as far as
possible. F
P
re-tighten the security bolt using the
wheelbrace 5 fitted with security socket 2 .
F
P
re-tighten the other bolts using wheelbrace
5 o n l y.
F
L
ower the vehicle again fully.
F
F
old jack 6 and detach it.
F
T
ighten the security bolt using the
wheelbrace 5 fitted with security socket 2 .
In the event of a breakdown
Page 229 of 320

227
Number plate lamps (LED)
Changing a fuse
Access to the tools
The extraction tweezers are located behind the
fusebox cover.
Changing a fuse
Before changing a fuse:
F identify the cause of the failure and correct it,
F
s
witch off all electrical consumers,
F
i
mmobilise the vehicle and switch off the
ignition,
F
i
dentify the defective fuse using the current
allocation tables and diagrams. To work on a fuse, you must:
F
u
se the special tweezers to extract the fuse
from its housing and check the condition of
its filament,
F
a
lways replace the defective fuse with a
fuse of the same rating (same colour); using
a different rating could cause a malfunction
(risk of fire).
If the fault recurs after replacing a fuse, have
the electrical system checked by a PEUGEOT
dealer or a qualified workshop.
F
D
isengage the cover completely.
F
T
ake the tweezers from their housing.
F
U
nclip the cover by pulling at the top left,
then right. F
O
pen the glove box.
F
P
ress on the central handle of the fusebox
c ove r.
F
L
ower the cover completely.
F
T
ake the tweezers from their housing. The fuse allocation tables and the
corresponding diagrams are available
from a PEUGEOT dealer or a qualified
workshop.
The replacement of a fuse not shown in
the allocation tables may cause a serious
malfunction of your vehicle. Contact a
PEUGEOT dealer or a qualified workshop.
8
In the event of a breakdown
Page 284 of 320

16
Select a Wi-Fi network found by the
system and connect.
Wi-Fi connection
This function is only available if it has been
activated either via the "Notifications" or
via the "Applications" menu. Press " Notifications ".
Select Wi-Fi to activate it.
OR Press Applications to display the
primary page.
Press the " OPTIONS" button to go to the
secondary page.
Select "Wi- Fi network
connection ".
Select the " Secured" or "Not
secured " or "Stored " tab.
Select a network. Using the virtual keypad, enter the
"
Key " for the Wi-Fi network and the
" Password ".
Press " OK" to start the connection.
Restrictions of use:
-
W
ith CarPlay
®, connection sharing is
only with a Wi-Fi connection.
-
W
ith MirrorLink™, connection sharing
is only with a USB connection.
The quality of ser vices depends on the
quality of the network connection.
With the arrival of "TOMTOM
TR AFFIC", the ser vices are available.
The ser vices offered with connected
navigation are as follows.
A Connected Services pack:
-
Weather,
-
F
illing stations,
-
C
ar park,
-
Tr a f f i c ,
-
P
OI local search.
A Danger zone pack (option). The processes and standards are
constantly changing; for the communication
process between the smartphone and the
system to work correctly, we recommend
that you update the operating system of
the smar tphone as well as the date and
time of the smar tphone and the system.
Settings specific to
connected navigation
In the "Settings" menu you can create
a profile for just one person or a group
of people with common points, with the
possibility of entering a multitude of
settings (radio presets, audio settings,
navigation history, contact favourites,
etc.); these settings are taken into account
automatically.
Press Navigation to display the
primary page.
Press the " MENU" button to go to the
secondary page.
Select "Settings ".
PEUGEOT Connect Nav
Page 290 of 320

22
Connection sharing
The system offers to connect the telephone with
3 profiles:
- "Telephone " (hands-free kit, telephone only),
-
"Streaming " (streaming: wireless playing of
the audio files on the telephone),
-
"Mobile internet data ".
The "Mobile internet data " profile
must be activated for connected
navigation (where the vehicle does not
have "Emergency and assistance call"
services), having first activated sharing of
this connection on your smartphone.
Select one or more profiles.
Press " OK" to confirm.
Wi-Fi connection
Network connection by the smartphone's Wi-Fi.
Press Applications to display the
primary page.
Press the " OPTIONS" button to go to the
secondary page. Select "
Wi- Fi network
connection ".
Select the " Secured" or "Not
secured " or "Stored " tab.
Select a network.
Using the virtual keypad, enter the
" Key " for the Wi-Fi network and the
" Password ".
Press " OK" to start the connection.
The Wi-Fi connection and the sharing of
the Wi-Fi connection are exclusive.
Wi-Fi connection sharing
Creation of a local Wi-Fi network by the
system. Press Applications to display the
primary page.
Press the " OPTIONS" button to go to the
secondary page.
Select "Share Wi-Fi connection ".Select the "
Activation" tab to activate or
deactivate sharing of the Wi-Fi connection.
And/Or
Select the " Settings" to change the name of
the system network and the password.
Press "OK" to confirm.
To protect against unauthorised access
and make your systems as secure as
possible, the use of a complex security
code or password is recommended.
Managing connections
Press Applications to display the
primary page.
Press the " OPTIONS" button to go to the
secondary page.
Select "Manage connection ".
With this function you can view the access
to connected ser vices, the availability of
connected services and modify the connection
mode.
PEUGEOT Connect Nav