2019 Peugeot 508 ECU
[x] Cancel search: ECUPage 119 of 320

117
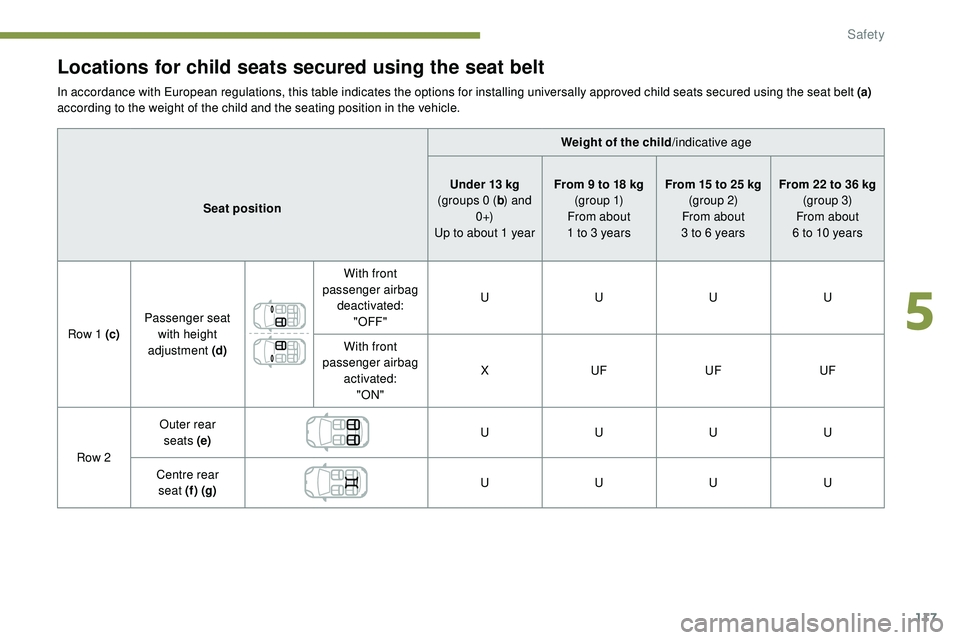
Locations for child seats secured using the seat belt
In accordance with European regulations, this table indicates the options for installing universally approved child seats secured using the seat belt (a)
according to the weight of the child and the seating position in the vehicle.Weight of the child/indicative age
Seat position Under 13
kg
(groups 0 ( b) and
0 +)
Up to about 1 year From 9 to 18 kg
(g r o u p 1)
From about
1 to 3 years From 15 to 25 kg
(group 2)
From about
3 to 6 years From 22 to 36 kg
(group 3)
From about
6 to 10 years
Row 1 (c) Passenger seat
with height
adjustment
(d)With front
passenger airbag deactivated: "OFF" U
UUU
With front
passenger airbag activated:"ON" X
UF UFUF
Row 2 Outer rear
seats
(e) U
UUU
Centre rear seat
(f )
(g) U
UUU
5
Safety
Page 120 of 320

118
U:seat suitable for installing a child
seat secured using the seat belt and
universally approved for "rearward
facing" and/or "forward facing" use.
UF: seat suitable for installing a child seat
secured using the seat belt and universally
approved for "forward facing" use.
X: seat not suitable for installing a child
seat of the weight group indicated.
(a) Universal child seat: child seat that can
be installed in all vehicles using the
seat belt.
(b) Group 0: from birth to 10
kg. Carrycots
and "car" infant carriers cannot be
installed on the front passenger seat.
(c) Refer to the current legislation in your
country before installing your child in
this seat.
(d) Adjust the passenger seat to the
maximum height position.
(e) When installing a child seat on a rear
seat in a "rear ward facing" or "for ward
facing" position, move the front seat
for ward then straighten the backrest to
allow enough room for the child seat
and the child's legs.
(f ) A child seat with a support leg must
never be installed on this seat.
(g) Before installing the child seat on the
centre seat, store the right-hand outer
buckle in the space provided in the seat
cushion."ISOFIX" mountings
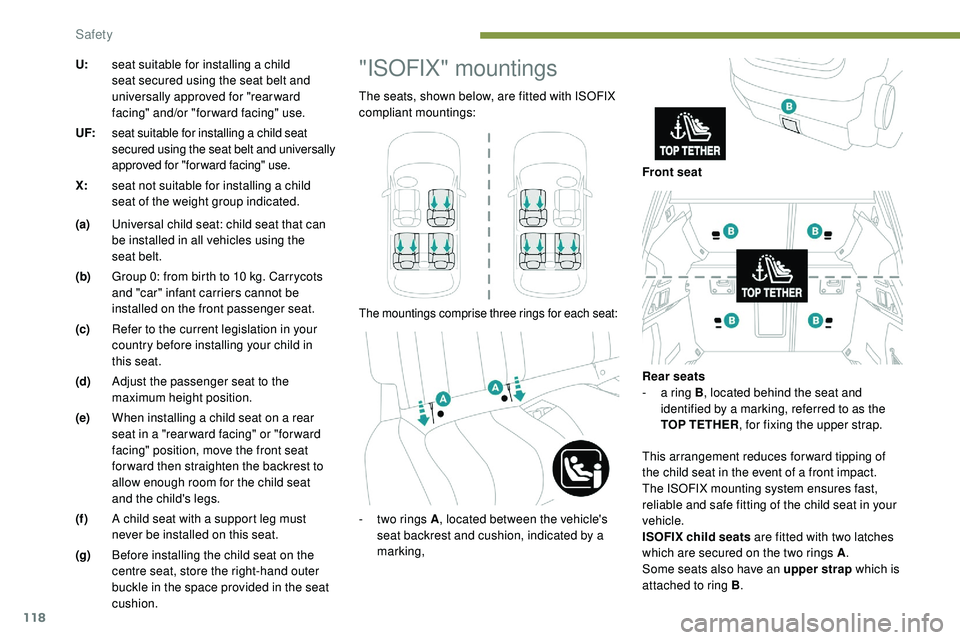
The seats, shown below, are fitted with ISOFIX
compliant mountings:
The mountings comprise three rings for each seat:
This arrangement reduces forward tipping of
the child seat in the event of a front impact.
The ISOFIX mounting system ensures fast,
reliable and safe fitting of the child seat in your
vehicle.
ISOFIX child seats are fitted with two latches
which are secured on the two rings A .
Some seats also have an upper strap which is
attached to ring B .
-
t
wo rings A , located between the vehicle's
seat backrest and cushion, indicated by a
marking, Front seat
Rear seats
-
a r
ing B
, located behind the seat and
identified by a marking, referred to as the
TOP TETHER , for fixing the upper strap.
Safety
Page 121 of 320

119
The incorrect installation of a child seat
in a vehicle compromises the child's
protection in the event of an accident.
Strictly obser ve the fitting instructions
provided with the child seat.
For information on the possibilities for
installing ISOFIX child seats in your
vehicle, refer to the summary table.
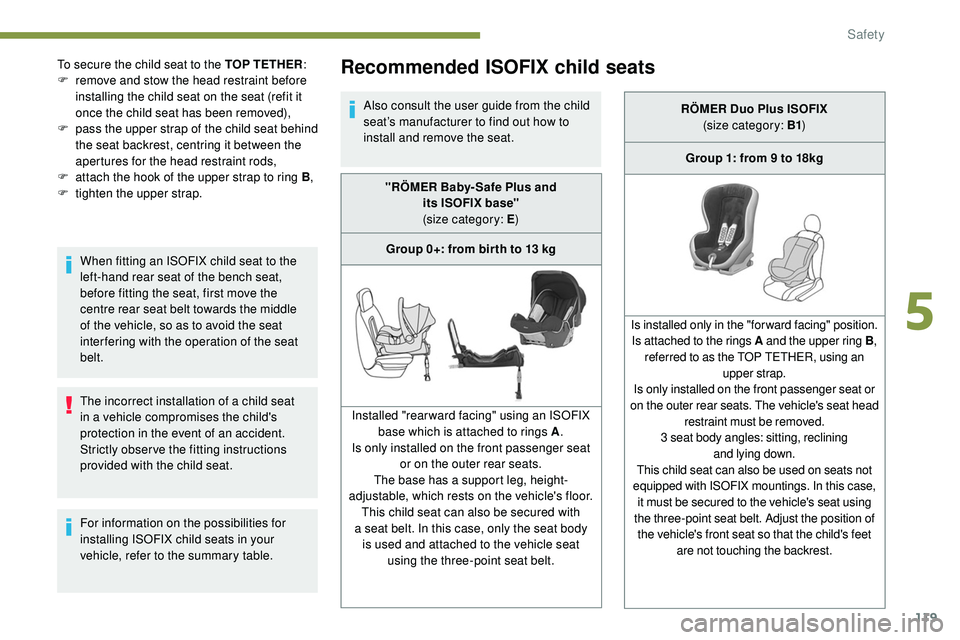
Recommended ISOFIX child seats
Also consult the user guide from the child
seat’s manufacturer to find out how to
install and remove the seat.
To secure the child seat to the TOP TETHER
:
F
r
emove and stow the head restraint before
installing the child seat on the seat (refit it
once the child seat has been removed),
F
p
ass the upper strap of the child seat behind
the seat backrest, centring it between the
apertures for the head restraint rods,
F
a
ttach the hook of the upper strap to ring B ,
F
t
ighten the upper strap. When fitting an ISOFIX child seat to the
left-hand rear seat of the bench seat,
before fitting the seat, first move the
centre rear seat belt towards the middle
of the vehicle, so as to avoid the seat
interfering with the operation of the seat
belt. "RÖMER Baby- Safe Plus and
its
ISOFIX base"
(size category: E )
Group 0+: from bir th to 13 kg
Installed "rearward facing" using an ISOFIX base which is attached to rings A .
Is only installed on the front passenger seat or on the outer rear seats.
The base has a support leg, height-
adjustable, which rests on the vehicle's floor. This child seat can also be secured with
a
seat belt. In this case, only the seat body
is
used and attached to the vehicle seat using
the three-point seat belt. RÖMER Duo Plus ISOFIX
(size category: B1 )
Group 1: from 9 to 18kg
Is installed only in the "forward facing" position. Is attached to the rings A and the upper ring
B,
referred to as the TOP TETHER, using
an
upper strap.
Is only installed on the front passenger seat or
on the outer rear seats. The vehicle's seat head restraint must be removed.
3 seat body angles: sitting, reclining and
lying
down.
This child seat can also be used on seats not
equipped with ISOFIX mountings. In this case, it
must be secured to the vehicle's seat using
the three-point seat belt. Adjust the position of the vehicle's front seat so that the child's feet are not touching the backrest.
5
Safety
Page 123 of 320

121
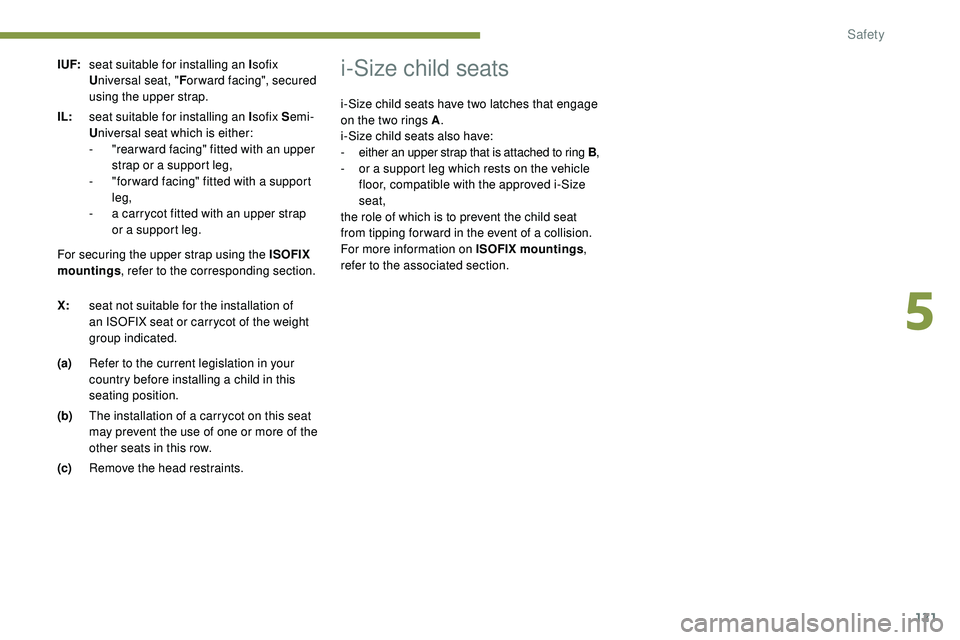
I UF:seat suitable for installing an I sofix
U niversal seat, " For ward facing", secured
using the upper strap.
IL: seat suitable for installing an I sofix Semi-
U niversal seat which is either:
-
"
rear ward facing" fitted with an upper
strap or a support leg,
-
"
for ward facing" fitted with a support
leg,
-
a c
arrycot fitted with an upper strap
or a support leg.
(a) Refer to the current legislation in your
country before installing a child in this
seating position.
(b) The installation of a carrycot on this seat
may prevent the use of one or more of the
other seats in this row.
(c) Remove the head restraints.i-Size child seats
For securing the upper strap using the ISOFIX
mountings , refer to the corresponding section.
X: seat not suitable for the installation of
an ISOFIX seat or carrycot of the weight
group indicated. i-Size child seats have two latches that engage
on the two rings A
.
i-Size child seats also have:
- either an upper strap that is attached to ring B ,- or a support leg which rests on the vehicle
floor, compatible with the approved i-Size
seat,
the role of which is to prevent the child seat
from tipping for ward in the event of a collision.
For more information on ISOFIX mountings ,
refer to the associated section.
5
Safety
Page 162 of 320

160
The cruise control operates by day and
night, in fog or moderate rainfall.
However, it is strongly recommended that
you always keep a safe distance from
vehicles ahead, according to the driving
conditions, the weather and the road
sur face.
Use the cruise control only where the
driving conditions allow running at a
constant speed and keeping an adequate
safety distance.
Do not activate the cruise control in urban
areas where pedestrians are likely to
cross the road, in heavy traffic, on winding
or steep roads, on slippery or flooded
roads, when there is snowfall, if the front
bumper or windscreen is damaged or
when the brake lamps have failed.
In certain circumstances, it may not
be possible for the speed setting to be
maintained or even attained: loaded
vehicle, ascending a steep hill, etc.The system is not intended for the
following situations:
-
i
f the front end of the vehicle has
been modified (addition of long-range
headlamps, painting of the front
bumper),
-
d
riving on a racing circuit,
-
r
unning on a rolling road,
-
u
se of snow chains, non-slip covers or
studded tyres.
The use of mats not approved by
PEUGEOT may inter fere with the
operation of the cruise control.
To avoid any risk of jamming the pedals:
-
e
nsure that the mat is secured
c o r r e c t l y,
-
n
ever place one mat on top of another.The following situations may interfere with
the operation of the system or prevent it
from working:
-
d
riving on a winding road,
-
p
oor visibility (inadequate street
lighting, falling snow, heavy rain, dense
f o g , e t c .),
-
d
azzle (headlamps of an oncoming
vehicle, low sun, reflections on a damp
road, leaving a tunnel, alternating
shade and light, etc.),
-
c
amera or radar obstructed (mud, frost,
snow, condensation, etc.).
In these situations, detection performance
may be reduced.
Operation of the radar, located in the
front bumper, may be impaired by the
accumulation of dirt (dust, mud, etc.) or in
certain weather conditions (snow, frost,
e t c .) .
Do not stick any items to the radar's
protective cover.
Clean the front bumper regularly.
Clean the windscreen regularly,
particularly the area in front of the
detection camera.
Do not allow snow to accumulate on the
bonnet or roof of the vehicle, as this could
obscure the camera.
Driving
Page 206 of 320

204
Maximum authorised load distributed over
the transverse roof bars, for a load height
not exceeding 40 cm (with the exception
of
bicycle carriers):
-
Hatchback: 65 kg.
-
SW: 80 kg .
For more information, contact a
PEUGEOT dealer or a qualified workshop.
If the height exceeds 40
cm, adapt the
speed of the vehicle to the profile of the
road to avoid damaging the roof bars and
the vehicle's fixing points.
For transporting objects which are longer
than the vehicle, refer to local legislation.
Recommendations
Distribute the load uniformly, taking care
to avoid overloading one of the sides.
Arrange the heaviest part of the load as
close as possible to the roof.
Secure the load firmly.
Drive gently: the vehicle will be more
susceptible to the effects of side winds
and its stability may be affected.
Regularly check the correct locking of the
roof bars, at least before each trip.
Remove the roof bars once they are no
longer needed.
If you use a roof box, contact a PEUGEOT
dealer or a qualified workshop to obtain
the compatible fixing parts. Sunroof
Do not operate the sunroof when using
roof bars – risk of major damage!
Bicycle/Accessory Carrier
Do not fit an accessory carrier to the
tailgate.
Bonnet
For more information about the Active bonnet ,
refer to the corresponding section. The location of the interior bonnet release
lever prevents opening of the bonnet when
the left-hand front door is shut.
When the engine is hot, handle the
exterior safety catch with care (risk of
burns), using the protected area.
When the bonnet is open, take care not to
damage the safety catch.
Do not open the bonnet under very windy
conditions.
The cooling fan may star t after
switching off the engine: take care
with articles and clothing that might
be
caught by the fan blades.
Opening
F From inside:
pull the release lever, located
on the left below the dashboard, towards you.
Before doing anything under the bonnet,
deactivate the Stop & Start system to
avoid
the risk of injury related to an
automatic change to START mode.
Practical information
Page 217 of 320

215
The jack must only be used to change a
wheel with a damaged or punctured tyre.
Do not use any jack other than the one
supplied with this vehicle.
If the vehicle does not have its original jack,
contact a PEUGEOT dealer or a qualified
workshop to obtain the correct jack for it.
The jack meets European standards,
as defined in the Machinery Directive
2006/42/CE.
The jack does not require any
maintenance.
List of tools
1.Chock to immobilise the vehicle (depending
on equipment).
2. Socket for the security bolts (located in the
glove box) (depending on equipment).
For adapting the wheelbrace to the special
"security" bolts.
3. Removable towing eye.
For more information on Towing the vehicle
and using the removable towing eye, refer to
the corresponding section.
With temporary puncture
repair kit
For more information on the Temporary
puncture repair kit , refer to the corresponding
section.
With spare wheel
For more information on the Spare wheel ,
refer to the corresponding section.
4.
Temporary puncture repair kit.
Contains a 12
V compressor and a
cartridge of sealant to temporarily repair
the wheel and adjust the tyre pressure,
as
well as a speed limit sticker.
5.
Wheelbrace.
For removing the wheel trim and removing
the wheel bolts.
6. Jack with integrated handle.
Used to raise the vehicle.
7. Wheel bolt cover remover (depending on
equipment).
For removing the wheel bolt head finishers
on alloy wheels.
8
In the event of a breakdown
Page 218 of 320

216
Temporary puncture
repair kit
Scan the QR code on page 3 to view
explanatory videos.
Comprising a compressor and a sealant
cartridge, it allows the temporary repair of
a tyre so that you can drive to the nearest
garage.
It is designed to repair most punctures which
could affect the tyre, located on the tyre tread
or shoulder.
The vehicle's electric system allows the
connection of the compressor for long
enough to inflate a tyre after a puncture
repair.
Composition of the kit
1. 12 V compressor, with integral pressure
gauge.
2. Sealant cartridge bottle, with integral hose.
3. Speed limit sticker.
Repair procedure
F Park the vehicle without obstructing the
traffic and apply the parking brake.
F
F
ollow the safety instructions (hazard
warning lamps, warning triangle, wearing
high visibility vest, etc.) according to the
legislation in force in the country where
you
are driving.
F
S
witch off the ignition.
F
U
ncoil the pipe stowed under the
compressor. Do not remove any foreign bodies (e.g.
nail, screw, etc.) which have penetrated
into the tyre.
F
C
onnect the pipe from the compressor to
the bottle of sealant.
F
T
urn the sealant bottle over and secure it in
the notch provided on the compressor.
In the event of a breakdown