2019 Peugeot 508 roof
[x] Cancel search: roofPage 47 of 320

45
Following an instruction to lock the
vehicle, the exterior perimeter monitoring
is activated after 5 seconds and the
interior volumetric and anti-tilt monitoring
after 45 seconds.
If an opening (door, boot or bonnet) is not
closed properly, the vehicle is not locked
but the exterior perimeter monitoring will
be activated after 45 seconds at the same
time as the interior volumetric and anti-tilt
monitoring.
Deactivation
F Press the unlocking button on the remote control.
or
F
U
nlock the vehicle with the Keyless Entry
and Starting system.
The monitoring system is deactivated: the
indicator lamp in the button goes off and the
direction indicators flash for about 2 seconds.
When the vehicle automatically locks
itself again (as happens if a door or the
boot is not opened within 30 seconds of
unlocking), the monitoring system is also
reactivated automatically.
Locking the vehicle
with exterior perimeter
monitoring only
Deactivate the interior volumetric and anti-tilt
monitoring to avoid unwanted triggering of the
alarm in certain cases such as:
-
l
eaving a pet in the vehicle,
-
l
eaving a window or sunroof partially open,
-
w
ashing your vehicle,
-
c
hanging a wheel,
-
h
aving your vehicle towed,
-
t
ransport by ship.
Deactivating the interior
volumetric and anti-tilt
monitoring
F Switch off the ignition and within 10 seconds, press this button until the
red
indicator lamp is on continuously.
F
G
et out of the vehicle.
F
I
mmediately lock the vehicle using the
remote control or the "Keyless Entry and
Starting" system. To be taken into account, the system must
be deactivated every time the ignition is
switched off.
Reactivating the interior
volumetric and anti-tilt monitoring
F Deactivate the perimeter monitoring by
unlocking the vehicle with the remote
control or the Keyless Entry and Starting
system.
The indicator lamp in the button goes off.
F
R
eactivate all monitoring by locking the
vehicle with the remote control or the
Keyless Entry and Starting system.
The red indicator lamp in the button once again
flashes every second.
Triggering of the alarm
Only the exterior perimeter monitoring is
activated. The red indicator lamp in the button
flashes every second.
This is indicated by sounding of the siren
and flashing of the direction indicators for
30
seconds.
Depending on the country of sale, certain
monitoring functions remain active until
the alarm has been triggered eleven times
consecutively.
2
Access
Page 55 of 320

53
Reinitialising the electric
windows
Following reconnection of the battery, the
safety anti-pinch function must be reinitialised.
The safety anti-pinch function is not active
during these operations.
For each window:
-
b
ring the window down completely,
then bring it back up. It will go up by a
few centimetres each time. Repeat the
operation until the window is fully closed,
-
c
ontinue to pull the switch for at least one
second after reaching the window closed
position. In the event of contact (pinching) during
operation of the windows, you must
reverse the movement of the window.
To
do this, press the switch concerned.
When operating the passenger electric
window switches, the driver must ensure
that nothing is preventing correct closing
of the windows.
The driver must ensure that the
passengers use the electric windows
c o r r e c t l y.
Be particularly aware of children when
operating the windows.
Be aware of passengers or other persons
present when closing the windows using
the electronic key or the "Keyless Entry
and Starting" system.
Before any change of or operation on the
battery, slightly lower the four windows.
Panoramic sunroof
The panoramic sunroof consists of a movable
glass that slides over the roof and a blind that
can be opened independently. Opening the roof
automatically opens the blind.
F
T
o operate the panoramic sunroof and its
blind, use the buttons in the roof console.
A. Sunroof blind control
B. Panoramic sunroof control
The sunroof or blind can be operated when the
ignition is turned on (if the battery is charged
enough), with the engine running, in STOP
mode of Stop & Start, and up to 45
seconds
after turning off the ignition of after locking the
vehicle.
2
Access
Page 56 of 320

54
Before operating the sunroof or blind
control buttons, ensure that no object or
person might prevent the movement.
Be particularly aware of children when
operating the sunroof or blind.
If something is trapped when closing the
sunroof or blind, you should reverse the
movement of the sunroof or blind. To do
this, press the control button in question.
The driver must ensure that passengers
use the sunroof and blind correctly.
Anti-pinch system
If the sunroof or blind encounters an obstacle
when closing, the movement is automatically
reversed.
The roof anti-pinch system is designed to be
effective at speeds of up to 75 mph (120 km/h).
Precautions
Do not put your head or arms through
the open sunroof when driving – Risk of
serious injury!
Ensure that any luggage or accessories
carried on the roof bars do not inter fere
with the movement of the sunroof.
Do not place heavy loads on the movable
glass of the sunroof. If the sunroof is wet, following a shower
or washing the vehicle, wait until it is
completely dry before opening.
Do not operate the sunroof if it is covered
by snow or ice – Risk of damage!
Use only plastic scrapers to remove snow
or ice from the sunroof.
Check the condition of the sunroof seals
regularly (presence of dust or deposits,
dead leaves, etc.).
If using a car wash, check that the sunroof
is correctly closed in advance and keep
the tip of the high-pressure lance at least
30 centimetres from the seals.
Never leave the vehicle with the sunroof
open.Operation
When opening the sunroof fully, the movable
glass moves to a partially open position, then
slides over the roof. All intermediate positions
are allowed.
Depending on the speed of the vehicle,
the partially open position may vary to
improve the acoustics.
Opening and closing
F To
open the sunroof or the blind, use the
part of the button at the back .
F
To close the sunroof or the blind, use the
part of the button at the front .
Button operation
F Pressing a button beyond its point of
resistance directly opens or closes the
sunroof fully.
F
P
ressing the button again stops the
movement.
F
I
f you hold a button (without going beyond
the point of resistance), the movement of
the sunroof or blind stops when you release
the button.
F
S
unroof closed: pressing once without
passing the point of resistance moves it to
a
partially open position.
F
S
unroof partially open: pressing once
without passing the point of resistance
completely opens or closes it.
Access
Page 57 of 320

55
You can close the sunroof and windows,
then also the blind, by pressing and
holding the door locking control. The
movement stops when you release the
locking control.
Closure of the blind is limited by the
position of the sunroof: the blind cannot go
further than the front of the movable glass.
During simultaneous movements of the
sunroof and blind, the blind automatically
stops or resumes movement depending on
the position of the roof.
Reinitialisation
Following reconnection of the battery or in
the event of a fault or jerky movement of the
sunroof or blind, the sunroof and blind must be
reinitialised:
F
C
heck that nothing is inter fering with the
sunroof or blind and that the seals are
clean.
F
W
ithin 5 seconds after the completion of
the sunroof movement followed by the
blind movement resulting in their complete
closing, press and hold the front part
of sunroof button B again for at least
5
seconds.
2
Access
Page 85 of 320

83
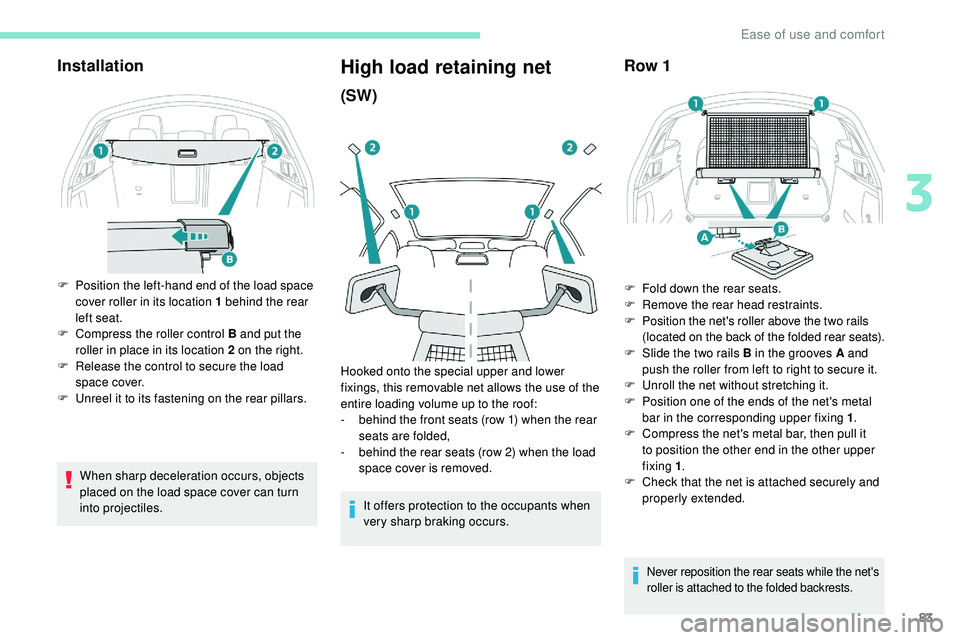
Installation
F Position the left-hand end of the load space cover roller in its location 1 behind the rear
left seat.
F
C
ompress the roller control B and put the
roller in place in its location 2 on the right.
F
R
elease the control to secure the load
space cover.
F
U
nreel it to its fastening on the rear pillars.
High load retaining net
(SW)
It offers protection to the occupants when
very sharp braking occurs.
Row 1
F Fold down the rear seats.
F R emove the rear head restraints.
F
P
osition the net's roller above the two rails
(located on the back of the folded rear seats).
F
S
lide the two rails B in the grooves A and
push the roller from left to right to secure it.
F
U
nroll the net without stretching it.
F
P
osition one of the ends of the net's metal
bar in the corresponding upper fixing 1 .
F
C
ompress the net's metal bar, then pull it
to position the other end in the other upper
fixing 1 .
F
C
heck that the net is attached securely and
properly extended.
Hooked onto the special upper and lower
fixings, this removable net allows the use of the
entire loading volume up to the roof:
-
b
ehind the front seats (row 1) when the rear
seats are folded,
-
b
ehind the rear seats (row 2) when the load
space cover is removed.
When sharp deceleration occurs, objects
placed on the load space cover can turn
into projectiles.
Never reposition the rear seats while the net's
roller is attached to the folded backrests.
3
Ease of use and comfort
Page 94 of 320

92
Clean the windscreen regularly,
particularly the area in front of the camera.
The internal sur face of the windscreen can
also become misted around the camera.
In humid and cold weather, demist the
windscreen regularly.
Do not allow snow to accumulate on the
bonnet or roof of the vehicle as this could
conceal the detection camera.
Static cornering lighting
Activation/Deactivation
The function is activated and
deactivated in the Driving/Vehicle
menu of the touch screen.
Switching on
This system operates from a certain angle of
rotation of the steering wheel.
Switching off
The system does not operate:
- b elow a certain angle of rotation of the
steering wheel,
-
a
bove 56 mph (90 km/h),
-
w
hen reverse gear is engaged.
Night Vision
Using an infrared camera at the front of the
vehicle, the system identifies and signals the
presence of pedestrians and animals in the
driver’s field of vision, in low exterior light
conditions.
For the permanent display of the image from
the infrared camera in the instrument panel,
select the "Night Vision" display mode by
turning the knob located to the left of the
steering wheel. Once the conditions are met,
an alert is triggered when there is a risk of
collision. Night Vision is a driving aid system that
cannot, under any circumstances, replace
the personal assessment of night-time
visibility and traffic conditions.
In some conditions, the contrasts in
temperature are insufficient and the
system may not detect all dangers or,
conversely, it may give false warnings
(e.g. engines of lorries parked on the edge
of the road).
Conditions for operation
With the dipped or main beam headlamps on,
this function allows headlamps to illuminate
the inside of a bend using light-emitting diodes
(LEDs).
The speed of the vehicle must be less than 56
mph (90 km/h).
This function is only available with the "Full
LED" technology headlamps. If the "Night Vision" display mode has not been
selected, the alert is triggered in the form of a
temporary window displayed in the instrument
panel.
The function is available with the engine
running and in STOP mode of Stop & Start.
The light conditions must be very poor. The
dipped beam headlamps must be switched on
and maintained in good working order.
The temperature detection range is between
-30°C and +30°C.
The speed of the vehicle must be less than
99
mph (160 km/h).
The camera detection range is between 15
m
(for pedestrians) and 200
m, depending on
visibility conditions.
Lighting and visibility
Page 110 of 320

108
In the event of a minor impact or bump on
the side of the vehicle or if the vehicle rolls
over, the airbags may not be deployed.
In the event of a rear or front collision,
none of the lateral airbags are deployed.Advice
For the airbags to be fully effective,
observe the safety recommendations
below.
Adopt a normal and upright sitting
position.
Fasten your seat belt, ensuring it is
positioned correctly.
Do not leave anything between the
occupants and the airbags (a child, pet,
object, etc.), nor fix or attach anything
close to or in the way of the airbag release
trajectory; this could cause injuries during
their deployment.
Never modify the original definition of your
vehicle, particularly in the area directly
around the airbags.
After an accident or if the vehicle has
been stolen or broken into, have the
airbag systems checked.
All work on the airbag system must be
carried out by a PEUGEOT dealer or a
qualified workshop.
Even if all of the precautions mentioned
are obser ved, a risk of injury or of minor
burns to the head, chest or arms when an
airbag is deployed cannot be ruled out.
The airbag inflates almost instantly (within
a few milliseconds) then deflates within
the same time discharging the hot gas via
openings provided for this purpose.Front airbags
Do not drive holding the steering wheel
by its spokes or resting your hands on the
centre part of the wheel.
Passengers must not place their feet on
the dashboard.
Do not smoke as deployment of the
airbags can cause burns or the risk of
injury from a cigarette or pipe.
Never remove or pierce the steering wheel
or hit it violently.
Do not fix or attach anything to the
steering wheel or dashboard, this could
cause injuries with deployment of the
airbags.
Curtain airbags
Do not fix or attach anything to the roof,
as this could cause head injuries when the
curtain airbag is deployed.
If fitted to your vehicle, do not remove the
grab handles installed on the roof, they
play a part in securing the curtain airbags.
Safety
Page 162 of 320

160
The cruise control operates by day and
night, in fog or moderate rainfall.
However, it is strongly recommended that
you always keep a safe distance from
vehicles ahead, according to the driving
conditions, the weather and the road
sur face.
Use the cruise control only where the
driving conditions allow running at a
constant speed and keeping an adequate
safety distance.
Do not activate the cruise control in urban
areas where pedestrians are likely to
cross the road, in heavy traffic, on winding
or steep roads, on slippery or flooded
roads, when there is snowfall, if the front
bumper or windscreen is damaged or
when the brake lamps have failed.
In certain circumstances, it may not
be possible for the speed setting to be
maintained or even attained: loaded
vehicle, ascending a steep hill, etc.The system is not intended for the
following situations:
-
i
f the front end of the vehicle has
been modified (addition of long-range
headlamps, painting of the front
bumper),
-
d
riving on a racing circuit,
-
r
unning on a rolling road,
-
u
se of snow chains, non-slip covers or
studded tyres.
The use of mats not approved by
PEUGEOT may inter fere with the
operation of the cruise control.
To avoid any risk of jamming the pedals:
-
e
nsure that the mat is secured
c o r r e c t l y,
-
n
ever place one mat on top of another.The following situations may interfere with
the operation of the system or prevent it
from working:
-
d
riving on a winding road,
-
p
oor visibility (inadequate street
lighting, falling snow, heavy rain, dense
f o g , e t c .),
-
d
azzle (headlamps of an oncoming
vehicle, low sun, reflections on a damp
road, leaving a tunnel, alternating
shade and light, etc.),
-
c
amera or radar obstructed (mud, frost,
snow, condensation, etc.).
In these situations, detection performance
may be reduced.
Operation of the radar, located in the
front bumper, may be impaired by the
accumulation of dirt (dust, mud, etc.) or in
certain weather conditions (snow, frost,
e t c .) .
Do not stick any items to the radar's
protective cover.
Clean the front bumper regularly.
Clean the windscreen regularly,
particularly the area in front of the
detection camera.
Do not allow snow to accumulate on the
bonnet or roof of the vehicle, as this could
obscure the camera.
Driving