2019 Peugeot 508 Seat
[x] Cancel search: SeatPage 54 of 320

52
After installing a towing device, it is
essential to contact a PEUGEOT dealer
or a qualified workshop so that it is taken
into account by the detection system.
Other wise, there is a risk of hands-free
function failure.
Electric windows
For more information about the Electric child
lock, refer to the corresponding section.
Manual operation
To open or close the window, press or pull the
switch gently, without exceeding the point of
resistance. The window stops as soon as the
switch is released.
Automatic operation
To open or close the window, press or pull the
switch fully, beyond the point of resistance: the
window opens or closes completely when the
switch is released. Pressing the switch again
stops the movement of the window.
The electric window switches remain
operational for approximately 45 seconds
after switching off the ignition.
Once this time has elapsed, the electric
windows will not operate. To reactivate
them, switch the ignition on again.
Safety anti-pinch
When the window rises and meets an obstacle,
it stops and immediately partially lowers again.
To reset normal operation , press the switch
until the window opens completely, then
pull the switch immediately until the window
closes fully. Continue to hold the switch for
approximately one more second.
Deactivation of the rear
controls for the rear electric
windows
1. Front left.
2. Front right.
3. Rear right.
4. Rear left.
5. Deactivation of the electric window
switches located at the rear seats.
Locking the rear doors – Electric child lock
(depending on version). The safety anti-pinch function is not active
during this operation.
The red indicator lamp in the button comes
on, accompanied by a message confirming
activation of the system. It remains on for as
long as the deactivation is maintained.
Use of the rear electric windows from the
driver's controls remains possible. In the event of a serious impact, the use of
the rear electric window controls becomes
possible again, if they were deactivated.
For your children's safety, press control 5 to
deactivate the controls for the rear electric
windows, irrespective of their positions.
Access
Page 58 of 320

56
Driving position
Adopting a good driving position helps improve
your comfort and protection.
It also optimises interior and exterior visibility
as well as access to controls.
Sitting comfortably
Whether or not your vehicle has certain seat
adjustments described in this section depends
on the trim level and country of sale.
Driver’s sideAs a safety precaution, adjust the seats
only when the vehicle is stationary.
If your vehicle has electric seats, the
ignition must be on to adjust them.
Passenger’s side
Before moving off
Adjust the interior and exterior door mirrors to
reduce blind spots.
Fasten your seat belt: place the diagonal belt in
the middle of your shoulder and adjust the lap
belt so that it is tightened across your pelvis.
Ensure that all passengers have fastened their
seat belts correctly.
Follow these recommendations as much as
your height permits...
Sit fully back in the seat with your pelvis, back
and shoulders in contact with the seat backrest.
The seat cushion height should be set so
your eyes are looking at the centre of the
windscreen. Adjust the longitudinal position of the seat so
you can fully press the pedals with legs slightly
flexed.
Adjust the head restraint so that its upper edge
is level with the top of your head.
Adjust the length of the seat cushion to support
your thighs.
Adjust the lumbar support so that it conforms to
the shape of your spine.
Adjust the steering wheel so that your arms are
slightly bent.
The steering wheel should not hide the
instrument panel.
Sit fully back in the seat with your pelvis, back
and shoulders in contact with the seat backrest.
Adjust the longitudinal position of the seat so
that you are at a distance of at least 10 in (25
cm) from the dashboard.
Adjust the head restraint so that its upper edge
is level with the top of your head.
Ease of use and comfort
Page 59 of 320

57
If your vehicle has electric door mirrors,
the ignition must be on to adjust them.
When driving
Maintain a good driving position and hold the
steering wheel with both hands at the "quarter
to three" position, so that you can quickly reach
the controls on and near the steering wheel.Never adjust the seats or steering wheel
when driving.
Always keep your feet on the floor.
Front seats
Front head restraints
Adjusting the height
The adjustment is correct when the upper
edge of the head restraint is level with the
top of the head.
Removing a head restraint
F Pull the head restraint up as far as it will go.
F P ress the lug A to release the head restraint
and remove it completely.
F
S
tow the head restraint securely.
Refitting a head restraint
F Introduce the head restraint rods into the guides in the seat backrest.
F
P
ush the head restraint down as far as it will go.
F
P
ress the lug A to free the head restraint and
push it down.
F
A
djust the height of the head restraint.
Never drive with the head restraints
removed; they should be in place and
correctly adjusted for the occupant of the
seat.
Upwards:
F
p
ull the head restraint up to the desired
position; the head restraint can be felt to
click into position.
Downwards:
F
p
ress and hold button B and push the head
restraint down to the desired position.
Seats with manual adjustments
For safety reasons, only adjust seats
when the vehicle is stationary.
Longitudinal
F Raise the control bar and slide the seat forwards or backwards.
F
R
elease the bar to lock the seat in position
on one of the runners.
Before moving the seat backwards,
ensure that there is nothing that might
prevent the full travel of the seat.
There is a risk of trapping or pinching
passengers if present in the rear seats
or jamming the seat if large objects are
placed on the floor behind the seat.
Height
F Pull the control upwards to raise or push it downwards to lower, as many times as
necessary to obtain the position required.
3
Ease of use and comfort
Page 60 of 320

58
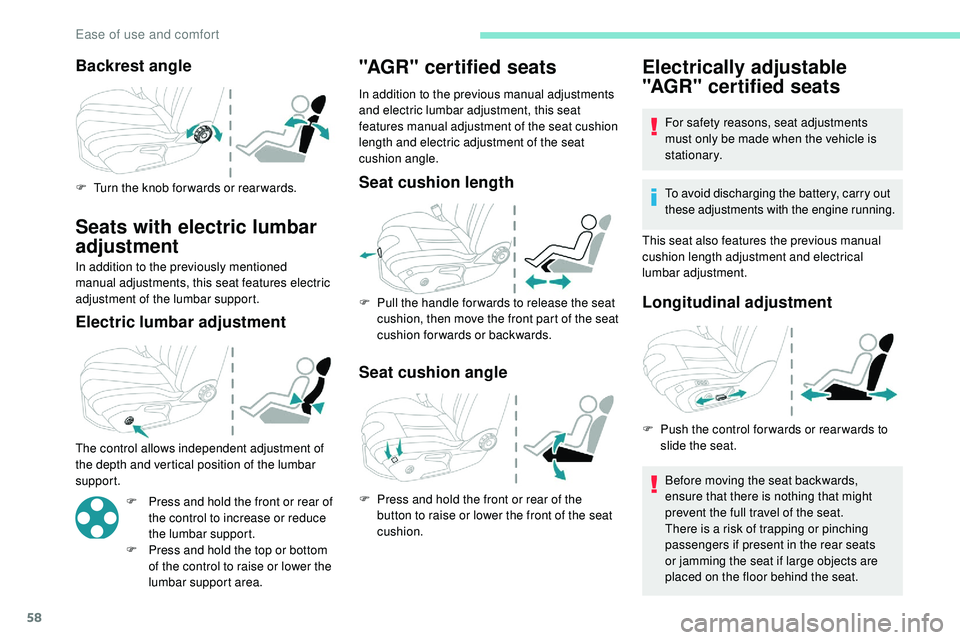
Backrest angle
F Turn the knob for wards or rear wards.
Seats with electric lumbar
adjustment
In addition to the previously mentioned
manual adjustments, this seat features electric
adjustment of the lumbar support.
Electric lumbar adjustment
The control allows independent adjustment of
the depth and vertical position of the lumbar
support.F
P
ress and hold the front or rear of
the control to increase or reduce
the lumbar support.
F
P
ress and hold the top or bottom
of the control to raise or lower the
lumbar support area.
"AGR" certified seats
In addition to the previous manual adjustments
and electric lumbar adjustment, this seat
features manual adjustment of the seat cushion
length and electric adjustment of the seat
cushion angle.
Seat cushion length
F Pull the handle for wards to release the seat cushion, then move the front part of the seat
cushion forwards or backwards.
Seat cushion angle
F Press and hold the front or rear of the button to raise or lower the front of the seat
cushion.
Electrically adjustable
"AGR" certified seats
For safety reasons, seat adjustments
must only be made when the vehicle is
stationary.
To avoid discharging the battery, carry out
these adjustments with the engine running.
This seat also features the previous manual
cushion length adjustment and electrical
lumbar adjustment.
Longitudinal adjustment
Before moving the seat backwards,
ensure that there is nothing that might
prevent the full travel of the seat.
There is a risk of trapping or pinching
passengers if present in the rear seats
or jamming the seat if large objects are
placed on the floor behind the seat.
F
P
ush the control for wards or rear wards to
slide the seat.
Ease of use and comfort
Page 61 of 320

59
Backrest angle
F Tilt the control for wards or rear wards.
Seat cushion height and angle
Comfort functions
Storing driving positions
Associated with the electrically-adjusted
driver’s seat, this function allows two driving
positions to be memorised, to make these
adjustments easier if there are frequent driver
changes.It takes account of the electric adjustments
of the seat, the door mirrors, and the air
conditioning system.
F
T
ilt the rear of the control upwards or
downwards to obtain the required height.
F
T
ilt the front of the control upwards or
downwards to obtain the required angle.
Recalling a stored position
Ignition on or engine running
F P ress button 1 or 2 to recall the
corresponding position.
An audible signal confirms that adjustment is
complete.
You can interrupt the current movement by
pressing button M , 1 or 2 or by using one
of the seat controls.
A stored position cannot be recalled while
driving.
Recalling stored positions is deactivated
45 seconds after switching off the ignition.
Heated seats
The function is active only with the engine
running.
Using buttons M/1/2
F
T
ake your seat and switch on the ignition.
F
A
djust your seat and the door mirrors.
F
P
ress button M
, then press button 1 or 2
within 4 seconds.
An audible signal confirms the memorisation.
Memorising a new position cancels the
previous position.
3
Ease of use and comfort
Page 62 of 320

60
Do not use the function when the seat is
not occupied.
Reduce the intensity of the heating as
soon as possible.
When the seat and passenger
compartment have reached an adequate
temperature, you can stop the function;
reducing the consumption of electrical
current reduces fuel consumption.Prolonged use is not recommended for
those with sensitive skin.
There is a risk of burns for people whose
perception of heat is impaired (illness,
taking medication, etc.).
There is a risk of overheating the system if
material with insulating properties is used,
such as cushions or seat covers.
Do not use the system:
-
i
f wearing damp clothing,
-
i
f child seats are fitted.
To avoid breaking the heating element in
the seat:
-
d
o not place heavy objects on the seat,
- d o not kneel or stand on the seat,
- d o not place sharp objects on the seat,
-
d
o not spill liquids onto the seat.
To avoid the risk of short-circuit:
-
d
o not use liquid products for cleaning
the seat,
-
n
ever use the heating function when
the seat is damp.
Multipoint massage
System with a choice of type of massage and
adjustment of its intensity.
This system operates with the engine running,
as well as in STOP mode of Stop & Start.
Activation/Settings
The massage settings are adjusted in the touch
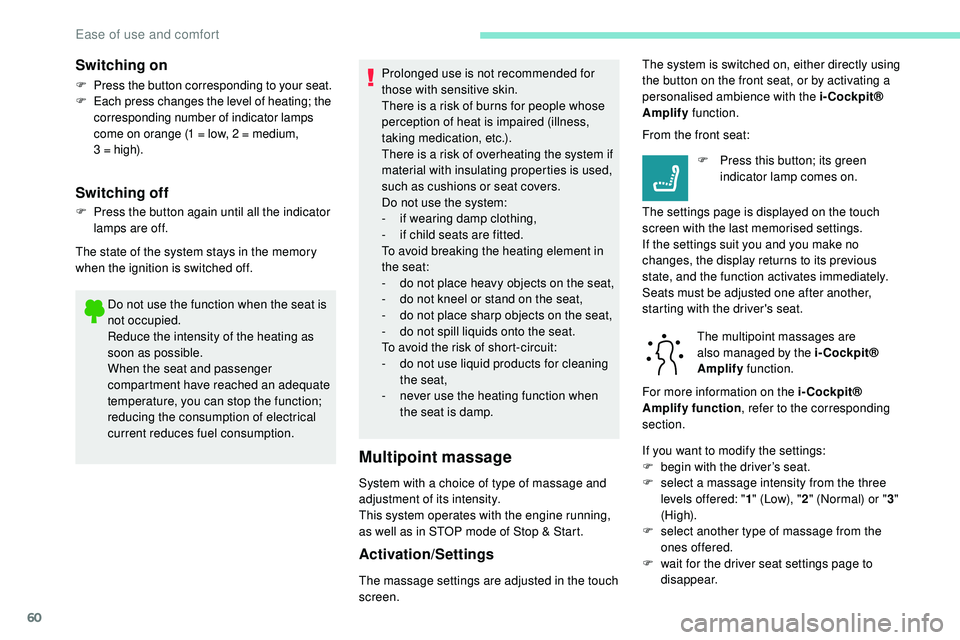
screen. The multipoint massages are
also managed by the i-Cockpit®
Amplify
function.
For more information on the i-Cockpit®
Amplify function , refer to the corresponding
section. From the front seat:
F
P
ress this button; its green
indicator lamp comes on.
The settings page is displayed on the touch
screen with the last memorised settings.
If the settings suit you and you make no
changes, the display returns to its previous
state, and the function activates immediately.
Seats must be adjusted one after another,
starting with the driver's seat.
Switching on
F Press the button corresponding to your seat.
F E ach press changes the level of heating; the
corresponding number of indicator lamps
come on orange (1 = low, 2 = medium,
3
= high).
Switching off
F Press the button again until all the indicator lamps are off.
The state of the system stays in the memory
when the ignition is switched off. The system is switched on, either directly using
the button on the front seat, or by activating a
personalised ambience with the i-Cockpit®
Amplify
function.
If you want to modify the settings:
F
b
egin with the driver’s seat.
F
s
elect a massage intensity from the three
levels offered: " 1" (Low), " 2" (Normal) or " 3"
(High).
F
s
elect another type of massage from the
ones offered.
F
w
ait for the driver seat settings page to
disappear.
Ease of use and comfort
Page 63 of 320

61
F next, proceed with the passenger's seat in the same way.
The changes are taken into account immediately.Once activated, the system starts a one hour
massage cycle, made up of sequences of 6 minutes
of massage followed by 3 minutes at rest.
The system stops automatically at the end of the
cycle; the indicator lamp in the button goes off.
Steering wheel adjustment
F When stationary , pull the control lever
to release the steering wheel adjustment
mechanism.
F
A
djust the height and reach to suit your
driving position.
F
P
ush the control lever to lock the steering
wheel adjustment mechanism.
As a safety measure, these adjustments
should only be carried out with the vehicle
stationary.
Mirrors
Door mirrors
Each fitted with an adjustable mirror glass
providing the lateral rear ward vision necessary
for overtaking or parking.
They can also be folded for parking in narrow
spaces.
On versions fitted with "electrochrome" mirrors,
a system connected to a brightness sensor
darkens the mirror to reduce the nuisance
to the driver caused by low sun or headlamp
beams from other vehicles.
Demisting/Defrosting
If fitted to your vehicle, the demisting/
defrosting of the door mirrors is
done by pressing the rear screen
defrosting control.
For more information on Rear screen demist/
Adjustment
As a safety measure, the mirrors should
be adjusted to reduce the blind spots.
The objects that you see in the mirrors are
in fact closer than they appear.
Take this into account in order to
correctly judge the distance of vehicles
approaching from behind.
F
M
ove control A to the right or to the left to
select the corresponding mirror.
F
M
ove control B in any of the four directions
to adjust.
F
R
eturn control A to its central position.
defrost , refer to the corresponding section.
3
Ease of use and comfort
Page 65 of 320

63
Rear seats
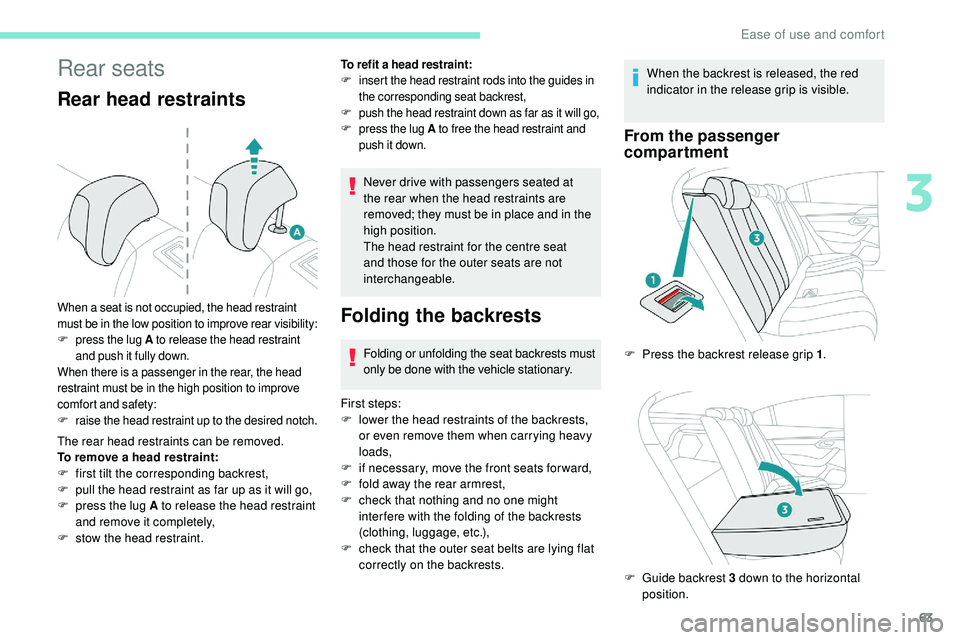
Rear head restraints
The rear head restraints can be removed.
To remove a head restraint:
F
f
irst tilt the corresponding backrest,
F
p
ull the head restraint as far up as it will go,
F
p
ress the lug A to release the head restraint
and remove it completely,
F
s
tow the head restraint.
When a seat is not occupied, the head restraint
must be in the low position to improve rear visibility:
F press the lug A to release the head restraint
and push it fully down.
When there is a passenger in the rear, the head
restraint must be in the high position to improve
comfort and safety:
F
r
aise the head restraint up to the desired notch.
Never drive with passengers seated at
the rear when the head restraints are
removed; they must be in place and in the
high position.
The head restraint for the centre seat
and those for the outer seats are not
interchangeable.
Folding the backrests
Folding or unfolding the seat backrests must
only be done with the vehicle stationary.
First steps:
F
l
ower the head restraints of the backrests,
or even remove them when carrying heavy
loads,
F
i
f necessary, move the front seats for ward,
F
f
old away the rear armrest,
F
c
heck that nothing and no one might
inter fere with the folding of the backrests
(clothing, luggage, etc.),
F
c
heck that the outer seat belts are lying flat
correctly on the backrests. When the backrest is released, the red
indicator in the release grip is visible.
From the passenger
compartment
To refit a head restraint:
F i
nsert the head restraint rods into the guides in
the corresponding seat backrest,
F
p
ush the head restraint down as far as it will go,
F
p
ress the lug A to free the head restraint and
push it down.
F Press the backrest release grip 1 .
F
G
uide backrest 3 down to the horizontal
position.
3
Ease of use and comfort