2019 NISSAN VERSA ESP
[x] Cancel search: ESPPage 177 of 372

∙ An iPod® nano (1st Generation) may re-main in fast forward or rewind mode if it
is connected during a seek operation. In
this case, please manually reset the
iPod®.
∙ An iPod® nano (2nd Generation) will continue to fast-forward or rewind if it is
disconnected during a seek operation.
∙ An incorrect song title may appear when the Play Mode is changed while
using an iPod® nano (2nd Generation).
∙ Audiobooks may not play in the same order as they appear on an iPod®.
∙ Large video files cause slow responses in an iPod®. The vehicle center display
may momentarily black out, but will
soon recover.
∙ If an iPod® automatically selects large video files while in the shuffle mode, the
vehicle center display may momen-
tarily black out, but will soon recover.iPod®* player
∙ Some characters used in other lan-
guages (Chinese, Japanese, etc.) are not
displayed properly on the vehicle center
screen. We recommend using English
or Spanish language characters with an
iPod®.
∙ Large video podcast files cause slow responses in the iPod®. The vehicle cen-
ter display may momentarily black out,
but it will soon recover.
∙ If the iPod® automatically selects large video podcast files while in the shuffle
mode, the vehicle center display may
momentarily black out, but it will soon
recover.
∙ Improperly plugging in the iPod® may cause a checkmark to be displayed on
and off (flickering). Always make sure
that the iPod® is connected properly.
∙ The iPod® nano (2nd Generation) will continue to fast forward or rewind if it is
disconnected during a seek operation.
∙ An incorrect song title may appear when the Play Mode is changed while
using the iPod® nano (2nd Generation). ∙ Audiobooks may not play in the same
order as they appear on the iPod®.
∙ The iPod® nano (1st Generation) may remain in fast forward or rewind mode if
it is connected during a seek operation.
In this case, please manually reset the
iPod®.
∙ If you are using an iPod® (3rd Generation with Dock connector), do not use very
long names for the song title, album
name or artist name to prevent the
iPod® from resetting itself.
∙ Be careful not to do the following, or the cable could be damaged and a loss of
function may occur:
∙ Bend the cable excessively (1.6 in (40 mm) radius maximum).
∙ Twist the cable excessively (more than 180 degrees).
∙ Pull or drop the cable.
∙ Do not force the iPod® cable connec- tor into the device port.
∙ Close the center console lid on the cable or connectors.
∙ Store objects with sharp edges in the storage where the cable is stored.
Monitor, climate, audio, phone and voice recognition systems4-25
Page 181 of 372

AUDIO button
Push to display the audio screen. When this
button is pushed while the audio screen is
not displayed, the last audio source played
will play.
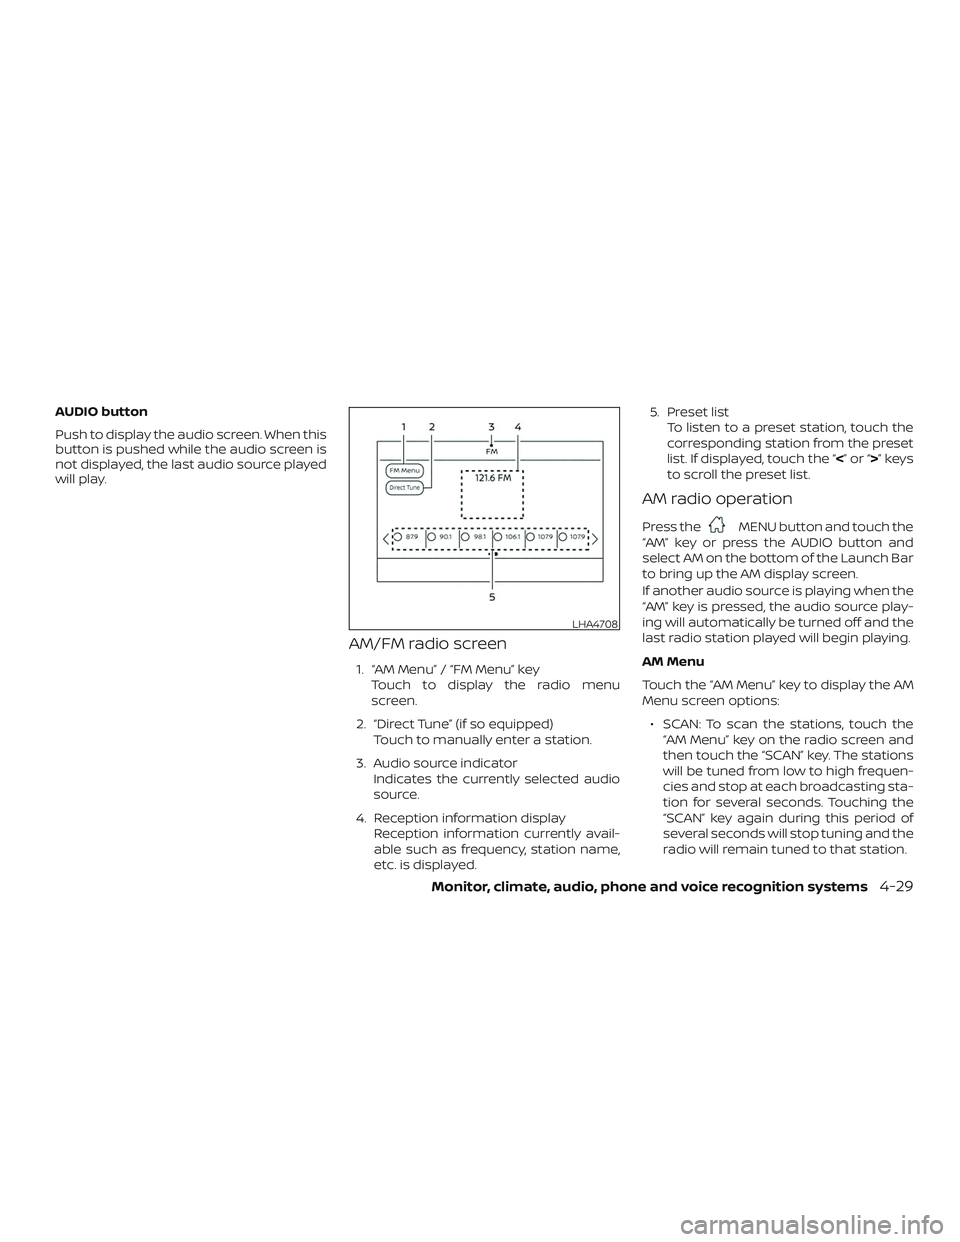
AM/FM radio screen
1. “AM Menu” / “FM Menu” keyTouch to display the radio menu
screen.
2. “Direct Tune” (if so equipped) Touch to manually enter a station.
3. Audio source indicator Indicates the currently selected audio
source.
4. Reception information display Reception information currently avail-
able such as frequency, station name,
etc. is displayed. 5. Preset list
To listen to a preset station, touch the
corresponding station from the preset
list. If displayed, touch the “ <”or“>”keys
to scroll the preset list.
AM radio operation
Press theMENU button and touch the
“AM” key or press the AUDIO button and
select AM on the bottom of the Launch Bar
to bring up the AM display screen.
If another audio source is playing when the
“AM” key is pressed, the audio source play-
ing will automatically be turned off and the
last radio station played will begin playing.
AM Menu
Touch the “AM Menu” key to display the AM
Menu screen options:
∙ SCAN: To scan the stations, touch the “AM Menu” key on the radio screen and
then touch the “SCAN” key. The stations
will be tuned from low to high frequen-
cies and stop at each broadcasting sta-
tion for several seconds. Touching the
“SCAN” key again during this period of
several seconds will stop tuning and the
radio will remain tuned to that station.
LHA4708
Monitor, climate, audio, phone and voice recognition systems4-29
Page 201 of 372

USING THE SYSTEM
The system allows hands-free operation of
the Bluetooth® Hands-Free Phone System.
If the vehicle is in motion, some commands
may not be available so full attention may
be given to vehicle operation.
Initialization
When the ignition switch is placed in the ON
position, NISSAN Voice Recognition is initial-
ized, which takes a few seconds. If the
button is pressed before the initialization
completes, the system will announce
“There is no phone connected” and will not
react to voice commands.
Operating tips
To get the best performance out of the
NISSAN Voice Recognition System, observe
the following:∙ Keep the interior of the vehicle as quiet as possible. Keep all vents pointed away
from the microphone and close the
windows to eliminate surrounding
noises (traffic noises, vibration sounds,
etc.), which may prevent the system
from recognizing voice commands cor-
rectly. ∙ Wait until the tone sounds before
speaking a command. Otherwise, the
command will not be received properly.
∙ Start speaking a command within 5 seconds af ter the tone sounds.
∙ Speak in a natural voice without paus- ing between words.
∙ For calling contacts by name, please say both the first and last name of the
contact for better recognition.
.Giving voice commands
To operate NISSAN Voice Recognition,
press the
button located on the
steering wheel for less than 1.5 seconds.
Af ter the tone sounds, speak a command.
The command given is picked up by the
microphone, and voice feedback is given
when the command is accepted.
∙ If a command is not recognized, the system announces, “Please say or se-
lect a command from the displayed list.”
Make sure the command is said exactly
as prompted by the system and repeat
the command in a clear voice. ∙ If you want to go back to the previous
command, you can say “Go back” or
“Correction” any time the system is
waiting for a response.
∙ You can cancel a command when the system is waiting for a response by say-
ing, “Cancel” or “Quit.” The system an-
nounces “Exit” and ends the Voice Rec-
ognition session. You can also press
and hold the
button on the steer-
ing wheel for 1.5 seconds at any time to
end the Voice Recognition session.
Whenever the Voice Recognition ses-
sion is canceled, a double beep is
played to indicate you have exited the
system.
∙ If you want to adjust the volume of the voice feedback, push the (+ or -) volume
control switches on the steering wheel
while being provided with feedback. You
can also use the radio volume control
knob.
Voice Prompt Interrupt
In most cases you can interrupt the voice
feedback to speak the next command by
pressing the
button on the steering
wheel. Af ter interrupting the system, wait
for a beep before speaking your command.
Monitor, climate, audio, phone and voice recognition systems4-49
Page 210 of 372

∙ Incoming Calls
∙ Outgoing Calls
∙ Missed Calls
∙ Dial
4. Once a recipient is chosen, the system prompts for which message to send.
Nine predefined messages are avail-
able. To choose one of the predefined
messages, speak one of the following
af ter the tone:
∙ “Driving, can’t text”
∙ “Call me”
∙ “On my way ”
∙ “Running late”
∙ “Okay ”
∙ “Yes”
∙ “No”
∙ “Where are you?”
∙ “When?” Reading a received text message
1. Press and hold the
button on the
steering wheel for less than 1.5 sec-
onds.
2. Say “Read Text” af ter the tone.
The display will show a list of 20 messages
with the sender and delivery time. Touch
the “Next” key on the screen to view all mes-
sages. To view a text message press
the
button on the steering wheel and
speak the number item list on the screen.
The following options will be available:
∙ Play Speak this command to have the sys-
tem say the message.
∙ Reply Speak this command to send a text
message response to the sender of the
text message.
∙ Call Speak this command to call the sender.
∙ Previous Speak this command to move to the
previous text message (if available).
∙Next Speak this command to move to the
next text message (if available). Siri® Eyes Free (if so equipped)
If a connected phone is equipped with Siri®,
it can also be used to create custom mes-
sages that are sent through the phone. For
additional information, refer to “Siri® Eyes
Free” in this section.
NOTE:
Text messages are only displayed if the
vehicle speed is less than 5 mph
(8 km/h).
NOTE:
For Apple iPhones®, text messages can
only be sent through Siri.
Text messaging using the control
panel
Display received message list
1. Press the
button on the control
panel.
2. Touch the “Text Message” key on the screen
3. Touch an item on the list to read or reply to the message.
Up to 100 messages can be stored in the
message list.
4-58Monitor, climate, audio, phone and voice recognition systems
Page 219 of 372

CAUTION
∙ Do not use leaded gasoline. Depositsfrom leaded gasoline will seriously re-
duce the three-way catalyst’s ability
to help reduce exhaust pollutants.
∙ Keep your engine tuned up. Malfunc- tions in the ignition, fuel injection, or
electrical systems can cause overrich
fuel flow into the three-way catalyst,
causing it to overheat. Do not keep
driving if the engine misfires, or if no-
ticeable loss of performance or other
unusual operating conditions are de-
tected. Have the vehicle inspected
promptly. It is recommended that you
visit a NISSAN dealer for this service.
∙ Avoid driving with an extremely low fuel level. Running out of fuel could
cause the engine to misfire, damag-
ing the three-way catalyst.
∙ Do not race the engine while warming it up.
∙ Do not push or tow your vehicle to start the engine.
TIRE PRESSURE MONITORING
SYSTEM (TPMS)
Each tire, including the spare (if provided),
should be checked monthly when cold and
inflated to the inflation pressure recom-
mended by the vehicle manufacturer on
the vehicle placard or tire inflation pressure
label. (If your vehicle has tires of a different
size than the size indicated on the vehicle
placard or tire inflation pressure label, you
should determine the proper tire inflation
pressure for those tires.)
As an added safety feature, your vehicle
has been equipped with a Tire Pressure
Monitoring System (TPMS) that illuminates
a low tire pressure telltale when one or
more of your tires is significantly under-
inflated. Accordingly, when the low tire
pressure telltale illuminates, you should
stop and check your tires as soon as pos-
sible, and inflate them to the proper pres-
sure. Driving on a significantly under-
inflated tire causes the tire to overheat and
can lead to tire failure. Under-inflation also
reduces fuel efficiency and tire tread life,
and may affect the vehicle’s handling and
stopping ability. Please note that the TPMS is not a substi-
tute for proper tire maintenance, and it is
the driver’s responsibility to maintain cor-
rect tire pressure, even if under-inflation
has not reached the level to trigger illumi-
nation of the TPMS low tire pressure telltale.
Your vehicle has also been equipped with a
TPMS malfunction indicator to indicate
when the system is not operating properly.
The TPMS malfunction indicator is com-
bined with the low tire pressure telltale.
When the system detects a malfunction,
the telltale will flash for approximately one
minute and then remain continuously illu-
minated. This sequence will continue upon
subsequent vehicle start-ups as long as
the malfunction exists. When the malfunc-
tion indicator is illuminated, the system
may not be able to detect or signal low tire
pressure as intended. TPMS malfunctions
may occur for a variety of reasons, includ-
ing the installation of replacement or alter-
nate tires or wheels on the vehicle that
prevent the TPMS from functioning prop-
erly. Always check the TPMS malfunction
telltale af ter replacing one or more tires or
wheels on your vehicle to ensure that the
replacement or alternate tires and wheels
allow the TPMS to continue to function
properly.
Starting and driving5-3
Page 222 of 372

∙ If the wheel is not originally specified byNISSAN.
FCC Notice:
For USA:
This device complies with Part 15 of the
FCC Rules. Operation is subject to the fol-
lowing two conditions: (1) This device
may not cause harmful interference, and
(2) this device must accept any interfer-
ence received, including interference
that may cause undesired operation.
NOTE:
Changes or modifications not expressly
approved by the party responsible for
compliance could void the user’s author-
ity to operate the equipment.
For Canada:
This device complies with Industry
Canada licence-exempt RSS standard(s).
Operation is subject to the following two
conditions: (1) this device may not cause
harmful interference, and (2) this device
must accept any interference received,
including interference that may cause
undesired operation of the device.TPMS with Easy-Fill Tire Alert (if so
equipped)
When adding air to an under-inflated tire,
the TPMS with Easy-Fill Tire Alert provides
visual and audible signals outside the ve-
hicle to help you inflate the tires to the rec-
ommended COLD tire pressure.
Vehicle set-up: 1. Park the vehicle in a safe and level place.
2. Apply the parking brake and place the shif t lever in the P (Park) position (if so
equipped).
3. Place the ignition switch in the ON po- sition. Do not start the engine.
Operation: 1. Add air to the tire.
2. Af ter a few seconds, the hazard indica- tors will start flashing.
3. When the designated pressure is reached, the horn beeps once and the
hazard indicators stop flashing.
4. Perform the above steps for each tire. ∙ If the tire is over-inflated more thanapproximately 4 psi (30 kPa), the horn
beeps and the hazard indicators flash three times. To correct the pres-
sure, push the core of the valve stem
on the tire briefly to release pressure.
When the pressure reaches the des-
ignated pressure, the horn beeps
once.
∙ If the hazard indicator does not flash within approximately 15 seconds af-
ter starting to inflate the tire, it indi-
cates that the Easy-Fill Tire Alert is
not operating.
∙ The TPMS will not activate the Easy- Fill Tire Alert under the following con-
ditions:
– If there is interference from an exter- nal device or transmitter.
– The air pressure from the inflation device is not sufficient to inflate the
tire.
– There is a malfunction in the TPMS system.
– There is a malfunction in the horn or hazard indicators.
– The identification code of the tire’s pressure sensor is not registered to
the system.
5-6Starting and driving
Page 224 of 372

RAPID AIR PRESSURE LOSS
Rapid air pressure loss or a “blow-out” can
occur if the tire is punctured or is damaged
due to hitting a curb or pothole. Rapid air
pressure loss can also be caused by driving
on under-inflated tires.
Rapid air pressure loss can affect the han-
dling and stability of the vehicle, especially
at highway speeds.
Help prevent rapid air pressure loss by
maintaining the correct air pressure and
visually inspecting the tires for wear and
damage. For additional information, refer
to “Wheels and tires” in the “Do-it-yourself ”
section of this manual. If a tire rapidly loses
air pressure or “blows-out” while driving,
maintain control of the vehicle by following
the procedure below. Please note that this
procedure is only a general guide. The ve-
hicle must be driven as appropriate based
on the conditions of the vehicle, road and
traffic.
WARNING
The following actions can increase the
chance of losing control of the vehicle if
there is a sudden loss of tire air pres-
sure. Losing control of the vehicle may
cause a collision and result in personal
injury.
∙ The vehicle generally moves or pullsin the direction of the flat tire.
∙ Do not rapidly apply the brakes.
∙ Do not rapidly release the accelerator pedal.
∙ Do not rapidly turn the steering wheel.
1. Remain calm and do not overreact.
2. Maintain a firm grip on the steering wheel with both hands and try to hold a
straight course.
3. When appropriate, slowly release the accelerator pedal to gradually slow the
vehicle.
4. Gradually steer the vehicle to a safe location off the road and away from
traffic if possible. 5. Lightly apply the brake pedal to gradu-
ally stop the vehicle.
6. Turn on the hazard warning flashers and contact a roadside emergency
service to change the tire. For addi-
tional information, refer to “Changing a
flat tire” in the “In case of emergency”
section of this manual.
DRINKING ALCOHOL/DRUGS AND
DRIVING
WARNING
Never drive under the influence of alco-
hol or drugs. Alcohol in the bloodstream
reduces coordination, delays reaction
time and impairs judgement. Driving
af ter drinking alcohol increases the
likelihood of being involved in an acci-
dent injuring yourself and others. Addi-
tionally, if you are injured in an accident,
alcohol can increase the severity of the
injury.
5-8Starting and driving
Page 231 of 372

3. Crank the enginewith your foot off
the accelerator pedal by turning the
ignition key to START. Release the key
when the engine starts. If the engine
starts, but fails to run, repeat the above
procedure.
∙ If the engine is very hard to start in extremely cold weather or when re-
starting, depress the accelerator
pedal a little (approximately 1/3 to the
floor) and hold it and then crank the
engine. Release the key and the ac-
celerator pedal when the engine
starts.
∙ If the engine is very hard to start be- cause it is flooded, depress the accel-
erator pedal all the way to the floor
and hold it. Crank the engine for
5-6 seconds. Af ter cranking the en-
gine, release the accelerator pedal.
Crank the engine with your foot off
the accelerator pedal by turning the
ignition key to START. Release the key
when the engine starts. If the engine
starts, but fails to run, repeat the
above procedure.CAUTION
Do not operate the starter for more
than 15 seconds at a time. If the engine
does not start, turn the key off and wait
10 seconds before cranking again, oth-
erwise the starter could be damaged.
4. Allow the engine to idle for at least 30 seconds af ter starting. Do not race
the engine while warming it up. Drive at
moderate speed for a short distance
first, especially in cold weather.
NOTE:
Care should be taken to avoid situations
that can lead to potential battery dis-
charge and potential no-start conditions
such as: 1. Installation or extended use of elec-
tronic accessories that consume bat-
tery power when the engine is not
running (phone chargers, GPS, DVD
players, etc.).
2. The vehicle is not driven regularly
and/or only driven short distances.
In these cases, the battery may need to
be charged to maintain battery health. 1. Apply the parking brake.
2. Move the shif t lever to P (Park) or N
(Neutral). P (Park) is recommended.
The starter is designed not to oper-
ate if the shif t lever is in any of the
driving positions.
3. Push the ignition switch to the ON po- sition. Depress the brake pedal and
push the ignition switch to start the
engine.
To start the engine immediately, push
and release the ignition switch while
depressing the brake pedal with the
ignition switch in any position.
∙ If the engine is very hard to start in extremely cold weather or when re-
starting, depress the accelerator
pedal a little (approximately 1/3 to the
floor) and while holding, crank the en-
gine. Release the accelerator pedal
when the engine starts.
∙ If the engine is very hard to start be- cause it is flooded, depress the accel-
erator pedal all the way to the floor
and hold it. Push the ignition switch
to the ON position to start cranking
the engine. Af ter 5 or 6 seconds, stop
cranking by pushing the ignition
STARTING THE ENGINE (models with
NISSAN Intelligent Key® system)
Starting and driving5-15