2019 NISSAN TITAN trans
[x] Cancel search: transPage 316 of 682
WARNING
∙ Always ensure that the battery is in-serted in the correct direction as
shown in the battery compartment.
∙ When the battery fails to function, re- place it immediately.
∙ Keep the battery out of the reach of children. In case the battery is acci-
dentally swallowed, immediately con-
sult a doctor. Also, when disposing of
used batteries, please comply with
governmental regulations or environ-
mental public institution rules that
apply in your country/area.
∙ Remove the battery if the remote con- trol is not used for a month or longer.
∙ Storage in extreme cold can weaken the battery. Keep the remote control
stored in a cool, dry place.
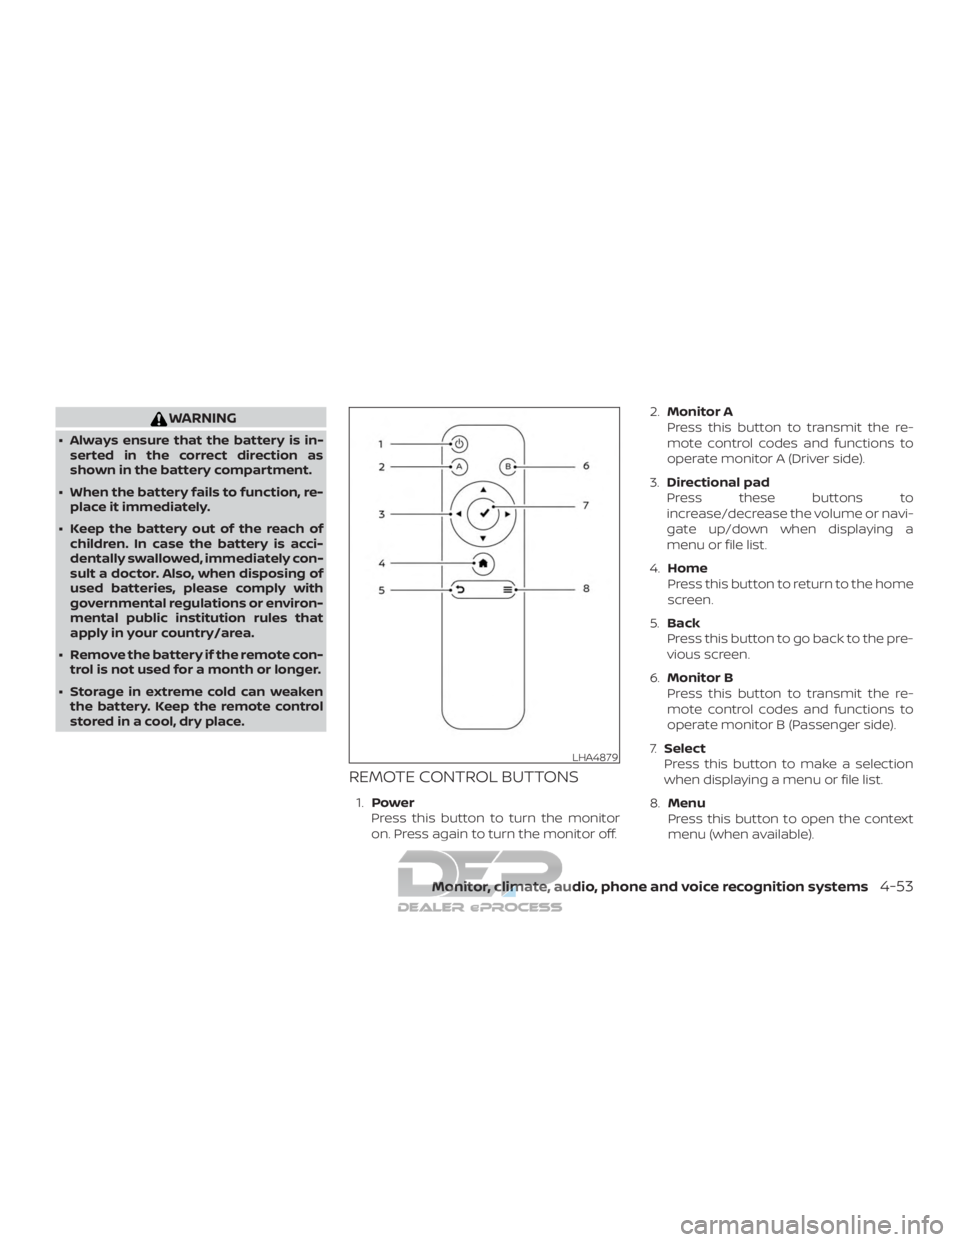
REMOTE CONTROL BUTTONS
1. Power
Press this button to turn the monitor
on. Press again to turn the monitor off. 2.
Monitor A
Press this button to transmit the re-
mote control codes and functions to
operate monitor A (Driver side).
3. Directional pad
Press these buttons to
increase/decrease the volume or navi-
gate up/down when displaying a
menu or file list.
4. Home
Press this button to return to the home
screen.
5. Back
Press this button to go back to the pre-
vious screen.
6. Monitor B
Press this button to transmit the re-
mote control codes and functions to
operate monitor B (Passenger side).
7. Select
Press this button to make a selection
when displaying a menu or file list.
8. Menu
Press this button to open the context
menu (when available).
LHA4879
Monitor, climate, audio, phone and voice recognition systems4-53
Page 326 of 682
NOTE:
HDMI connected devices are indepen-
dent and must be controlled directly
from the source device.
MHL connection
The system also allows mobile devices
supporting Mobile High-Definition Link
(MHL) to be connected. An MHL-to-HDMI
cable is required (sold separately).
Mobile High-Definition Link (MHL) is an in-
dustry standard mobile audio/ video inter-
face that allows connection of smart-
phones, tablets, and other portable
consumer electronics devices to the sys-
tem. MHL transports high-quality uncom-
pressed audio and video from a mobile
source device to the system and at the
same time provides power to recharge the
device.
NOTE:
MHL connected devices are independent
and must be controlled directly from the
source device.
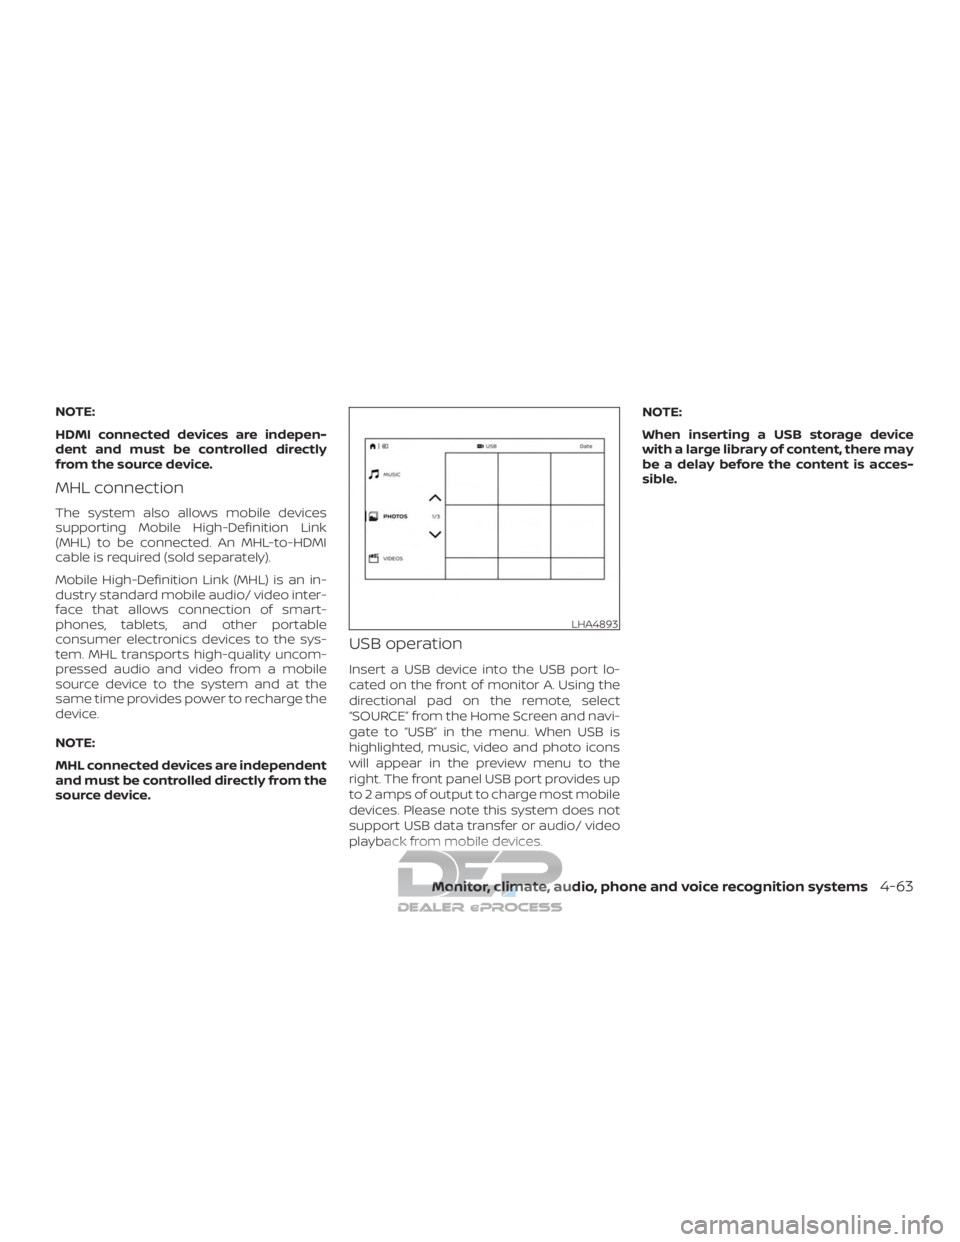
USB operation
Insert a USB device into the USB port lo-
cated on the front of monitor A. Using the
directional pad on the remote, select
“SOURCE” from the Home Screen and navi-
gate to “USB” in the menu. When USB is
highlighted, music, video and photo icons
will appear in the preview menu to the
right. The front panel USB port provides up
to 2 amps of output to charge most mobile
devices. Please note this system does not
support USB data transfer or audio/ video
playback from mobile devices.NOTE:
When inserting a USB storage device
with a large library of content, there may
be a delay before the content is acces-
sible.
LHA4893
Monitor, climate, audio, phone and voice recognition systems4-63
Page 349 of 682
COMPLIANCE INFORMATION
FCC Notice
This device complies with Part 15 of FCC
Rules and Industry Canada license-exempt
RSS standard(s). Operation is subject to the
following two conditions: (1) this device may
not cause interference, and (2) this device
must accept any interference, including in-
terference that may cause undesired op-
eration of this device.
This transmitter must not be co-located or
operated in conjunction with any other an-
tenna or transmitter. The Bluetooth® an-
tenna cannot be removed (or replaced) by
user.
Alteration or modifications carried out
without appropriate authorization may in-
validate the user’s right to operate the
equipment.
This equipment has been tested and found
to comply with the limits for a Class B digi-
tal device, pursuant to Part 15 of the FCC
Rules. These limits are designed to provide
reasonable protection against harmful in-
terference in a residential installation. This
equipment generates, uses and can radi-
ate radio frequency energy and, if not in-
stalled and used in accordance with the
instructions, may cause harmful interfer-ence to radio communications. However,
there is no guarantee that interference will
not occur in a particular installation. If this
equipment does cause harmful interfer-
ence to radio or television reception, which
can be determined by turning the equip-
ment off and on, the user is encouraged to
try to correct the interference by one or
more of the following measures:
∙ Reorient or relocate the receiving an- tenna.
∙ Increase the separation between the equipment and receiver.
∙ Connect the equipment into an outlet on a circuit different from that to which
the receiver is connected.
∙ Consult the dealer or an experienced radio/ TV technician for help.
Bluetooth®
The Bluetooth® word mark and logos are
registered trademarks owned by the
Bluetooth SIG, Inc. and any use of such
marks by Voxx Automotive Corporation is
under license. Other trademarks and trade
names are those of their respective own-
ers.
DVD Video Playback
This item incorporates copy protection
technology that is protected by U.S. pat-
ents and other intellectual property rights
of Rovi Corporation. Reverse engineering
and disassembly are prohibited.
LHA4926
4-86Monitor, climate, audio, phone and voice recognition systems
Page 353 of 682
5 Starting and driving
Precautions when starting and driving..........5-2
Exhaust gas (carbon monoxide) ..............5-2
Three-way catalyst (if so equipped) ...........5-2
Tire Pressure Monitoring System
(TPMS)........................................5-3
On-pavement and off-road driving
precautions ..................................5-7
Avoiding collision and rollover ................5-7
Off-roadrecovery ............................5-7
Rapid air pressure loss .......................5-8
Drinking alcohol/drugs and driving ...........5-9
Driving safety precautions ....................5-9
Push-button ignition switch .....................5-11
Operating range ............................. 5-12
Push-button ignition switch positions .......5-12
Emergency engine shut off ..................5-13
NISSAN Intelligent Key® battery
discharge ................................... 5-14
NISSAN Vehicle Immobilizer System .........5-14
Before starting the engine ......................5-15
Starting the engine (gasoline engine only) ......5-15
Remote Engine Start (if so equipped) ........5-16
Starting the engine (diesel only) ................5-16
Driving the vehicle .............................. 5-17Engine protection mode
.....................5-17
Automatic transmission (A/T) ...............5-17
Parking brake .................................. 5-23
Blind Spot Warning (BSW) (if so equipped) .......5-23
BSW system operation ......................5-25
How to enable/disable the BSW system .....5-26
BSW system limitations ......................5-27
BSW driving situations .......................5-28
System temporarily unavailable .............5-31
System maintenance ........................ 5-32
Rear Cross Traffic Alert (RCTA) (if so equipped) . . 5-33 RCTA system operation ......................5-34
How to enable/disable the RCTA
system ...................................... 5-36
RCTA system limitations .....................5-37
System temporarily unavailable .............5-39
System maintenance ........................ 5-40
Cruise control .................................. 5-41
Pr ec autions
on cruise control ................5-41
Cruise control operations ....................5-42
Break-in schedule .............................. 5-43
Fuel efficient driving tips ........................5-43
Increasing fuel economy .......................5-44
Page 354 of 682
Using 4–Wheel Drive (4WD) (if so equipped)......5-45
Transfer case shif ting procedures ...........5-46
Electronic locking rear differential (E-Lock)
system (if so equipped) ......................... 5-52
Eco Drive Report (if so equipped) ...............5-53
Parking/parking on hills ........................5-54
Power steering ................................. 5-55
Brake system ................................... 5-55
Brake precautions ........................... 5-55
Anti-lock Braking System (ABS) ..............5-56
Brake Assist ................................. 5-57
Active Brake Limited Slip (ABLS) system .........5-58
Vehicle Dynamic Control (VDC) system .........5-59
Brake force distribution ......................5-60
Hill descent control system (if so equipped) .....5-61
Hill start assist system .......................... 5-62Front and rear sonar system (if so equipped) . . . 5-63
System operation ........................... 5-64
How to enable/disable the sonar
system ...................................... 5-66
Sonar limitations ............................ 5-67
System maintenance ........................ 5-68
Cold weather driving ........................... 5-68
Freeing a frozen door lock ...................5-68
Antifreeze ................................... 5-68
Battery...................................... 5-68
Draining of coolant water ....................5-69
Tire equipment .............................. 5-69
Special winter equipment ...................5-69
Driving on snow or ice .......................5-69
Engine block heater (if so equipped) .........5-70
Page 358 of 682

∙ If the low tire pressure warning lightilluminates while driving, avoid sud-
den steering maneuvers or abrupt
braking, reduce vehicle speed, pull off
the road to a safe location and stop
the vehicle as soon as possible. Driv-
ing with under-inflated tires may per-
manently damage the tires and in-
crease the likelihood of tire failure.
Serious vehicle damage could occur
and may lead to an accident and could
result in serious personal injury.
Check the tire pressure for all four
tires. Adjust the tire pressure to the
recommended COLD tire pressure
shown on the Tire and Loading Infor-
mation label to turn the low tire pres-
sure warning light off. If you have a flat
tire, replace it with a spare tire as soon
as possible. (For additional informa-
tion, refer to “Flat tire” in the “In case of
emergency ” section for changing a
flat tire.) ∙ When replacing a wheel without the
TPMS such as the spare tire, when a
spare tire is mounted or a wheel is
replaced, tire pressure will not be indi-
cated, the TPMS will not function and
the low tire pressure warning light will
flash for approximately 1 minute. The
light will remain on af ter 1 minute.
Have your tires replaced and/or TPMS
system reset as soon as possible. It is
recommended that you visit a NISSAN
dealer for this service.
∙ Replacing tires with those not origi- nally specified by NISSAN could affect
the proper operation of the TPMS.
∙ Do not inject any tire liquid or aerosol tire sealant into the tires, as this may
cause a malfunction of the tire pres-
sure sensors.
CAUTION
Do not place metalized film or any
metal parts (antenna, etc.) on the win-
dows. This may cause poor reception of
the signals from the tire pressure sen-
sors, and the TPMS will not function
properly. Some devices and transmitters may tem-
porarily interfere with the operation of the
TPMS and cause the low tire pressure
warning light to illuminate.
Some examples are:
∙ Facilities or electric devices using simi- lar radio frequencies are near the ve-
hicle.
∙ If a transmitter set to similar frequen- cies is being used in or near the vehicle.
∙ If a computer (or similar equipment) or a DC/AC converter is being used in or
near the vehicle.
The low tire pressure warning light may
illuminate in the following cases: ∙ If the vehicle is equipped with a wheel and tire without TPMS.
∙ If the TPMS has been replaced and the ID has not been registered.
∙ If the wheel is not originally specified by NISSAN.
Starting and driving5-5
Page 359 of 682
FCC Notice:
For USA:
This device complies with Part 15 of the
FCC Rules. Operation is subject to the fol-
lowing two conditions: (1) This device
may not cause harmful interference, and
(2) this device must accept any interfer-
ence received, including interference
that may cause undesired operation.
NOTE:
Changes or modifications not expressly
approved by the party responsible for
compliance could void the user’s author-
ity to operate the equipment.
For Canada:
This device complies with Industry
Canada licence-exempt RSS standard(s).
Operation is subject to the following two
conditions: (1) this device may not cause
harmful interference, and (2) this device
must accept any interference received,
including interference that may cause
undesired operation of the device.TPMS with Easy-Fill Tire Alert
WARNING
Af ter rotating the tires, do not use the
Easy-Fill Tire Alert to adjust the tire
pressure. Instead use a gauge to adjust
the tires to the correct pressure in ac-
cordance with Tire and Loading Infor-
mation label.
When adding air to an under-inflated tire,
the TPMS with Easy-Fill Tire Alert provides
visual and audible signals outside the ve-
hicle to help you inflate the tires to the rec-
ommended COLD tire pressure.
Vehicle set-up 1. Park the vehicle in a safe and level place.
2. Apply the parking brake and place the shif t lever in the P (Park) position.
3. Place the ignition switch in the ON po- sition. Do not start the engine.
Operation 1. Add air to the tire.
2. Af ter a few seconds, the hazard indica- tors will start flashing. 3. When the designated pressure is
reached, the horn beeps once and the
hazard indicators stop flashing.
4. Perform the above steps for each tire. ∙ If the tire is over-inflated more thanapproximately 4 psi (30 kPa), the horn
beeps and the hazard indicators
flash three times. To correct the pres-
sure, push the core of the valve stem
on the tire briefly to release pressure.
When the pressure reaches the des-
ignated pressure, the horn beeps
once.
∙ If the hazard indicator does not flash within approximately 15 seconds af-
ter starting to inflate the tire, it indi-
cates that the Easy-Fill Tire Alert is
not operating.
∙ The TPMS will not activate the Easy- Fill Tire Alert under the following con-
ditions:
– If there is interference from an exter- nal device or transmitter.
– The air pressure from the inflation device is not sufficient to inflate the
tire.
– There is a malfunction in the TPMS.
5-6Starting and driving
Page 363 of 682
∙ Stay alert when driving to the top of ahill. At the top there could be a drop-
off or other hazard that could cause
an accident.
∙ If your engine stalls or you cannot make it to the top of a steep hill, never
attempt to turn around. Your vehicle
could tip or roll over. Always back
straight down in R (Reverse) gear and
apply brakes to control your speed.
∙ Heavy braking going down a hill could cause your brakes to overheat and
fade, resulting in loss of control and
an accident. Apply brakes lightly and
use a low gear to control your speed.
∙ Unsecured cargo can be thrown around when driving over rough ter-
rain. Properly secure all cargo so it will
not be thrown forward and cause in-
jury to you or your passengers.
∙ Secure heavy loads in the cargo area as far forward and as low as possible.
Do not equip the vehicle with tires
larger than specified in this manual.
This could cause your vehicle to roll
over. ∙ Do not grip the inside or spokes of the
steering wheel when driving off-road.
The steering wheel could move sud-
denly and injure your hands. Instead
drive with your fingers and thumbs on
the outside of the rim.
∙ Before operating the vehicle, ensure that the driver and all passengers
have their seat belts fastened.
∙ Lower your speed when encountering strong crosswinds. With a higher cen-
ter of gravity, your NISSAN is more af-
fected by strong side winds. Slower
speeds ensure better vehicle control.
∙ Do not drive beyond the performance capability of the tires, even with 4WD
engaged.
∙ For 4WD equipped vehicles, do not at- tempt to raise two wheels off the
ground and shif t the transmission to
any drive or reverse position with the
engine running. Doing so may result
in drivetrain damage or unexpected
vehicle movement which could result
in serious vehicle damage or personal
injury. ∙ Do not attempt to test a 4WD
equipped vehicle on a 2-wheel dyna-
mometer (such as the dynamometers
used by some states for emissions
testing) or similar equipment even if
the other two wheels are raised off the
ground. Make sure you inform test fa-
cility personnel that your vehicle is
equipped with 4WD before it is placed
on a dynamometer. Using the wrong
test equipment may result in drive-
train damage or unexpected vehicle
movement which could result in seri-
ous vehicle damage or personal
injury.
∙ Accelerating quickly, sharp steering maneuvers or sudden braking may
cause loss of control.
∙ If at all possible, avoid sharp turning maneuvers, particularly at high
speeds. Your NISSAN 4WD vehicle has
a higher center of gravity than a pas-
senger car. The vehicle is not de-
signed for cornering at the same
speeds as passenger cars. Failure to
operate this vehicle correctly could
result in loss of control and/or a roll-
over accident.
5-10Starting and driving