2019 NISSAN TITAN run flat
[x] Cancel search: run flatPage 29 of 682
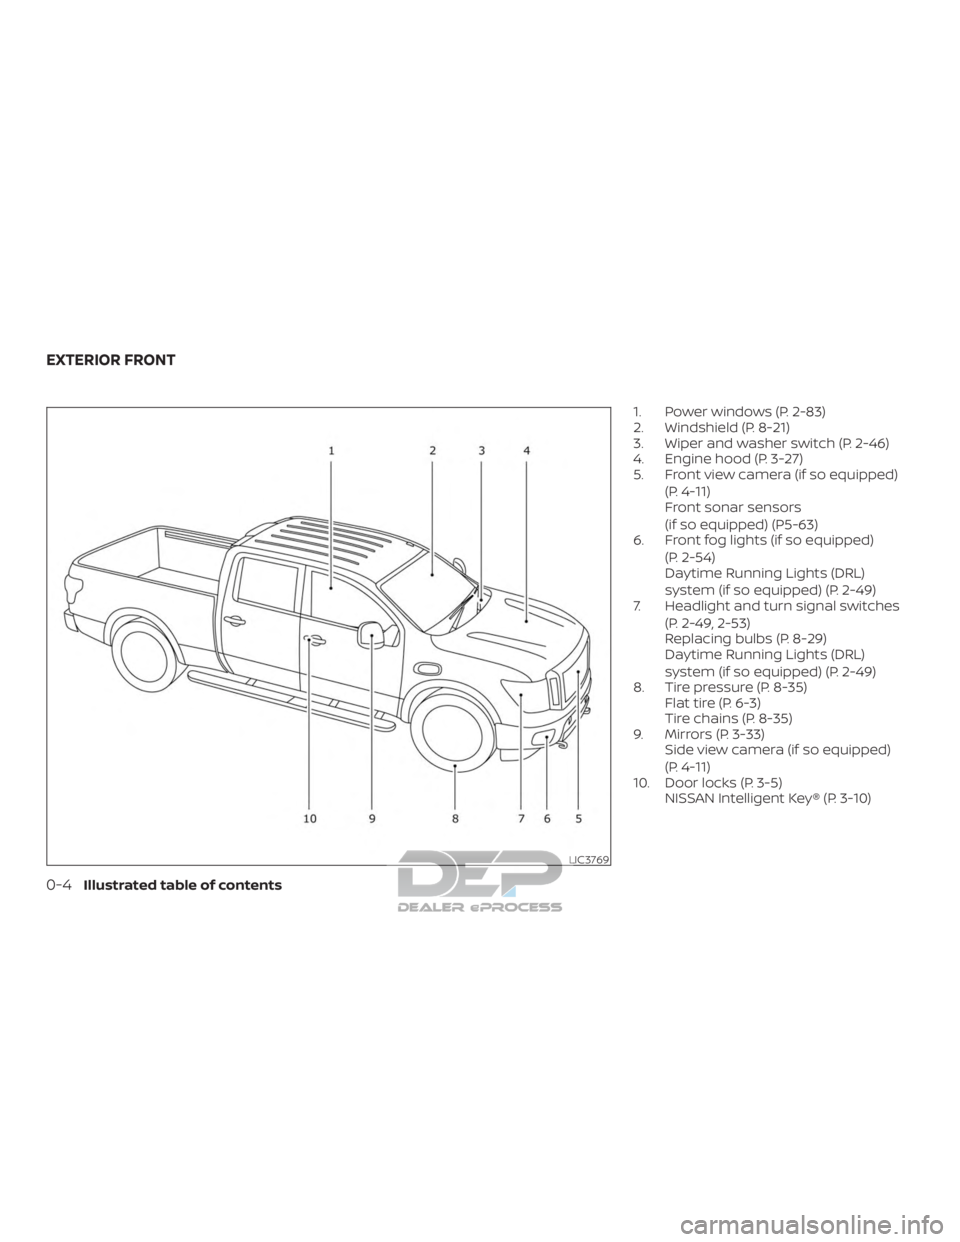
1. Power windows (P. 2-83)
2. Windshield (P. 8-21)
3. Wiper and washer switch (P. 2-46)
4. Engine hood (P. 3-27)
5. Front view camera (if so equipped)(P. 4-11)
Front sonar sensors
(if so equipped) (P5-63)
6. Front fog lights (if so equipped)
(P. 2-54)
Daytime Running Lights (DRL)
system (if so equipped) (P. 2-49)
7. Headlight and turn signal switches
(P. 2-49, 2-53)
Replacing bulbs (P. 8-29)
Daytime Running Lights (DRL)
system (if so equipped) (P. 2-49)
8. Tire pressure (P. 8-35) Flat tire (P. 6-3)
Tire chains (P. 8-35)
9. Mirrors (P. 3-33) Side view camera (if so equipped)
(P. 4-11)
10. Door locks (P. 3-5) NISSAN Intelligent Key® (P. 3-10)
LIC3769
EXTERIOR FRONT
0-4Illustrated table of contents
Page 143 of 682

CAUTION
Running the engine with the engine oil
pressure warning light on could cause
serious damage to the engine almost
immediately. Such damage is not cov-
ered by warranty. Turn off the engine as
soon as it is safe to do so.
Low DEF warning light (if soequipped)
For additional information, refer to the Ti-
tan Diesel Owner’s Manual.
Low tire pressure warninglight
Your vehicle is equipped with a Tire Pres-
sure Monitoring System (TPMS) that moni-
tors the tire pressure of all tires except the
spare.
The low tire pressure warning light warns
of low tire pressure or indicates that the
TPMS is not functioning properly.
Af ter the ignition switch is placed in the ON
position, this light illuminates for about
1 second and turns off. Low tire pressure warning
If the vehicle is being driven with low tire
pressure, the warning light will illumi-
nate. A “Tire Pressure Low - Add Air”
warning also appears in the vehicle in-
formation display (if so equipped).
When the low tire pressure warning light
illuminates, you should stop and adjust
the tire pressure of all four tires to the
recommended COLD tire pressure shown
on the Tire and Loading Information la-
bel located in the driver’s door opening.
The low tire pressure warning light does
not automatically turn off when the tire
pressure is adjusted. Af ter the tire is in-
flated to the recommended pressure,
the vehicle must be driven at speeds
above 16 mph (25 km/h) to activate the
TPMS and turn off the low tire pressure
warning light. Use a tire pressure gauge
to check the tire pressure.
For vehicles with a vehicle information dis-
play, the “Tire Pressure Low - Add Air” warn-
ing appears each time the ignition switch is
placed in the ON position as long as the low
tire pressure warning light remains illumi-
nated.
For additional information, refer to “Vehicle
information display” in this section, “Tire
Pressure Monitoring System (TPMS)” in the
“Starting and driving” and “In case of emer-
gency” sections of this manual.
TPMS malfunction
If the TPMS is not functioning properly, the
low tire pressure warning light will flash for
approximately 1 minute when the ignition
switch is placed in the ON position. The
light will remain on af ter 1 minute. Have the
system checked. It is recommended that
you visit a NISSAN dealer for this service.
The "Tire Pressure Low — Add Air" warning
does not appear if the low tire pressure
warning light illuminates to indicate a
TPMS malfunction.
For additional information, refer to “Tire
Pressure Monitoring System (TPMS)” in the
“Starting and driving” section and “Tire
pressure” in the “Do-it-yourself ” section of
this manual.
2-20Instruments and controls
Page 175 of 682
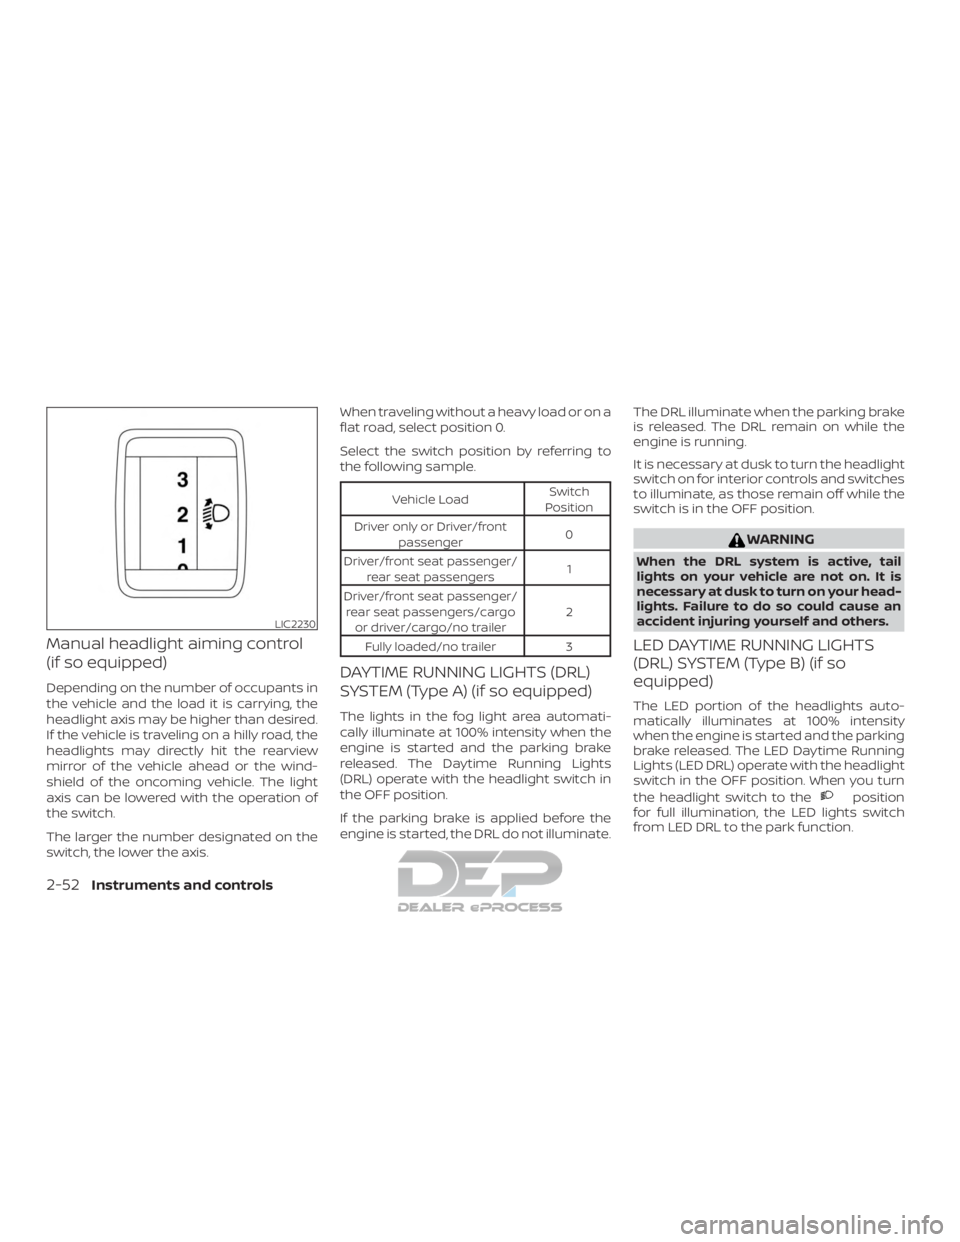
Manual headlight aiming control
(if so equipped)
Depending on the number of occupants in
the vehicle and the load it is carrying, the
headlight axis may be higher than desired.
If the vehicle is traveling on a hilly road, the
headlights may directly hit the rearview
mirror of the vehicle ahead or the wind-
shield of the oncoming vehicle. The light
axis can be lowered with the operation of
the switch.
The larger the number designated on the
switch, the lower the axis.When traveling without a heavy load or on a
flat road, select position 0.
Select the switch position by referring to
the following sample.
Vehicle Load
Switch
Position
Driver only or Driver/front passenger 0
Driver/front seat passenger/ rear seat passengers 1
Driver/front seat passenger/ rear seat passengers/cargo or driver/cargo/no trailer 2
Fully loaded/no trailer 3
DAYTIME RUNNING LIGHTS (DRL)
SYSTEM (Type A) (if so equipped)
The lights in the fog light area automati-
cally illuminate at 100% intensity when the
engine is started and the parking brake
released. The Daytime Running Lights
(DRL) operate with the headlight switch in
the OFF position.
If the parking brake is applied before the
engine is started, the DRL do not illuminate. The DRL illuminate when the parking brake
is released. The DRL remain on while the
engine is running.
It is necessary at dusk to turn the headlight
switch on for interior controls and switches
to illuminate, as those remain off while the
switch is in the OFF position.
WARNING
When the DRL system is active, tail
lights on your vehicle are not on. It is
necessary at dusk to turn on your head-
lights. Failure to do so could cause an
accident injuring yourself and others.
LED DAYTIME RUNNING LIGHTS
(DRL) SYSTEM (Type B) (if so
equipped)
The LED portion of the headlights auto-
matically illuminates at 100% intensity
when the engine is started and the parking
brake released. The LED Daytime Running
Lights (LED DRL) operate with the headlight
switch in the OFF position. When you turn
the headlight switch to the
position
for full illumination, the LED lights switch
from LED DRL to the park function.
LIC2230
2-52Instruments and controls
Page 356 of 682
WARNING
∙ The exhaust gas and the exhaust sys-tem are very hot. Keep people, ani-
mals or flammable materials away
from the exhaust system
components.
∙ Do not stop or park the vehicle over flammable materials such as dry
grass, waste paper or rags. They may
ignite and cause a fire.
CAUTION
∙ Do not use leaded gasoline. Depositsfrom leaded gasoline will seriously re-
duce the three-way catalyst’s ability
to help reduce exhaust pollutants.
∙ Keep your engine tuned up. Malfunc- tions in the ignition, fuel injection, or
electrical systems can cause overrich
fuel flow into the three-way catalyst,
causing it to overheat. Do not keep
driving if the engine misfires, or if no-
ticeable loss of performance or other
unusual operating conditions are de-
tected. Have the vehicle inspected
promptly. It is recommended that you
visit a NISSAN dealer for this service. ∙ Avoid driving with an extremely low
fuel level. Running out of fuel could
cause the engine to misfire, damag-
ing the three-way catalyst.
∙ Do not race the engine while warming it up.
∙ Do not push or tow your vehicle to start the engine.
TIRE PRESSURE MONITORING
SYSTEM (TPMS)
Each tire, including the spare (if provided),
should be checked monthly when cold and
inflated to the inflation pressure recom-
mended by the vehicle manufacturer on
the vehicle placard or tire inflation pressure
label. (If your vehicle has tires of a different
size than the size indicated on the vehicle
placard or tire inflation pressure label, you
should determine the proper tire inflation
pressure for those tires.)
As an added safety feature, your vehicle
has been equipped with a Tire Pressure
Monitoring System (TPMS) that illuminates
a low tire pressure telltale when one or
more of your tires is significantly under-
inflated. Accordingly, when the low tire
pressure telltale illuminates, you should
stop and check your tires as soon as pos- sible, and inflate them to the proper pres-
sure. Driving on a significantly under-
inflated tire causes the tire to overheat and
can lead to tire failure. Under-inflation also
reduces fuel efficiency and tire tread life,
and may affect the vehicle’s handling and
stopping ability.
Please note that the TPMS is not a substi-
tute for proper tire maintenance, and it is
the driver’s responsibility to maintain cor-
rect tire pressure, even if under-inflation
has not reached the level to trigger illumi-
nation of the TPMS low tire pressure telltale.
Your vehicle has also been equipped with a
TPMS malfunction indicator to indicate
when the system is not operating properly.
The TPMS malfunction indicator is com-
bined with the low tire pressure telltale.
When the system detects a malfunction,
the telltale will flash for approximately one
minute and then remain continuously illu-
minated. This sequence will continue upon
subsequent vehicle start-ups as long as
the malfunction exists. When the malfunc-
tion indicator is illuminated, the system
may not be able to detect or signal low tire
pressure as intended. TPMS malfunctions
may occur for a variety of reasons, includ-
ing the installation of replacement or alter-
nate tires or wheels on the vehicle that
Starting and driving5-3
Page 368 of 682
∙ Make sure the area around the vehicle isclear.
∙ Check fluid levels such as engine oil, coolant, brake fluid, Diesel Exhaust Fluid
(Diesel only) and windshield-washer
fluid as frequently as possible, or at least
whenever you refuel.
∙ Check that all windows and lights are clean.
∙ Visually inspect tires for their appear- ance and condition. Also check tires for
proper inflation.
∙ Check that all doors are closed.
∙ Position seat and adjust head restraints/headrests.
∙ Adjust inside and outside mirrors.
∙ Fasten seat belts and ask all passen- gers to do likewise.
∙ Check the operation of warning lights when the ignition switch is placed in the
ON position. For additional information,
refer to “Warning lights, indicator lights
and audible reminders” in the “Instru-
ments and controls” section of this
manual. 1. Apply the parking brake.
2. Move the shif t lever to P (Park) or N
(Neutral). P (Park) is recommended.
The starter is designed not to oper-
ate unless the shif t lever is in either P
(Park) or N (Neutral).
3. Push the ignition switch to the ON po- sition. Depress the brake pedal and
push the ignition switch to start the
engine.
To start the engine immediately, push
and release the ignition switch while
depressing the brake pedal with the
ignition switch in any position.
∙ If the engine is very hard to start in extremely cold weather or when re-
starting, depress the accelerator
pedal a little (approximately 1/3 to the
floor) and while holding, crank the en-
gine. Release the accelerator pedal
when the engine starts.
∙ If the engine is very hard to start be- cause it is flooded, depress the accel-
erator pedal all the way to the floor
and hold it. Push the ignition switch
to the ON position to start cranking
the engine. Af ter 5 or 6 seconds, stop
cranking by pushing the ignition switch to the LOCK position. Af ter
cranking the engine, release the ac-
celerator pedal. Crank the engine
with your foot off the accelerator
pedal by depressing the brake pedal
and pushing the ignition switch to
start the engine. If the engine starts,
but fails to run, repeat the above pro-
cedure.
CAUTION
Do not operate the starter for more
than 15 seconds at a time. If the engine
does not start, push the ignition switch
to the OFF position and wait 10 seconds
before cranking again, otherwise the
starter could be damaged.
4. Warm-up
Allow the engine to idle for at least
30 seconds af ter starting. Do not race
the engine while warming it up. Drive at
a moderate speed for a short distance
first, especially in cold weather. In cold
weather, keep the engine running for a
minimum of 2 to 3 minutes before
shutting it off. Starting and stopping
the engine over a short period of time
may make the vehicle more difficult to
start.
BEFORE STARTING THE ENGINE STARTING THE ENGINE (gasoline engine only)
Starting and driving5-15
Page 442 of 682
WARNING
Be careful not to allow your hands, hair,
jewelry or clothing to come into contact
with, or get caught in, engine belts or
the engine cooling fan. The engine cool-
ing fan can start at any time.7. Af ter the engine cools down, check the coolant level in the engine coolant res-
ervoir tank with the engine running. Add
coolant to the engine coolant reservoir
tank if necessary. It is recommended
that you visit a NISSAN dealer for this
service. When towing your vehicle, all jurisdictional
and local regulations for towing must be
followed. Incorrect towing equipment
could damage your vehicle. Towing in-
structions are available from a NISSAN
dealer. Local service operators are gener-
ally familiar with the applicable laws and
procedures for towing. To assure proper
towing and to prevent accidental damage
to your vehicle, NISSAN recommends hav-
ing a service operator tow your vehicle. It is
advisable to have the service operator
carefully read the following precautions:
WARNING
∙ Never ride in a vehicle that is being
towed.
∙ Never get under your vehicle af ter it has been lif ted by a tow truck.
∙ If your vehicle has front recovery hooks as original factory equipment,
do not remove or modif y them. If it
was not equipped with front recovery
hooks, do not install them. Either ac-
tion could affect proper operation of
the front air bag system resulting in
injury or death.
CAUTION
∙ When towing, make sure that thetransmission, axles, steering system
and powertrain are in working condi-
tion. If any of these conditions apply,
dollies or a flatbed tow truck must be
used.
∙ Always attach safety chains before towing.
For additional information, refer to "Flat
towing for 2-Wheel Drive (2WD) vehicle" or
"Flat towing for 4-Wheel Drive (4WD) ve-
hicle" in the "Technical and consumer infor-
mation" section of this manual.
TOWING RECOMMENDED BY
NISSAN
NISSAN recommends towing your vehicle
based upon the type of drivetrain. For addi-
tional information, refer to the diagrams in
this section to ensure that your vehicle is
properly towed.
TOWING YOUR VEHICLE
In case of emergency6-17
Page 577 of 682
Trailer lights
CAUTION
When splicing into the vehicle electrical
system, a commercially available
power-type module/converter must be
used to provide power for all trailer
lighting. This unit uses the vehicle bat-
tery as a direct power source for all
trailer lights while using the vehicle tail
light, stop light and turn signal circuits
as a signal source. The
module/converter must draw no more
than 15 milliamps from the stop and tail
lamp circuits. Using a
module/converter that exceeds these
power requirements may damage the
vehicle’s electrical system. See a repu-
table trailer retailer to obtain the proper
equipment and to have it installed.
Trailer lights should comply with federal
and/or local regulations. For assistance in
hooking up trailer lights, it is recommended
that you contact a NISSAN dealer or repu-
table trailer retailer. Vehicles equipped with
the optional trailer tow package are
equipped with a 7-pin trailer harness con-
nector. If your trailer is equipped with a flat
4-pin connector, an adapter will be needed to connect the trailer lights to the vehicle.
Adapters are available at auto parts stores
and hitch retailers.Trailer brakes (if so equipped)
If your trailer is equipped with a braking
system, make sure it conforms to federal
and/or local regulations and that it is prop-
erly installed.
Vehicles equipped with a 7–pin trailer har-
ness connector are pre-wired for a trailer
brake controller. It is recommended that
you visit a NISSAN dealer for a trailer brake
adapter harness.
When towing a trailer load of 3,500 lbs.
(1587 kg) or more, trailers with a brake
system MUST be used.
However, most
states require a separate braking system
on trailers with a loaded weight above a
specific amount. Make sure the trailer
meets the local regulations and the regu-
lations where you plan to tow.
WARNING
The Gross Combined Weight Rating
(GCWR) must never exceed the vehicle
manufacturers recommendation.
Several types of braking systems are avail-
able. Surge Brakes -
The surge brake actuator is
mounted on the trailer tongue with a hy-
draulic line running to each trailer wheel.
Surge brakes are activated by the trailer
pushing against the hitch ball when the
tow vehicle is braking. Hydraulic surge
brakes are common on rental trailers and
some boat trailers. In this type of system,
there is no hydraulic or electric connection
for brake operation between the tow ve-
hicle and the trailer.
CAUTION
Your factory trailer brake control unit
will not activate surge-style trailer
brakes
Electric Trailer Brakes - Electric braking
systems are activated by an electronic sig-
nal sent from a trailer brake controller (spe-
cial brake-sensing module). If electric trailer
brakes are used, refer to “Electric trailer
brake controller" in this section.
Have a professional supplier of towing
equipment make sure the trailer brakes are
properly installed and demonstrate proper
brake function testing.
10-54Technical and consumer information
Page 593 of 682
Top tether strap anchor point
locations...................1-31
Child safety rear door lock ..........3-10
Chimes, audible reminders .........2-25
Cleaningexteriorandinterior......7-2,7-4
Climatecontrolseatswitch.........2-55
C.M.V.S.S. certification label .........10-20
Coldweatherdriving.............5-68
Compass ....................2-12
Console light ..................2-88
Controls Heater and air conditioner controls . .4-39
Heater and air conditioner controls
(manual) ...................4-29
Coolant Capacities and recommended
fuel/lubricants...............10-2
Changing engine coolant .........8-6
Checking engine coolant level ......8-6
Engine coolant temperature gauge . .2-8
Corrosionprotection..............7-7
Cruisecontrol...........5-41,5-41,5-42
Cupholders...................2-78
Curtain side-impact and rollover air
bag........................1-78
D
Daytime Running Light System . . .2-52, 8-30
Diesel Particulate Filter (DPF) .........8-11
DigitalvideodiscDVD ............4-44
Dimensions and weights ..........10-12
Dimmer switch for instrument panel . . .2-53
Display......................2-26
Door locks ..................3-5,3-6 Door open warning light
...........2-19
Drivebelt ....................8-19
Drive positioner, Automatic ......3-43,3-45
Driving Cold weather driving ...........5-68
Driving with automatic
transmission ................5-17
Precautions when starting and
driving..................5-2,5-9
Drivingthevehicle...............5-17
E
Eco Drive Report ................5-53
Economy - fuel .................5-44
Electronic locking rear differential (E-Lock)
system ......................5-52
Electronic locking rear differential (E-Lock)
system switch .................2-62
Emergency engine shutoff .......5-13,6-2
Emission control information label . . . .10-20
Emission control system warranty . . . .10-65
Engine Before starting the engine ........5-15
Blockheater................5-70
Capacities and recommended
fuel/lubricants...............10-2
Changing engine coolant .........8-6
Changing engine oil ............8-8
Changing engine oil filter .........8-9
Checking engine coolant level ......8-6
Checking engine oil level .........8-7
Engine compartment check
locations...................8-3
Engine coolant temperature gauge . .2-8 Engine cooling system
..........8-5
Engine oil ...................8-7
Engine oil and oil filter
recommendation .............10-7
Engine oil pressure gauge .....2-10,2-11
Engine oil pressure warning light ....2-19
Engine oil viscosity ............10-8
Engine serial numbe r..........10-19
Engine specifications ..........10-10
Engine coolant temperature gauge ....2-8
Engine oil pressure gauge .......2-10,2-11
EventDatarecorders............10-67
Exhaust gas (Carbon monoxide) .......5-2
Explanation of maintenance items .....9-2
Explanation of scheduled maintenance
items .......................9-5
Extended storage switch ..........2-70
Eyeglasscase..................2-77
F
Flashers
(Seehazardwarningflasherswitch)....6-2
Flattire....................6-3,6-4
F lo
ormatpositioningaid...........7-5
Fluid Brakefluid..................8-13
Capacities and recommended
fuel/lubricants...............10-2
Engine coolant ...............8-5
Engine oil ...................8-7
Powersteeringfluid............8-12
Windshield-washer fluid .........8-13
F.M.V.S.S. certification label .........10-20
Foglightswitch................2-54
11-2