2019 NISSAN TITAN warning
[x] Cancel search: warningPage 578 of 682
WARNING
The NISSAN trailer brake controller has
been verified to be compatible with
trailers having electric actuated drum
brakes (one to four axles) and electric-
over-hydraulic brakes. It will not acti-
vate hydraulic surge-style trailer brakes
WARNING
Never connect a trailer brake system di-
rectly to the vehicle brake system.
Electric trailer brake controller (if
so equipped)
Trailers equipped with electric brakes may
require the installation of an af termarket
trailer brake controller.
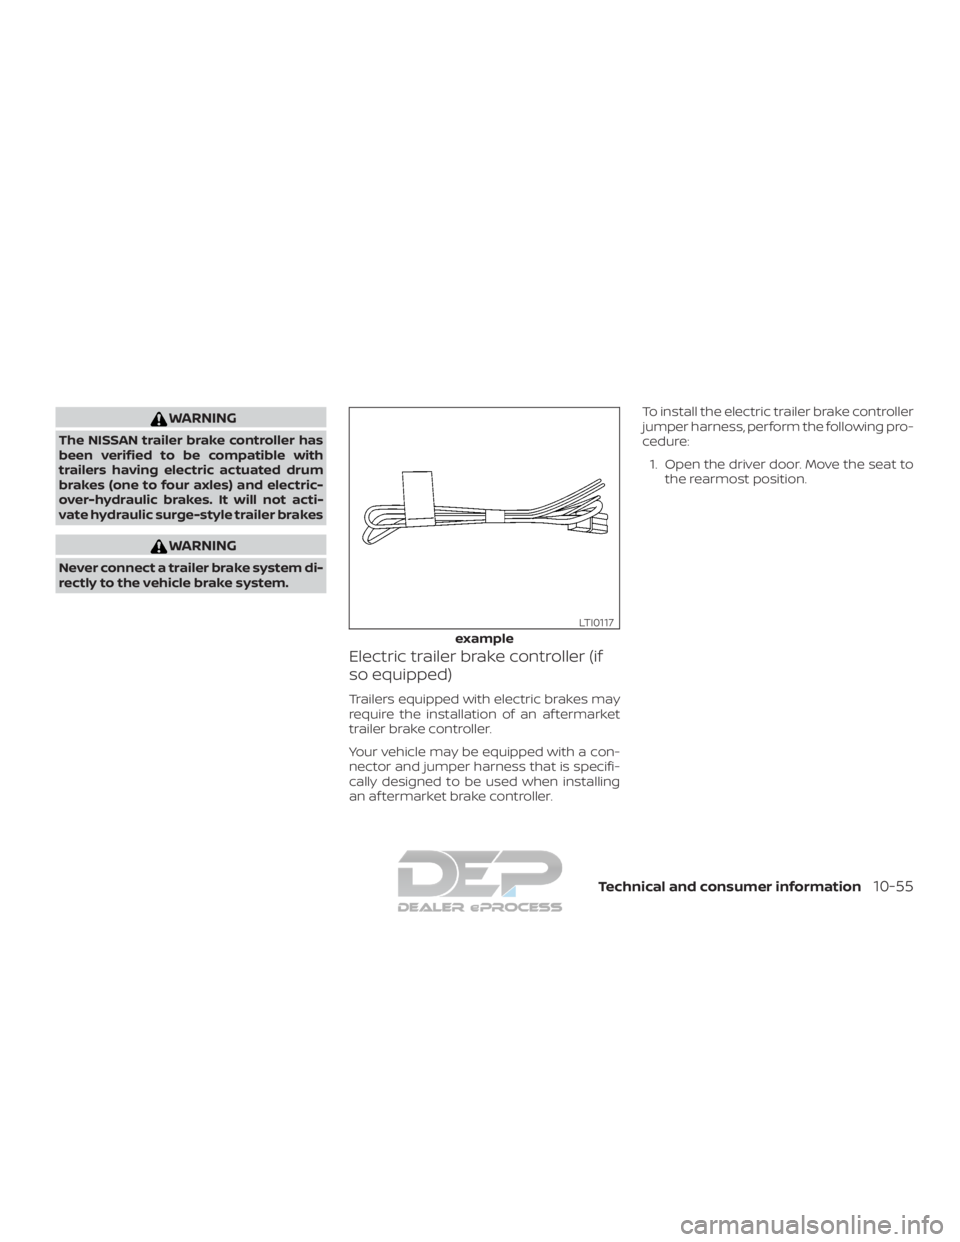
Your vehicle may be equipped with a con-
nector and jumper harness that is specifi-
cally designed to be used when installing
an af termarket brake controller.To install the electric trailer brake controller
jumper harness, perform the following pro-
cedure:
1. Open the driver door. Move the seat to the rearmost position.
example
LTI0117
Technical and consumer information10-55
Page 582 of 682
WARNING
Do not exceed Gross Combined Weight
Rating (GVWR). For additional informa-
tion about GVWR, refer to “Towing
load/specification” in this section of the
manual.
Pre-towing tips
∙ Be certain your vehicle maintains a levelposition when a loaded and/or un-
loaded trailer is hitched. Do not drive the
vehicle if it has an abnormal nose-up or
nose-down condition; check for im-
proper tongue load, overload, worn sus-
pension or other possible causes of ei-
ther condition.
∙ Always secure items in the trailer to pre- vent load shif t while driving.
∙ Keep the cargo load as low as possible in the trailer to keep the trailer center of
gravity low.
∙ Load the trailer so approximately 60% of the trailer load is in the front half and
40% is in the back half. Also make sure
the load is balanced side to side.
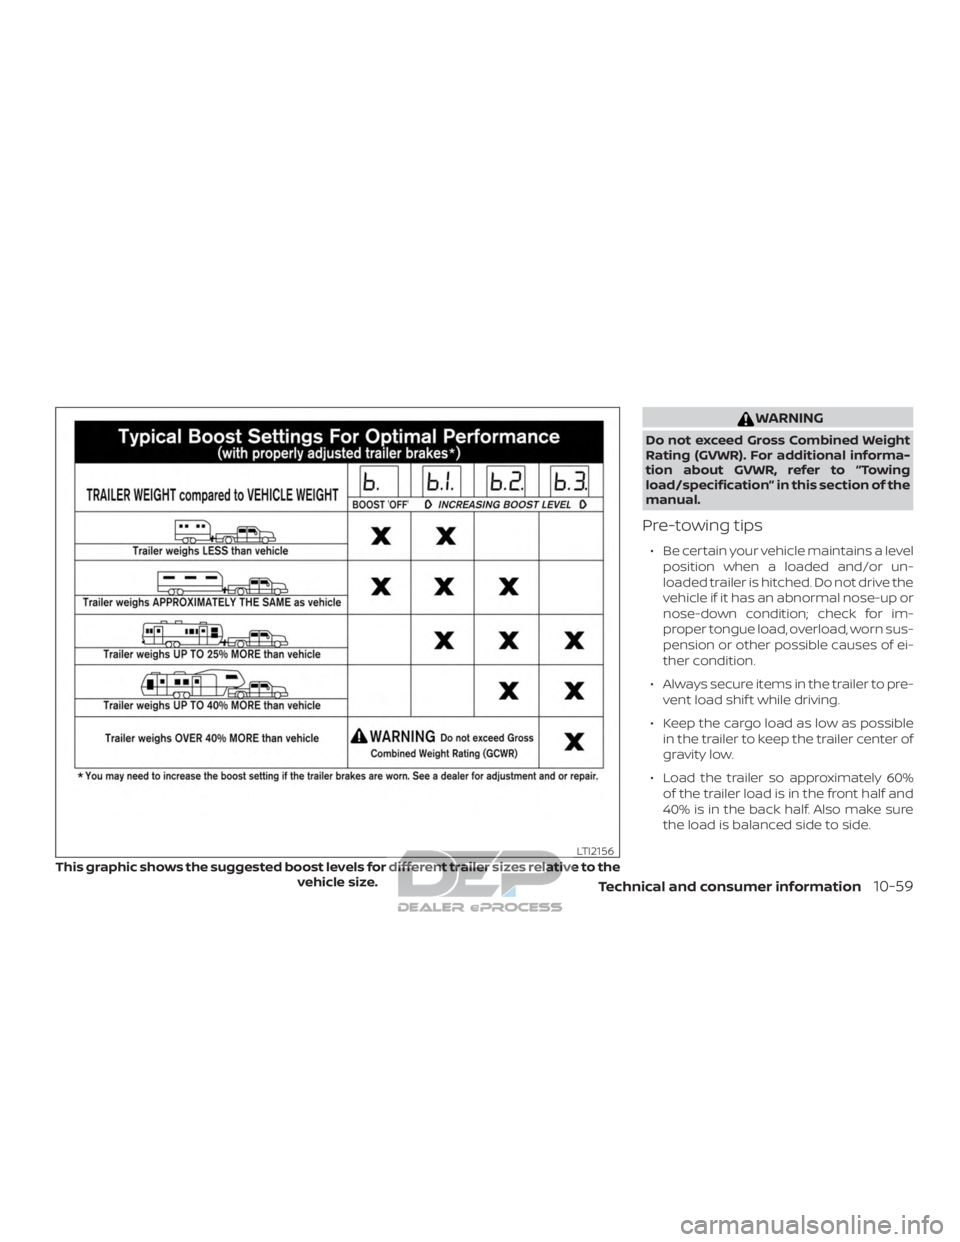
This graphic shows the suggested boost levels for different trailer sizes relative to the vehicle size.
LTI2156
Technical and consumer information10-59
Page 583 of 682
∙ Check your hitch, trailer tire pressure,vehicle tire pressure, trailer light opera-
tion, and trailer wheel lug nuts every
time you attach a trailer to the vehicle.
∙ Be certain your rearview mirrors con- form to all federal, state or local regula-
tions. If not, install any mirrors required
for towing before driving the vehicle.
∙ Determine the overall height of the ve- hicle and trailer so the required clear-
ance is known.
Trailer towing tips
In order to gain skill and an understanding
of the vehicle’s behavior, you should prac-
tice turning, stopping and backing up in an
area which is free from traffic. Steering sta-
bility and braking performance will be
somewhat different than under normal
driving conditions.
∙ Always secure items in the trailer to pre- vent load shif t while driving.
∙ Lock the trailer hitch coupler with a pin or lock to prevent the coupler from in-
advertently becoming unlatched.
∙ Avoid abrupt starts, acceleration or stops.
∙ Avoid sharp turns or lane changes. ∙ Always drive your vehicle at a moderate
speed.
∙ When backing up, hold the bottom of the steering wheel with one hand. Move
your hand in the direction in which you
want the trailer to go. Make small cor-
rections and back up slowly. If possible,
have someone guide you when you are
backing up.
Always block the wheels on both vehicle
and trailer when parking. Parking on a
slope is not recommended; however, if you
must do so:
CAUTION
If you move the shif t selector to the P
(Park) position before blocking the
wheels and applying the parking brake,
transmission damage could occur.
1. Apply and hold the brake pedal.
2. Have someone place blocks on the downhill side of the vehicle and trailer
wheels.
3. Af ter the wheel blocks are in place, slowly release the brake pedal until the
blocks absorb the vehicle load.
4. Apply the parking brake. 5. Shif t the transmission into P (Park).
6. Make sure the
indicator light (if so
equipped) indicates the transfer case is
in 4H, 4LO, or 2H and that the ATP light is
off. If the
indicator light is flashing,
or the ATP light is ON, make sure the
transmission is in P (Park) (A/T) and
turn the 4WD switch to 2WD or 4H. For
additional information, refer to “Auto-
matic transmission park warning light”
in the “Instruments and controls” sec-
tion and “Using 4-wheel drive (4WD)” in
the “Starting and driving” section of this
manual.
7. Turn off the engine.
To drive away:
1. Start the vehicle.
2. Apply and hold the brake pedal.
3. Shif t the transmission into gear.
4. Release the parking brake.
5. Drive slowly until the vehicle and trailer are clear from the blocks.
6. Apply and hold the brake pedal.
7. Have someone retrieve and store the blocks.
10-60Technical and consumer information
Page 584 of 682
∙ While going downhill, the weight of thetrailer pushing on the tow vehicle may
decrease overall stability. Therefore, to
maintain adequate control, reduce your
speed and shif t to a lower gear. Avoid
long or repeated use of the brakes
when descending a hill, as this reduces
their effectiveness and could cause
overheating. Shif ting to a lower gear in-
stead provides “engine braking” and re-
duces the need to brake as frequently.
∙ If the engine coolant temperature rises to a high temperature, refer to “If your
vehicle overheats” in the “In case of
emergency” section of this owner’s
manual.
∙ Trailer towing requires more fuel than normal circumstances.
∙ Avoid towing a trailer for your vehicle’s first 500 miles (805 km).
∙ For the first 500 miles (805 km) that you do tow, do not drive over 50 mph
(80 km/h).
∙ Have your vehicle serviced more of ten than at intervals specified. For addi-
tional information, refer to “Mainte-
nance schedules” in the “Maintenance
and schedule” section of this manual. ∙ When making a turn, your trailer wheels
will be closer to the inside of the turn
than your vehicle wheels. To compen-
sate for this, make a larger than normal
turning radius during the turn.
∙ Crosswinds and rough roads will ad- versely affect vehicle/trailer handling,
possibly causing vehicle sway. When
being passed by larger vehicles, be pre-
pared for possible changes in cross-
winds that could affect vehicle han-
dling.
Trailer Sway Assist :
To minimize trailer sway, your vehicle may
apply braking to individual wheels based
on input from your vehicle sensors and ve-
hicle speed. Trailer sway control is a func-
tion of the Vehicle Dynamic Control (VDC)
system and is active when the VDC func-
tion is enabled.
CAUTION
If the VDC-OFF switch is on (meaning
VDC system OFF), the Trailer Sway As-
sist is also disabled When Trailer Sway Assist is in operation, the
VDC warning light blinks. When vehicle con-
trol is regained, VDC warning light will turn
OFF.
For additional information about the VDC
system, refer to “Vehicle Dynamic Control
(VDC) OFF switch” in the “Instruments and
controls” section and “Vehicle Dynamic
Control (VDC) system” in the “Starting and
driving” section of this manual.
If Trailer Sway Assist activates, do the fol-
lowing:
1. Take your foot off the accelerator pedal to allow the vehicle to coast and steer
as straight ahead as the road condi-
tions allow. This combination will help
stabilize the vehicle
CAUTION
Do not try to correct trailer sway by
steering or applying the brakes.
2. When the trailer sway stops, gently ap- ply the brakes and pull to the side of the
road in a safe area.
3. Try to rearrange the trailer load so it is balanced. For additional information,
refer to “Pre-towing tips” in this section.
Technical and consumer information10-61
Page 586 of 682
FLAT TOWING FOR 2-WHEEL DRIVE
(2WD) VEHICLE (if so equipped)
Towing your vehicle with all four wheels on
the ground is sometimes called flat towing.
This method is sometimes used when
towing a vehicle behind a recreational ve-
hicle, such as a motor home.
CAUTION
∙ Failure to follow these guidelines canresult in severe transmission damage.
∙ Never flat tow your 2WD vehicle.
∙ Never tow your 2WD vehicle with the rear wheels on the ground. Doing so
may cause serious and expensive
damage to the powertrain.
∙ DO NOT tow your 2WD vehicle with all four wheels on the ground (flat tow-
ing). Doing so WILL DAMAGE internal
transmission parts due to lack of
transmission lubrication.
∙ For emergency towing procedures re- fer to “Towing recommended by
NISSAN” in the “In case of emergency ”
section of this manual.
FLAT TOWING FOR 4-WHEEL DRIVE
(4WD) VEHICLE (if so equipped)
Towing your vehicle with all four wheels on
the ground is sometimes called flat towing.
This method is sometimes used when
towing a vehicle behind a recreational ve-
hicle, such as a motor home.
CAUTION
∙ Failure to follow these guidelines canresult in severe transmission damage.
∙ Never flat tow your 4WD vehicle.
∙ DO NOT tow your 4WD vehicle with any wheels on the ground. Doing so
may cause serious and expensive
damage to the powertrain.
∙ For emergency towing procedures re- fer to “Towing recommended by
NISSAN” in the “In case of emergency ”
section of this manual.
Automatic Transmission
To tow a vehicle equipped with an auto-
matic transmission, an appropriate vehicle
dolly MUST be placed under the towed ve-
hicle’s drive wheels. Alwaysfollow the dolly
manufacturer’s recommendations when
using their product. NISSAN does not make a snowplow for TI-
TAN and has not evaluated the suitability of
its trucks for use as snowplow platforms.
Instead, the snowplow manufacturers es-
tablish minimum vehicle requirements for
their various plow products and they make
the determination as to which vehicle plat-
forms are suitable, based on their indi-
vidual product specifications. Consult the
snowplow manufacturers and sellers con-
cerning the fitness of the TITAN for use with
their products. NISSAN advises caution
whenever installing af termarket parts and
accessories because these products have
not been tested or certified by NISSAN.
Please reference the NISSAN Body Builder’s
guide for the appropriate upfit capacities
and requirements of the TITAN XD ‘Snow-
plow Prep’ package (if so equipped) or ‘HD
Front GAWR’ Package (if so equipped).
WARNING
∙ Installing a snowplow may affect ve-
hicle handling. This may cause the
driver to lose control of the vehicle
and could result in vehicle damage,
serious injury, or death.
SNOW PLOW
Technical and consumer information10-63
Page 587 of 682
∙ A snowplow attached may affect theoperation of the air bags. Use extreme
caution while driving and plowing to
avoid vehicle damage, serious injury,
or death. DOT (Department of Transportation) Qual-
ity Grades: All passenger car tires must
conform to federal safety requirements in
addition to these grades.
Quality grades can be found where appli-
cable on the tire sidewall between tread
shoulder and maximum section width. For
example:
Treadwear 200 Traction AA Temperature
A
Treadwear
The treadwear grade is a comparative rat-
ing based on the wear rate of the tire when
tested under controlled conditions on a
specified government test course. For ex-
ample, a tire graded 150 would wear one
and one-half (1 1/2) times as well on the
government course as a tire graded 100.
The relative performance of tires depends
upon the actual conditions of their use,
however, and may depart significantly from
the norm due to variations in driving habits,
service practices and differences in road
characteristics and climate.
Traction AA, A, B and C
The traction grades, from highest to low-
est, are AA, A, B, and C. Those grades repre-
sent the tire’s ability to stop on wet pave- ment as measured under controlled
conditions on specified government test
surfaces of asphalt and concrete. A tire
marked C may have poor traction perfor-
mance.
WARNING
The traction grade assigned to this tire
is based on straight-ahead braking
traction tests, and does not include ac-
celeration, cornering, hydroplaning, or
peak traction characteristics.
Temperature A, B and C
The temperature grades are A (the high-
est), B, and C, representing the tire’s resis-
tance to the generation of heat, and its
ability to dissipate heat when tested under
controlled conditions on a specified indoor
laboratory test wheel. Sustained high tem-
perature can cause the material of the tire
to degenerate and reduce tire life, and ex-
cessive temperature can lead to sudden
tire failure. The grade C corresponds to a
level of performance which all passenger
car tires must meet under the Federal Mo-
tor Vehicle Safety Standard No. 109. Grades
B and A represent higher levels of perfor-
mance on the laboratory test wheel than
the minimum required by law.
UNIFORM TIRE QUALITY GRADING
10-64Technical and consumer information
Page 588 of 682
WARNING
The temperature grade for this tire is
established for a tire that is properly in-
flated and not overloaded. Excessive
speed, under-inflation, or excessive
loading, either separately or in combi-
nation, can cause heat build-up and
possible tire failure.Your NISSAN vehicle is covered by the fol-
lowing emission warranties:
For USA
1. Emission Defects Warranty
2. Emissions Performance Warranty
Details of this warranty may be found with
other vehicle warranties in your Warranty
Information Booklet which comes with
your NISSAN vehicle. If you did not receive a
Warranty Information Booklet, or it is lost,
you may obtain a replacement by writing
to: ∙ Nissan North America, Inc. Consumer Affairs Department
P.O. Box 685003
Franklin, TN 37068-5003 For Canada
Emission Control System Warranty
Details of this warranty may be found with
other vehicle warranties in your Warranty
Information Booklet which comes with
your NISSAN vehicle. If you did not receive a
Warranty Information Booklet, or it is lost,
you may obtain a replacement by writing
to:
∙ Nissan Canada Inc. 5290 Orbitor Drive
Mississauga, Ontario, L4W 4Z5
EMISSION CONTROL SYSTEM
WARRANTY
Technical and consumer information10-65
Page 590 of 682
WARNING
A vehicle equipped with 4-Wheel Drive
(4WD) should never be tested using a
two wheel dynamometer (such as the
dynamometers used by some states for
emissions testing), or similar equip-
ment. Make sure you inform the test fa-
cility personnel that your vehicle is
equipped with 4WD before it is placed
on a dynamometer. Using the wrong
test equipment may result in transmis-
sion damage or unexpected vehicle
movement which could result in serious
vehicle damage or personal injury.
Due to legal requirements in some states
and Canadian Provinces, your vehicle may
be required to be in what is called the
“ready condition” for an
Inspection/Maintenance (I/M) test of the
emission control system.
The vehicle is set to the “ready condition”
when it is driven through certain driving
patterns. Usually, the ready condition can
be obtained by ordinary usage of the ve-
hicle. If a powertrain system component is re-
paired or the battery is disconnected, the
vehicle may be reset to a “not ready” condi-
tion. Before taking the I/M test, check the
vehicle’s inspection/maintenance test
readiness condition. Place the ignition
switch in the ON position without starting
the engine. If the Malfunction Indicator
Light (MIL) comes on steady for 20 seconds
and then blinks for 10 seconds, the I/M test
condition is “not ready”. If the MIL does not
blink af ter 20 seconds, the I/M test condi-
tion is “ready”. It is recommended that you
visit a NISSAN dealer to set the “ready con-
dition” or to prepare the vehicle for testing.
diesel engine only
For additional information, refer to the Ti-
tan Diesel Owner’s Manual.
This vehicle is equipped with an Event Data
Recorder (EDR). The main purpose of an
EDR is to record, in certain crash or near
crash-like situations, such as an air bag
deployment or hitting a road obstacle, data
that will assist in understanding how a ve-
hicle’s systems performed. The EDR is de-
signed to record data related to vehicle dy-
namics and safety systems for a short
period of time, typically 30 seconds or less.
The EDR in this vehicle is designed to re-
cord such data as:
∙ How various systems in your vehicle were operating;
∙ Whether or not the driver and passen- ger safety belts were buckled/fastened;
∙ How far (if at all) the driver was depress- ing the accelerator and/or brake pedal;
and,
∙ How fast the vehicle was traveling.
∙ Sounds are not recorded.
READINESS FOR INSPECTION/
MAINTENANCE (I/M) TEST (gas
engine only) EVENT DATA RECORDERS (EDR)
Technical and consumer information10-67