Page 227 of 610

Autolight system
The autolight system allows the headlights
and tail lights to be set so they turn on and
off automatically.
To set the autolight system:
1. Make sure the headlight switch is in theAUTO position
�1.
2.
Place the power switch in the ON position.
3.The autolight system automatically turns
the headlights and tail lights on and off.
To turn the autolight system off, turn the
switch to the OFF,
orposition.
The autolight system can turn on the
headlights and tail lights automatically
when it is dark and turn off the headlights
when it is light.
For US models: The headlights and tail
lights will also be turned on automatically
at twilight or in rainy weather (when the
windshield wiper is operated continuously).
If the power switch is placed in the OFF
position and one of the doors is opened
and this condition continues, the head-
lights remain on for 45 seconds.
Automatic headlights off delay:
You can keep the headlights on for up to
180 seconds af ter you push the power
switch to OFF and open any door then
close all the doors.
You can adjust the period of the automatic
headlights off delay from 0 seconds (OFF)
to 180 seconds. The factory default setting
is 45 seconds.
NOTE:
For additional information on adjust-
ing the automatic headlights off delay,
refer to “Vehicle information display ”
in this section.
2-54Instruments and controls
Page 233 of 610
To sound the horn, push the center pad
area of the steering wheel.
WARNING
Do not disassemble the horn. Doing so
could affect proper operation of the
supplemental front air bag system.
Tampering with the supplemental
front air bag system may result in seri-
ous personal injury. To turn on the ECO mode, push the ECO
switch. The ECO mode indicator appears
on the meter.
To turn off the ECO mode, push the ECO
switch again. The ECO mode indicator will
turn off.
For additional information, refer to “ECO
mode” in the “Starting and driving” section
of this manual
Rear
HORNECO SWITCHHEATED SEAT SWITCHES (IF SO
EQUIPPED)
2-60Instruments and controls
Page 252 of 610

To clear all programming:
1. Press and hold the two outer HomeLink®buttons until the indicator light begins to
flash in approximately 10 seconds. Do
not hold for longer than 20 seconds.
2. Release both buttons.
HomeLink® is now in the programming
modeandcanbeprogrammedatanytime
beginning with “Programming HomeLink®” -
Step 1.
REPROGRAMMING A SINGLE
HOMELINK® BUTTON
To reprogram a HomeLink® Universal
Transceiver button, complete the following:
1. Press and hold the desired HomeLink® button. DO NOT release the button.
2. The indicator light will begin to flash af ter 20 seconds. Without releasing the
HomeLink® button, proceed with “Pro-
gramming HomeLink®” - Step 1.
For questions or comments, contact
HomeLink® at: www.homelink.com or
1–800–355–3515. The HomeLink® Universal Transceiver but-
ton has now been reprogrammed. The
new device can be activated by pushing
the HomeLink® button that was just pro-
grammed. This procedure will not affect
any other programmed HomeLink® but-
tons.
IF YOUR VEHICLE IS STOLEN
If your vehicle is stolen, you should change
the codes of any non-rolling code device
that has been programmed into
HomeLink®. Consult the owner’s manual of
each device or call the manufacturer or
dealer of those devices for additional infor-
mation.
When your vehicle is recovered, you will
need to reprogram the HomeLink® Uni-
versal Transceiver with your new trans-
mitter information.
FCC notice:
For USA:
This device complies with Part 15 of the
FCC Rules. Operation is subject to the fol-
lowing two conditions: (1) This device
may not cause harmful interference, and
(2) this device must accept any interfer-
ence received, including interference
that may cause undesired operation.
NOTE:
Changes or modifications not expressly
approved by the party responsible for
compliance could void the user’s author-
ity to operate the equipment.
For Canada:
This device complies with Industry
Canada licence-exempt RSS standard(s).
Operation is subject to the following two
conditions: (1) this device may not cause
interference, and (2) this device must ac-
cept any interference, including interfer-
ence that may cause undesired opera-
tion of the device.
Instruments and controls2-79
Page 269 of 610

Setting hazard indicator and horn
mode
This ve")
• It has run for a period of time, or
• Any of the buttons on the Intelligent Keyis pushed. (Note: The
button must
be pushed for more than 1 second.)
Setting hazard indicator and horn
mode
This vehicle is set in hazard indicator and
horn mode when you first receive the ve-
hicle.
In hazard indicator and horn mode, when
the
button�1is pressed, the hazard
indicator flashes twice and the horn chirps
once. When the
button�2is pressed,
the hazard indicator flashes once. If horns are not necessary, the system can
be switched to the hazard indicator mode.
In hazard indicator mode, when the
button is pressed, the hazard indicator
flashes twice. When the
button is
pressed, neither the hazard indicator nor
the horn operates.
Hazard indicator and horn mode:
Operation DOOR LOCK DOOR UNLOCK
Pushing door handle request switch or rear hatch request switch HAZARD -
twice
OUTSIDE CHIME - twice HAZARD -
once
OUTSIDE CHIME - once
Pressing
orbutton HAZARD -
twice
HORN - once HAZARD -
once
HORN - none
Hazard indicator mode:
Operation DOOR LOCK DOOR UNLOCK
Pushing door handle request switch or rear hatch request switch HAZARD -
twice
OUTSIDE CHIME - none HAZARD - none
OUTSIDE CHIME - none
Pressing
orbutton HAZARD -
twice
HORN - none HAZARD - none
HORN - none
3-16Pre-driving checks and adjustments
Page 270 of 610
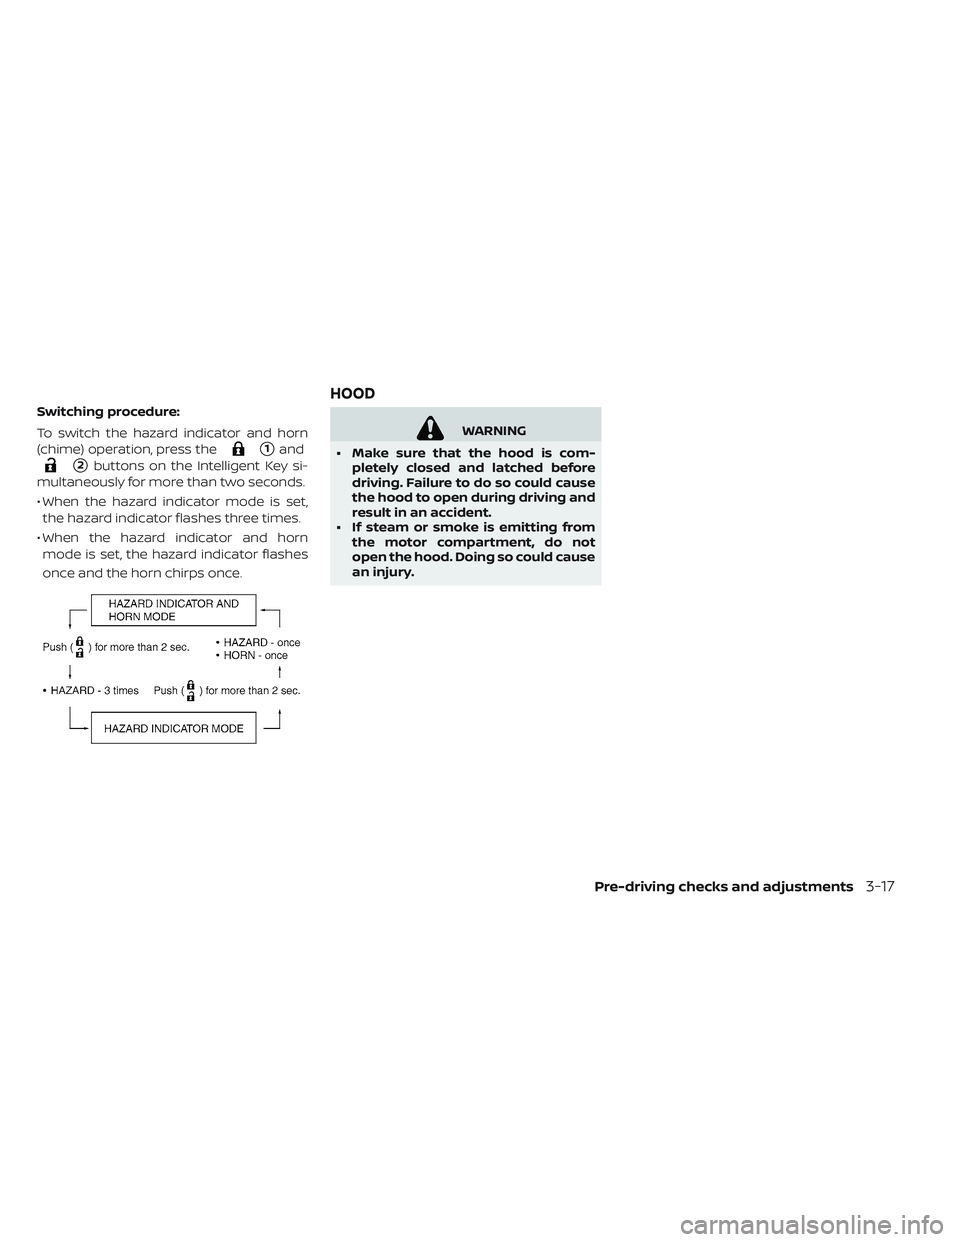
Switching procedure:
To switch the hazard indicator and horn
(chime) operation, press the
�1and
�2buttons on the Intelligent Key si-
multaneously for more than two seconds.
• When the hazard indicator mode is set, the hazard indicator flashes three times.
• When the hazard indicator and horn mode is set, the hazard indicator flashes
once and the horn chirps once.
WARNING
• Make sure that the hood is com- pletely closed and latched before
driving. Failure to do so could cause
the hood to open during driving and
result in an accident.
• If steam or smoke is emitting from the motor compartment, do not
open the hood. Doing so could cause
an injury.
HOOD
Pre-driving checks and adjustments3-17
Page 280 of 610

(if so equipped).......................4-3
RearView Monitor (if so equipped) ...........4-4
RearView M")
4 Monitor, climate, audio, phone and
voice recognition systems
NissanConnect® Manual (for Leaf )
(if so equipped).......................4-3
RearView Monitor (if so equipped) ...........4-4
RearView Monitor system operation .......4-5
How to read the displayed lines ..........4-6
Difference between predicted and actual
distances .........................4-7
How to park with predictive course lines
(if so equipped) .................... .4-8
Adjusting the screen
(models with 40 kWh battery) ...........4-10
Adjusting the screen
(models with 62 kWh battery) ...........4-11
How to turn on and off predictive course lines
(for models with 40 kWh battery) .........4-11
How to turn on and off predictive course lines
(for models with 62 kWh battery) .........4-11
RearView Monitor system limitations ......4-11
System maintenance ................4-13
Intelligent Around View Monitor
(if so equipped) .......................4-14
Intelligent Around View Monitor system
operation ........................4-16 Difference between predicted and actual
distances
........................4-19
How to park with predictive course lines . . . .4-20
How to switch the display .............4-22
Adjusting the screen ................ .4-22
Intelligent Around View Monitor system
limitations ........................4-23
System maintenance ................4-25
Moving Object Detection (MOD)
(if so equipped) ......................4-26
MOD system operation ...............4-27
Turning MOD ON and OFF .............4-28
MOD system limitations ..............4-28
System maintenance ................4-29
Vents ............................ .4-30
Heater and air conditioner (automatic) .......4-31
Displaying climate control system status
screen (models with navigation system) . . . .4-32
Operating tips .................... .4-33
In-cabin microfilter ................. .4-34
Automatic climate control
(models without Navigation System) ......4-35
Page 289 of 610

Models without Navigation System
1. While on a RearView Monitor screen,press the ENTER/SETTING button until
the Brightness or Contrast setting bar
is")
ADJUSTING THE SCREEN
(MODELS WITH 40 KWH BATTERY)
Models without Navigation System
1. While on a RearView Monitor screen,press the ENTER/SETTING button until
the Brightness or Contrast setting bar
is displayed on the RearView Monitor
screen.
2. Turn the TUNE/SCROLL knob to adjust the level. 3. To complete the adjustment, press the
ENTER/SETTING button until the Bright-
ness or Contrast setting bar disappears
from the RearView Monitor screen.
NOTE:
Do not adjust any of the display set-
tings of the RearView Monitor while
the vehicle is moving. Make sure the
parking brake is firmly applied
Models with Navigation System
1. While on a RearView Monitor screen,touch the touch-screen display. Touch
the “Display Settings” key to bring up the
Display Settings screen.
2. Touch the “Brightness,” “Contrast,” “Tint,” “Color,” or “Black Level” key.
3. Adjust the item by touching the “+” or “-” key on the touch-screen display.
NOTE:
Do not adjust any of the display set-
tings of the RearView Monitor while
the vehicle is moving. Make sure the
parking brake is firmly applied
4-10Monitor, climate, audio, phone and voice recognition systems
Page 290 of 610

1. Push the MENU button.
2. Touch the ”Settings” key.
3. Touch the “Camera” key.
4. Touch the “Display Settings” key.
5. Touch the “Brig")
ADJUSTING THE SCREEN
(MODELS WITH 62 KWH BATTERY)
1. Push the MENU button.
2. Touch the ”Settings” key.
3. Touch the “Camera” key.
4. Touch the “Display Settings” key.
5. Touch the “Brightness”, “Contrast”, “Tint”,“Color”, or “Black Level” key.
6. Adjust the item by touching the “+” or “-” key on the touch-screen display.
NOTE:
Do not adjust any of the display
settings of the RearView Monitor
while the vehicle is moving. Make
sure the parking brake is firmly
applied
HOW TO TURN ON AND OFF
PREDICTIVE COURSE LINES (FOR
MODELS WITH 40 KWH BATTERY)
To toggle ON and OFF the predictive course
lines while in the P (Park) position:
1. Touch the “Settings” key.
2. Touch the “Camera” key.
3. Touch the “Predictive Course Lines” keyto turn the feature ON or OFF.
To toggle ON and OFF the predictive course
lines while in the R (Reverse) position:
1. Touch the touch-screen display.
2. Touch the “Predictive Course Lines” key to turn the feature ON or OFF.
HOW TO TURN ON AND OFF
PREDICTIVE COURSE LINES (FOR
MODELS WITH 62 KWH BATTERY)
To toggle ON and OFF the predictive course
lines while in the P (Park) position:
1. Touch the “Settings” key.
2. Touch the “Camera” key.
3. Touch the “Predictive Course Lines” keyto turn the feature ON or OFF.
REARVIEW MONITOR SYSTEM
LIMITATIONS
WARNING
Listed below are the system limita-
tions for RearView Monitor. Failure to
operate the vehicle in accordance with
these system limitations could result
in serious injury or death.
• The system cannot completely eliminate blind spots and may not
show every object.
Monitor, climate, audio, phone and voice recognition systems4-11