Page 235 of 610
.
Push the heated steering wheel switch to
warm th")
The heated steering wheel system is de-
signed to operate only when the surface
temperature of the steering wheel is below
approximately 68°F (20°C).
Push the heated steering wheel switch to
warm the steering wheel when the power
switch is in the ACC or ON position. The indi-
cator light
�1on the switch will illuminate.
If the surface temperature of the steering
wheel is below approximately 68°F (20°C),
the system will heat the steering wheel and
cycle off and on to maintain a temperature
above 68°F (20°C). The indicator light will
remain on as long as the system is on. Push the switch again to turn the heated
steering wheel system off manually. The
indicator light turns off.
NOTE:
•
If the surface temperature of the steer-
ing wheel is above 68°F (20°C) when the
switch is turned on, the system will not
heat the steering wheel. This is not a
malfunction.
• If the outside temperature is low (ap-
proximately 50°F (10°C) or less) and the
Climate Control Timer or Remote Cli-
mate Control are used, the steering
wheel heater will automatically operate
in the following conditions.
– When using the Climate Control Timer: Operates from approximately
15 minutes before the set departure
time until the set departure time.
– When using Remote Climate Control: Operates 15 minutes af ter Remote
Climate Control starts.
• The heated steering wheel consumes
less power than the heater and can be
used to either help extend vehicle range
by reducing heater use or to maximize
comfort by supplementing the heater. The E-call (SOS) system button is used in
combination with a NissanConnect® (for
Leaf ) Services subscription to call for assis-
tance in case of an emergency.
Pressing the button will (with a paid sub-
scription) reach a Response Specialist that
will provide assistance based on the situa-
tion described by the vehicle’s occupant. For
additional information, or to enroll your ve-
hicle, refer to www.NissanUSA.com/connect
or call 855–426–6628.
HEATED STEERING WHEEL SWITCH
(IF SO EQUIPPED)
E-CALL (SOS) BUTTON (IF SO
EQUIPPED)
2-62Instruments and controls
Page 236 of 610
To open the charge port lid, push the
charge port lid switch. For additional infor-
mation, refer to “Charge port lid” in the “Pre-
driving checks and adjustments” section of
this manual.To turn off the charge timer, push the im-
mediate charge switch. For additional in-
formation, refer to “Charging timer” in the
“Charging” section of this manual.
The Steering Assist switch is used to en-
able and disable the Steering Assist sys-
tem that is activated using the settings
menu of the vehicle information display.
The Steering Assist system controls the
steering system, when ProPILOT Assist is
engaged, to help keep your vehicle near
the center of the lane when driving. For
additional information, refer to “ProPILOT
Assist" and “Intelligent Lane Intervention
(I-LI)” in the “Starting and driving” section of
this manual.
CHARGE PORT LID SWITCH
IMMEDIATE CHARGE SWITCHSTEERING ASSIST SWITCH (IF SO
EQUIPPED)
Instruments and controls2-63
Page 254 of 610

3 Pre-driving checks and adjustments
Keys ..............................3-2NISSAN Intelligent Key® ................3-3
NISSAN Vehicle Immobilizer System keys . . . .3-3
Doors ............................ .3-4
Locking with key (driver’s side only) ........3-5
Locking with inside lock knob ............3-5
Locking with power door lock switch .......3-5
Automatic door locks ................ .3-6
Child safety rear door lock ..............3-6
NISSAN Intelligent Key® system .............3-6
NISSAN Intelligent Key® operating range of
the door lock/unlock function ...........3-8
Door locks/unlocks precaution ...........3-9
NISSAN Intelligent Key® operation ........3-10
12-volt battery saver system ............3-11
Warning signals ................... .3-12
Troubleshooting guide ................3-12 How to use remote keyless entry function . . .3-14
Hood ............................ .3-17
Rear hatch ......................... .3-18
Secondary rear hatch release ...........3-19
Charge port lid .......................3-20
Opening charge port lid ...............3-20
Charge port cap ................... .3-22
Steering wheel .......................3-23
Tilt operation ......................3-23
Sun visors ......................... .3-23
Vanity mirror ......................3-24
Mirrors ........................... .3-24
Inside rearview mirror ................3-24
Manual anti-glare rearview mirror
(if so equipped) ................... .3-25
Automatic anti-glare type (if so equipped). . .3-25
Outside mirrors ................... .3-26
Page 276 of 610

WARNING
• Do not adjust the steering wheel while driving. You could lose control
of your vehicle and cause an acci-
dent.
• Do not adjust the steering wheel any closer to you than is necessary for
proper steering operation and com-
fort. The driver’s air bag inflates with
great force. If you are unrestrained,
leaning forward, sitting sideways or
out of position in any way, you are at
greater risk of injury or death in a
crash. You may also receive serious
or fatal injuries from the air bag if
you are up against it when it inflates.
Always sit back against the seat-
back and as far away as practical
from the steering wheel. Always use
the seat belts.
TILT OPERATION
Push the lock lever down�1and adjust the
steering wheel up or down
�2to the de-
sired position.
Pull the lock lever up
�3to lock the steering
wheel in place.
1. To block out glare from the front, swingdown the sun visor
�1.
2. To block glare from the side, remove the sun visor from the center mount and
swing it to the side
�2.
3. Slide the extension sun visor in or out as needed
�3.
STEERING WHEEL SUN VISORS
Pre-driving checks and adjustments3-23
Page 281 of 610
........4-38
Climate ctrl. timer .................. .4-41
Audio system (models without NissanConnect®
System) .......................... .4-46")
Automatic climate control
(models with Navigation System)........4-38
Climate ctrl. timer .................. .4-41
Audio system (models without NissanConnect®
System) .......................... .4-46
Radio .......................... .4-46
FM radio reception ................. .4-47
AM radio reception ................. .4-47
Satellite radio reception ...............4-48
Audio operation precautions ...........4-48
FM/AM/SAT radio with Compact Disc (CD)
player...........................4-55
USB (Universal Serial Bus) connection port . . .4-61
iPod® player operation ...............4-62
Bluetooth® streaming audio ............4-65
Aux device player operation ............4-65
CD care and cleaning ................4-66
Steering wheel switch for audio control . . . .4-66 Antenna
.......................... .4-67
Car phone or CB radio .................4-68
Bluetooth® Hands-Free Phone System without
Navigation System (for models without
NissanConnect® system) ................4-68
Regulatory information ...............4-70
Using the system .................. .4-70
Control buttons ................... .4-71
Connecting procedure ...............4-72
Voice commands .................. .4-73
Making a call ......................4-74
Receiving a call ................... .4-75
During a call ......................4-75
Ending a call ......................4-75
Text messaging (if so equipped) .........4-76
Bluetooth® settings ................. .4-77
Manual control .................... .4-78
Troubleshooting guide ...............4-79
Page 285 of 610

HOW TO READ THE DISPLAYED
LINES
Guiding lines which indicate the vehicle
width and distances to objects with refer-
ence to the vehicle body line
�Aare dis-
played on the monitor.
Distance guide lines
Indicate distances from the vehicle body.
• Red line
�1: approx. 1.5 f t (0.5 m)
• Yellow line
�2: approx. 3 f t (1 m )
• Green line
�3: approx. 7 f t (2 m) Vehicle width guide lines
�4
Indicate the vehicle width when backing
up.
The width of the vehicle width guide line is
wider than the actual width.
Predictive course lines (if so equipped)
�5
Indicate the predicted course when back-
ing up. The predictive course lines will be
displayed on the monitor when the shif t
lever is in the R (Reverse) position and the
steering wheel is turned. The predictive
course lines will move depending on how
much the steering wheel is turned and will
not be displayed while the steering wheel is
in the straight-ahead position.
The vehicle width guide lines and the width
of the predictive course lines are wider
than the actual width and course.
DIFFERENCE BETWEEN PREDICTED
AND ACTUAL DISTANCES
The displayed guidelines and their loca-
tions on the ground are for approximate
reference only. Objects on uphill or downhill
surfaces or projecting objects will be actu-
ally located at distances different from
those displayed in the monitor relative to
the guidelines (refer to illustrations). When
in doubt, turn around and view the objects
as you are backing up, or park and exit the
vehicle to view the positioning of objects
behind the vehicle.
4-6Monitor, climate, audio, phone and voice recognition systems
Page 287 of 610

Backing up behind a projecting
object
The position�Cis shown farther than the
position
�Bin the display. However, the po-
sition
�Cis actually at the same distance as the position
�A. The vehicle may hit the
object when backing up to the position
�A
if the object projects over the actual back-
ing up course.
HOW TO PARK WITH PREDICTIVE
COURSE LINES (IF SO EQUIPPED)
WARNING
• If the tires are replaced with differ- ent sized tires, the predictive course
lines may be displayed incorrectly.
• On a snow-covered or slippery road, there may be a difference between
the predictive course line and the
actual course line.
• If the battery is disconnected or be- comes discharged, the predictive
course lines may be displayed incor-
rectly. If this occurs, please perform
the following procedures:
- Turn the steering wheel from lock
to lock while the EV (electric vehicle)
system is running.
- Drive the vehicle on a straight road
for more than 5 minutes. • When the steering wheel is turned
with the power switch in the ACC po-
sition, the predictive course lines
may be displayed incorrectly.
4-8Monitor, climate, audio, phone and voice recognition systems
Page 288 of 610
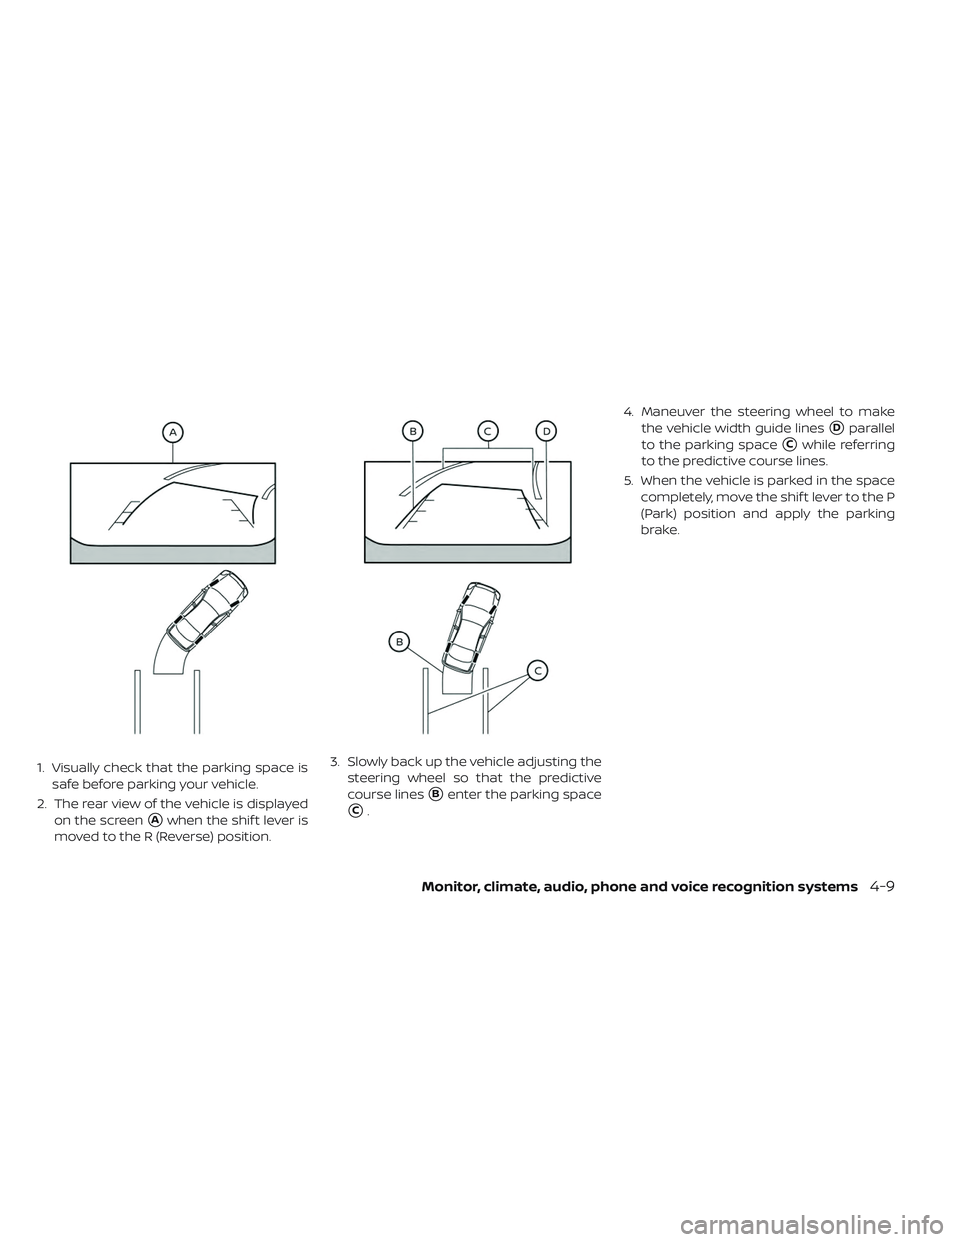
1. Visually check that the parking space issafe before parking your vehicle.
2. The rear view of the vehicle is displayed on the screen
�Awhen the shif t lever is
moved to the R (Reverse) position. 3. Slowly back up the vehicle adjusting the
steering wheel so that the predictive
course lines
�Benter the parking space
�C. 4. Maneuver the steering wheel to make
the vehicle width guide lines
�Dparallel
to the parking space
�Cwhile referring
to the predictive course lines.
5. When the vehicle is parked in the space completely, move the shif t lever to the P
(Park) position and apply the parking
brake.
Monitor, climate, audio, phone and voice recognition systems4-9