Page 268 of 610

Locking doors
�1Lockbutton
�2Unlockbutton
�3Charge port unlockbutton
�4Panicbutton
When you lock or unlock the doors, the haz-
ard indicator may flash and the horn may
sound as a confirmation. For additional in-
formation, refer to “Hazard warning flasher
switch” in the “In case of emergency” sec-
tion and “Horn” in the “Instruments and
controls” sections of this manual. 1. Push the power switch to the OFF posi-
tion and make sure you carry the Intelli-
gent Key with you.
2. Carry the Intelligent Key with you.
3. Close all the doors.
4. Press the
button�1on the Intelli-
gent Key.
5. All the doors and the rear hatch will lock.
6. The hazard indicator may flash twice and the horn may chirp once.
Operate the door handles to confirm that
the doors have been securely locked.
Unlocking doors
1. Press thebutton�2on the Intelli-
gent Key once.
2. The hazard indicator may flash once. The driver’s door will unlock.
3. Press the
button on the Intelligent
Key again within one minute.
4. The hazard indicator may flash once again. All the doors and the rear hatch
will unlock. All doors will be locked automatically un-
less one of the following operations is per-
formed within one minute af ter pressing
the
button while the doors are locked.
•
Opening any door (including the rear hatch).
• Pushing the power switch.
During this one minute time period, if
the
button on the Intelligent Key is
pressed, all doors will be locked automati-
cally af ter another one minute.
Opening charge port lid
The charge port lid may be opened by
pressing and holding the
button�3.
For additional information, refer to "Open-
ing charge port lid" in this section.
Using panic alarm
If you are near your vehicle and feel threat-
ened, you may activate the alarm to call
attention as follows:
1. Push the
button�4on the Intelli-
gent Key for more than 1 second.
2. The panic alarm and headlights will stay on for a period of time.
3. The panic alarm stops when:
Pre-driving checks and adjustments3-15
Page 270 of 610
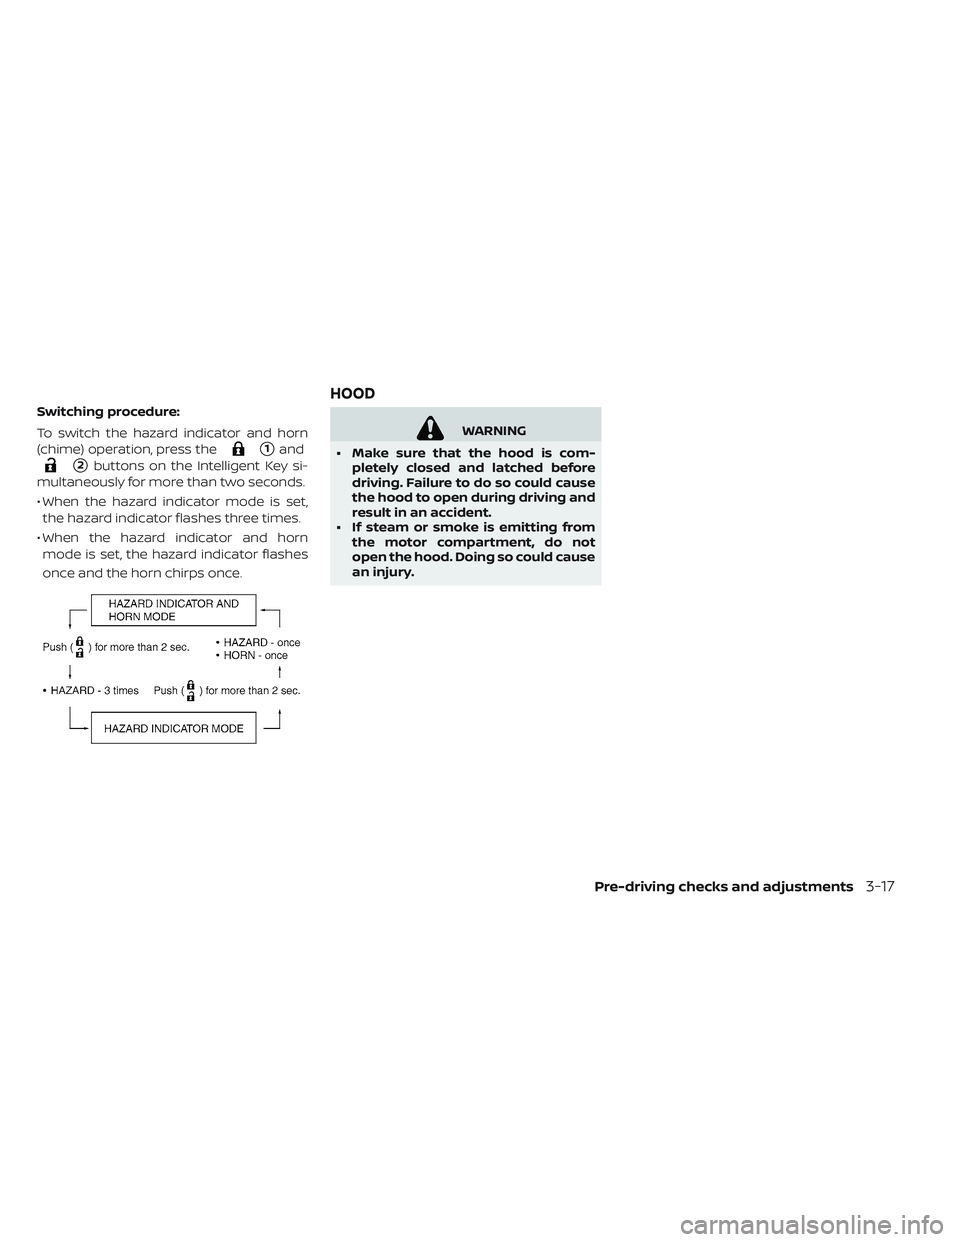
Switching procedure:
To switch the hazard indicator and horn
(chime) operation, press the
�1and
�2buttons on the Intelligent Key si-
multaneously for more than two seconds.
• When the hazard indicator mode is set, the hazard indicator flashes three times.
• When the hazard indicator and horn mode is set, the hazard indicator flashes
once and the horn chirps once.
WARNING
• Make sure that the hood is com- pletely closed and latched before
driving. Failure to do so could cause
the hood to open during driving and
result in an accident.
• If steam or smoke is emitting from the motor compartment, do not
open the hood. Doing so could cause
an injury.
HOOD
Pre-driving checks and adjustments3-17
Page 271 of 610

When opening the hood:
1. Securely close the charge port door.
2. Pull the hood lock release handle
�1
located below the instrument panel.
The hood will then spring up slightly.
3. Locate the lever
�2in between the hood
and charge port lid, and push the lever
upward with your fingertips.
4. Raise the hood
�3.
5. Remove the support rod
�4from the
hood and insert it into the slot
�5. Hold the coated part
�Awhen removing
or resetting the support rod. Avoid direct
contact with the metal parts because
they may be hot immediately af ter the
EV system has been stopped.
When closing the hood:
1. Return the support rod to its original position.
2. Slowly move the hood down to latch the lock.
3. Push the hood down to lock the hood securely into place.
WARNING
•
Alwaysmakesurethattherearhatch
has been closed securely to prevent it
from opening while driving.
•Do not drive with the rear hatch open.• Make sure that all passengers have their hands, etc. inside the vehicle
before closing the rear hatch.
REAR HATCH
3-18Pre-driving checks and adjustments
Page 276 of 610

WARNING
• Do not adjust the steering wheel while driving. You could lose control
of your vehicle and cause an acci-
dent.
• Do not adjust the steering wheel any closer to you than is necessary for
proper steering operation and com-
fort. The driver’s air bag inflates with
great force. If you are unrestrained,
leaning forward, sitting sideways or
out of position in any way, you are at
greater risk of injury or death in a
crash. You may also receive serious
or fatal injuries from the air bag if
you are up against it when it inflates.
Always sit back against the seat-
back and as far away as practical
from the steering wheel. Always use
the seat belts.
TILT OPERATION
Push the lock lever down�1and adjust the
steering wheel up or down
�2to the de-
sired position.
Pull the lock lever up
�3to lock the steering
wheel in place.
1. To block out glare from the front, swingdown the sun visor
�1.
2. To block glare from the side, remove the sun visor from the center mount and
swing it to the side
�2.
3. Slide the extension sun visor in or out as needed
�3.
STEERING WHEEL SUN VISORS
Pre-driving checks and adjustments3-23
Page 278 of 610

The night position�1reduces glare from
the headlights of vehicles behind you at
night.
Use the day position
�2when driving in
daylight hours.
WARNING")
MANUAL ANTI-GLARE REARVIEW
MIRROR (IF SO EQUIPPED)
The night position�1reduces glare from
the headlights of vehicles behind you at
night.
Use the day position
�2when driving in
daylight hours.
WARNING
Use the night position only when nec-
essary, because it reduces rearview
clarity.
AUTOMATIC ANTI-GLARE TYPE
(IF SO EQUIPPED)
The inside mirror is designed so that it au-
tomatically changes reflection based on
the intensity of the headlights of the vehicle
behind.
When the system is turned on, the indicator
light
�Awill illuminate and excessive glare
from the headlights of the vehicle behind
you will be reduced. Push the “�” switch
�Cto make the inside
rearview mirror operate normally. The indi-
cator light will turn off. Push the “I” switch
�D
to turn the system on.
Do not allow any object to cover the sen-
sors
�Bor apply glass cleaner on them.
Doing so will reduce the sensitivity of the
sensor, resulting in improper operation.
WARNING
Use the night position only when nec-
essary, because it reduces rear view
clarity.
Pre-driving checks and adjustments3-25
Page 279 of 610

OUTSIDE MIRRORS
Adjusting outside mirrors
WARNING
Objects viewed in the outside mirror
on the passenger side are closer than
they appear. Be careful when moving
to the right. Using only this mirror
could cause an accident. Use the inside
mirror or glance over your shoulder
to properly judge distances to other
objects. The outside mirror control switch is lo-
cated on the armrest.
The outside mirror will operate only when
the power switch is in the ACC or ON posi-
tion.
Turn the switch right or lef t to select the
right or lef t side mirror
�1, then adjust the
mirror using the control switch
�2.
Move the switch to the center (neutral) po-
sition to prevent accidentally moving the
mirror.
Defogging outside mirrors (if so
equipped)
The outside mirrors will be heated when
the rear window defogger switch is oper-
ated. For additional information, refer to
“Rear window and outside mirror defogger
switch” in the “Instruments and controls”
section of this manual.Folding outside mirrors
Fold the outside mirror by pushing it to-
ward the rear of the vehicle.
3-26Pre-driving checks and adjustments
Page 283 of 610
1. CAMERA button (if so equipped)
WARNING
Failure to follow the warnings and in-
structions for proper use of the Rear-
View Monitor system could result in se-
rious injury or death. • RearView Monitor is a convenience
feature and is not a substitute for
proper backing. Always turn and
look out the windows and check
mirrors to be sure that it is safe to
move before operating the vehicle.
Always back up slowly.
REARVIEW MONITOR (IF SO
EQUIPPED)
4-4Monitor, climate, audio, phone and voice recognition systems
Page 287 of 610

Backing up behind a projecting
object
The position�Cis shown farther than the
position
�Bin the display. However, the po-
sition
�Cis actually at the same distance as the position
�A. The vehicle may hit the
object when backing up to the position
�A
if the object projects over the actual back-
ing up course.
HOW TO PARK WITH PREDICTIVE
COURSE LINES (IF SO EQUIPPED)
WARNING
• If the tires are replaced with differ- ent sized tires, the predictive course
lines may be displayed incorrectly.
• On a snow-covered or slippery road, there may be a difference between
the predictive course line and the
actual course line.
• If the battery is disconnected or be- comes discharged, the predictive
course lines may be displayed incor-
rectly. If this occurs, please perform
the following procedures:
- Turn the steering wheel from lock
to lock while the EV (electric vehicle)
system is running.
- Drive the vehicle on a straight road
for more than 5 minutes. • When the steering wheel is turned
with the power switch in the ACC po-
sition, the predictive course lines
may be displayed incorrectly.
4-8Monitor, climate, audio, phone and voice recognition systems

WARNING
Failure to follow the warnings and in-
structions for proper use of the Rear-
View Monitor system could result in se-
rious injury or death. • RearView Moni")