Page 265 of 610

WARNING SIGNALS
To help prevent the vehicle from moving
unexpectedly by erroneous operation of
the Intelligent Key listed on the following
chart or to help prevent the vehicle from
being stolen, chime or beep sounds inside
and outside the vehicle and a warning dis-
plays in the vehicle information display.When a chime or beep sounds or the warn-
ing displays, be sure to check the vehicle
and Intelligent Key.
For additional information, refer to the
”Troubleshooting guide” in this section and
“Vehicle information display” in the “Instru-
ments and controls” section of this manual.
TROUBLESHOOTING GUIDE
Verif y the location of all Intelligent Keys that
are programmed for the vehicle. If another
Intelligent Key is in range or inside the
vehicle, the vehicle system may respond
differently than expected.
Symptom
Possible causeAction to take
When opening the driver’s door
to get out of the vehicleThe inside warning chime sounds continu-
ously. The power switch is pushed to the OFF
position while the driver's door is open.
Close the driver's door.
The power switch is in the ACC position. Push the power switch to the OFF position
then close the driver's door.
When closing the door af ter get-
ting out of the vehicle The No Key Detected warning appears on
the display, the outside chime sounds three
times and the inside warning chime sounds
for a few seconds.
The power switch is in the ACC or ON
position.
Push the power switch to the OFF position.
The Rear Door Alert (if so equipped) warning
message appears on the display, the horn
sounds three times twice, or a Check Back
Seat for all Articles (if so equipped) warning
appears on the display. The Rear Door Alert (if so equipped) is
activated.
Check the back seat for all articles, press
the ENTER button to clear the Rear Door
Alert (if so equipped) warning message.
The outside chime sounds continuously. The power switch is in the ACC or OFF
position, the electric shif t control sys-
tem has malfunctioned and the vehicle
cannot be placed in the P (Park) position
when the parking brake is not applied.Make sure the parking brake is applied.
When closing the door with the
inside lock knob turned to LOCK The outside chime sounds for a few sec-
onds and all the doors unlock. The Intelligent Key is inside the vehicle
or cargo area.
Carry the Intelligent Key with you.
3-12Pre-driving checks and adjustments
Page 266 of 610

SymptomPossible causeAction to take
When pushing the request
switch or thebutton on
the Intelligent Key to lock the
doorThe outside chime sounds for a few seconds.The Intelligent Key is inside the vehicle
or a cargo area. Carry the Intelligent Key with you.
When pushing the power switch
in the READY to drive position The EV system operation for discharged
Intelligent Key system indicator appears on
the display.
The Intelligent Key battery charge is low.For additional information, refer to
“NISSAN Intelligent Key® battery discharge”
in the “Starting and driving” section of this
manual.
The No Key Detected warning appears on
the display and the inside warning chime
sounds for a few seconds. The Intelligent Key is not in the vehicle. Carry the Intelligent Key with you.
When pushing the power switch The Key System Error indicator appears on
the display. It warns of a malfunction with the Intel-
ligent Key system.It is recommended that you visit a NISSAN
certified LEAF dealer.
Pre-driving checks and adjustments3-13
Page 280 of 610

(if so equipped).......................4-3
RearView Monitor (if so equipped) ...........4-4
RearView M")
4 Monitor, climate, audio, phone and
voice recognition systems
NissanConnect® Manual (for Leaf )
(if so equipped).......................4-3
RearView Monitor (if so equipped) ...........4-4
RearView Monitor system operation .......4-5
How to read the displayed lines ..........4-6
Difference between predicted and actual
distances .........................4-7
How to park with predictive course lines
(if so equipped) .................... .4-8
Adjusting the screen
(models with 40 kWh battery) ...........4-10
Adjusting the screen
(models with 62 kWh battery) ...........4-11
How to turn on and off predictive course lines
(for models with 40 kWh battery) .........4-11
How to turn on and off predictive course lines
(for models with 62 kWh battery) .........4-11
RearView Monitor system limitations ......4-11
System maintenance ................4-13
Intelligent Around View Monitor
(if so equipped) .......................4-14
Intelligent Around View Monitor system
operation ........................4-16 Difference between predicted and actual
distances
........................4-19
How to park with predictive course lines . . . .4-20
How to switch the display .............4-22
Adjusting the screen ................ .4-22
Intelligent Around View Monitor system
limitations ........................4-23
System maintenance ................4-25
Moving Object Detection (MOD)
(if so equipped) ......................4-26
MOD system operation ...............4-27
Turning MOD ON and OFF .............4-28
MOD system limitations ..............4-28
System maintenance ................4-29
Vents ............................ .4-30
Heater and air conditioner (automatic) .......4-31
Displaying climate control system status
screen (models with navigation system) . . . .4-32
Operating tips .................... .4-33
In-cabin microfilter ................. .4-34
Automatic climate control
(models without Navigation System) ......4-35
Page 284 of 610

• The system is designed as an aid tothe driver in showing large station-
ary objects directly behind the ve-
hicle, to help avoid damaging the ve-
hicle.
• The distance guide line and the ve- hicle width line should be used as a
reference only when the vehicle is on
a level paved surface. The distance
viewed on the monitor is for refer-
ence only and may be different than
the actual distance between the ve-
hicle and displayed objects.
CAUTION
Do not scratch the camera lens when
cleaning dirt or snow from the front of
the camera. The RearView Monitor system automati-
cally shows a rear view of the vehicle when
the shif t lever is shif ted into the R (Reverse)
position. The radio can still be heard while
the RearView Monitor is active.
To display the rear view, the RearView Moni-
tor system uses a camera located just
above the vehicle’s license plate
�1.
REARVIEW MONITOR SYSTEM
OPERATION
With the EV (electric vehicle) system on and
in “READY to Drive”, move the shif t lever to
the R (Reverse) position to operate the
RearView Monitor.
Monitor, climate, audio, phone and voice recognition systems4-5
Page 285 of 610

HOW TO READ THE DISPLAYED
LINES
Guiding lines which indicate the vehicle
width and distances to objects with refer-
ence to the vehicle body line
�Aare dis-
played on the monitor.
Distance guide lines
Indicate distances from the vehicle body.
• Red line
�1: approx. 1.5 f t (0.5 m)
• Yellow line
�2: approx. 3 f t (1 m )
• Green line
�3: approx. 7 f t (2 m) Vehicle width guide lines
�4
Indicate the vehicle width when backing
up.
The width of the vehicle width guide line is
wider than the actual width.
Predictive course lines (if so equipped)
�5
Indicate the predicted course when back-
ing up. The predictive course lines will be
displayed on the monitor when the shif t
lever is in the R (Reverse) position and the
steering wheel is turned. The predictive
course lines will move depending on how
much the steering wheel is turned and will
not be displayed while the steering wheel is
in the straight-ahead position.
The vehicle width guide lines and the width
of the predictive course lines are wider
than the actual width and course.
DIFFERENCE BETWEEN PREDICTED
AND ACTUAL DISTANCES
The displayed guidelines and their loca-
tions on the ground are for approximate
reference only. Objects on uphill or downhill
surfaces or projecting objects will be actu-
ally located at distances different from
those displayed in the monitor relative to
the guidelines (refer to illustrations). When
in doubt, turn around and view the objects
as you are backing up, or park and exit the
vehicle to view the positioning of objects
behind the vehicle.
4-6Monitor, climate, audio, phone and voice recognition systems
Page 286 of 610
Backing up on a steep uphill
When backing up the vehicle up a hill, the
distance guide lines and the vehicle width
guide lines are shown closer than the actual
distance. Note that any object on the hill is
further than it appears on the monitor.
Backing up on a steep downhill
When backing up the vehicle down a hill, the
distance guide lines and the vehicle width
guide lines are shown farther than the actual
distance. Note that any object on the hill is
closer than it appears on the monitor.
Backing up near a projecting
object
The predictive course lines (if so equipped)
�Ado not touch the object in the display.
However, the vehicle may hit the object if it
projects over the actual backing up course.
Monitor, climate, audio, phone and voice recognition systems4-7
Page 287 of 610

Backing up behind a projecting
object
The position�Cis shown farther than the
position
�Bin the display. However, the po-
sition
�Cis actually at the same distance as the position
�A. The vehicle may hit the
object when backing up to the position
�A
if the object projects over the actual back-
ing up course.
HOW TO PARK WITH PREDICTIVE
COURSE LINES (IF SO EQUIPPED)
WARNING
• If the tires are replaced with differ- ent sized tires, the predictive course
lines may be displayed incorrectly.
• On a snow-covered or slippery road, there may be a difference between
the predictive course line and the
actual course line.
• If the battery is disconnected or be- comes discharged, the predictive
course lines may be displayed incor-
rectly. If this occurs, please perform
the following procedures:
- Turn the steering wheel from lock
to lock while the EV (electric vehicle)
system is running.
- Drive the vehicle on a straight road
for more than 5 minutes. • When the steering wheel is turned
with the power switch in the ACC po-
sition, the predictive course lines
may be displayed incorrectly.
4-8Monitor, climate, audio, phone and voice recognition systems
Page 288 of 610
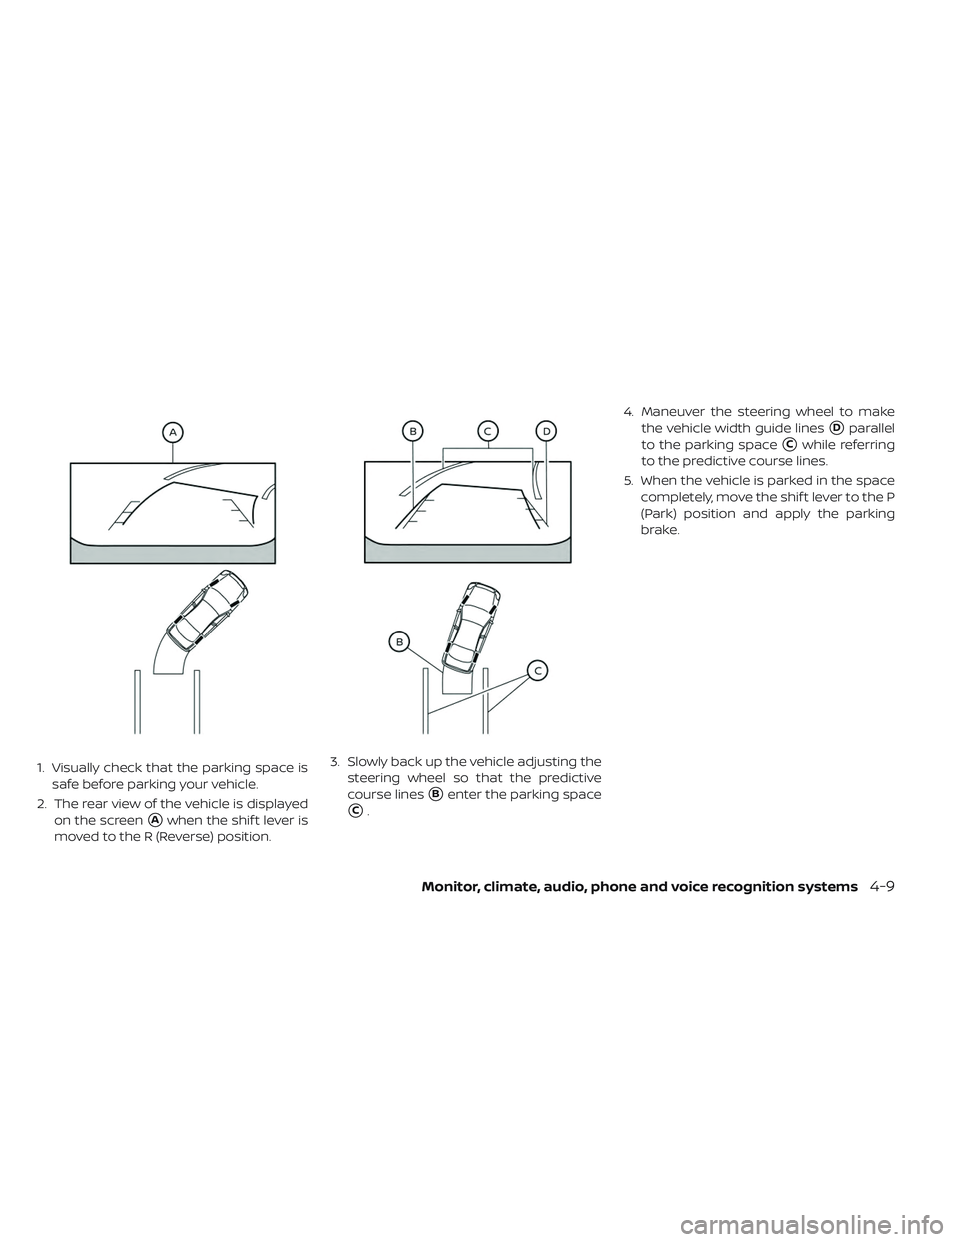
1. Visually check that the parking space issafe before parking your vehicle.
2. The rear view of the vehicle is displayed on the screen
�Awhen the shif t lever is
moved to the R (Reverse) position. 3. Slowly back up the vehicle adjusting the
steering wheel so that the predictive
course lines
�Benter the parking space
�C. 4. Maneuver the steering wheel to make
the vehicle width guide lines
�Dparallel
to the parking space
�Cwhile referring
to the predictive course lines.
5. When the vehicle is parked in the space completely, move the shif t lever to the P
(Park) position and apply the parking
brake.
Monitor, climate, audio, phone and voice recognition systems4-9