Page 147 of 536

.This power outlet is not designed
for use with a cigarette lighter
unit.
. Push the plug in as far as it will
go. If good contact is not made,
the plug may overheat or the
internal temperature fuse may
blow.
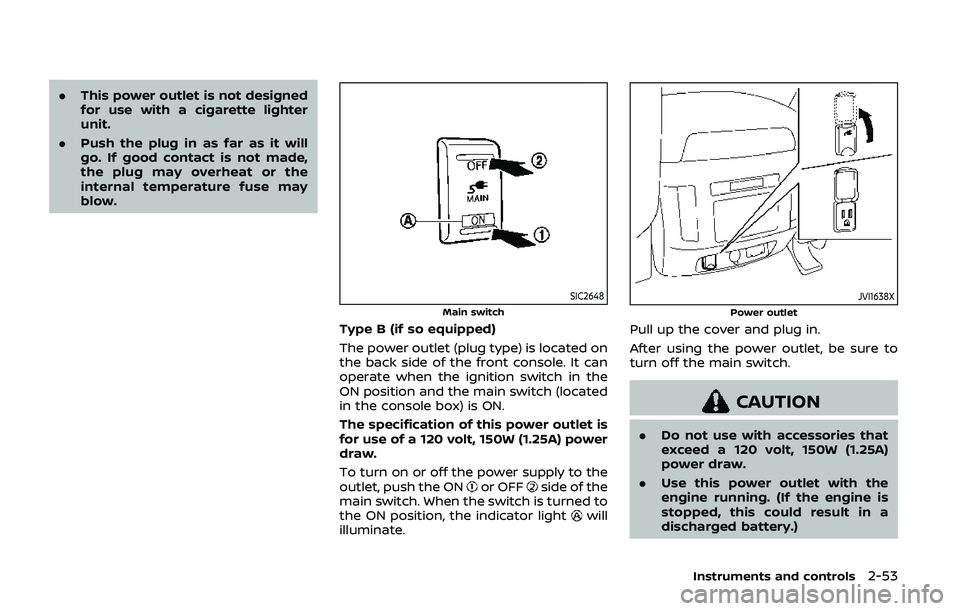
SIC2648
Main switch
Type B (if so equipped)
The power outlet (plug type) is located on
the back side of the front console. It can
operate when the ignition switch in the
ON position and the main switch (located
in the console box) is ON.
The specification of this power outlet is
for use of a 120 volt, 150W (1.25A) power
draw.
To turn on or off the power supply to the
outlet, push the ON
or OFFside of the
main switch. When the switch is turned to
the ON position, the indicator light
will
illuminate.
JVI1638X
Power outlet
Pull up the cover and plug in.
After using the power outlet, be sure to
turn off the main switch.
CAUTION
. Do not use with accessories that
exceed a 120 volt, 150W (1.25A)
power draw.
. Use this power outlet with the
engine running. (If the engine is
stopped, this could result in a
discharged battery.)
Instruments and controls2-53
Page 149 of 536
JVI1688X
Front
To open the cup holder, push the lid.
To close, lower the cup holder lid and
push it down lightly.
The cup holder is not designed to store
personal items.
SIC3118
2nd row seat
Type A (if so equipped):
To open the cup holder, push the lid
.
The flap will be folded down when insert-
ing a large container.
To close, lower the cup holder lid and
push it down lightly.
To clean the front cup holder, pull up the
inside tray
and remove it.
The cup holder is not designed to store
personal items.
SIC2915
Type B (if so equipped):
To open the cup holder, pull the lid.
Instruments and controls2-55
Page 151 of 536
CAUTION
.Do not use for anything other
than glasses.
. Do not leave glasses in the sun-
glasses holder while parking in
direct sunlight. The heat may
damage the glasses.
SIC4393
GLOVE BOX
WARNING
Keep glove box lid closed while driv-
ing to help prevent injury in an
accident or a sudden stop.
To open the glove box, pull the handle
.
To close, push the lid in until the lock
latches.
To lock
/unlockthe glove box, use the
mechanical key. For the mechanical key
usage, see “Keys” (P.3-2).
JVI1711X
CONSOLE BOX
Front
Type A (if so equipped):
To open the console box lid, push up the
knob
and pull up the lid.
To close, push the lid down until the lock
latches.
Instruments and controls2-57
Page 159 of 536
Locking passengers’ windows
When the lock buttonis pushed in, only
the driver side window can be opened or
closed. Push it in again to cancel.
SIC4353
Passenger side power window
switch
The passenger side switch will open or
close only the corresponding window. To
open or close the window, push down or
pull up the switch and hold it.
SIC4354
Automatic operation
To fully open or close the window, com-
pletely push down or pull up the switch
and release it; it need not be held. The
window will automatically open or close
all the way. To stop the window, just push
or lift the switch in the opposite direction.
A light push or pull on the switch will
cause the window to open or close until
the switch is released.
Instruments and controls2-65
Page 162 of 536

2-68Instruments and controls
matically when the auto reverse function
activates due to a malfunction, push and
hold the switch to the CLOSE
position.
Depending on the environment or driv-
ing conditions, the auto reverse func-
tion may be activated if an impact or
load similar to something being caught
in the moonroof occurs.
If the moonroof does not operate
If the moonroof does not operate prop-
erly, perform the following procedure to
initialize the moonroof operation system.
1. If the moonroof is open, close it fully by repeatedly pushing the moonroof
switch to the CLOSE
position.
2. Push and hold the switch to the CLOSE
position.
3. Release the moonroof switch after the moonroof moves slightly up and
down.
4. Push and hold the switch to the OPEN
position to fully tilt the moonroof
down.
5. Check if the moonroof switch oper- ates normally.
If the moonroof does not operate prop-
erly after performing the procedure
above, have your moonroof checked and
repaired. It is recommended you visit a
NISSAN dealer for this service.
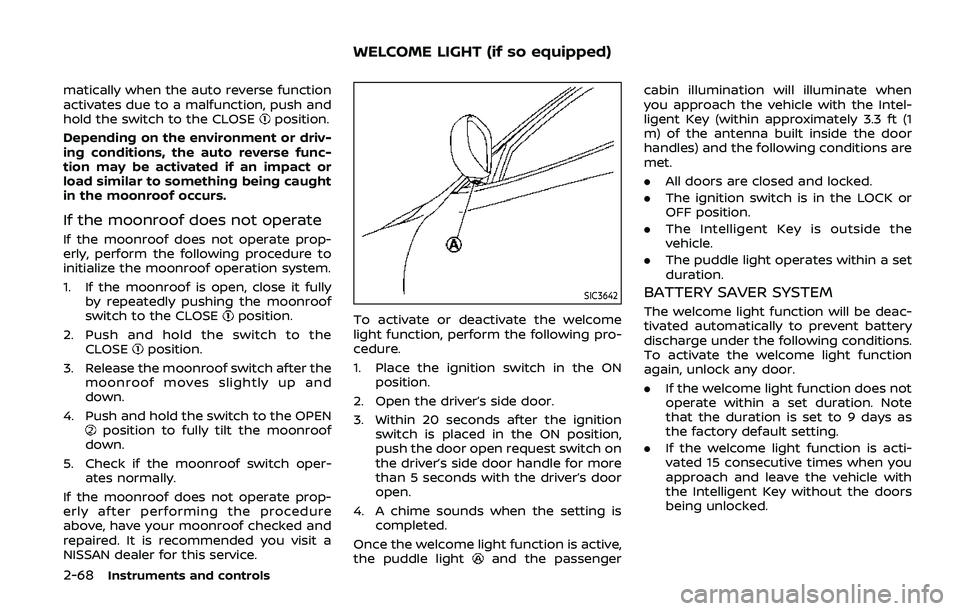
SIC3642
To activate or deactivate the welcome
light function, perform the following pro-
cedure.
1. Place the ignition switch in the ON position.
2. Open the driver’s side door.
3. Within 20 seconds after the ignition switch is placed in the ON position,
push the door open request switch on
the driver’s side door handle for more
than 5 seconds with the driver’s door
open.
4. A chime sounds when the setting is completed.
Once the welcome light function is active,
the puddle light
and the passenger cabin illumination will illuminate when
you approach the vehicle with the Intel-
ligent Key (within approximately 3.3 ft (1
m) of the antenna built inside the door
handles) and the following conditions are
met.
.
All doors are closed and locked.
. The ignition switch is in the LOCK or
OFF position.
. The Intelligent Key is outside the
vehicle.
. The puddle light operates within a set
duration.
BATTERY SAVER SYSTEM
The welcome light function will be deac-
tivated automatically to prevent battery
discharge under the following conditions.
To activate the welcome light function
again, unlock any door.
.If the welcome light function does not
operate within a set duration. Note
that the duration is set to 9 days as
the factory default setting.
. If the welcome light function is acti-
vated 15 consecutive times when you
approach and leave the vehicle with
the Intelligent Key without the doors
being unlocked.
WELCOME LIGHT (if so equipped)
Page 163 of 536

CAUTION
.Turn off the lights when you leave
the vehicle.
. Do not use the lights for extended
periods of time with the engine
stopped. This could result in a
discharged battery.
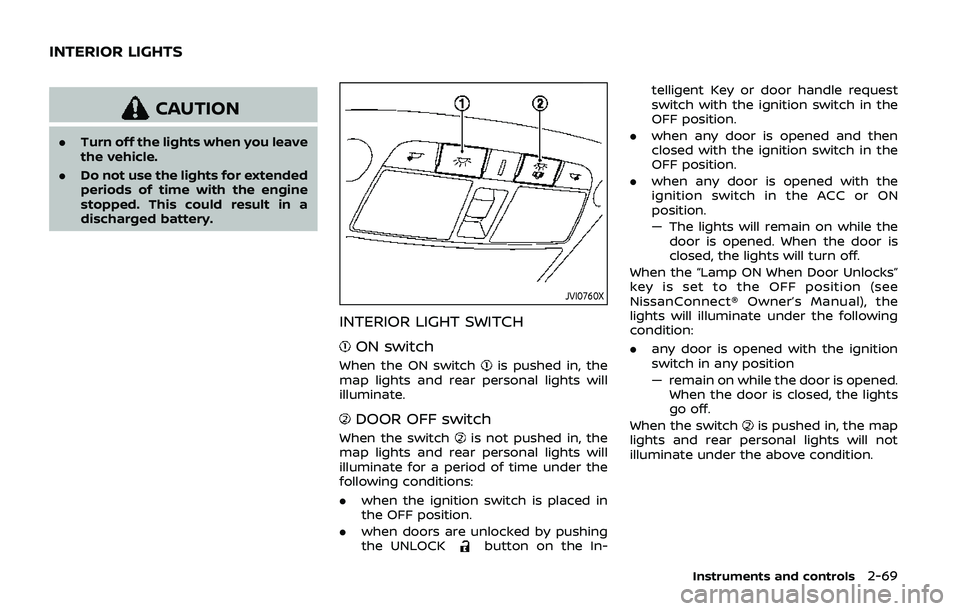
JVI0760X
INTERIOR LIGHT SWITCH
ON switch
When the ON switchis pushed in, the
map lights and rear personal lights will
illuminate.
DOOR OFF switch
When the switchis not pushed in, the
map lights and rear personal lights will
illuminate for a period of time under the
following conditions:
. when the ignition switch is placed in
the OFF position.
. when doors are unlocked by pushing
the UNLOCK
button on the In- telligent Key or door handle request
switch with the ignition switch in the
OFF position.
. when any door is opened and then
closed with the ignition switch in the
OFF position.
. when any door is opened with the
ignition switch in the ACC or ON
position.
— The lights will remain on while the
door is opened. When the door is
closed, the lights will turn off.
When the “Lamp ON When Door Unlocks”
key is set to the OFF position (see
NissanConnect® Owner’s Manual), the
lights will illuminate under the following
condition:
. any door is opened with the ignition
switch in any position
— remain on while the door is opened.
When the door is closed, the lights
go off.
When the switch
is pushed in, the map
lights and rear personal lights will not
illuminate under the above condition.
Instruments and controls2-69
INTERIOR LIGHTS
Page 164 of 536
2-70Instruments and controls
JVI0759X
CONSOLE LIGHT
The console light will turn on whenever
the clearance lights or headlights are
illuminated.
JVI0758X
MAP LIGHTS
Push the button as illustrated to turn the
light on or off.
SIC3250
REAR PERSONAL LIGHTS
Push the button as illustrated to turn the
light on or off.
Page 165 of 536

SIC4448
The light on the vanity mirror will turn on
when the cover on the vanity mirror is
opened.
When the cover is closed, the light will
turn off.
The lights will also turn off after a
period of time when the lights remain
illuminated to prevent the battery from
becoming discharged.
SIC4418
The cargo light switch has three posi-
tions: ON, centerand OFF.
ON position
When the switch is in the ON position
,
the cargo light will illuminate.
Center position
When the switch is in the center position
, the cargo light will illuminate when the
liftgate is opened.
OFF position
When the switch is in the OFF position
,
the cargo light will not illuminate. The HomeLink® Universal Transceiver
provides a convenient way to consolidate
the functions of up to three individual
hand-held transmitters into one built-in
device.
HomeLink® Universal Transceiver:
.
Will operate most Radio Frequency
(RF) devices such as garage doors,
gates, home and office lighting, entry
door locks and security systems.
. Is powered by your vehicle’s battery.
No separate batteries are required. If
the vehicle’s battery is discharged or is
disconnected, HomeLink® will retain
all programming.
When the HomeLink® Universal Trans-
ceiver is programmed, retain the origi-
nal transmitter for future programming
procedures (Example: new vehicle pur-
chases). Upon sale of the vehicle, the
programmed HomeLink® Universal
Transceiver buttons should be erased
for security purposes. For additional
information, refer to “Programming
HomeLink®” (P.2-72).WARNING
. Do not use the HomeLink® Uni-
versal Transceiver with any gar-
age door opener that lacks safety
Instruments and controls2-71
VANITY MIRROR LIGHTS CARGO LIGHTHomeLink® UNIVERSAL TRANSCEIVER
(Type A) (if so equipped)