2019 MERCEDES-BENZ SPRINTER engine
[x] Cancel search: enginePage 136 of 354

Ru
les for off-road driving
Alw ays be aware of the ground clearance of the
ve hicle and avoid obs tacles such as deep tire
ru ts.
Obs tacles can damage thefo llowing parts of the
ve hicle, forex ample:
R Suspension
R Driv etra in
R Fuel and supply tanks
The refore , alw ays drive slowly when off-road. If
yo u must drive over obs tacles, ha vethe co-driver
instruct you.
% Mercedes-Benz
recommends that you addi‐
tionally car rya sho vel and a reco very rope
with a shackle in theve hicle.
R Make sure that loads and items of luggage
are securely stored or lashed down
(/ page 72).
R Before driving off-road, stop theve hicle and
engage a low gear.
R Vehicles with DSR: activate DSR when you
are driving downhill (/ page120).
R All-wheel drive vehicles: activate the all-
wheel drive (/ page119) and, if necessa ry,
activate theLO W RANGE transmission ratio
(/ page 119).
R Ifth e sur face requ ires, temp orarily deactivate
ASR when pulling away ( /page 119).
R Only drive off-road with the engine running
and a gear engaged.
R Drive slowly and smo othly. Wa lking pace is
necessary in many situations.
R Avoid spinning the driven wheels.
R Always ensure that the wheels remain in con‐
ta ct wi th the ground.
R Exercise the utmost caution when driving
across unfamiliar, unpredictable terrain. As a
precaution, getout of theve hicle totake a
look at thero ute tobe take nfirs t.
R Look out for obs tacles (e.g. rocks, holes, tree
st umps and tire ruts).
R Avoid edges where the sur face could crumble
or break away.
Ru les forfo rd ing off-road (all-wheel drive
ve hicles)
R Obser vethe saf ety no tes and general no tes
on driving off-road. R
Check the dep thand characteristics of the
body of water before ford ing. The water must
not be deeper than 23.6 in (60 cm).
R The climate control sy stem is switched off
(/ page 95).
R The auxiliary heating is switched off
(/ page 100).
R Swit chon all-wheel drive (/ page118) and
engage it on vehicles with theLO W RANGE
transmission ratio (/ page 119).
R Restrict the shift range to1or 2.
R Avoid high engine speeds.
R Drive slowly and smoo thly at no more than a
wa lking pace.
R Ensure that no bow wavefo rm s while driving.
R Afterfo rd ing, dry the brakes.
Af ter driving thro ugh a body of water deeper than
19 .7 in (50 cm), make su retocheck all vehicle
fl uids for any signs of penetration bywate r.
Checklist af ter driving off-road
If yo ufind damage totheve hicle af ter off-road
driving, ha vetheve hicle checked at a qualified
specialist workshop immediatel y.
Driving overro ugh terrain places greater
demands on your vehicle than normal road opera‐
tion. Check your vehicle af ter driving on rough
te rrain. This allo wsyouto detect damage
prom ptly and reduce therisk of an accident for
yo urself and other road users. Clean your vehicle
th oroughly before driving on public roads.
Obse rveth efo llowing points af ter driving off-
ro ad, on con stru ction sites and before driving on
public roads:
R Vehicles with DSR: deactivate DSR
(/ page 120).
R All-wheel drive vehicles: deactivate the all-
wheel drive (/ page119).
R Activate ASR (/ page 119).
R Clean theex terior lighting, particular lythe
headlamp s andtail lamps, and check them
fo r dama ge.
R Clean the front and rear license plates.
R Clean the windshield, windo wsand outside
mir rors.
R Clean thesteps, entra nces and grab handles.
This increases the saf ety of your foot ing.
R Clean the wheels and tires, wheel wells and
th e underbody of theve hicle with a water jet. 11 2
Driving and pa rking
Page 138 of 354
Diesel pa
rticulate filter Note
s onrege neration &
DANG ER Risk of fata l injuries due to
ex haust gases
Combustion engines emit poisonous exhaust
ga ses such as carbon monoxide. Inhaling
th ese exhaust gases is hazardous tohealth
and can lead topoisoning. #
Never lea vethe engine running in an
enclosed space wi thout suf ficient venti‐
lation. &
WARNING Risk offire caused byhot
ex haust sy stem parts
Flammable material such as lea ves, grass or
twigs may ignite if they come into contact
wi th hot parts of theex haust sy stem or
ex haust gasflow. #
Park theve hicle so that no flammable
material can come into con tact wi thhot
ve hicle components. #
In particular, do not park on dry grass‐
land or har vested grain fields. If
th eve hicle is predominantly used for short dis‐
ta nce driving or extended non-operational times,
th is could lead toa malfunction in the automatic
cleaning function forth e diesel particulate filter.
As a result, permanent blocking of the diesel par‐
ticulate filter may occur and fuel may also accu‐
mulate in the engine oil and cause engine failure.
If yo u main lydrive short dis tances, you should
drive on a free way or go for a country drive for 20
minutes every500 km (300 miles). This facili‐
ta testh e diesel particulate filter's burn-off proc‐
ess.
* NO
TEDama gedue tohot exhaust gases During
rege neration, extremely hot exhaust
ga ses escape from theta ilpipe. #
During rege neration, maintain a mini‐
mum di stance of 7 ft(2 m) from other
objects, e.g. par kedve hicles. Battery main switch
Note
s onthe bat tery main switch *
NO
TEDama getothe electrical sy stem If
yo ure mo veor disconnect the battery main
switch, it could lead tothe electrical sy stem
becoming damaged. #
Make sure that the ignition is switched
off and that at least 15minutes ha ve
passed before removing or reconnecting
th e battery main switch. Otherwise,
electrical sy stem components could be
damaged. Yo
u can use the battery main switch todiscon‐
nect the cur rent toall your vehicle's consumers.
This will pr event uncontrolled battery discha rge
caused byquiescent cur rent consumers.
If yo ur vehicle is equipped with an auxiliary bat‐
te ry inthe engine compartment or in the base of
th e front-passen ger seat, you must disconnect
bo th batteries. Only then is the electrical sy stem
fully disconnected from the po wer supply.
% Only disconnect theve hicle from the po wer
supply using the battery main switch in the
fo llowing situations:
R The vehicle is stationary for a long time
R It is absolutely necessary todisconnect
th eve hicle from the po wer supply
Af ter switching on the po wer supp ly,yo u will
need toreset the side windo ws (/page 53)
and the electric sliding door (/ page 49). Switching
the po wer supply on/o ff Switching off
the po wer supply 11 4
Driving and pa rking
Page 139 of 354
#
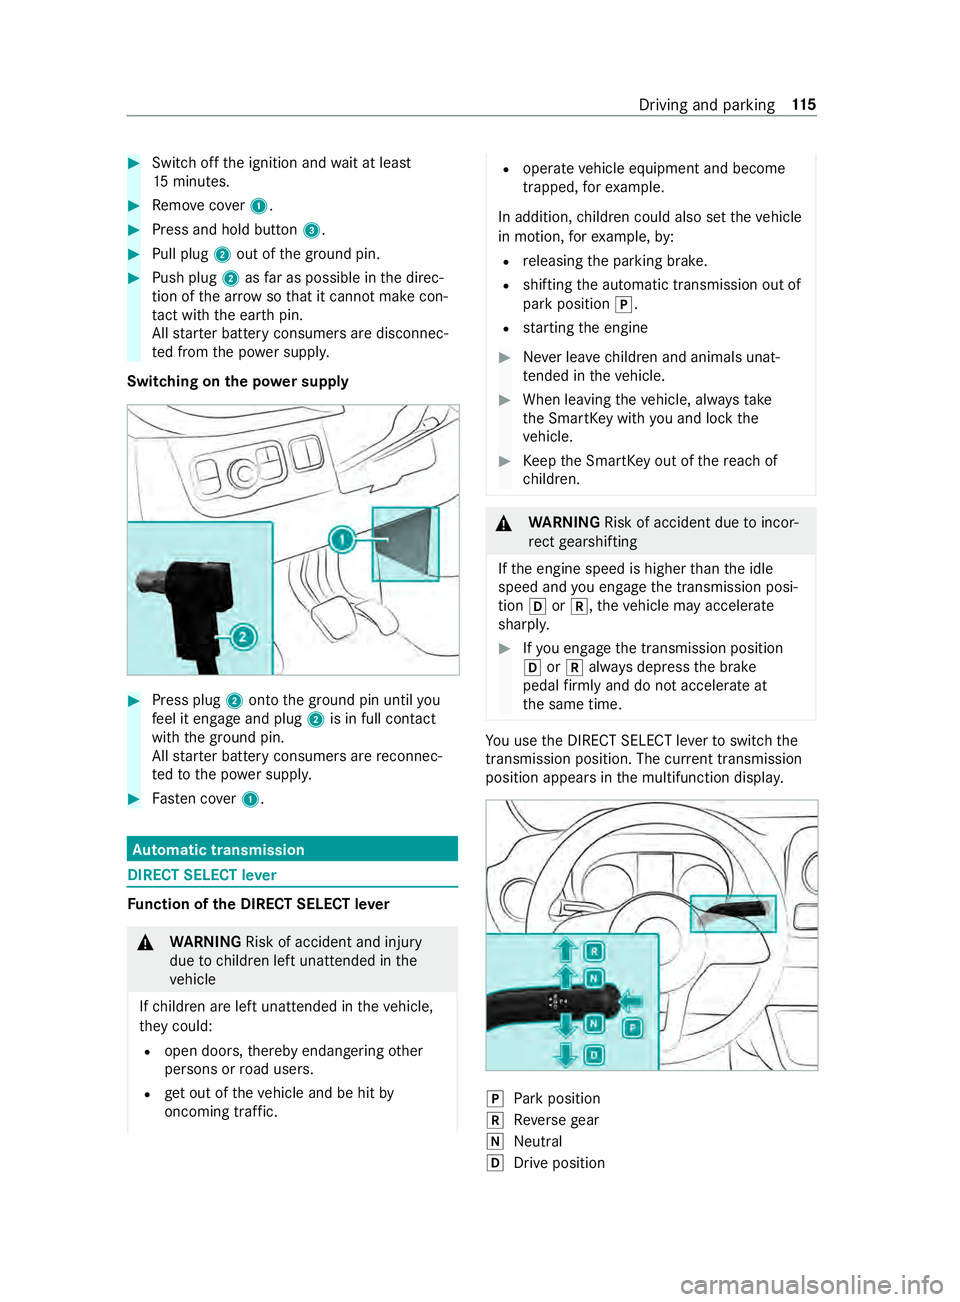
Switch off the ignition and wait at least
15 minutes. #
Remo vecover1. #
Press and hold button 3.#
Pull plug 2out of the ground pin. #
Push plug 2asfar as possible in the direc‐
tion of the ar row sothat it cannot make con‐
ta ct wi th the ear thpin.
All star ter battery consumers are disconnec‐
te d from the po wer supp ly.
Switching on the po wer supply #
Press plug 2onto the ground pin until you
fe el it engage and plug 2is in full contact
with the ground pin.
All star ter battery consumers are reconnec‐
te dto the po wer supply. #
Fasten co ver1. Au
tomatic transmission DIRECT SELECT le
verFu
nction of the DIRECT SELECT le ver&
WARNING Risk of accident and inju ry
due tochildren left unat tended in the
ve hicle
If ch ildren are left unat tended in theve hicle,
th ey could:
R open doo rs,th ereby endangering other
persons or road users.
R get out of theve hicle and be hit by
oncoming traf fic. R
operate ve hicle equipment and become
trapped, forex ample.
In addition, children could also set theve hicle
in motion, forex ample, by:
R releasing the parking brake.
R shifting the automatic transmission out of
park position 005D.
R starting the engine #
Never lea vechildren and animals unat‐
te nded in theve hicle. #
When leaving theve hicle, alw aysta ke
th e SmartK eywith you and lock the
ve hicle. #
Keep the SmartK eyout of there ach of
ch ildren. &
WARNING Risk of accident due toincor‐
re ct gearshifting
If th e engine speed is higher than the idle
speed and you engage the transmission posi‐
tion 005Bor005E, theve hicle may accelerate
sharply. #
Ifyo u engage the transmission position
005B or005E always depress the brake
pedal firm lyand do not accelerate at
th e same time. Yo
u use the DIRECT SELECT le verto switch the
transmission position. The cur rent transmission
position appears in the multifunction displa y. 005D
Park position
005E Reversege ar
005C Neut ral
005B Drive position Driving and pa
rking 11 5
Page 140 of 354
Engaging
reve rsege ar R #
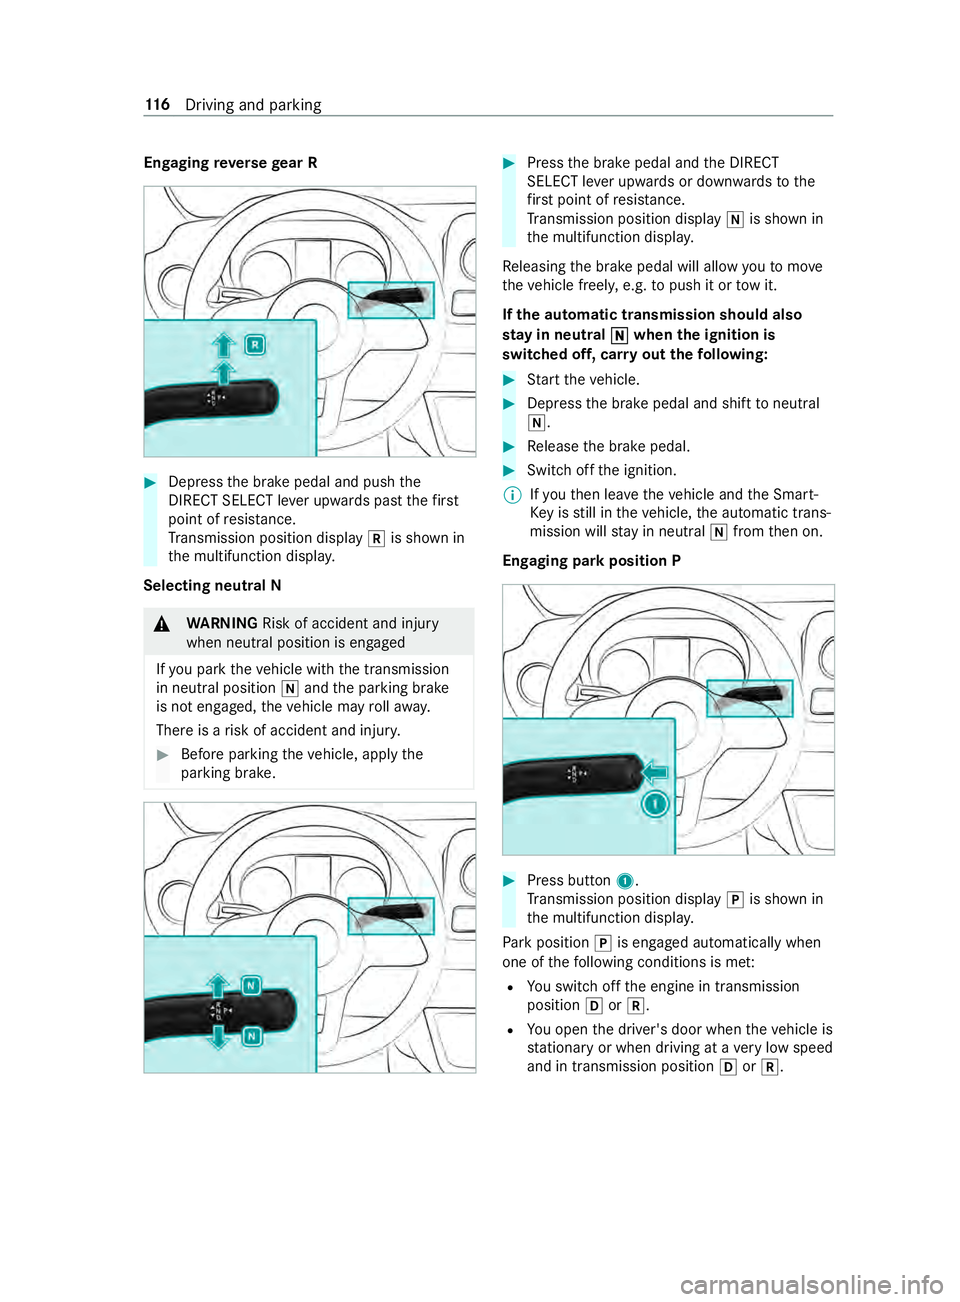
Depress the brake pedal and push the
DIRECT SELECT le ver upwards past thefirst
point of resis tance.
Tr ansmission position display 005Eis shown in
th e multifunction displa y.
Selecting neutral N &
WARNING Risk of accident and inju ry
when neut ral position is engaged
If yo u park theve hicle with the transmission
in neutral position 005Cand the parking brake
is not engaged, theve hicle may rollaw ay.
There is a risk of accident and injur y.#
Before pa rking theve hicle, apply the
parking brake. #
Press the brake pedal and the DIRECT
SELECT le ver upwards or down wardsto the
fi rs t point of resis tance.
Tr ansmission position display 005Cis shown in
th e multifunction displa y.
Re leasing the brake pedal will allow youto mo ve
th eve hicle freely, e.g. topush it or tow it.
If th e automatic transmission should also
st ay in neutral 005C 005Cwhen the ignition is
switched off, car ryout thefo llowing: #
Start theve hicle. #
Depress the brake pedal and shift toneutral
005C. #
Release the brake pedal. #
Switch off the ignition.
% If
yo uth en lea vetheve hicle and the Smart‐
Ke y is still in theve hicle, the automatic trans‐
mission will stay in neut ral005C from then on.
Engaging park position P #
Press button 1.
Tr ansmission position display 005Dis shown in
th e multifunction displa y.
Pa rk position 005Dis engaged automatically when
one of thefo llowing conditions is me t:
R You swit choff the engine in transmission
position 005Bor005E.
R You open the driver's door when theve hicle is
st ationary or when driving at a very low speed
and in transmission position 005Bor005E
. 11 6
Driving and pa rking
Page 141 of 354
Engaging drive position D
#
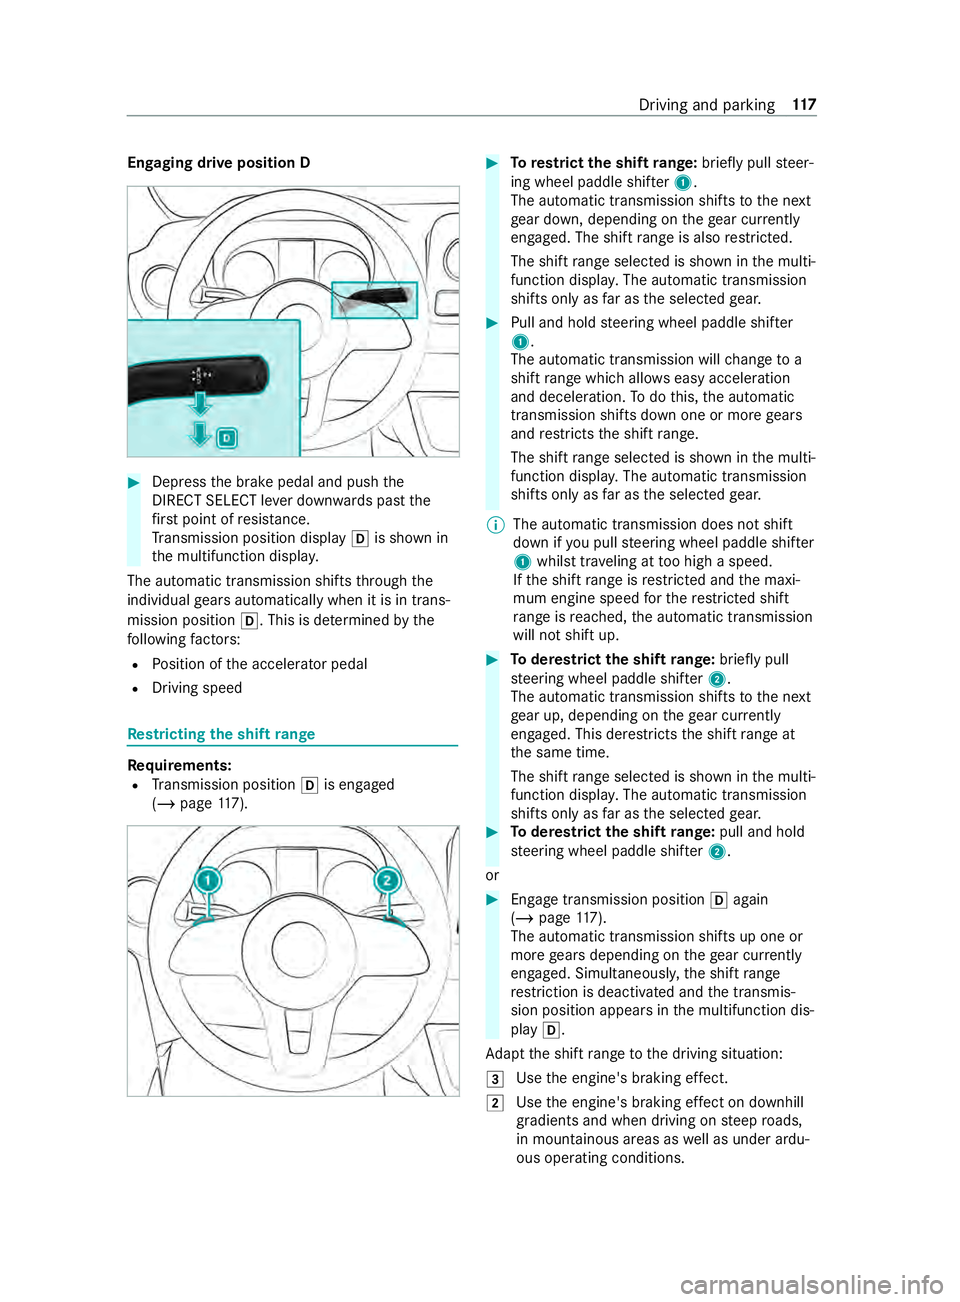
Dep ress the brake pedal and push the
DIRECT SELECT le ver down wards past the
fi rs t point of resis tance.
Tr ansmission position display 005Bis shown in
th e multifunction displa y.
The automatic transmission shifts thro ugh the
individual gears automatically when it is in trans‐
mission position 005B. This is determ ined bythe
fo llowing factors:
R Position of the accelerator pedal
R Driving speed Re
stricting the shift range Re
quirements:
R Transmission position 005Bis engaged
(/ page 117). #
Torestrict the shift range: briefly pull steer‐
ing wheel paddle shif ter1.
The automatic transmission shifts tothe next
ge ar down, depending on thege ar cur rently
engaged. The shi ftrange is also restricted.
The shi ftrange selected is shown in the multi‐
function displa y.The automatic transmission
shifts only as far as the selected gear. #
Pull and hold steering wheel paddle shif ter
1 .
The automatic transmission will change to a
shift range which allo wseasy acceleration
and deceleration. Todo this, the automatic
transmission shifts down one or more gears
and restricts the shift range.
The shi ftrange selected is shown in the multi‐
function displa y.The automatic transmission
shifts only as far as the selected gear.
% The automatic transmission does not shift
down if
you pull steering wheel paddle shif ter
1 whilst tr aveling at too high a speed.
If th e shift range is restricted and the maxi‐
mum engine speed forth ere stricted shi ft
ra nge is reached, the automatic transmission
will not shift up. #
Toderestrict the shi ftrange: briefly pull
st eering wheel paddle shif ter2.
The automatic transmission shifts tothe next
ge ar up, depending on thege ar cur rently
engaged. This de restricts the shift range at
th e same time.
The shift range selected is shown in the multi‐
function displa y.The automatic transmission
shifts only as far as the selected gear. #
Toderestrict the shi ftrange: pull and hold
st eering wheel paddle shif ter2.
or #
Engage transmission position 005Bagain
(/ page 117).
The automatic transmission shi fts up one or
more gears depending on thege ar cur rently
engaged. Simultaneously, the shift range
re striction is deactivated and the transmis‐
sion position appears in the multifunction dis‐
play 005B.
Ad apt the shift range tothe driving situation:
0049 Use
the engine's braking ef fect.
0048 Use
the engine's braking ef fect on downhill
gradients and when driving on steep roads,
in mountainous areas as well as under ardu‐
ous operating conditions. Driving and parking
117
Page 142 of 354

0047
Use
the engine's braking ef fect on extremely
st eep downhill gradients and on long down‐
hill stre tches. Using kickdown
#
For maximum acceleration: depressthe
accelerator pedal be yond the pressure point. #
Ease off the accelera tor pedal once the
desired speed is reached. All-wheel drive
Note
s on all-wheel drive All-wheel drive ensures permanent drive
for all
fo ur wheels, and toget her with ESP ®
it impr oves
th e traction of theve hicle.
The traction contro l ofthe all-wheel drive also
ta ke s place via the brake sy stem. Therefore, the
brake sy stem can overheat during extreme off-
ro ad use. In this case, ease off the accelerator
pedal or stop toallow the brake sy stem tocool
down.
If a driven wheel spins due toinsuf ficient trac‐
tion, obser vethefo llowing no tes:
R When pulling away, make use of the traction
cont rol integrated in ESP ®
. Depress the
accelerator pedal as far as necessar y.
R Take your foot off the accelera tor pedal,
slowly, while theve hicle is in motion.
In wintry driving conditions, alw ays use winter
tires (M+S tires) and, if necessar y,snow chains
(/ page 233). Only in this wa y can the maximum
ef fect of all-wheel drive be achie ved.
Use DSR (Downhill Speed Regulation) when driv‐
ing downhill off-road (/ page120).
If yo ufa ilto adapt your driving style or if you are
inat tentive, the all-wheel drive sy stem can neither
re duce therisk of an accident nor override the
la ws of ph ysics. The all-wheel drive sy stem can‐
not take road, weather and traf fic conditions into
account. The all-wheel drive sy stem is only an
aid. You are responsible for maintaining a safe
dis tan ce from theve hicle in front, forve hicle
speed, for braking in good time and forst ay ing in
lane. *
NO
TERisk of damage tothe driv etra in
and the brake sy stem If
yo u operate vehicles with all-wheel drive on
a one-axle test st and, you may damage the
driv etra in or the brake sy stem. #
A function or per form ance test should
only be car ried out on a two-axle test
st and. #
Ifyo u wish tooperate theve hicle on
such a test st and, please consult a
qu alified specialist workshop in
advance. *
NO
TERisk of damage tothe transfer
case If
yo uto w theve hicle with a raised axle, the
trans fer case can getdamaged. Such damage
is not co veredby Mercedes-Benz Limited
Wa rrant y. #
Neverto w theve hicle with a raised axle. #
Only tow theve hicle with all wheels on
th e ground or fully raised. #
Notethe instructions on towing the
ve hicle with full contact with the ground
fo r all wheels. Engaging all-wheel drive
Conditions
for en gaging/disengaging
Yo u can engage and deactivate the all-wheel drive
when stationary or while driving slowl y.
When stationar y,thefo llowing must be obser ved:
R The engine is running.
R The steering wheel in thest ra ight-ahead posi‐
tion.
If th e all-wheel drive cann otbe engaged when
st ationary: #
Vehicles with automatic transmission:
shift the selector le ver from 005Cto005B from
005B to005C from 005Cto005E and back to005C .
Engaging and disengaging the all-wheel drive
can be made easier in this wa y.
Obser vethefo llowing when driving slowly:
R The engine is running.
R The vehicle is not tr aveling fasterthan
6.2 mph (1 0 km/h).
R The vehicle is not being driven around a bend. 11 8
Driving and pa rking
Page 143 of 354
If it is not possible
toengage all-wheel drive when
th eve hicle is rolling: #
Vehicles with automatic transmission:
brief lymo vethe selector le verto 005C . Engaging/disen
gaging all-wheel drive *
NO
TERisk of damage tothe transfer
case If
yo ustep on the accelerator pedal while the
all-wheel drive is engaged or disen gage d, the
trans fer case may be dama ged. #
Do not step on the accelera tor pedal
when the indicator lamp in the switch
fo rth e all-wheel drive is flashing. #
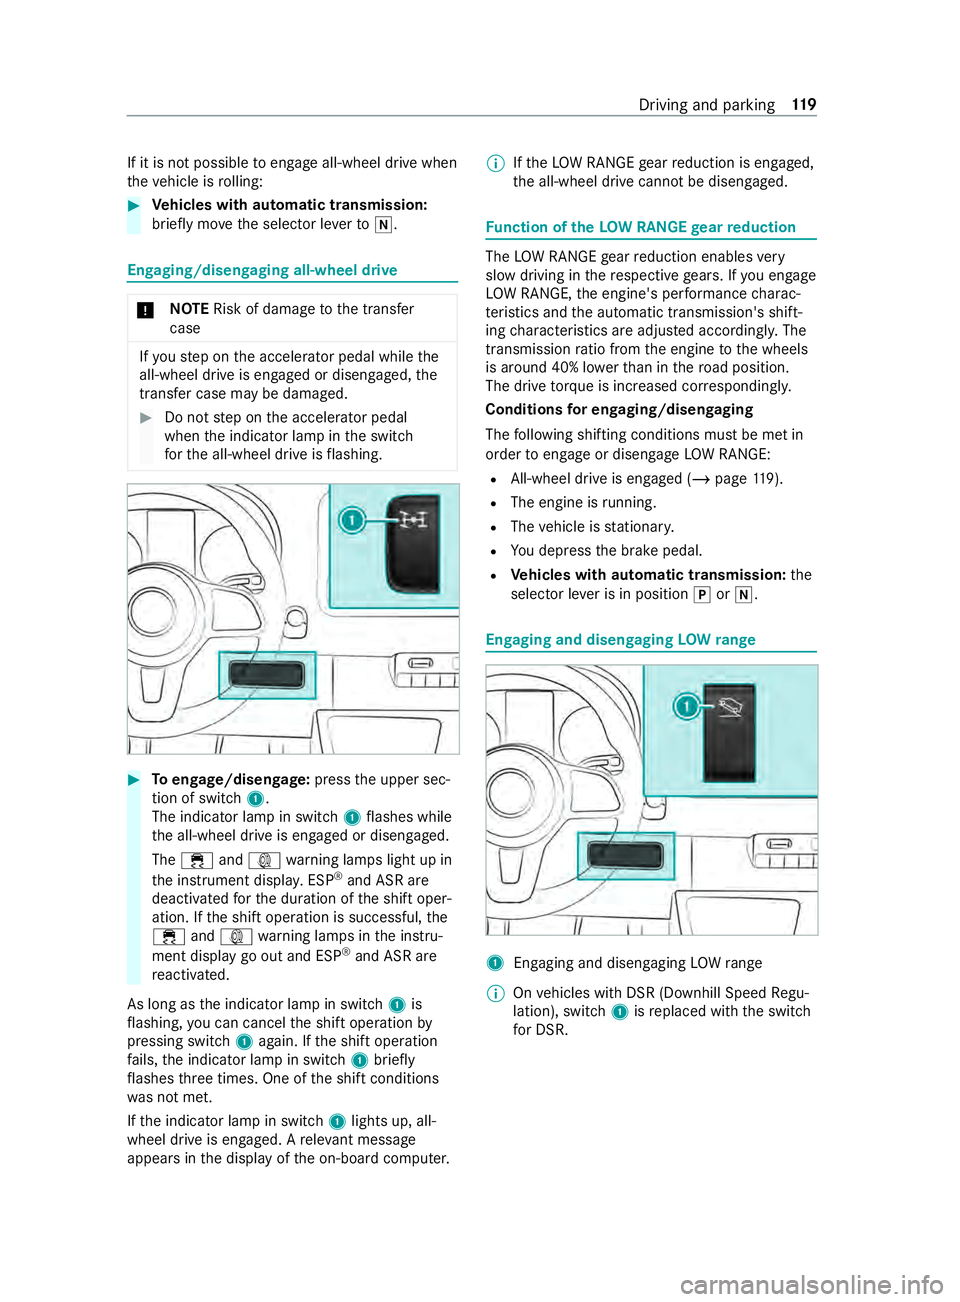
Toengage/disen gage:press the upper sec‐
tion of switch 1.
The indicator lamp in switch 1flashes while
th e all-wheel drive is engaged or disengaged.
The 00E5 and003D warning lamps light up in
th e instrument displa y.ESP ®
and ASR are
deacti vatedfo rth e duration of the shift oper‐
ation. If the shift operation is successful, the
00E5 and003D warning lamps in the instru‐
ment display go out and ESP ®
and ASR are
re activated.
As long as the indicator lamp in switch 1is
fl ashing, you can cancel the shift operation by
pressing switch 1again. If the shift operation
fa ils, the indicator lamp in switch 1brief ly
fl ashes thre e times. One of the shift conditions
wa s not met.
If th e indicator lamp in switch 1lights up, all-
wheel drive is engaged. A releva nt messa ge
appears in the display of the on-board computer. %
If
th eLO W RANGE gear reduction is engaged,
th e all-wheel drive cann otbe disengaged. Fu
nction of theLO W RANGE gear reduction The
LOW RANGE gear reduction enables very
slow driving in there spective gears. If you engage
LO W RANGE, the engine's per form ance charac‐
te rist ics and the automatic transmission's shift‐
ing characteristics are adjus ted according ly. The
transmission ratio from the engine tothe wheels
is around 40% lo werth an in thero ad position.
The drive torque is in creased cor respondingly.
Conditions for en gaging/disengaging
The following shifting conditions must be met in
order toengage or disengage LOW RANGE:
R All-wheel drive is engaged (/ page119).
R The engi ne isrunning.
R The vehicle is stationar y.
R You depress the brake pedal.
R Vehicles with automatic transmission: the
selector le ver is in position 005Dor005C. Engaging and disen
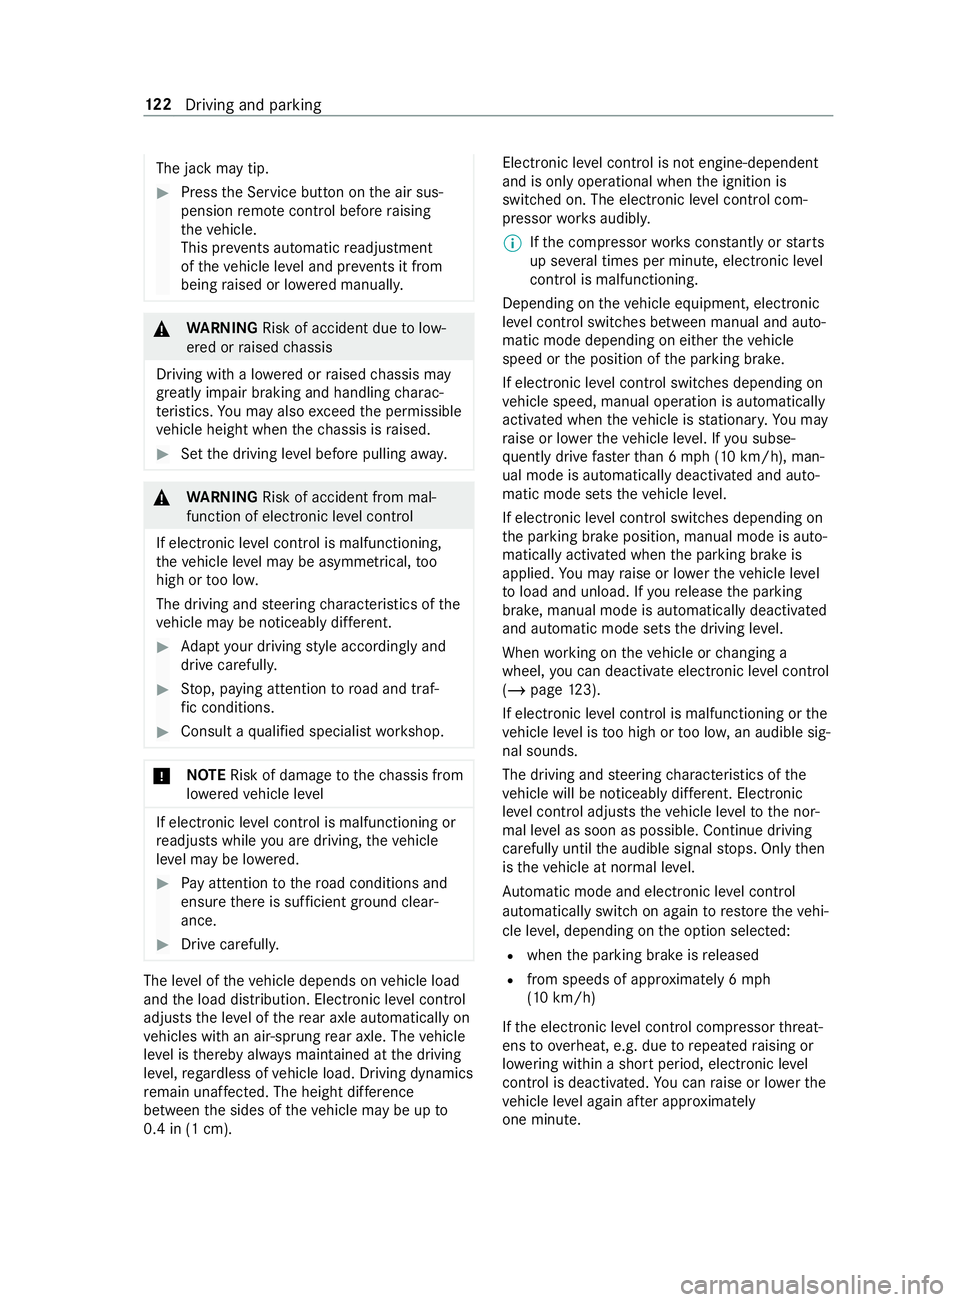
gaging LOW range 1
Enga ging and disengaging LOWrange
% On
vehicles with DSR (Downhill Speed Regu‐
lation), switch 1isreplaced with the switch
fo r DSR. Driving and parking
11 9
Page 146 of 354
The jack may tip.
#
Press the Service button on the air sus‐
pension remo tecontrol before raising
th eve hicle.
This pr events au tomatic readjustment
of theve hicle le vel and pr events it from
being raised or lo wered manually. &
WARNING Risk of accident due tolow‐
ered or raised chassis
Driving with a lo wered or raised chassis may
greatly impair braking and handling charac‐
te rist ics. You may also exceed the permissible
ve hicle height when thech assis is raised. #
Set the driving le vel before pulling away. &
WARNING Risk of accident from mal‐
function of electronic le vel control
If elect ronic le vel control is malfunctioning,
th eve hicle le vel may be asymmetrical, too
high or too lo w.
The driving and steering characteristics of the
ve hicle may be noticeably dif fere nt. #
Adapt your driving style according lyand
drive carefull y. #
Stop, paying attention toroad and traf‐
fi c conditions. #
Consult a qualified specialist workshop. *
NO
TERisk of damage tothech assis from
lo we redve hicle le vel If electronic le
vel control is malfunctioning or
re adjusts while you are driving, theve hicle
le ve l may be lo wered. #
Pay attention tothero ad conditions and
ensure there is suf ficient ground clear‐
ance. #
Drive carefully. The le
vel of theve hicle depends on vehicle load
and the load distribution. Elect ronic le vel control
adjusts the le vel of there ar axle automatically on
ve hicles with an air-sprung rear axle. The vehicle
le ve l is thereby alw ays maintained at the driving
le ve l,re ga rdless of vehicle load. Driving dynamics
re main unaf fected. The height dif fere nce
between the sides of theve hicle may be up to
0.4 in (1 cm). Electronic le
vel control is not engine-dependent
and is only operational when the ignition is
switched on. The electronic le vel control com‐
pressor works audibl y.
% If
th e compressor works cons tantly or starts
up se veral times per minute, elect ronic le vel
control is malfunctioning.
Depending on theve hicle equipment, electronic
le ve l control switches between manual and auto‐
matic mode depending on either theve hicle
speed or the position of the parking brake.
If electronic le vel control switches depending on
ve hicle speed, manual operation is automatically
activated when theve hicle is stationar y.Yo u may
ra ise or lo werth eve hicle le vel. If you subse‐
qu ently drive faster than 6 mph (10 km/h), man‐
ual mode is automatically deactivated and auto‐
matic mode sets theve hicle le vel.
If elect ronic le vel control switches depending on
th e parking brake position, manual mode is auto‐
matically activated when the parking brake is
applied. You may raise or lo werth eve hicle le vel
to load and unload. If youre lease the parking
brake, manual mode is automatically deactivated
and automatic mode sets the driving le vel.
When working on theve hicle or changing a
wheel, you can deactivate electronic le vel control
(/ page 123).
If electronic le vel control is malfunctioning or the
ve hicle le vel is too high or too lo w,an audible sig‐
nal sounds.
The driving and steering characteristics of the
ve hicle will be noticeably dif fere nt. Electronic
le ve l control adjusts theve hicle le velto the nor‐
mal le vel as soon as possible. Continue driving
carefully until the audible signal stops. Only then
is theve hicle at normal le vel.
Au tomatic mode and electronic le vel control
automatically switch on again torestore theve hi‐
cle le vel, depending on the option selected:
R when the parking brake is released
R from speeds of appr oximately 6 mph
(10 km/h)
If th e electronic le vel control compressor thre at‐
ens to ov erheat, e.g. due torepeated raising or
lo we ring wi thin a short period, elect ronic le vel
control is deactivated. You can raise or lo werthe
ve hicle le vel again af ter appro ximately
one minu te. 12 2
Driving and pa rking