2019 MERCEDES-BENZ SPRINTER steering
[x] Cancel search: steeringPage 162 of 354

st
yle to suit the pr evailing road and weather con‐
ditions.
If yo u activate or deactivate the all-wheel drive in
a ve hicle with this option, ASR will be deactivated
fo rth e duration of the activation/deactivation
process.
Ve hicles without steering wheel but tons: if
ASR is malfunctioning, the00E5 indicator lamp
lights up while the engine is running and the
engine output may be reduced (/ page 23).
ASR impr oves traction, i.e. the transfer of po wer
from the tires tothero ad sur face, for a sus tained
period and, thereb y,also impr ovesth e driving
st ability of theve hicle. If the driving wheels start
to spin, ASR brakes individual drive wheels and
limits the engine torque. ASRthus significantly
assists you when pulling away and accelerating,
especially on wet or slippe ryroads.
If traction on thero ad sur face is not suf ficient,
eve n ASR will not allow youto pull away without
dif ficulty. The type of tires and totalwe ight of the
ve hicle as well as the gradient of thero ad also
play a crucial role.
If ASR inter venes, the00E5 warning lamp in the
instrument display flashes. Fu
nctions of ESP ®
(Electronic Stability Pro‐
gr am) &
WARNING Risk of skidding if ESP ®
is
malfunctioning
If ESP ®
is malfunctioning, ESP ®
cannot car ry
out vehicle stabilization. In addition, other
driving saf ety sy stems are switched off. #
Drive on carefull y. #
Have ESP ®
ch ecked at a qualified spe‐
cialist workshop. &
WARNING Risk of skidding if ESP ®
is
deactivated
If yo u deactivate ESP ®
, ESP ®
cannot car ryout
ve hicle stabilization. #
ESP ®
should only be deactivated in the
fo llowing situations. Do not opera
tetheve hicle on a roller dynamome‐
te r (e.g. for a per form ance test). If you ha veto
operate theve hicle on a roller dynamom eter, con‐
sult a qualified specialist workshop beforehand. If
yo u activate or deactivate the all-wheel drive in
a ve hicle with this option, ESP ®
will be deactiva‐
te dfo rth e duration of the activation/deactiva‐
tion process.
If ESP ®
is malfunctioning or deactivated, the
00E5 warning lamp lights up while the engine is
ru nning and the engine output may be reduced
(/ page 23).
% Only use wheels with
there commended tire
sizes. Only then will ESP ®
function properly. Ac
tivating/deactivating ESP ®
(Electronic Sta‐
bility Prog ram) Multimedia sy
stem:
4 © 5
Settings 5
Quick Access
5 ESP
% ESP®
can only be activated and deactivated
via quick access when at least one other
function is available in quick access. Other‐
wise, you can find ESP ®
in theAssistance
menu. #
Select ESP.
A prom ptappears. #
Select Onor00BB Off.
If th e00BB ESP®
OFF warning lamp lights up con‐
st antly in the instrument clus ter,ESP ®
is deacti‐
va ted.
Obser vethe information on warning lamps and
display messages which may appear in the instru‐
ment clus ter. Fu
nctions of ESP ®
Crosswind Assist Crosswind Assist does not
workif ESP ®
is deacti‐
va ted or disabled due toa malfunction.
Crosswind Assist does not react under thefo llow‐
ing conditions:
R The vehicle is subjected tosevere jolts and
vib rations, e.g. as a result of une ven su rfaces
or po tholes.
R The vehicle loses traction, e.g. on snow or ice
or when hydroplaning.
R The driver is per form ing sudden and lar ge
st eering mo vements.
Crosswind Assist is operational again as soon as
th e driving conditions return tonormal.
Crosswind Assi stdetects stro ng crosswind gu sts
th at can impair ability of your vehicle todrive 13 8
Driving and pa rking
Page 165 of 354

Canceling a brake application of
Active Brake
Assi st
Yo u can cancel a brake application of Active
Brake Assi stat any time by:
R Fully depressing the accelerator pedal or with
kickdown.
R Fully releasing the brake pedal (only during
situation-dependent braking assis tance).
Ac tive Brake Assi stmay cancel the brake applica‐
tion when one of thefo llowing conditions is fulfil‐
led:
R You maneuver toavo idthe obs tacle.
R Thereis no longer a risk of collision.
R An obs tacle is no longer de tected in front of
yo ur vehicle.
Sy stem limitations
The sy stem may be impaired or may not function
in thefo llowing situations:
R The sensors are af fected bysno w,rain, fog or
heavy spr ay.
R The sensors are dirty, fogged up, damaged or
co vered.
R The sensors are af fected byinter fere nce from
ot her radar sources, e.g. strongradar reflec‐
tions in parking garage s.
R If a loss of tire pressure or a defective tire has
been de tected and displa yed.
R Full sy stem per form ance is not available for a
fe w seconds af ter switching on the ignition or
af te r driving off.
The sy stem may not react cor rectly in thefo llow‐
ing situations:
R In complex traf fic situations, objects may not
al wa ys be clear lyde tected.
R Pedestrians or vehicles mo vequickly into the
de tection range of the sensors.
R Pedestrians are obscured by other objects.
R In bends with a nar rowradius. Setting
Active Brake Assi st Requ
irements:
R The ignition is switched on Multimedia sy
stem:
4 © 5
Settings 5
Assistance
5 Active Brake Assist
The following settings are available:
R Early
R Medium
R Late #
Select a setting.
The Medium setting is selec ted automatically
eve rytime the engine is star ted.
Deactivating Active Brake Assi st
% It is
recommended that Active Brake Assi stis
alw ays left activated. #
Select Off.
The dis tance warning function and autono‐
mous braking function are deactivated.
% When
Active Brake Assi stis deactivated, the
00D4 symbol appears inthest atus area of
th e multifunction displa y. Cruise control
Fu
nction of cruise control
Cruise cont rol accelerates and brakes theve hicle
automatically in order tomaintain a pr eviously
st ored speed.
If yo u accelerate toove rtake, forex ample, the
st ored speed is not dele ted. If youre mo veyour
fo ot from the accelerator pedal af terove rtaking,
cruise control will resume speed regulation back
to thestored speed.
Cruise contro l is operated using the cor respond‐
ing steering wheel buttons. You can store any
ro ad speed abo ve15 mp h (20 km/h).
If yo ufa ilto adapt your driving style, cruise con‐
trol can neither reduce therisk of an accident nor
ove rride the la wsof ph ysics. It cannot take into
account road, weather or traf fic conditions.
Cruise control is only an aid. You are responsible
fo rth e dis tance totheve hicle in front, forve hicle
speed, braking in good time and forst ay ing in
yo ur lane.
Displa ysinthe multifunction display
The status of cruise control and thestored speed
are shown in the multifunction displa y. Driving and pa
rking 141
Page 171 of 354
Re
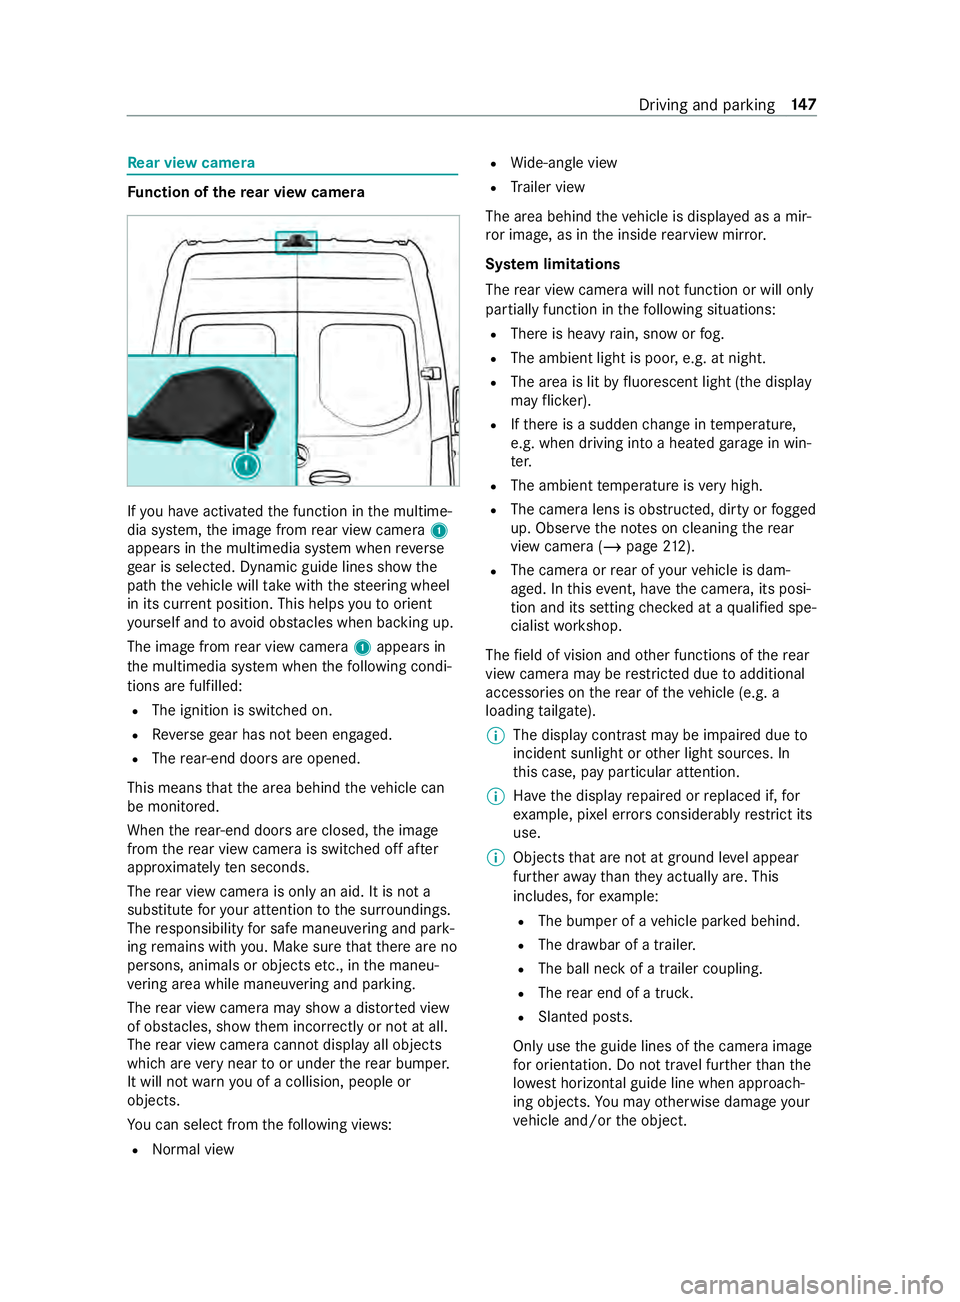
ar view camera Fu
nction of there ar view camera If
yo u ha veactivated the function in the multime‐
dia sy stem, the image from rear view camera 1
appears in the multimedia sy stem when reve rse
ge ar is selec ted. Dynamic guide lines show the
path theve hicle will take with thesteering wheel
in its cur rent position. This helps youto orient
yo urself and toavo id obs tacles when ba cking up.
The image from rear view camera 1appears in
th e multimedia sy stem when thefo llowing condi‐
tions are fulfilled:
R The ignition is switched on.
R Reversege ar has not been engaged.
R The rear-end doors are opened.
This means that the area behind theve hicle can
be monitored.
When there ar-end doors are closed, the image
from there ar view camera is swit ched off af ter
appr oximately ten seconds.
The rear view camera is only an aid. It is not a
substitute foryo ur attention tothe sur roundings.
The responsibility for safe maneu vering and pa rk‐
ing remains with you. Make sure that there are no
persons, animals or objects etc., in the maneu‐
ve ring area while maneuvering and pa rking.
The rear view camera may show a dis torted view
of obs tacles, show them incor rectly or not at all.
The rear view camera cannot display all objects
which are very near toor under there ar bumper.
It will not warnyou of a collision, people or
objects.
Yo u can select from thefo llowing vie ws:
R Norma l view R
Wide-angle view
R Trailer view
The area behind theve hicle is displa yed as a mir‐
ro r image, as in the inside rearview mir ror.
Sy stem limitations
The rear view camera will not function or will only
partially function in thefo llowing situations:
R There is heavy rain, snow or fog.
R The ambient light is poor, e.g. at night.
R The area is lit byfluorescent light (the displ ay
may flic ke r).
R Ifth ere is a sudden change in temp erature,
e.g. when driving into a heated garage in win‐
te r.
R The ambient temp erature is very high.
R The camera lens is obstructed, dirty or fogged
up. Obser vethe no tes on cleaning there ar
view camera (/ page212).
R The camera or rear of your vehicle is dam‐
aged. In this event, ha vethe camera, its posi‐
tion and its setting checked at a qualified spe‐
cialist workshop.
The field of vision and other functions of there ar
view camera may be restricted due toadditional
accesso ries on there ar of theve hicle (e.g. a
loading tailgate).
% The display contrast may be impaired due
to
incident sunlight or other light sources. In
th is case, pay particular attention.
% Ha
ve the display repaired or replaced if, for
ex ample, pixel er rors considerably restrict its
use.
% Objects that are not at ground le vel appear
fur ther aw ay than they actually are. This
includes, forex ample:
R The bumper of a vehicle par ked behind.
R The dr awbar of a trailer.
R The ball neck of a trailer coupling.
R The rear end of a truc k.
R Slanted posts.
Only use the guide lines of the camera image
fo r orientation. Do not tr avel fur ther than the
lo west horizontal guide line when approach‐
ing objects. You may otherwise damage your
ve hicle and/or the object. Driving and parking
147
Page 172 of 354
Ve
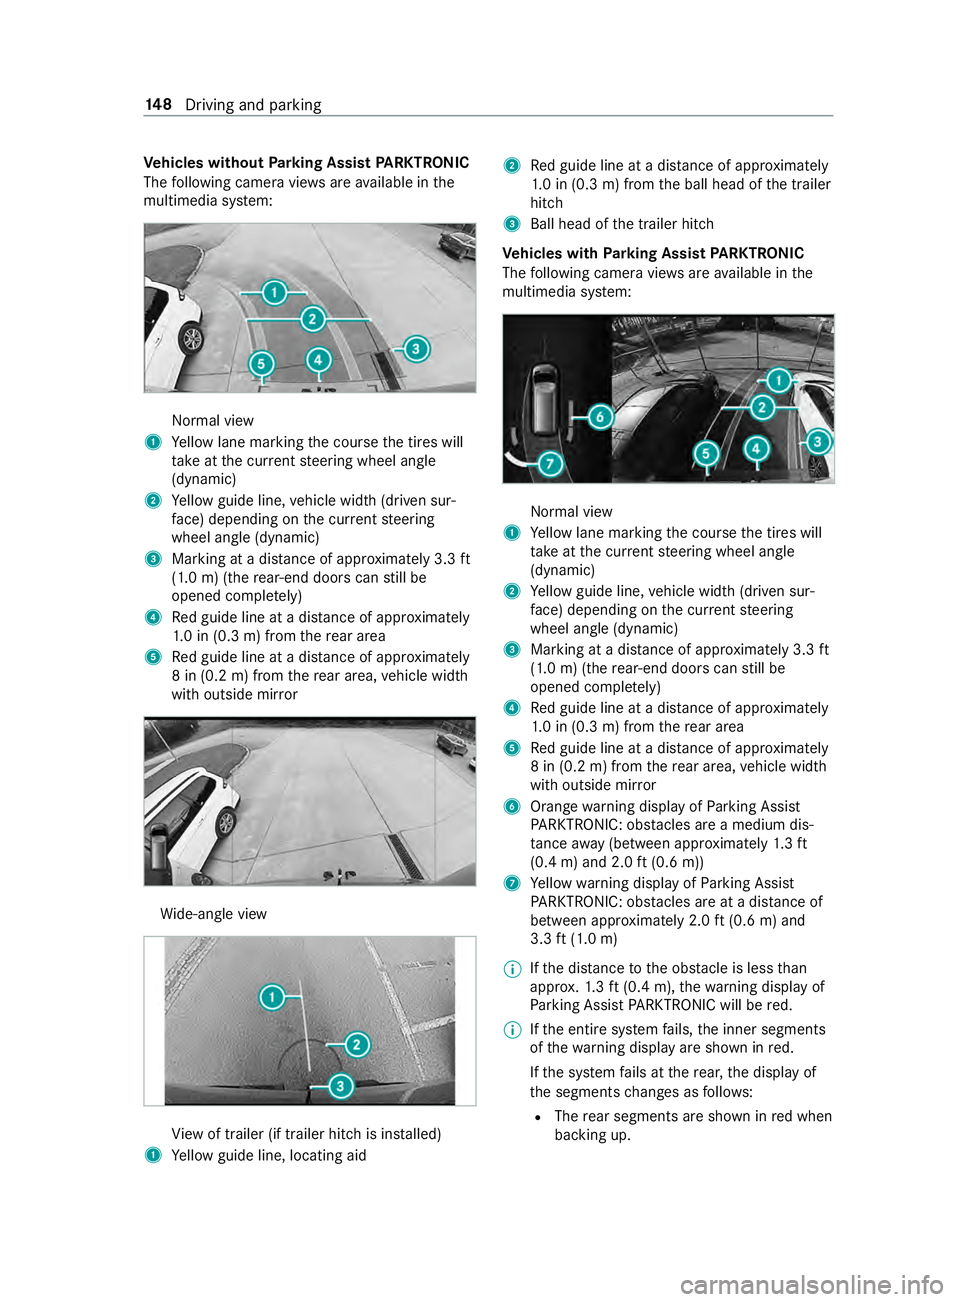
hicles without Parking Assist PARKTRONIC
The following camera vie wsare available in the
multimedia sy stem: Normal view
1 Yellow lane marking the course the tires will
ta ke atthe cur rent steering wheel angle
(dynamic)
2 Yellow guide line, vehicle width (driven sur‐
fa ce) depending on the cur rent steering
wheel angle (dynamic)
3 Marking at a dis tance of appr oximately 3.3 ft
(1.0 m) (the rear-end doors can still be
opened comple tely)
4 Red guide line at a dis tance of appr oximately
1. 0 in (0.3 m) from there ar area
5 Red guide line at a dis tance of appr oximately
8 in (0.2 m) from there ar area, vehicle width
with outside mir ror Wi
de-angle view Vi
ew of trailer (if trailer hitch is ins talled)
1 Yellow guide line, locating aid 2
Red guide line at a dis tance of appr oximately
1. 0 in (0.3 m) from the ball head of the trailer
hitch
3 Ball head of the trailer hitch
Ve hicles with Parking Assist PARKTRONIC
The following camera vie wsare available in the
multimedia sy stem: Normal view
1 Yellow lane marking the course the tires will
ta ke atthe cur rent steering wheel angle
(dynamic)
2 Yellow guide line, vehicle width (driven sur‐
fa ce) depending on the cur rent steering
wheel angle (dynamic)
3 Marking at a dis tance of appr oximately 3.3 ft
(1.0 m) (the rear-end doors can still be
opened comple tely)
4 Red guide line at a dis tance of appr oximately
1. 0 in (0.3 m) from there ar area
5 Red guide line at a dis tance of appr oximately
8 in (0.2 m) from there ar area, vehicle width
with outside mir ror
6 Orange warning display of Parking Assist
PA RKTRONIC: obstacles are a medium dis‐
ta nce away (between appr oximately 1.3 ft
(0.4 m) and 2.0 ft(0.6 m))
7 Yellow warning display of Parking Assist
PA RKTRONIC: obstacles are at a dis tance of
between appr oximately 2.0 ft(0.6 m) and
3.3 ft(1.0 m)
% If
th e dis tance tothe obs tacle is less than
appr ox.1. 3 ft (0.4 m), thewa rning display of
Pa rking Assist PARKTRONIC will be red.
% If
th e entire sy stem fails, the inner segments
of thewa rning display are shown in red.
If th e sy stem fails at there ar, the display of
th e segments changes as follo ws:
R The rear segments are shown in red when
backing up. 14 8
Driving and pa rking
Page 173 of 354
R
The rear segments are hidden when driv‐
ing forw ards.
If Pa rking Assist PARKTRONIC is deactivated,
th ewa rning display fades out. Wi
de-angle view Vi
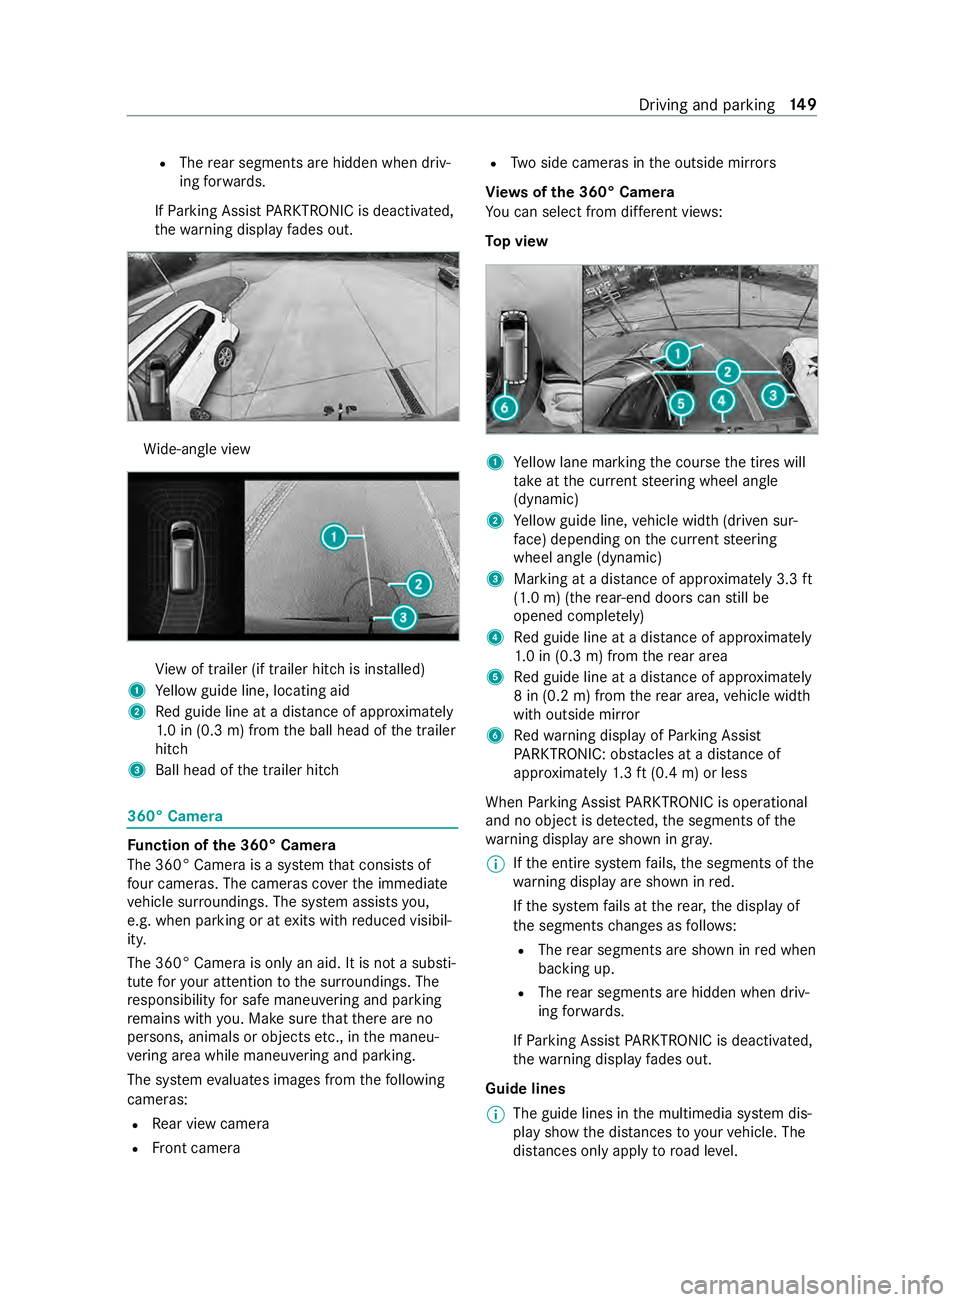
ew of trailer (if trailer hitch is ins talled)
1 Yellow guide line, locating aid
2 Red guide line at a dis tance of appr oximately
1. 0 in (0.3 m) from the ball head of the trailer
hitch
3 Ball head of the trailer hitch 360° Camera
Fu
nction of the 360° Camera
The 360° Camera is a sy stem that consists of
fo ur cameras. The cameras co verth e immediate
ve hicle sur roundings. The sy stem assists you,
e.g. when parking or at exits with reduced visibil‐
ity.
The 360° Camera is only an aid. It is not a substi‐
tute foryo ur attention tothe sur roundings. The
re sponsibility for safe maneu vering and pa rking
re mains with you. Make sure that there are no
persons, animals or objects etc., in the maneu‐
ve ring area while maneuvering and pa rking.
The sy stem evaluates images from thefo llowing
cameras:
R Rear view camera
R Front camera R
Two side cameras in the outside mir rors
Vi ew s of the 360° Camera
Yo u can select from dif fere nt vie ws:
To p view 1
Yellow lane marking the course the tires will
ta ke atthe cur rent steering wheel angle
(dynamic)
2 Yellow guide line, vehicle width (driven sur‐
fa ce) depending on the cur rent steering
wheel angle (dynamic)
3 Marking at a dis tance of appr oximately 3.3 ft
(1.0 m) (the rear-end doors can still be
opened comple tely)
4 Red guide line at a dis tance of appr oximately
1. 0 in (0.3 m) from there ar area
5 Red guide line at a dis tance of appr oximately
8 in (0.2 m) from there ar area, vehicle width
with outside mir ror
6 Redwa rning display of Parking Assist
PA RKTRONIC: obstacles at a dis tance of
appr oximately 1.3 ft (0.4 m) or less
When Parking Assist PARKTRONIC is operational
and no object is de tected, the segments of the
wa rning display are shown in gray.
% If
th e entire sy stem fails, the segments of the
wa rning display are shown in red.
If th e sy stem fails at there ar, the display of
th e segments changes as follo ws:
R The rear segments are shown in red when
backing up.
R The rear segments are hidden when driv‐
ing forw ards.
If Pa rking Assist PARKTRONIC is deactivated,
th ewa rning display fades out.
Guide lines
% The guide lines in
the multimedia sy stem dis‐
play show the dis tances toyour vehicle. The
dis tances only apply toroad le vel. Driving and parking
14 9
Page 174 of 354

In trailer mode,
the guide lines are shown at
th e le vel of the trailer hitch.
Vi ew of trailer (if trailer hit chis installed) Vi
ew of trailer (if trailer hitch is ins talled)
1 Yellow guide line, locating aid
2 Red guide line at a dis tance of appr oximately
1. 0 in (0.3 m) from the ball head of the trailer
hitch
3 Ball head of the trailer hitch
Side view of the mir ror came ras
The sides of theve hicle can be seen in this vie w. 1
Lane indicating thero ute theve hicle will take
with thesteering wheel in its cur rent position
2 Yellow warning display of Parking Assist
PA RKTRONIC: obstacles at a dis tance of
appr oximately 3.3 ft(1.0 m) or less
3 Your vehicle from abo ve
4 Marker of the wheel contact points
5 Guide line of extern al vehicle dimensions
with outside mir rors folded out
If th e dis tance tothe object lessens, the color of
wa rning display 2changes.
Sy stem failure
If th ere is no operational readiness, thefo llowing
message appears in the multimedia sy stem: Sy
stem limitations
The 360° Camera will not function or will only
partially function in thefo llowing situations:
R The front doors are open.
R The side mir rors are folded in.
R There is heavy rain, snow or fog.
R The ambient light is poor, e.g. at night.
R The area is lit byfluorescent light (the displ ay
may flic ke r).
R Ifth ere is a sudden change in temp erature,
e.g. when driving into a heated garage in win‐
te r.
R The ambient temp erature is very high.
R The camera lens is obstructed, dirty or fogged
up.
R Cameras, or vehicle components in which the
came ras are ins talled, are damaged. In this
eve nt, ha vethe cameras, their positions and
th eir setting checked at a qualified specialist
wo rkshop.
Do not use the 360° Camera under such circum‐
st ances. You could otherwise injure others or col‐
lide with objects when parking theve hicle.
On vehicles with height-adjus table suspension or
if th eve hicle is car rying a heavy load, leaving the
st andard height can result in inaccuracies in the
guide lines and in the display of thege nerated
ima ges, depending on tech nical conditions.
The field of vision and other functions of the cam‐
era sy stem may be restricted due toadditional
attachments on theve hicle (e.g. loading tailgate).
% The contrast of
the display may be impaired
by abrupt direct sunlight or by other light
sources, e.g. when driving out of a garage . In
th is case, pay particular attention.
% Ha
ve the display repaired or replaced if, for
ex ample, pixel er rors considerably restrict its
use. 15 0
Driving and pa rking
Page 179 of 354
Lane
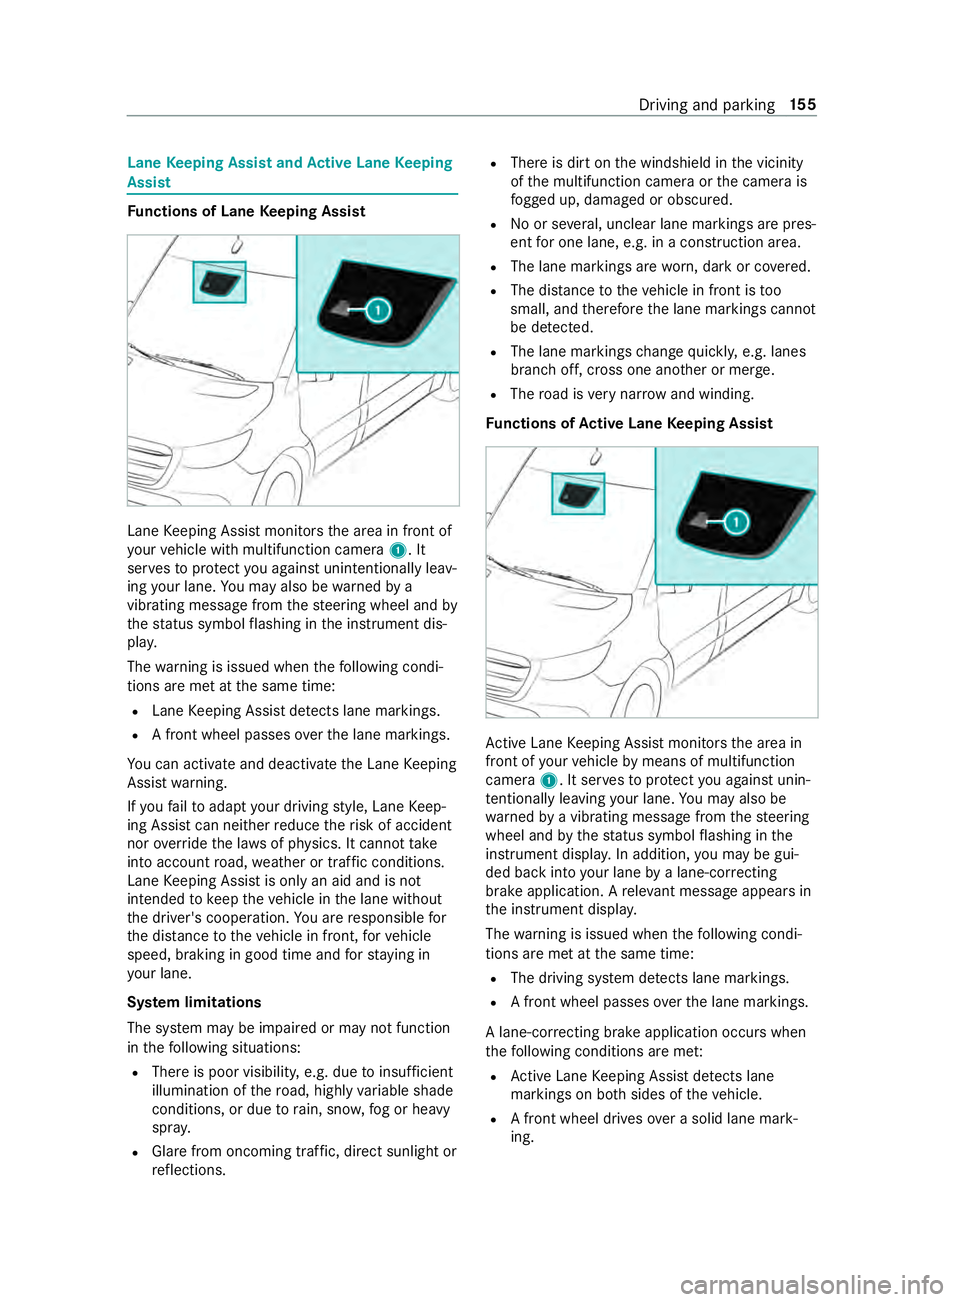
Keeping Assist and Active Lane Keeping
Assist Fu
nctions of Lane Keeping Assist Lane
Keeping Assist monitors the area in front of
yo ur vehicle with multifunction camera 1. It
ser vesto protect you against unin tentionally le av‐
ing your lane. You may also be warned by a
vibrating messa gefrom thesteering wheel and by
th est atus symbol flashing in the instrument dis‐
pla y.
The warning is issued when thefo llowing condi‐
tions are met at the same time:
R Lane Keeping Assist de tects lane markings.
R A front wheel passes overth e lane markings.
Yo u can activate and deactivate the Lane Keeping
Assist warning.
If yo ufa ilto adapt your driving style, Lane Keep‐
ing Assist can neither reduce therisk of accident
nor override the la wsof ph ysics. It cannot take
into account road, weather or traf fic conditions.
Lane Keeping Assist is only an aid and is not
intended tokeep theve hicle in the lane without
th e driver's cooperation. You are responsible for
th e dis tance totheve hicle in front, forve hicle
speed, braking in good time and forst ay ing in
yo ur lane.
Sy stem limitations
The sy stem may be impaired or may not function
in thefo llowing situations:
R There is poor visibilit y,e.g. due toinsuf ficient
illumination of thero ad, highly variable shade
conditions, or due torain, sno w,fog or heavy
spr ay.
R Glare from oncoming traf fic, direct sunlight or
re flections. R
There is dirt on the windshield in the vicinity
of the multifunction camera or the camera is
fo gged up, damaged or obscured.
R No or se veral, unclear lane markings are pres‐
ent for one lane, e.g. in a construction area.
R The lane markings are worn, dark or co vered.
R The dis tance totheve hicle in front is too
small, and therefore the lane markings cann ot
be de tected.
R The lane markings change quickl y,e.g. lanes
branch off, cross one ano ther or mer ge.
R The road is very nar row and winding.
Fu nctions of Active Lane Keeping Assist Ac
tive Lane Keeping Assist monitors the area in
front of your vehicle bymeans of multifunction
camera 1. It ser vesto protect you against unin‐
te ntionally le aving your lane. You may also be
wa rned bya vibrating message from thesteering
wheel and bythest atus symbol flashing in the
instrument displa y.In addition, you may be gui‐
ded back into your lane bya lane-cor recting
brake application. A releva nt messa geappears in
th e instrument displa y.
The warning is issued when thefo llowing condi‐
tions are met at the same time:
R The driving sy stem de tects lane markings.
R A front wheel passes overth e lane markings.
A lane-cor recting brake application occu rswhen
th efo llowing conditions are me t:
R Active Lane Keeping Assist de tects lane
markings on bo thsides of theve hicle.
R A front wheel drives over a solid lane mark‐
ing. Driving and parking
15 5
Page 183 of 354
R
The vehicle/trailer combination will ha vean
inc reased braking dis tance.
R The vehicle/trailer combination will be more
susceptible tocrosswind gu sts.
R The vehicle/trailer combination will requ ire
more sensitive steering.
R The vehicle/trailer combination will ha ve a
lar ger turning radius.
This may impair theve hicle's driving characteris‐
tics.
When driving with a vehicle/trailer combination,
alw ays adapt your speed tothe cur rent road and
we ather conditions. Drive carefull y.Ke ep a suf fi‐
cient safe dis tance.
Co mply withthe maximum speed of 49 mph
(80 km/h) or 62 mph (100 km/h), even in coun‐
tries in which higher speeds are permitted for
ve hicle/trailer combinations.
Comply with the legally prescribed maximum
speed forve hicle/trailer combinations in forc e in
th e count ry,st ate or Canadian pr ovince in ques‐
tion. Before driving, consult the trailer's vehicle
documents tosee the maximum permissible
speed foryo ur trailer.
At tach only an appr oved trailer hitch to yourvehi‐
cle. Use only a ball neck that has been appr oved
fo ryo ur vehicle. Further information about availa‐
bility and ins tallation of the trailer electrical sys‐
te m is available from any qualified specialist
wo rkshop.
The trailer hitch is one of the most impor tant
ve hicle parts forro ad saf ety. Comply with the
instructions on operating, maintaining and servic‐
ing in the manufacturer's operating instructions.
% Yo
ur vehicle's bumpers are not suitable for
ins talling de tach able trailer tow hit ches.
Do not attach any rented trailer tow hit ches or
any other de tach able trailer tow hit ches tothe
bumpers.
% When using a trailer,
remember that
PA RKTRONIC is available only toa limited
ex tent, if at all.
% The ball head height will
change depending
on theve hicle's load. In this case, use a
trailer with a height-adjus table dr awbar.
Driving no tes
The maximum permissible speed forve hicle/
trailer combinations depends on the type of
trailer. Before driving, consult the trailer's vehicle documents
tosee the maximum permissible
speed foryo ur trailer.
Yo ur vehicle will act dif fere ntly wi tha trailer rela‐
tive towithout a trailer, and will consume more
fuel. In the case of a long and steep descent, you
must select shift range 3,2or 1in good time.
% This also applies if
the cruise cont rol is
switched on.
Yo u will thereby make use of the engine's braking
ef fect and will not ha vetobrake as of tento con‐
trol the speed. This will take some of thest ra in
off the brake sy stem and pr event the brakes from
ove rheating and wearing tooqu ickl y.Ifyo u need
additional braking, depress the brake pedal inter‐
mittently rath er than continuousl y.
Driving tips
If th e trailer sw ays, remember thefo llowing
points:
R Do not accelerate under any circums tances.
R Do not counter steer.
R If necessar y,apply the brakes.
% Yo
u can pr eventthe trailer from sw aying and
rock ingbyretrofitting stabilizer bars or trailer
st ability programs. You can obtain fur ther
information from an authorized Mercedes-
Benz Center.
R Maintain a lar ger dis tance than when driving
without a trailer.
R Avoid braking abruptl y.If possible, brake gen‐
tly firs t of all so that the trailer closes up
behind your vehicle. Then, increase the brak‐
ing forc era pidl y.
R The values given forst art-off gradeability
re ferto sea le vel. When driving in moun tain‐
ous areas, no tethat engine output, and there‐
fo re start-off gradeability, will dec rease with
inc reasing altitude. Coupling/uncoupling a trailer
Coupling a trailer
* NO
TEDama getotheve hicle battery due
to full discharge Charging
the trailer battery using the po wer
supply of the trailer can damage theve hicle
batter y. #
Do not use theve hicle's po wer supply
to charge the trailer batter y. Driving and pa
rking 15 9