2019 MERCEDES-BENZ SLC ROADSTER ignition
[x] Cancel search: ignitionPage 240 of 306
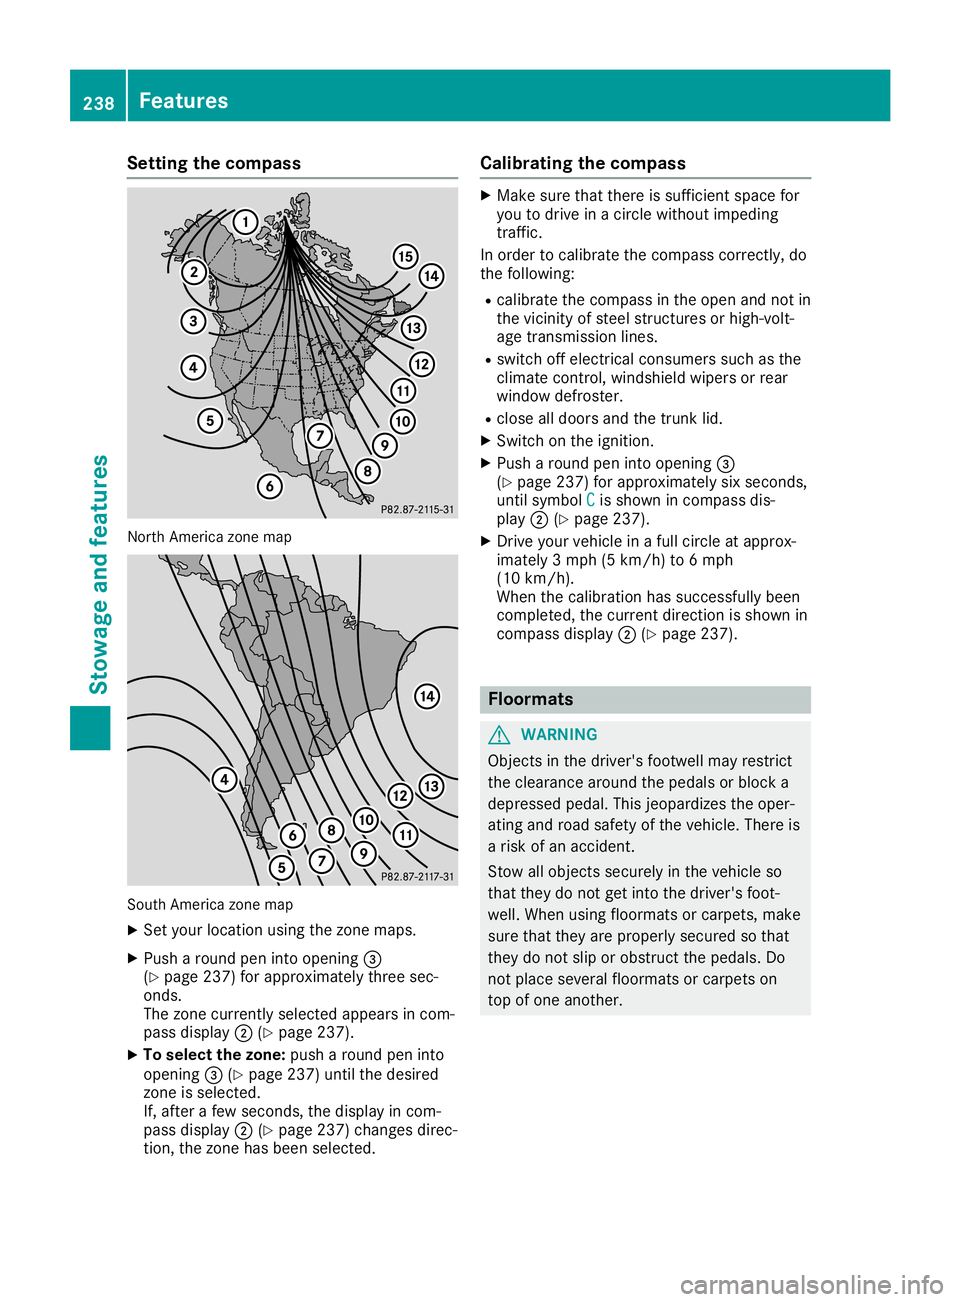
Setting
thecompass North
America zonemap South
America zonemap
X Set your location usingthezone maps.
X Push around peninto opening 0087
(Y page 237)forapproximately threesec-
onds.
The zone current lyselected appearsincom-
pass display 0044(Ypage 237).
X To selec tthe zone: pusharound peninto
opening 0087(Ypage 237)untilthedesired
zone isselected.
If, after afew seconds, thedisplay incom-
pass display 0044(Ypage 237)changes direc-
tion, thezone hasbeen selected. Calibrating
thecompass X
Make surethatthere issufficient spacefor
you todrive inacircle without impeding
traffic.
In order tocalibrate thecompass correctly,do
the following:
R calibrate thecompass inthe open andnotin
the vicinity ofsteel struct uresorhigh-volt-
age transm issionlines.
R switch offelectrical consumers suchasthe
climate control,windshield wipersorrear
window defroster.
R close alldoors andthetrunk lid.
X Switch onthe ignition.
X Push around peninto opening 0087
(Y page 237)forapproximately sixseconds,
until symbol C C
is shown incompass dis-
play 0044(Ypage 237).
X Drive yourvehicle inafull circle atapprox-
imately 3mph (5km/h) to6mph
(10 km/h).
When thecalibration hassuccessfully been
completed, thecurrent direction isshown in
compass display0044(Ypage 237). Floo
rmats G
WARNING
Object sin the driver's footwell mayrestrict
the clearance aroundthepedals orblock a
depressed pedal.Thisjeopardizes theoper-
ating androad safety ofthe vehicle. Thereis
a risk ofan accident.
Stow allobject ssecurely inthe vehicle so
that they donot getinto thedriver's foot-
well. When usingfloormats orcarpets, make
sure thatthey areproperly securedsothat
they donot slip orobstruct thepedals. Do
not place several floormats orcarpets on
top ofone another. 238
FeaturesStowage
andfeatu res
Page 245 of 306
If
you need todo any work inside theengine
compartment:
R switch offthe ignition
R never reach intothearea where thereisa
risk ofdanger frommoving components,
such asthe fanrotation area
R remove jewelryandwatches
R keep items ofclothing andhair, forexam-
ple, awayfrom moving parts G
WARNING
The cooling systemispressu rized,particu-
larl ywhen themotor iswarm. Ifyou open
the cap, youcould bescalde difhot coolant
spray sout. There isarisk ofinjury.
Let the engine cooldown before youopen
the cap. Wear protective glovesandprotec-
tive eyew earwhen opening. Openthecap
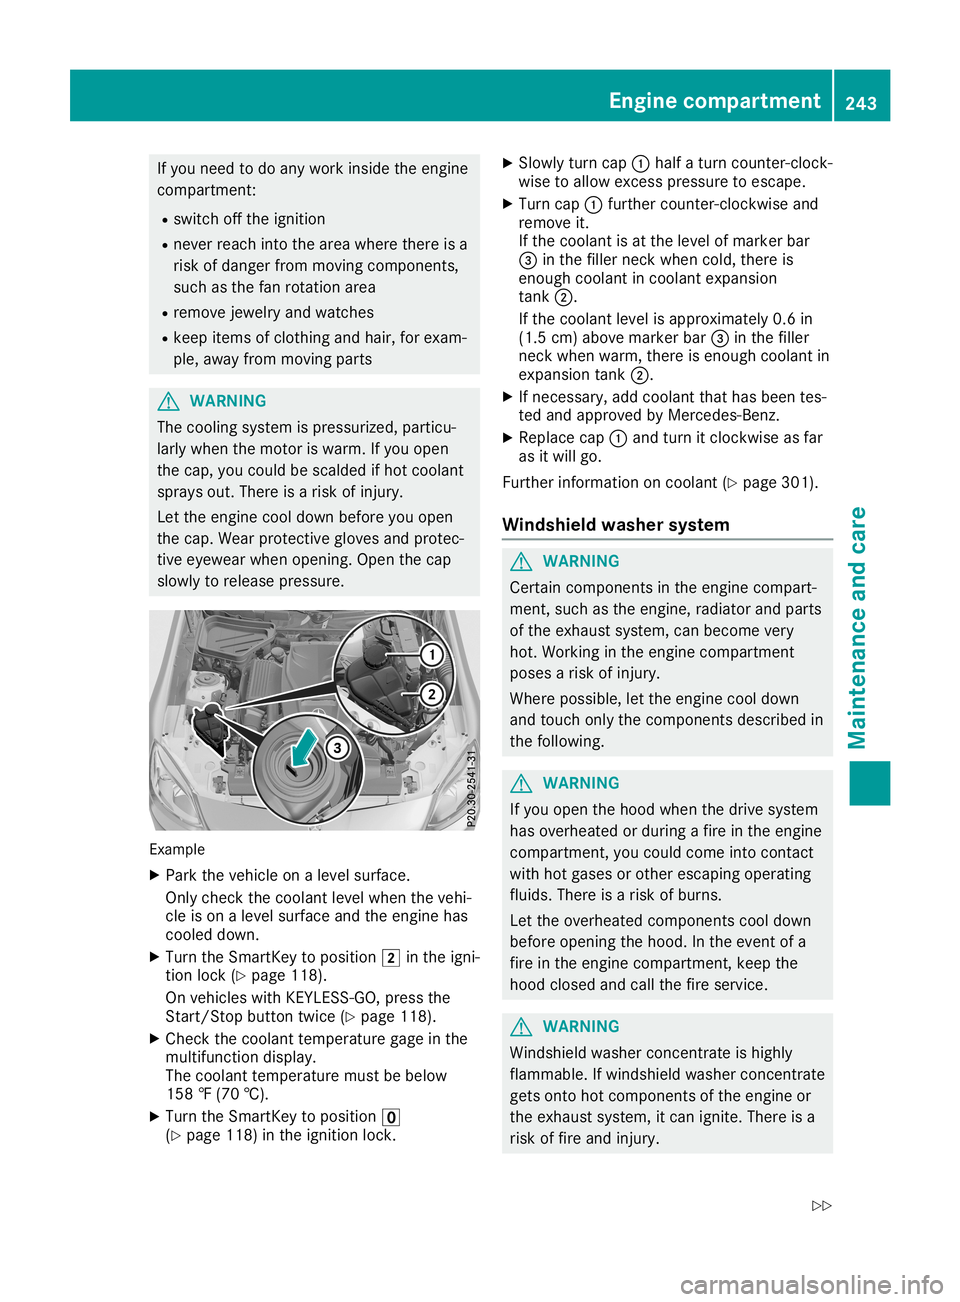
slow lyto relea sepressu re. Example
X Park thevehicle onalevel surface.
Only check thecoolant levelwhen thevehi-
cle ison alevel surface andtheengine has
cooled down.
X Turn theSmartKey topositio n0048 inthe igni-
tion lock (Ypage 118).
On vehicle swith KEYLESS- GO,press the
Start/St opbutton twice(Ypage 118).
X Check thecoolant temperature gageinthe
multifu nctiondisplay.
The coolant temperature mustbebelow
158 ‡(70 †).
X Turn theSmartKey topositio n0092
(Y page 118)inthe ignition lock. X
Slowl yturn cap0043half aturn counter-clock-
wise toallow excess pressureto escape .
X Turn cap0043further <004600520058005100570048005500100046004F00520046004E005A004C0056
0048[ and
remove it.
If the coolant isat the level ofmarker bar
0087 inthe fillerneck when cold,there is
enough coolant incoolant expansion
tank 0044.
If the coolant levelisappro ximately 0.6in
(1.5 cm)above marker bar0087inthe filler
neck when warm, thereisenough coolant in
expansion tank0044.
X Ifnecessary ,add coolant thathasbeen tes-
ted and appro vedbyMercedes-Benz.
X Repl acecap 0043and turn itclockwise asfar
as itwil lgo.
Further information oncoolant (Ypage 301).
Windshie ldwashe rsystem G
WARNING
Certai ncomponents inthe engine compart-
ment, suchasthe engine, radiator andparts
of the exhau stsystem, canbecome very
hot. Working inthe engine compartment
poses arisk ofinjury.
Where possible,let the engine cooldown
and touch onlythecomponents describedin
the follow ing. G
WARNING
If you open thehood when thedrive system
has overhea tedorduri ngafire inthe engine
compartment, youcould come intocontact
with hotgases orother escapi ngopera ting
flui ds. There isarisk ofburns.
Let the overhea tedcomponents cooldown
before opening thehood. Inthe event ofa
fire inthe engine compartment, keepthe
hood closed andcallthefire service. G
WARNING
Windshi eldwash erconcentrate ishighl y
flamma ble.Ifwindshi eldwash erconcentrate
gets onto hotcomponents ofthe engine or
the exhau stsystem, itcan ignite. Thereisa
risk offire and injury. Eng
inecompar tment
243Maintenanc eand care
Z
Page 247 of 306
Maintaining
thetime-dependent servicesched-
ule:
X Note down theservice duedate display edin
the multifunction displaybeforedisconnec t-
ing the battery.
or X Aft erreconn ectingthebattery, subtract the
battery disconnec tionperiods fromtheser-
vice date shown onthe display . Hiding
service displays
X Press the0076 or0038 button onthe steer-
ing wheel. Showing
servicedisplays
X Switch onthe ignition.
X Press 0059or0065 onthe steering wheel
to select theServ. Serv.
menu.
X Press 0063or0064 toselect theASSYST ASSYST
PLUS PLUS
submenu andconfirm bypressing the
0076 button.
The service duedate appears inthe multi-
funct iondisplay . Informat
ionabout Service
Resetting theASSYST PLUSservice
interval display !
If
the ASS YST PLUS service interval dis-
play hasbeen inadvertent lyreset, thisset-
ting canbecorrect edataqual ified special-
ist workshop.
Have service workcarried outasdescribed
in the Maintenanc eBooklet. Thismay other-
wise leadtoincreased wearanddamage to
the major assemblies orthe vehicle.
A qual ified specialist workshop, e.g.anauthor-
ized Mercedes-Ben zCenter, willreset the
ASS YST PLUS service interval displayafterthe
service workhasbeen carried out.Youcan
also obtain further information onmainte-
nance work,forexample. Special
servicerequirements The
specified maintenanc einterval takesonly
the normal operation ofthe vehicle into
account. Serviceworkwillneed tobe per-
formed moreoften ifthe vehicle isoperated
under arduou scondition sor increased loads.
The ASSYST PLUS service interval displayis
only anaid. Thedriver ofthe vehicle isrespon-
sible forwhether serviceworkwillneed tobe
performed morefrequently thanrequired asa
result ofthe actual operating conditions
and/or loads.
Examples ofarduou soperating conditions:
R regular citydriving withfrequent intermedi-
ate stops
R the vehicle isprimarily usedtotravel short
distances
R frequent useinmountainous terrainoron
poor roadsurfaces
R the engine isoften leftidling forlong peri-
ods
R particularly dustycondition s,or ifair-recir-
culation modeisfrequently used
In these orsimilar operating conditions,have
the interior filter,airfilter, engine oiland oilfil-
ter, forexample, changedmorefrequently.
Under arduou soperating conditions,the tires
must becheck edmore often. Further informa-
tion canbeobtained ataqual ified specialist
workshop.
Driving abroad An
exten siveMercedes-Ben zService network
is also availa bleinother countr ies.You can
obtain further information fromanyauthorized
Mercedes-Ben zService Center. Care
Notes
oncare H
Environmental
note
Dispose ofempty packaging andcleaning
cloths inan environm entallyresponsible
manner.
! When
cleaning yourcar,donot use:
R dry, coarse orhard cloths
R abrasive cleaningagents Care
245Maintenance andcare Z
Page 263 of 306
R
Make surethatthepositive terminal ofaconn ected battery doesnotcome intocontactwith
vehicle parts.
R Never placemetal object sor tools onabattery.
R Itis important thatyouobserve thedescribed orderofthe battery terminals whenconnect-
ing and disconnec tingabattery.
R When jump-st arting,makesurethatthebattery poleswithidentical polarityareconn ected.
R Itis particularly importanttoobserve thedescribed orderwhenconnecting anddisconnec t-
ing the jumper cables.
R Never connectordisconnec tthe battery terminals whiletheengine isrunning. G
WARNING
A discharged batterycanfreeze attemperatures belowfreezing point.Whenjump-st artingthe
vehicle orcharging thebattery, gasescanescape fromthebattery. Thereisarisk ofan explo-
sion.
Allow thefrozen battery tothaw outbefore charging itor jump-st arting.
! Avoid
repeated andlengthy startingattempt s.Otherwise, thecatalytic convertercould be
damaged bythe non- combusted fuel.
If the indicator/warnin glamps donot light upatlow temperatures, itis very likely thatthedis-
charged batteryhasfrozen .In this case, youmay neither chargethebattery norjump-st artthe
vehicle. Theservice lifeofathawed-out batterymaybeshorter. Thestartin gcharacterist icscan
be impaired, particularly atlow temperatures. Havethethawed-out batterycheckedataqual i-
fied specialist workshop.
Do not start thevehicle usingarapid charging device.Ifyour vehicle's batteryisdischarged, the
engine canbejump-st artedfromanother vehicleorfrom adonor battery usingjumper cables.
Observe thefollowing points:
R The battery isnot accessible inall vehicles. Ifthe other vehicle's batteryisnot accessible,
jump-st artthe vehicle usingadonor battery orajump-st artingdevice.
R You may onlyjump-st artthe vehicle whentheengine andexhaust systemarecold.
R Do not start theengine ifthe battery isfrozen .Let the battery thawfirst.
R Only jump-st artfrom batteries witha12 Vvoltage rating.
R Only usejumper cableswhichhaveasufficient cross-sectionandinsulated terminalclamps.
R Ifthe battery isfully discharged, leavethebattery thatisbeing usedtojump-st artconn ected
for afew minutes beforeattempt ingtostart. Thischarges thebattery slightly.
R Make surethatthetwo vehicles donot touch.
Make surethat:
R The jumper cablesarenot damaged.
R Bare parts ofthe terminal clampdonot come intocontactwith other metal partswhile the
jumper cablesareconn ected tothe battery.
R The jumper cablescannot comeintocontactwith parts which canmove whentheengine is
running, suchasthe V-belt pulleyor the fan.
X Secure thevehicle byapply ingthe electric parking brake.
X Shift thetransmission toposition 005D.
X Make surethattheignition isswitched off.Allindicator lampsinthe instrumen tcluster must
be off. When usingtheSmartK ey,turn theSmartK eytoposition 0092inthe ignition lockand
remove it(Y page 118). Jump
-starting
261Breakdown assistance Z
Page 266 of 306
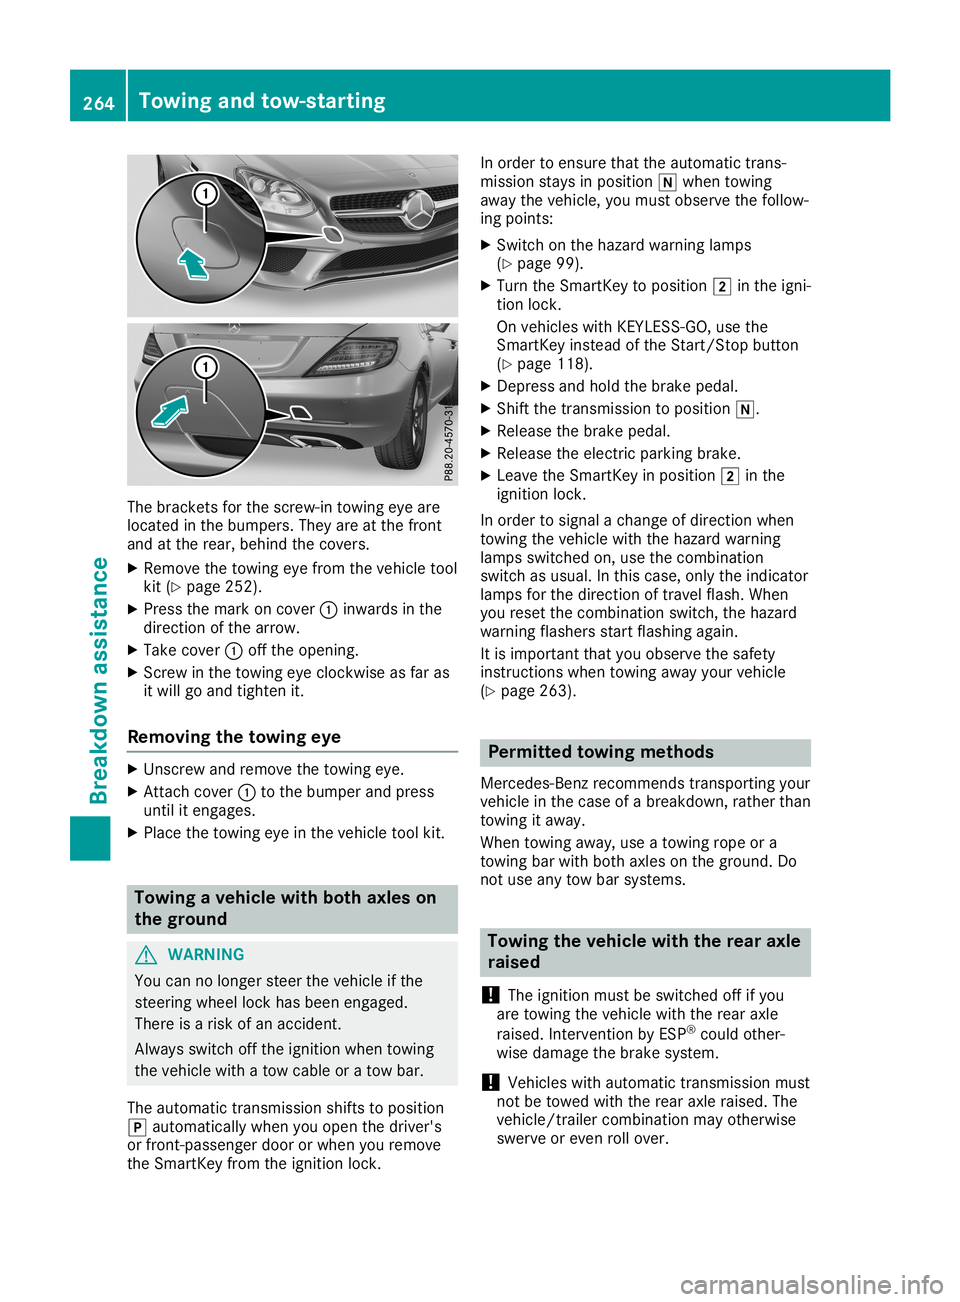
The
bracket sfor the screw-in towingeyeare
located inthe bumpers. Theyareatthe front
and atthe rear, behind thecovers.
X Remove thetowing eyefrom thevehicle tool
kit (Ypage 252).
X Press themark oncover 0043inwards inthe
direction ofthe arrow.
X Take cover 0043offthe opening.
X Scr ew inthe towing eyeclock wiseasfar as
it will goand tighten it.
Removing thetowing eye X
Unsc rewand remove thetowing eye.
X Attach cover 0043tothe bumper andpress
until itengages.
X Place thetowing eyeinthe vehicle toolkit. Towing
avehicle withboth axles on
the ground G
WARNIN
G
You cannolonger steerthevehicle ifthe
steerin gwheel lockhasbeen engaged.
There isarisk ofan accident .
Always switchoffthe ignition whentowing
the vehicle withatow cable oratow bar.
The automatic transmission shiftstoposition
005D automatically whenyouopen thedriver's
or front -passenger doororwhen youremove
the Smart Keyfrom theignition lock. In
order toensure thattheautomatic trans-
mission staysinposition 005Cwhen towing
away thevehicle, youmust observe thefollow-
ing points:
X Switch onthe hazard warning lamps
(Y page 99).
X Turn theSmart Keytoposition 0048inthe igni-
tion lock.
On vehicles withKEYLE SS-GO, usethe
Smart Keyinstead ofthe Start /Stopbutton
(Y page 118).
X Depress andhold thebrake pedal.
X Shift thetrans mission toposition 005C.
X Release thebrake pedal.
X Release theelectric parking brake.
X Leave theSmart Keyinposition 0048inthe
ignition lock.
In order tosignal achange ofdirection when
towing thevehicle withthehazard warning
lamps switched on,use thecombinat ion
switch asusual. Inthis case, onlytheindicator
lamps forthe direction oftravel flash.When
you reset thecombinat ionswitch, thehazard
warning flashersstartflashing again.
It is important thatyouobserve thesafety
instr uctions whentowing awayyourvehicle
(Y page 263). Permit
tedtowing methods
Mercedes- Benzrecomm endstransportin gyour
vehicle inthe case ofabreakdown, ratherthan
towing itaway .
When towing away,use atowing ropeora
towing barwith both axles onthe ground. Do
not use anytow barsystems. Towing
thevehicle withtherear axle
raised
! The
ignition mustbeswitched offifyou
are towing thevehicle withtherear axle
raised. Intervent ionbyESP ®
could other-
wise damage thebrake system.
! Vehicles
withautomatic transmission must
not betowed withtherear axle raised. The
vehicle/t railercombinat ionmay otherwise
swerve oreven rollover. 264
Towing
andtow-sta rtingBr eakdown assistance
Page 268 of 306
X
Make surethattheignition isswitched off
(Y page 118).
or
X When usingtheSmartK ey,turn theSmart-
Key toposition 0092inthe ignition lockand
remove it(Y page 118).
X Secure thevehicle against rollingaway
(Y page 134).
All indicator lampsinthe instrumen tcluster
must beoff.
The fuses arelocated invarious fuseboxes:
R Fuse boxinthe engine compartmen ton the
left-hand sideofthe vehicle, whenviewed in
the direction oftravel
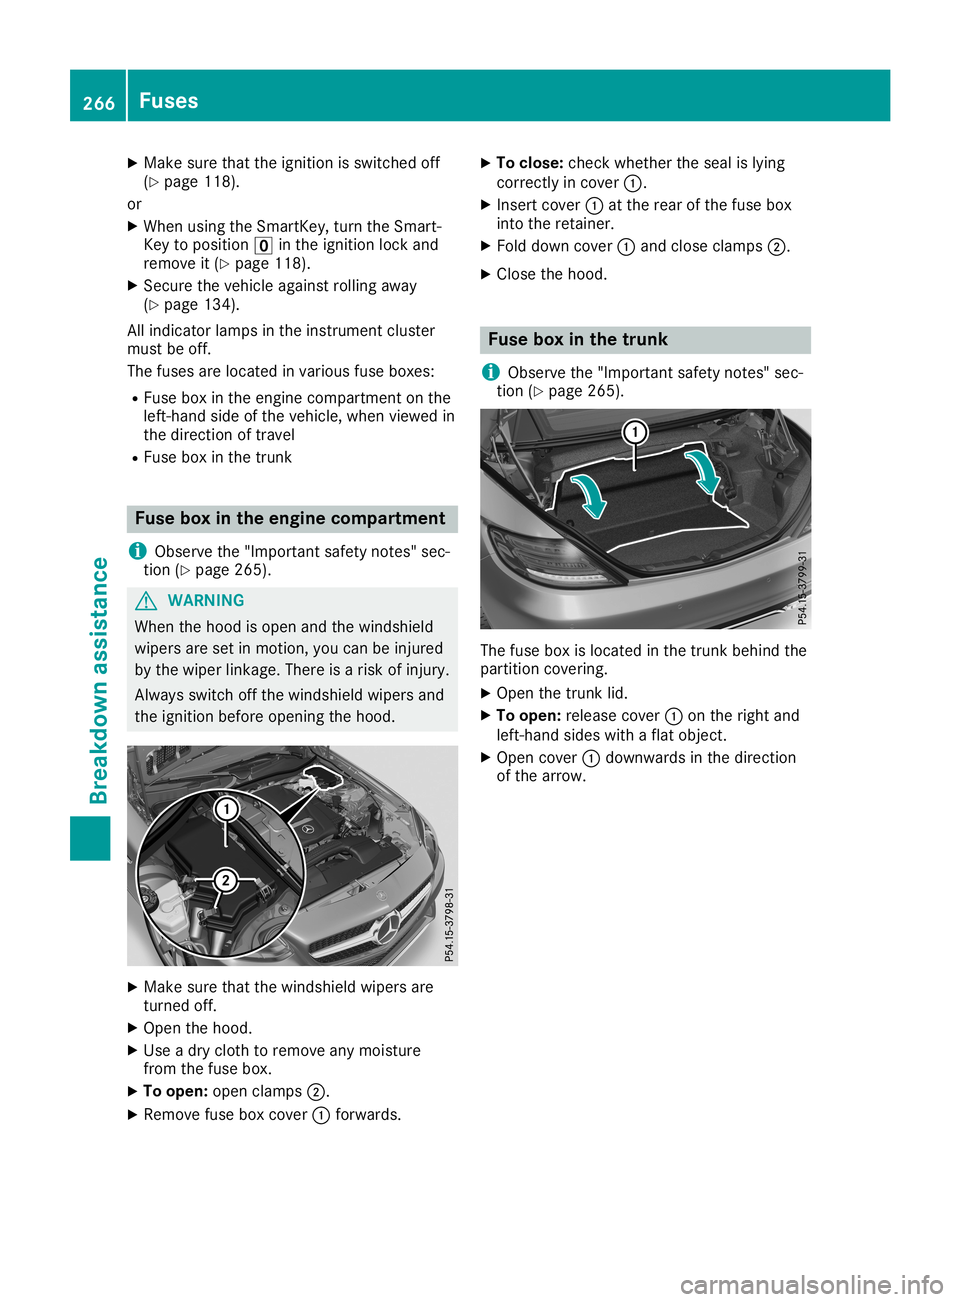
R Fuse boxinthe trunk Fuse
boxinthe engine compart ment
i Observe
the"Important safetynotes" sec-
tion (Ypage 265). G
WARNING
When thehood isopen andthewindshield
wipers aresetinmotion, youcan beinjured
by the wiper linkage. Thereisarisk ofinjury.
Always switchoffthe windshield wipersand
the ignition beforeopening thehood. X
Make surethatthewindshield wipersare
turned off.
X Open thehood.
X Use adry cloth toremove anymoisture
from thefuse box.
X To open: openclamps 0044.
X Remove fuseboxcover 0043forwards. X
To close :check whether theseal islying
correct lyin cover 0043.
X Insert cover0043atthe rear ofthe fuse box
into theretainer.
X Fold down cover 0043and close clamps 0044.
X Close thehood. Fuse
boxinthe trunk
i Observe
the"Important safetynotes" sec-
tion (Ypage 265). The
fuse boxislocated inthe trunk behind the
partition covering.
X Open thetrunk lid.
X To open: release cover0043onthe right and
left-hand sideswithaflat object .
X Open cover 0043downwards inthe direction
of the arrow. 266
FusesBr
eakdown assistance
Page 279 of 306
If
the wheel positio nson the vehicle arerota-
ted, thetire pressu resmay bedispl ayedfor
the wrong positionsfor ashort time.Thisis
rectified afterafew minutes ofdriving, andthe
tire pressu resare displ ayedfor the correct
positio ns.
Restarting thetire pressure monitor When
yourestart thetire pressu remonitor, all
existing warning message sare dele tedand the
warning lampsgo out. Themonitor usesthe
currently settire pressu resasthe reference
valu esfor monitoring. Inmost cases, thetire
pressu remonitor willautoma ticallydetect the
new reference valuesafter youhave changed
the tire pressu re.However, youcan also set
reference valuesmanua llyas describe dhere.
The tirepressu remonitor thenmonitors the
new tirepressu revalu es.
X Set thetire pressu reto the valu erecom-
mended forthe corresponding drivingsitua-
tion onthe Tire andLoadi ngInformation
pla card onthe driver's sideB-pilla r
(Y page 270).
Additional tirepressu revalu esfor different
load scan also befound onthe tire pressu re
table onthe inside ofthe fuel fillerflap
(Y page 270).
X Make surethatthetire pressu reiscorrect
on allfour wheel s.
X Ensure thattheSmartKey isin positio n0048
in the ignition lock.
X Press the0059 or0065 button onthe steer-
ing wheel toselect theServ. Serv.
menu.
X Press the0063 or0064 button toselect
Tire Pressure Tire
Pressure.
X Press 0076.
The multifu nctiondisplayshows thecurrent
tire pressu refor the individ ualtires orthe
Tire pressure willbedisplayed Tire
pressure willbedisplayed
after driving afew minutes after
driving afew minutes message.
X Press the0064 button.
The Use Current Pressures asNew Use
Current Pressures asNew
Reference Values Reference
Valuesmessage appearsinthe
multifu nctiondisplay.
If you wishto con firm therestart:
X Press 0076.
The Tire Press. Monitor Restarted Tire
Press. Monitor Restarted
messag eappe arsinthe multifu nctiondis-
pla y. After
driving forafew minutes, thesystem
checks whether thecurrent tirepressu res
are within thespecifie drange. Thenew tire
pressu resare then accepted asreference
valu esand monitored.
If you wishto canc elthe restart:
X Press 0038.
The tirepressu revalu esstored atthe last
restart willcontinue tobe monitored. Tire
pressure
277Wheelsand tires Z