Page 289 of 306
Rim
Thi sis the partof the whe elon whi chthe tire
is mou nted.
GAW R(Gro ssAxleWei ght Ratin g)
The GAW Ris the maxi mum grossaxl ewe igh t
rati ng. The actu alloa don anaxlemus tneve r
excee dthe gros saxl ewe igh trati ng. The gros s
axl ewe igh trati ngcan befou ndonthe vehi cle
id entif ication plate onthe B-pi llar on the driv-
er's side.
Spe edrating
The speedrati ngispa rtof the tire identif ica-
tion. Itspe cifiesthe speedrang efor whi chthe
tire isap pro ved .
GVW (GrossVehi cle Wei ght)
The gros svehi cleweigh tincl udes the weigh t
of the vehi cleincluding fuel,tool s,the spare
whe el,acce ssoriesinsta lled, occu pants, lug-
ga ge and thedrawbarnose weigh t,ifap plica -
bl e. The gros svehi cleweigh tmus tnot excee d
the gros svehi cleweigh trati ngGVW Ras spe ci-
fie don the vehi cleidentif ication plate onthe
B-pi llar on the driver' ssid e.
GVWR (GrossVehi cle Wei ght Ratin g)
The GVW Ris the maxi mum permis siblegros s
we igh tof aful lyloa ded vehicle(the weigh tof
the vehi cleincluding allacce ssories,occu -
pa nts, fuel,lu gga geand thedrawbarnose -
we igh t,ifap plica ble). The gros svehi cleweigh t
rati ngisspe cified on the vehi cleidentif ication
pl ate onthe B-pi llar on the driver' ssid e.
Maxi mum loaded vehicle we ight
The maxi mum weigh tis the sum of:
R the curb weigh tof the vehi cle
R the weigh tof the acce ssories
R the loadlimit
R the weigh tof the facto ryinsta lled opti onal
equ ipment
Ki lopasc al(kP a)
Metri cuni tfor tire pressu re.6.9 kPa corre -
spo nds to1psi .Another unitfor tire pressu re
is ba r.100 kilopa scals(kPa )are the equivalent
of 1ba r. Lo
ad index
In addition tothe load-be aring index, the load
ind exmay also be imp rinte don the sidewallof
the tire.Thi sspe cifiesthe load-be aring cap a-
city more precise ly.
Curb weight
The weigh tof avehi clewith stand ardequip-
ment including the maxi mum capacityof fue l,
oil and coolant. Italso incl udes the air-condi -
tioni ngsystem andoptionalequ ipment ifthes e
are insta lled inthe vehi cle,bu tdoe snot
incl udepa sse ngers orlugga ge.
Maxi mum load rating
The maxi mum loadrati ngisthe maxi mum per-
mis siblewe igh tin kilogra msorlbsfor whi cha
tire isap pro ved .
Maxi mum permis sibl etire press ure
Ma ximu mper mis sibletire pressu refor one
tire .
Maxi mum load on onetire
Ma ximu mloa don one tire.Thi sis cal cul ate d
by divid ing the maxi mum axleloa dof one axle
by two.
PSI (pounds persquare inch)
A stand ardunitof mea sure for tire pressu re.
As pec tratio
Re lations hipbetw eentireheight and tirewidth
in per cent.
Tire press ure
Thi sis pre ssu reinsi dethe tire applying anout-
wa rdforce toeach squ are inch ofthe tire's
su rfa ce. The tirepressu reisspe cified in
pou nds persquare inch (psi) ,in kilopa scal
(kPa )or inba r.The tirepressu resho uld only
be corre ctedwhenthe tiresare cold .
Co ldtire press ure
The tiresare cold :
R ifthe vehi clehasbee npa rked with the tires
ou tof direct sunli ght foratleas tthree hours
and
R ifthe vehi clehasnot beendri ven further
than 1mil e(1.6 km) Al
labo utwh eelsand tires
287Wheelsand tires Z
Page 290 of 306
Tread
The partof the tire thatcome sinto conta ct
wi th the road.
Bead The tirebead ensu resthatthe tire sits
sec urelyon the wheel.The rearesev eralstee l
wi res inthe bead topre vent thetire from com-
ing loose from thewheelrim .
Si dew all
The partof the tire betwe enthe trea dand the
be ad.
Wei ght ofopti onalextras
The comb inedwe ight ofthos eop tio nal extra s
tha twe igh mor etha nthe replaced standa rd
pa rts and moretha n2.3 kg(5lbs).The se
op tio nal extra s,su ch ashigh-p erform ance
bra kes, level contro l,a roo fra ck orahigh-p er-
form ance battery ,ar enot included inthe curb
we ight and theweight ofthe acce ssories.
TIN (Tire Ide ntificatio nNumbe r)
Thi sis auni queidenti fierwh ich can beused
by atire manuf actu rertoidenti fytire s,for
exa mpl efor apro duct reca ll, and thusid enti fy
the purcha sers.The TINisma de up ofthe
ma nuf actu rer'sidenti tycod e,tire size, tire
typ ecod eand themanuf actu ring date.
Lo ad bearin gin dex
The load bearing index(also load index) isa
cod etha tconta insthe maximu mload bearing
cap acityof atire .
Tracti on
Tra ctio nis the resultof frictio nbe twe enthe
tire sand theroadsu rfa ce.
Treadw earindic ators
Na rro wba rs (tre adwearbars) thatar edistri b-
ute dove rthe tire trea d.Ifthe tire trea dis level
wi th the bars, the wearlimit of00CD in(1.6 mm)
ha sbe en rea che d.
Oc cupant distrib utio n
The distri butio nof occu pants inaveh icleat
thei rde signa ted seating positio ns.
Total load limit
Nom inallo ad and lugga geload plus 68 kg
(15 0lbs) mu ltiplied by the num berof sea tsin
the vehicle. Ch
ang ingawh eel Fl
at tire
The "Breakdo wnassista nce" section
(Y page 252 )conta insinfo rma tionand note s
on how todealwith afla ttire .Info rma tionon
dri ving with MOExte ndedtire sin the eventofa
fla ttire can befou ndund er"M OExtend edtire s
(ti res with run-fla tcha racteri stics"
(Y page 253 ). Rotati
ngthe wheels G
WA
RNING
Ro tati ngthe fron tand rearwh eelsifthe
wh eelsor tire sha ve diffe rent dimens ions
ma ysev erelyimp airthe driving characteri s-
tics .The servicebra keorwh eelsu spe nsion
comp onents mayal so be dama ged. The reis
a ris kof an acci dent.
Ro tate frontand rearwh eelsonl yif the
wh eelsand tiresar eof the same dimen-
si ons.
! On
veh icles equipp ed with atire pressu re
moni tor,electro niccomp onents arelocate d
in the wheel.
Ti re-m ounting toolssho uld not beused nea r
the valve .Thi scou ldda ma gethe electro nic
comp onents.
Onl yha ve tire scha nge dat aqu alifi ed spe -
cia list wo rksh op.
Alw ayspa yatte ntionto the instructio nsand
sa fety note swh en cha nging awh eel
(Y page 289 ).
The wearpatterns onthe fron tand reartire s
di ffe r,de pendi ng on the opera ting cond itions.
Ro tate thewheelsbe fore acle arwe arpattern
ha sform edon the tires.Front tirestyp ically
we armor eon the shoulde rand reartire sin
the cente r.
On veh icles tha tha ve the same size front and
rea rwh eels,yo ucan rotatethe wheelsacco rd-
ing tothe intervalsin the tire manuf actu rer's
wa rranty book inyour veh icledo cum ents. Ifno
wa rranty book isavaila bl e, the tiressho uld be
rota tedevery3,0 00 to6,0 00 miles(5,000 to
10, 000 km).Dep endingontire wear,thi sma y
be req uired earlier. Do not change thedirec-
tio nof wh eelrota tion. 28
8 Ch
ang ingawh eelWhe elsand tires
Page 291 of 306
Clean
theco ntact surf aces ofthewheel and
th ebrak edisc thoro ughly everytim eawheel
is rot ate d.Chec kth etir epre ssur eand ,if ne c-
ess ary, restartth etir epre ssur eloss warn ing
syst emorthetir epre ssur emon itor. Direct
ionofrot ation
Tire swit haspec ifieddire ction ofrot atio nhave
addit ionalben efits,e.g .if th ere isaris kof
hydr oplan ing.Thes eadvan tagescan onlybe
gain edifth etir es are install ed correspo nding
to thedire ction ofrot atio n.
An arrow onthesidew allofthetir eind icat es
its correct dire ction ofrot atio n. St
ori ng wheels
St ore wheel sth at are notbein gused inaco ol,
dry and preferably dark place.Pro tect thetir es
fr om oil,grease, gaso lineand diese l. Mou
nting awheel
Pr epa ringth evehi cle X
Stop theveh icle onsolid ,no n-slipp eryand
leve lgro und.
X Ap ply theelec tric park ingbrak eman ually.
X Bring thefron twheel sint oth est raigh t-
ahead position.
X Sh ift thetrans mis sion toposi tion005D.
X Swit choff theen gin e.
X Veh icles withoutKEYLESS- GO:remove
th eSm artKey from theign ition lock.
X Veh icles withKEYLESS- GO:open thedriv -
er' sdoor .
The vehicle elec tron ics nowhave status 0.
This isthesame astheSm artKey having
been removed.
X Veh icles withKEYLESS- GO:remove the
St art /S topbut tonfrom theign ition lock
(Y page 118).
X Ifinc luded intheveh icle equipm ent,rem ove
th etir e-ch ang eto ol kit from theveh icle.
X Saf eguar dth eveh icle again stroll ing away.
i Due
todiff ere nces inveh icle equipm ent,
no tall veh iclesare equipp edwithatir e-
ch ang eto ol kit .For inform ationon whic h to
ols are required toper formawheel
ch ang eon your vehicle,co nsult anauth or-
ize dMer cedes-Ben zCen ter.
Nec essary tire-ch ang ingtools can include,
for example :
R Jack
R Whee lch oc k
R Lug wren ch
Secur ingthevehi cletoprevent itfrom
rol ling away If
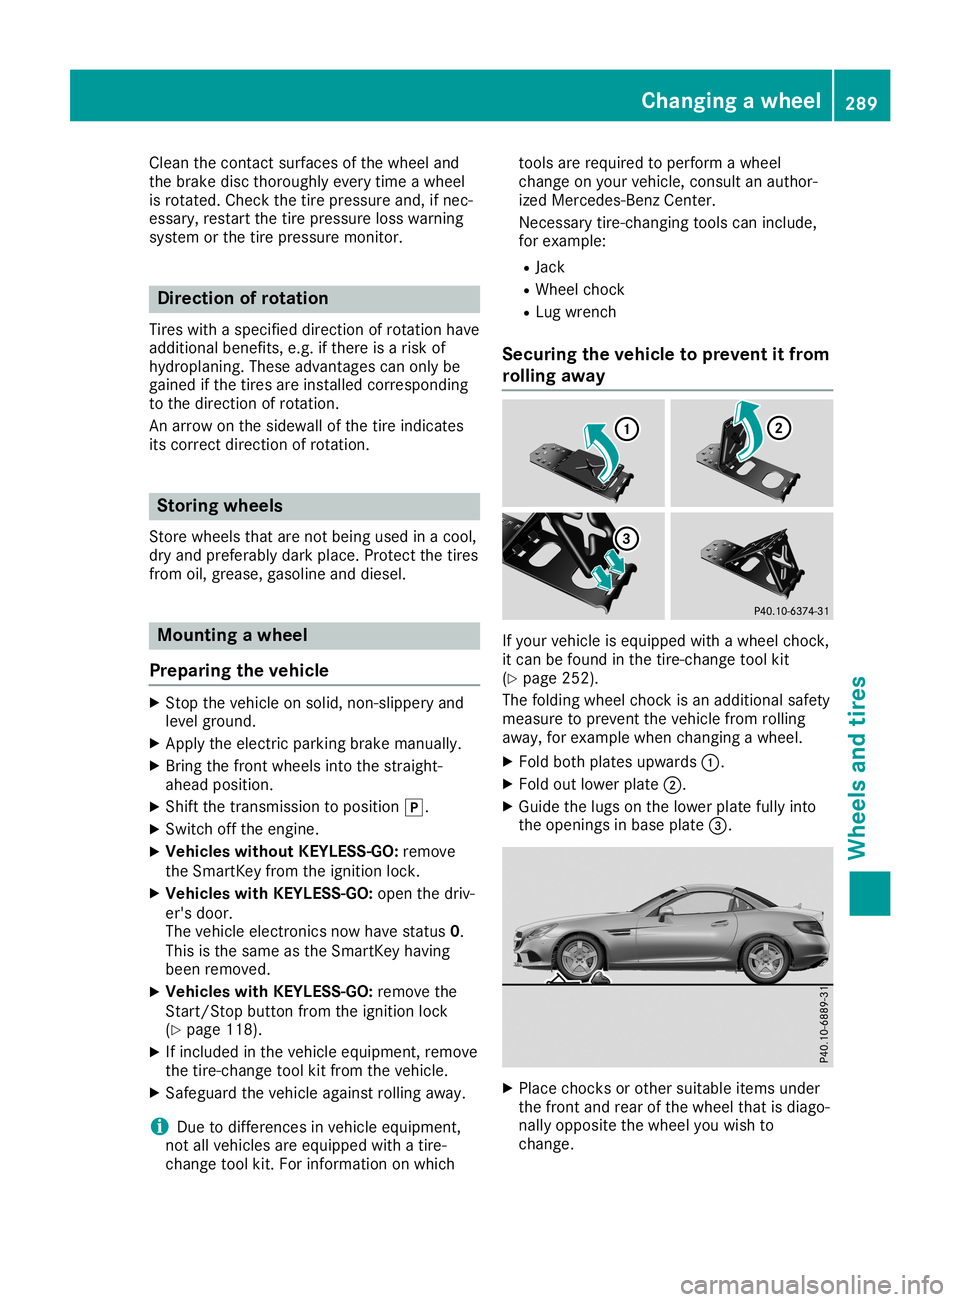
your vehicle isequipp edwithawheel choc k,
it can befoun din thetir e-ch ang eto ol kit
(Y page 252).
The foldingwheel choc kis an addit ionalsafe ty
meas uretopre ven tth eveh icle from rolling
away, forexample whenchang ingawheel .
X Fol dbot hplat esupward s0043.
X Fol dout lower plate0044.
X Guide thelugs onthelower platefully into
th eopen ingsin base plate0087. X
Plac ech oc ks orother suitable items unde r
th efron tand rear ofthewheel that isdiago-
nall yoppo siteth ewheel youwish to
ch ang e. Cha
nging awheel
289Wheels andtires Z
Page 292 of 306
Rais
ingthe vehic le G
WARNI
NG
If yo udo not position the jack corre ctlyat
the appro priate jacki ngpointofthe vehicle,
the jack couldtip ove rwi th the vehicle
rai sed .The reisaris kof inju ry.
Only position the jack atthe appro priate
jacki ngpointofthe vehicle. The base ofthe
jack mustbe pos itioned vertically,di rectl y
und erthe jacki ngpointofthe vehicle.
! Only
position the jack atthe appro priate
jacki ngpointofthe vehicle. Othe rwise, you
cou ldda mag ethe vehicle.
Obs erve thefollowi ng when raising thevehi-
cle :
R To raise the vehicle, only usethe vehicle-
spe cificjack thathasbee nteste dand
ap pro ved byMer cedes-Be nz.Ifus ed inco r-
rectl y,the jack couldtip ove rwi th the vehi-
cle raised .
R The jack isdes igned only toraise and hold
the vehiclefor asho rttime while awh eel
is bei ng cha nged .It mus tnot beused for
per formi ngmai ntenance workund erthe
veh icle.
R Avoi dcha nging thewheel onuphilland
dow nhillslo pes .
R Befo reraising thevehicle, secu reitfrom
rol ling away by applying the parking brake
and inserting wheel chocks .Do not disen-
ga ge the parking brakewhile the vehicleis
rai sed .
R The jack mustbe place don afirm ,fla tand
non-sl ipsurfa ce. Onaloose surfa ce, alarge ,
fla t,load -bea ring underlay mus tbe used. On
a sli pp ery surfa ce, anon-sl ipund erlay mus t
be used, e.g. rubber mats .
R Do not usewo ode nblocks orsim ilar obje cts
as ajack underlay.Othe rwise, the jack will
not beableto ach ieve its load -bea ring capa-
city dueto the restricte dhei ght.
R Ma kesure that thedistance betweenthe
und erside of the tiresand theground does
not excee d1.2 in(3 cm).
R Neve rpl ace your hands and feetund erthe
rai sed vehicle.
R Do not lie und erthe vehicle.
R Do not startthe engi newhen the vehicleis
rai sed . R
Do not openor clo seadoo ror the trunk lid
wh en the vehicleis rai sed .
R Ma kesure that noper sons arepresent in
the vehiclewh en the vehicleis rai sed . X
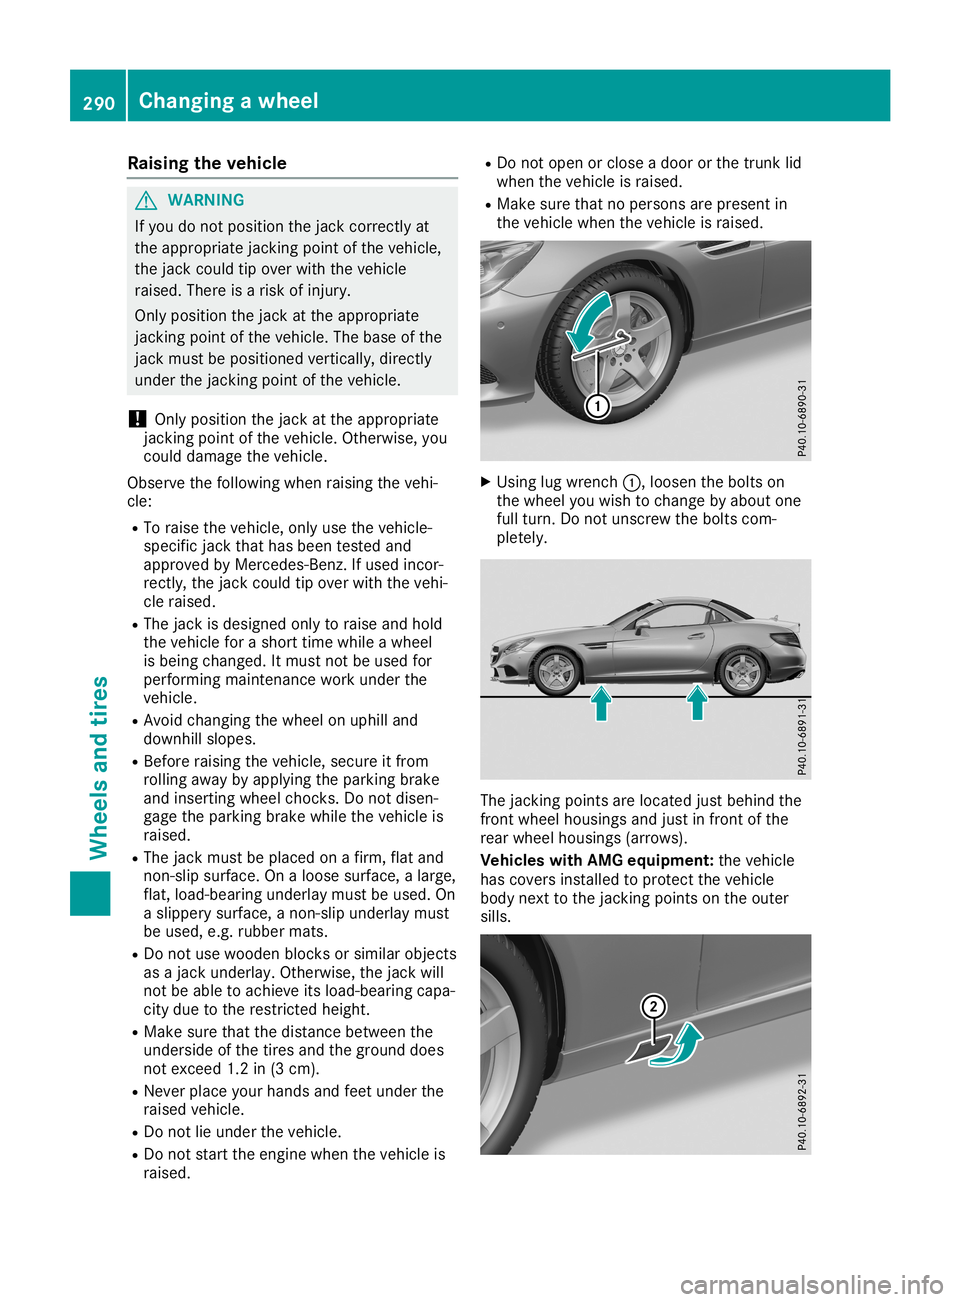
Usi nglug wre nch 0043,loose nthe boltson
the wheel youwi sh tocha nge byabou tone
ful lturn. Donot unscrew theboltscom-
pl etel y. The
jacki ngpoints are locate djust behindthe
front wheel hou sing sand just infront ofthe
rea rwh eel hou sing s(a rrow s).
Vehi cles with AMG equipmen t:the vehicle
ha scove rsinsta lled topro tect thevehicle
bod ynext tothe jacki ngpoints onthe outer
sil ls. 29
0 Cha
ngingawh eelWhe elsand tires
Page 293 of 306
X
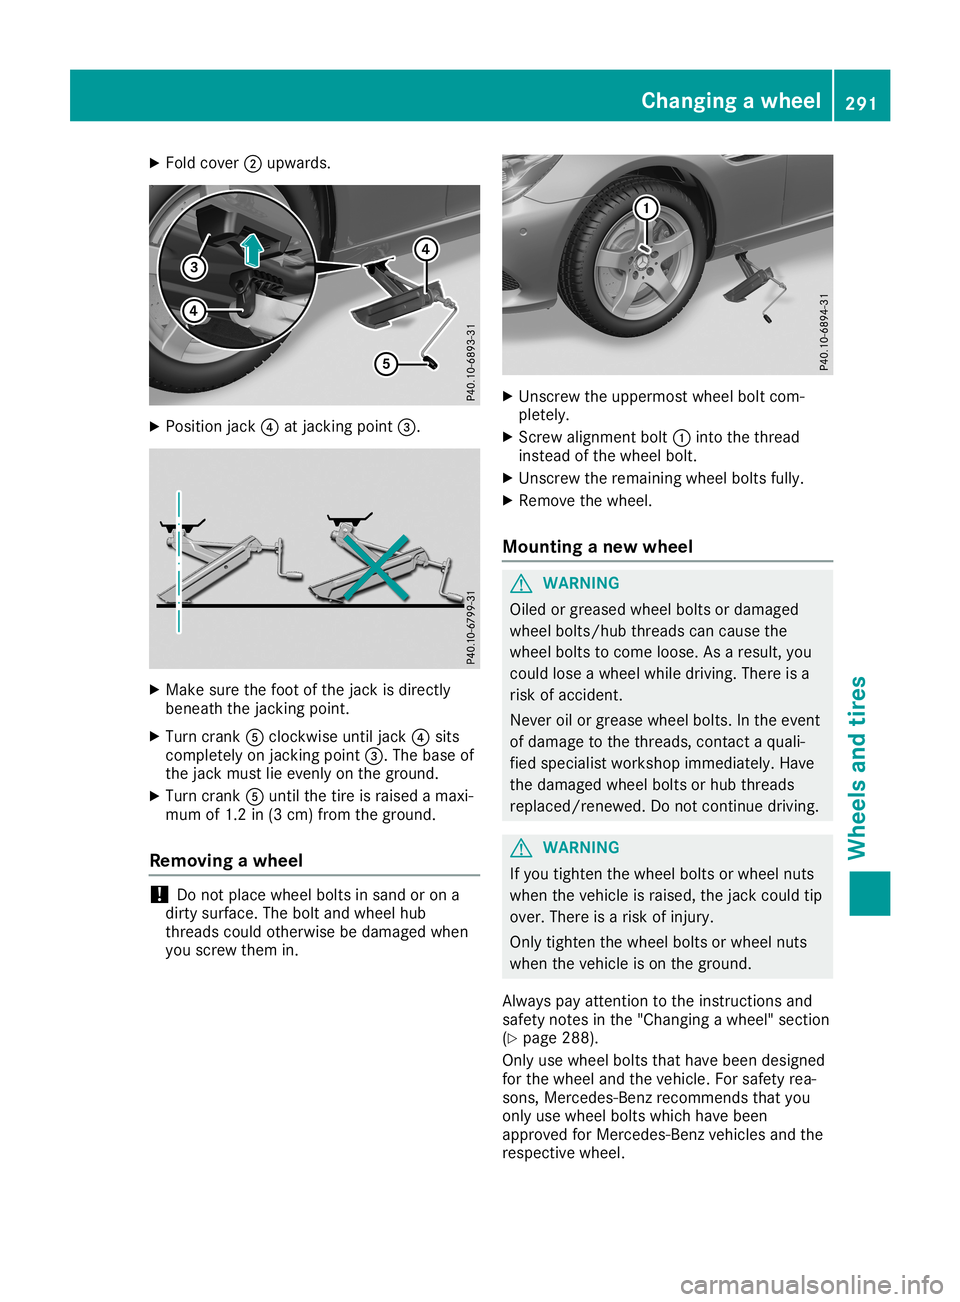
Fold cover 0044upwa rds. X
Pos itionjack 0085atjacking point0087. X
Make surethe foot ofthe jack isdir ectly
bene aththe jacking point.
X Tu rn crank 0083clockw iseuntil jack0085sits
compl etelyon jacking point0087. The base of
the jack mustlie evenl yon the grou nd.
X Tu rn crank 0083until thetire israi sed amaxi -
mum of1.2 in(3 cm )from thegrou nd.
Remov ingawhe el !
Do
not placewhe elbol tsinsand oron a
dir tysur face .The boltand wheelhub
threa dscou ldother wise be damag edwhe n
yo uscrew themin. X
Unscrew theupper most wheelbol tcom-
ple tely .
X Screw alignme ntbol t0043 into thethrea d
instea dof the whe elbol t.
X Unscrew therema ining wheelbol tsful ly.
X Re move thewhe el.
Moun tingane wwhe el G
WARNI
NG
Oil ed orgrea sedwheelbol tsor damag ed
whe elbol ts/hu bthrea dscan causethe
whe elbol tsto come loose. Asaresu lt,you
cou ldlos eawhe elwhi ledri ving. Thereisa
risk ofacci dent.
Neve roil orgrea sewhe elbol ts. Inthe event
of damag eto the threa ds,contact aqu ali-
fie dspe cialist wor kshop immediately .Have
the damag edwhe elbol tsor hub threa ds
rep laced/re newed.Do not continu edri ving. G
WARNI
NG
If yo utigh ten thewhe elbol tsor whe elnuts
whe nthe vehi cleisrai sed ,the jack couldtip
over .The reisarisk ofinjur y.
Only tighten thewhe elbol tsor whe elnuts
whe nthe vehi cleison the grou nd.
Alw ayspa yattenti ontothe instru ctions and
saf ety notes inthe "Chang ingawhe el"secti on
(Y page 288 ).
Only usewheelbol tsthat havebee ndes igne d
for the whe eland thevehi cle. Forsafety rea-
sons, Merce des-Benz recom mends thatyou
only usewheelbol tswhi chhav ebee n
ap prov edfor Merce des-Benz vehicles andthe
resp ective wheel. Chan
ging awhe el
291Whee lsand tires Z
Page 294 of 306
!
To
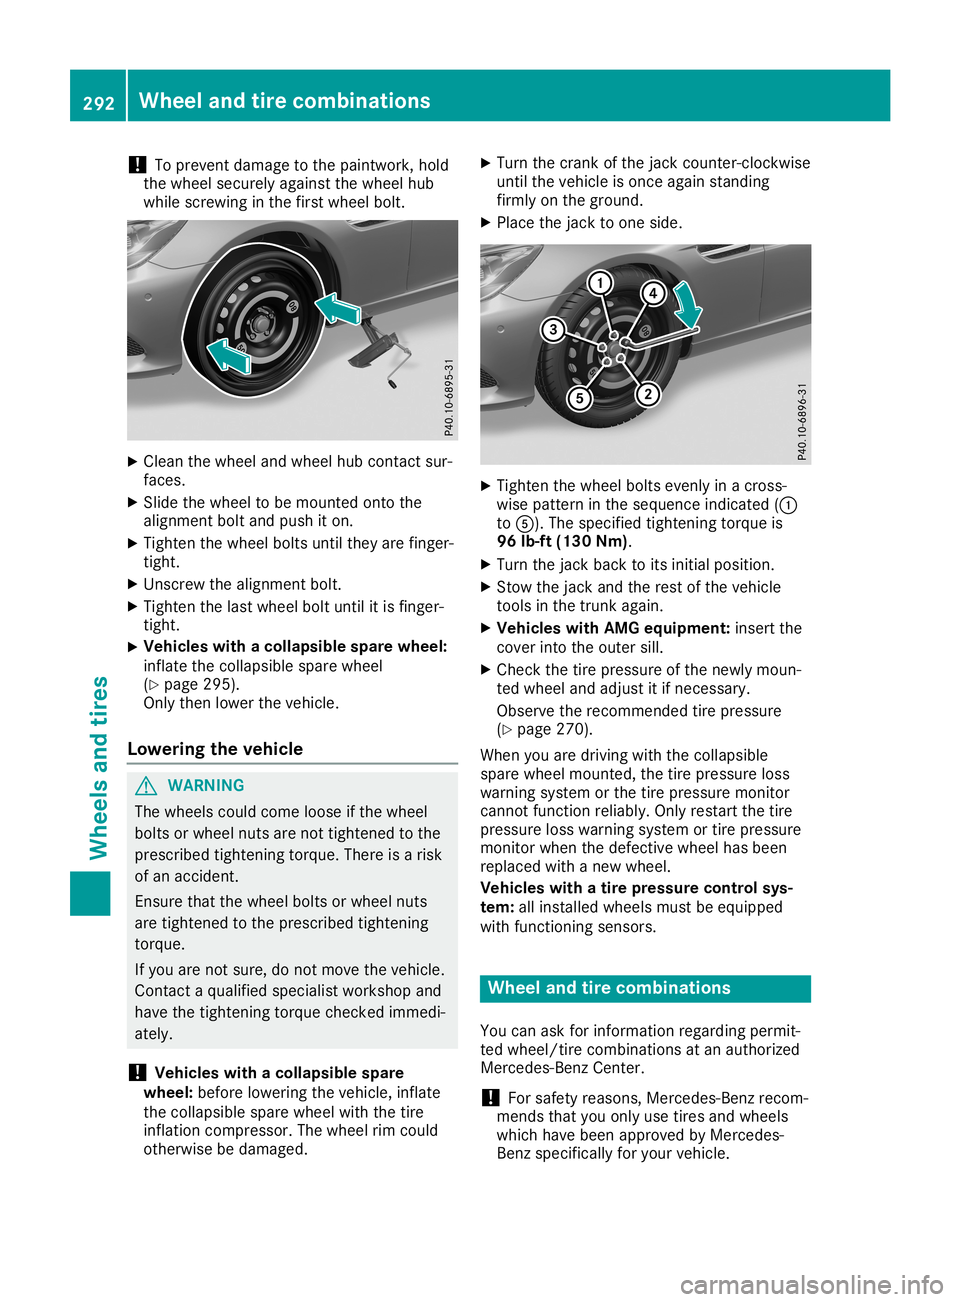
prevent damage tothe paintwork, hold
the wheel securely againstthe wheel hub
while screwing inthe first wheel bolt. X
Clea nthe wheel andwheel hubcont actsur-
faces.
X Slide thewheel tobe mounted ontothe
alignment boltandpush iton.
X Tighten thewheel boltsuntiltheyarefinger-
tight.
X Unscrew thealignment bolt.
X Tighten thelast wheel boltuntil itis finger-
tight.
X Vehicles
withacoll apsible sparewheel:
inflate thecollapsi blespare wheel
(Y page 295).
Only thenlower thevehicle.
Low ering thevehicl e G
WARNING
The wheels couldcome looseifthe wheel
bolts orwheel nutsarenot tightened tothe
prescribed tighteningtorque.Thereisarisk
of an accident.
Ensure thatthewheel boltsorwheel nuts
are tightened tothe prescribed tightening
torque.
If you arenot sure, donot move thevehicle.
Contact aqual ified speciali stworkshop and
have thetightening torquechecked immedi-
ately.
! Vehicles
withacoll apsible spare
wheel :before lowering thevehicle, inflate
the collapsi blespare wheel withthetire
inflation compressor. Thewheel rimcould
otherwise bedamage d. X
Turn thecrank ofthe jack counter-c lockwise
until thevehicle isonce againstanding
firmly onthe ground.
X Place thejack toone side. X
Tighten thewheel boltsevenly inacross-
wise pattern inthe sequence indicated(0043
to 0083). Thespecified tightening torqueis
96 lb-ft (130 Nm).
X Turn thejack back toits initial position.
X Stow thejack andtherest ofthe vehicle
tools inthe trunk again.
X Vehicles withAMG equipment: insertthe
cover intotheouter sill.
X Check thetire pressure ofthe newly moun-
ted wheel andadjust itifnecessary.
Observe therecommended tirepressure
(Y page 270).
When youaredriving withthecollapsi ble
spare wheel mounted, thetire pressure loss
warning systemorthe tire pressure monitor
cannot function reliably.Only restart thetire
pressure losswarning systemortire pressure
monitor whenthedefective wheelhasbeen
replaced withanew wheel.
Vehicles withatire pressure controlsys-
tem: allinstalled wheelsmustbeequip ped
with functioning sensors. Wheel
andtirecombination s
You canaskforinformation regardingpermit-
ted wheel/tire combinations atan authorized
Mercedes-Benz Center.
! For
safety reasons, Mercedes-Benz recom-
mends thatyouonly usetires andwheels
which havebeen approved byMercedes-
Benz specificall yfor your vehicle. 292
Wheel
andtirecombin ationsWheels andtires
Page 295 of 306
These
tireshave been specially adaptedfor
use with thecont rolsystems, suchasABS
or ESP ®
,and aremarked asfollows:
R MO =Mercedes- BenzOriginal
R MOE =Mercedes- BenzOriginal Extended
(tires featuring run-flatcharact eristics)
R MO1 =Mercedes- BenzOriginal (onlycer-
tain AMG tires)
Mercedes- BenzOriginal Extended tiresmay
only beused onwheels thathave been spe-
cifically approved byMercedes- Benz.
Only usetires, wheels oraccessories tested
and approved byMercedes- Benz.Certain
charact eristics, e.g.handling, vehiclenoise
emissions orfuel consumpt ion,may other-
wise beadversely affected.Inaddition,
when driving withaload, tiredimension var-
iations couldcause thetires tocome into
cont actwith thebodywork andaxle compo-
nent s.This could result indamage tothe
tires orthe vehicle.
Mercedes- Benzaccepts noliabil ityfor dam-
age resulting fromtheuse oftires, wheels
or accessories otherthanthose testedand
approved.
Infor mation ontires, wheels andapproved
combinat ionscanbeobtained fromany
qualified specialist workshop.
! Retreaded
tiresareneither testednor rec-
ommended byMercedes- Benz,since previ-
ous damage cannotalway sbe detect edon
retreaded tires.Asaresult, Mercedes- Benz
cann otguarantee vehiclesafetyifretreaded
tires aremounted. Donot mount usedtires
if you have noinform ationabout theirprevi-
ous usage.
The recomm endedpressures forvarious oper-
ating condit ionscanbefound:
R on the Tire andLoading Information placard
on the B-pillar onthe driver's side
R in the tire pressure tableonthe fuel filler
flap
Observe thenoteson recomm endedtirepres-
sures under various operating conditions
(Y page 270).
Check tirepressures regularly,andonly when
the tires arecold. Comply withthemainte-
nanc erecomm endations ofthe tire manufac-
turer inthe vehicle document wallet. Notes
onthe vehicle equipment –alway s
equip thevehicle:
R with tires ofthe same sizeonagiven axle
(left andright)
R with thesame typeoftires atagiven time
(summer tires,winter tires,MOEx tended
tires)
Exc eption: itis permissible tomount adif-
ferent typeormake inthe event ofaflat
tire. Observe the"MOExt endedtires(tires
with run-flatcharact eristics)" section
(Y page 253).
Vehicles equipped withMOEx tended tiresare
not equipped withaTIREFIT kitatthe factor y.
It is therefor erecomm endedthatyouaddition-
ally equip yourvehicle withaTIREFIT kitifyou
mount tiresthatdonot feature run-flatcharac-
terist ics,e.g. winter tires.ATIREFIT kitmay be
obtained fromaqualified specialist workshop. Emergency
sparewheel Import
antsafety notes G
WARNIN
G
The wheel ortire size aswell asthe tire type
of the spare wheel oremergenc yspare
wheel andthewheel tobe replaced maydif-
fer. Mountin gan emergenc yspare wheel
may severely impairthedriving charact eris-
tics. There isarisk ofan accident .
To avoid hazardous situations:
R adapt yourdriving styleaccording lyand
drive carefully.
R never mount morethanonespare wheel
or emergenc yspare wheel thatdiffers in
size.
R only useaspare wheel oremergenc y
spare wheel ofadifferent sizebriefly.
R do not switch ESP®
off.
R have aspare wheel oremergenc yspare
wheel ofadifferent sizereplaced atthe
nearest qualified specialist workshop.
Observe thatthewheel andtiredimen-
sions aswell asthe tire type must becor-
rect . Emergency
sparewheel
293Wheels andtires Z
Page 296 of 306
When
usinganemergen cyspare wheel or
spare wheel ofadifferen tsize, youmust not
exceed themaximum speedof50 mph
(80 km/ h).
Sno wchains mustnotbemount edon emer-
gency sparewheels. General
notes
You canaskforinform ationregarding permit-
ted emergen cyspare wheels atan authorized
Mercedes- BenzCenter .
You should regularly checkthepressure ofthe
emergen cyspare wheel, particularly priorto
long trips, andcorrectthe pressure asneces -
sary (Ypage 270). Thevalue onthe wheel is
valid.
An emergen cyspare wheel mayalsobemoun-
ted against thedirect ionofrotat ion.Observe
the time restriction onuse aswell asthe
speed limitation specifiedonthe emergen cy
spare wheel.
Replace thetires after sixyears atthe latest,
regardless ofwear. Thisalso applies tothe
emergen cyspare wheel.
When youaredriving withthecollapsible
spare wheel mounted,the tire pressure loss
warning systemorthe tire pressure monitor
cann otfunct ionreliably. Onlyrestart thetire
pressure losswarning systemortire pressure
monit orwhen thedefect ivewheel hasbeen
replaced withanew wheel.
Vehicles withtirepressu remonitor :after
mount inganemergen cyspare wheel, thesys-
tem may stilldisplay thetire pressure ofthe
removed wheelforafew minutes .The value
displayed forthe mount edemergen cyspare
wheel isnot thesame asthe curren ttire pres-
sure ofthe emergen cyspare wheel. Removing
theemergency spare
wheel
Vehicles withacollapsible spare
wheel The
collapsible sparewheel canbefound in
the stowage wellunder thetrun kfloor
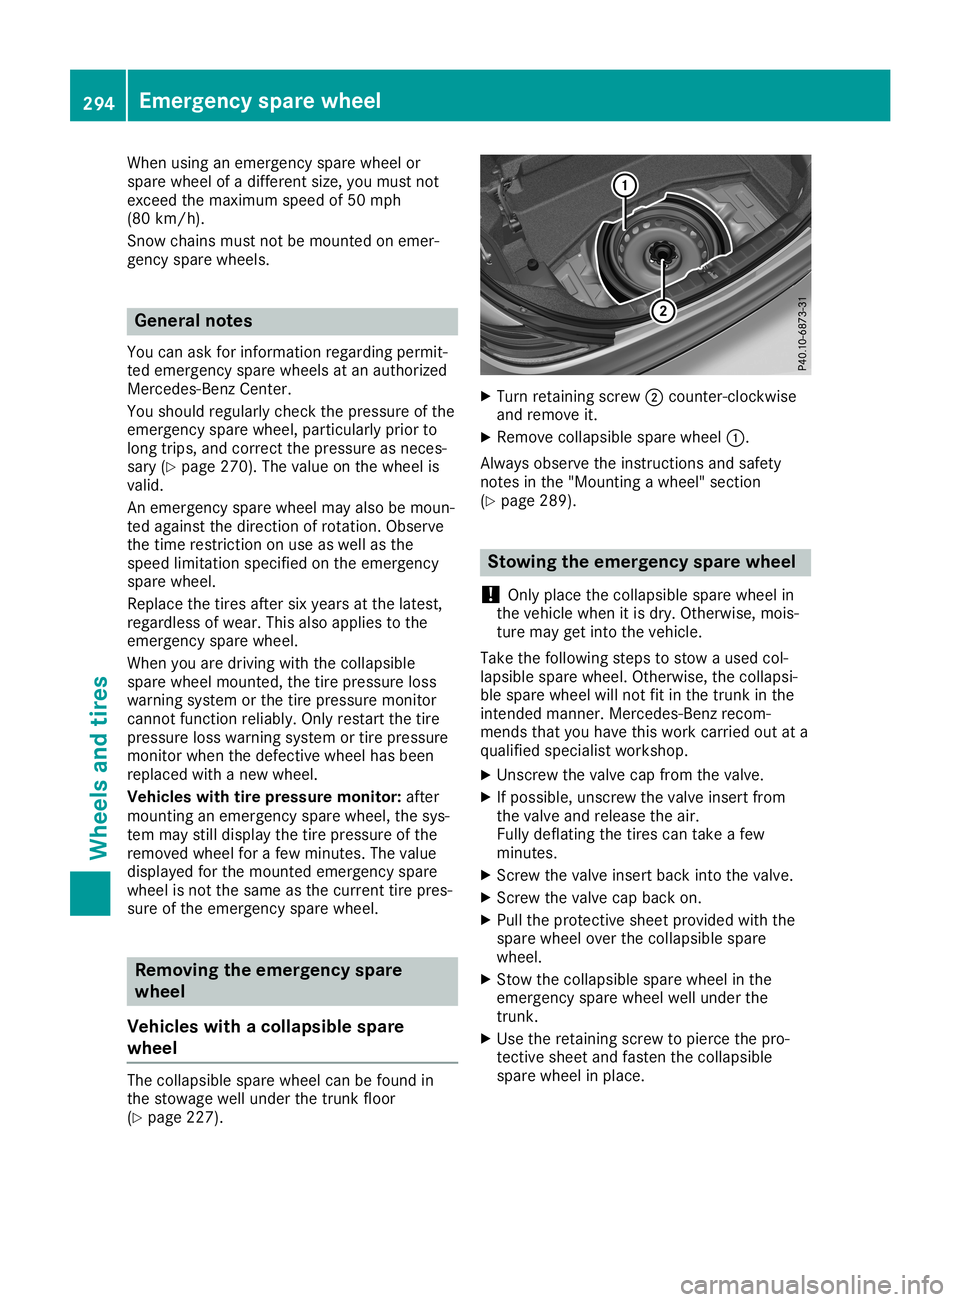
(Y page 227). X
Turn retainin gscrew 0044count er-clockwise
and remove it.
X Remove collapsible sparewheel 0043.
Always observe theinstruction sand safety
not esinthe "Mountin gawheel" section
(Y page 289). Stowing
theemergency sparewheel
! Only
place thecollapsible sparewheel in
the vehicle whenitis dry. Other wise, mois-
ture may getinto thevehicle.
Take thefollowing stepstostow aused col-
lapsible sparewheel. Otherwise, thecollapsi-
ble spare wheel willnotfitinthe trun kin the
inten dedmann er.Mercedes- Benzrecom-
mends thatyouhave thiswork carried outata
qualified specialist workshop.
X Unsc rewthevalve capfrom thevalve.
X Ifpossible, unscrewthe valve insert from
the valve andrelease theair.
Fully deflating thetires cantake afew
minutes .
X Scr ew the valve insert backintothevalve.
X Scr ew the valve capback on.
X Pull theprotec tivesheet provided withthe
spare wheel overthecollapsible spare
wheel.
X Stow the collapsible sparewheel inthe
emergen cyspare wheel wellunder the
trun k.
X Use theretainin gscrew topierce thepro-
tect ivesheet andfasten thecollapsible
spare wheel inplace. 294
Emergency
sparewheelWheels andtires
 1
1 2
2 3
3 4
4 5
5 6
6 7
7 8
8 9
9 10
10 11
11 12
12 13
13 14
14 15
15 16
16 17
17 18
18 19
19 20
20 21
21 22
22 23
23 24
24 25
25 26
26 27
27 28
28 29
29 30
30 31
31 32
32 33
33 34
34 35
35 36
36 37
37 38
38 39
39 40
40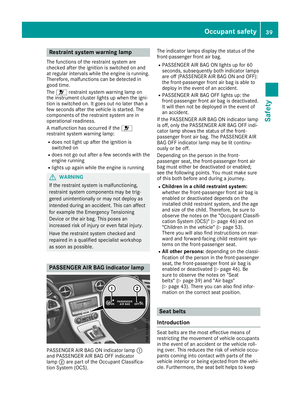 41
41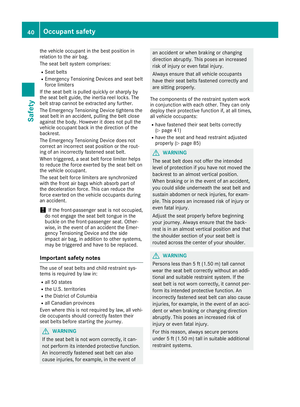 42
42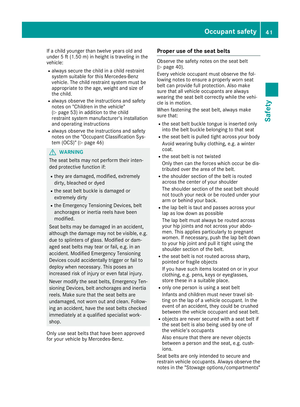 43
43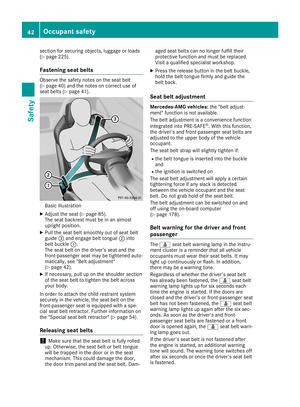 44
44 45
45 46
46 47
47 48
48 49
49 50
50 51
51 52
52 53
53 54
54 55
55 56
56 57
57 58
58 59
59 60
60 61
61 62
62 63
63 64
64 65
65 66
66 67
67 68
68 69
69 70
70 71
71 72
72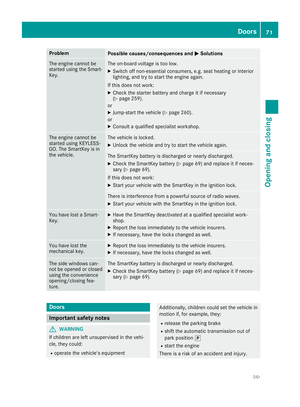 73
73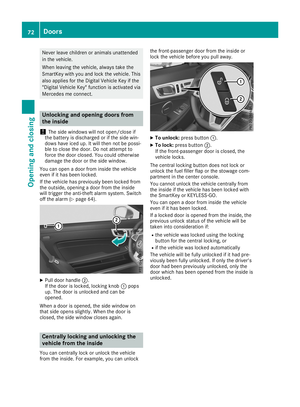 74
74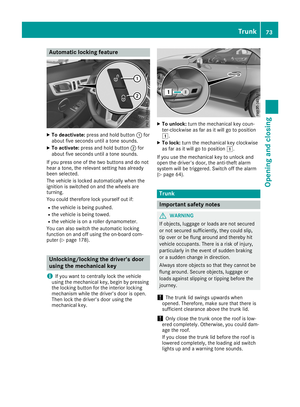 75
75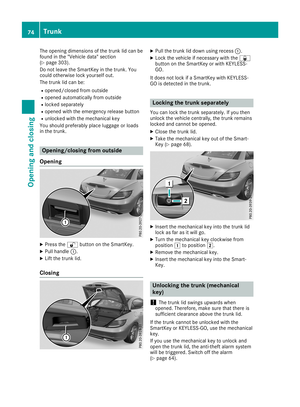 76
76 77
77 78
78 79
79 80
80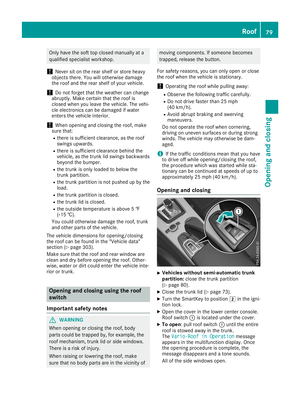 81
81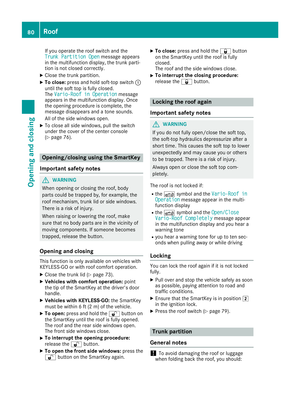 82
82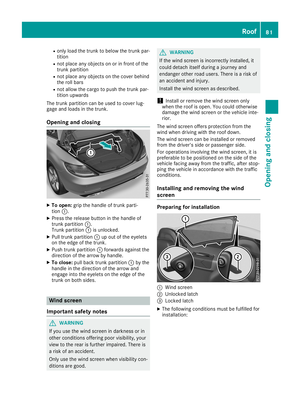 83
83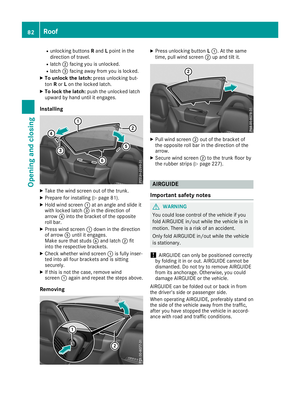 84
84 85
85 86
86 87
87 88
88 89
89 90
90 91
91 92
92 93
93 94
94 95
95 96
96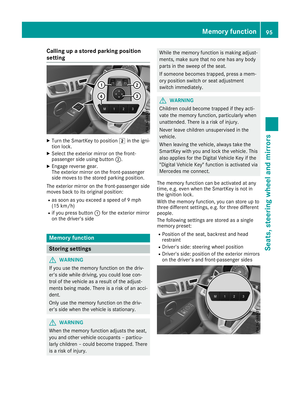 97
97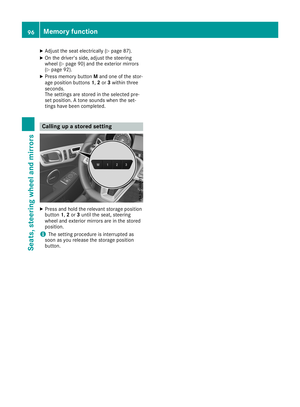 98
98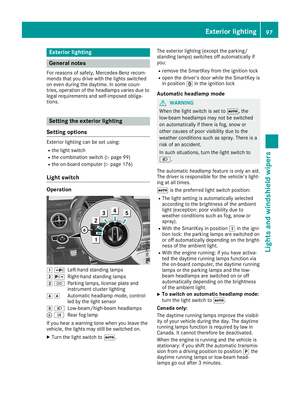 99
99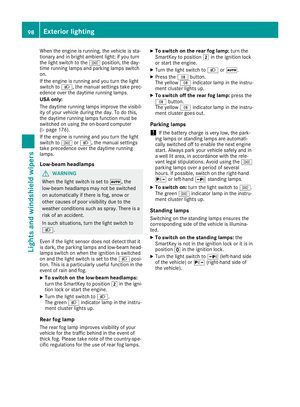 100
100 101
101 102
102 103
103 104
104 105
105 106
106 107
107 108
108 109
109 110
110 111
111 112
112 113
113 114
114 115
115 116
116 117
117 118
118 119
119 120
120 121
121 122
122 123
123 124
124 125
125 126
126 127
127 128
128 129
129 130
130 131
131 132
132 133
133 134
134 135
135 136
136 137
137 138
138 139
139 140
140 141
141 142
142 143
143 144
144 145
145 146
146 147
147 148
148 149
149 150
150 151
151 152
152 153
153 154
154 155
155 156
156 157
157 158
158 159
159 160
160 161
161 162
162 163
163 164
164 165
165 166
166 167
167 168
168 169
169 170
170 171
171 172
172 173
173 174
174 175
175 176
176 177
177 178
178 179
179 180
180 181
181 182
182 183
183 184
184 185
185 186
186 187
187 188
188 189
189 190
190 191
191 192
192 193
193 194
194 195
195 196
196 197
197 198
198 199
199 200
200 201
201 202
202 203
203 204
204 205
205 206
206 207
207 208
208 209
209 210
210 211
211 212
212 213
213 214
214 215
215 216
216 217
217 218
218 219
219 220
220 221
221 222
222 223
223 224
224 225
225 226
226 227
227 228
228 229
229 230
230 231
231 232
232 233
233 234
234 235
235 236
236 237
237 238
238 239
239 240
240 241
241 242
242 243
243 244
244 245
245 246
246 247
247 248
248 249
249 250
250 251
251 252
252 253
253 254
254 255
255 256
256 257
257 258
258 259
259 260
260 261
261 262
262 263
263 264
264 265
265 266
266 267
267 268
268 269
269 270
270 271
271 272
272 273
273 274
274 275
275 276
276 277
277 278
278 279
279 280
280 281
281 282
282 283
283 284
284 285
285 286
286 287
287 288
288 289
289 290
290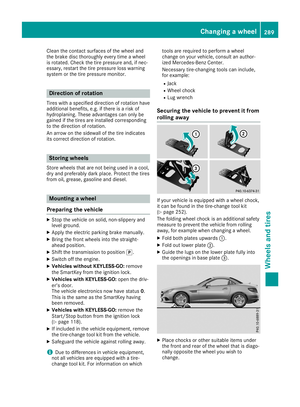 291
291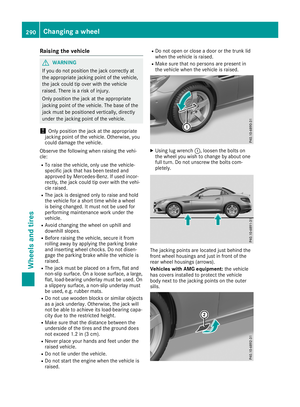 292
292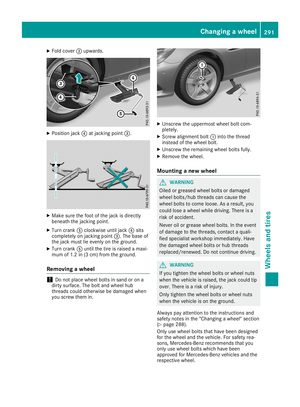 293
293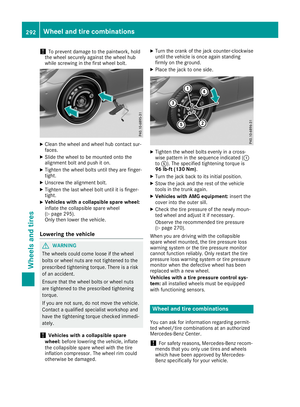 294
294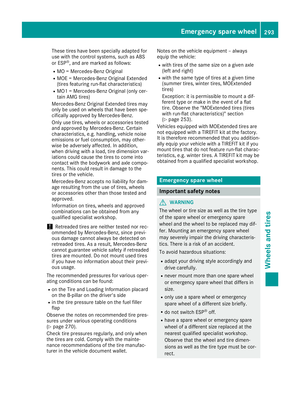 295
295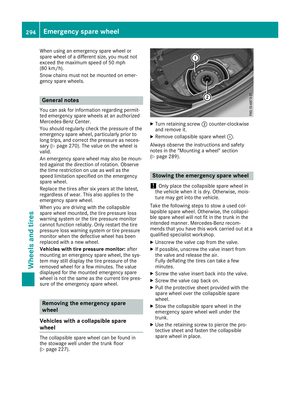 296
296 297
297 298
298 299
299 300
300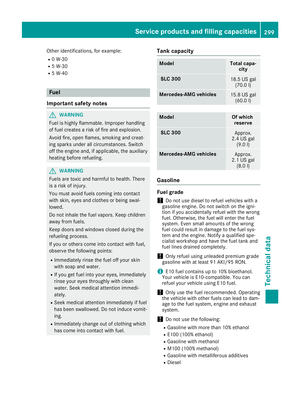 301
301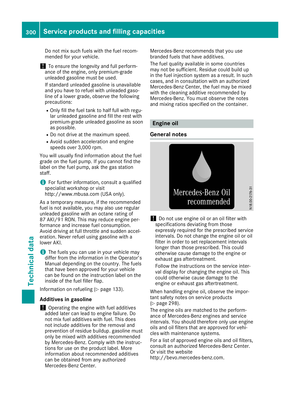 302
302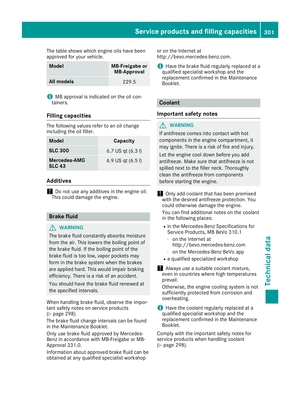 303
303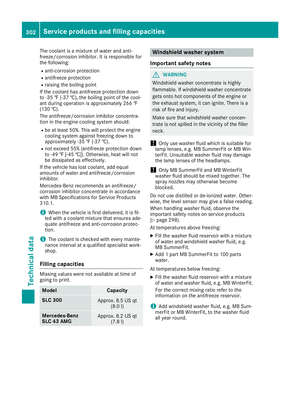 304
304 305
305


