2019 MERCEDES-BENZ SLC maintenance
[x] Cancel search: maintenancePage 250 of 306
Do not use these care products in the sun oron the hood while the hood is hot.
XUse a suitable touch-up stick, e.g. MBTouch-Up Stick, to repair slight damage tothe paintwork quickly and provisionally.
Matte finish care
!Never polish the vehicle or the light alloywheels. Polishing causes the finish to shine.
!The following can give the paint a glossyappearance and thus reduce the matteffect:
RRubbing hard with unsuitable agents
RWashing the vehicle in direct sunlight
!Never use paint cleaner, buffing or polish-ing products, or gloss preserver, e.g. wax,for the purpose of paintwork care. Theseproducts are only suitable for high-gloss sur-faces. Their use on vehicles with mattepaintwork leads to considerable surfacedamage or, more specifically, to shiny, spot-ted areas.
Always have paintwork repairs carried out ata qualified specialist workshop.
!Only use automatic car washes which cor-respond to the latest technological stand-ards. Never use wash programs which finishby treating the vehicle with hot wax.
Observe these notes if your vehicle has a clearmatte finish. This will help you to avoid dam-age to the paintwork due to incorrect treat-ment.
These notes also apply to light alloy wheelswith a clear matte finish.
iUse only insect remover and car shampoofrom the range of recommended andapproved Mercedes-Benz care products.
Cleaning the decorative film
!The following may have an effect on theservice life and color of decorative film:
Rsunlight
Rtemperature, e.g. hot-air fan
Rweather conditions
Rstone impacts and dirt
Rchemical cleaning agents
Rgreasy substances
!Do not use any types of polish on mattdecorative film. Polishing surfaces coveredwith film gives it a shiny finish.
!Do not treat matt or structured decorativefilm with wax. This may lead to marks thatcannot be removed.
Observe the notes in the section on the careand treatment of matte paintwork(Ypage 248); these notes also apply to mattedecorative film.
To clean, use plenty of water and a mild clean-ing agent without additional or abrasive prod-ucts, e.g. a car shampoo approved byMercedes-Benz.
XDry vehicles covered with film using a soft,absorbent cloth after every wash.Water marks could otherwise form.
Scratches, corrosive deposits, areas affectedby corrosion and damage caused by inade-quate care cannot always be completelyrepaired. In such cases, visit a qualified spe-cialist workshop.
XRemove dirt immediately, where possible,while avoiding rubbing too hard.The decorative film may be irreparably dam-aged.
XSoak insect remains with insect removerand rinse off the treated areas afterwards.
XSoak bird droppings with water and rinse offthe treated areas afterwards.
The cleaning product, Paint Cleaner, which hasbeen approved and recommended byMercedes-Benz, should be used when dirt haspenetrated the decorative film surface or thedecorative film has become dull.
The manufacturer can provide you with infor-mation on special care and cleaning products.
Laminated surfaces may exhibit optical differ-ences to surfaces which were not protected bya decorative film when the decorative film isremoved.
iHave work or repairs on decorative filmcarried out at a qualified specialist work-shop. Mercedes-Benz recommends that youuse an authorized Mercedes-Benz Center forthis purpose.
248Care
Maintenance and care
Page 251 of 306
Cleaning the vehicle parts
Cleaning the wheels
GWARNING
The water jet from a circular jet nozzle (dirt
blasters) can cause invisible exterior dam-
age to the tires or chassis components.
Components damaged in this way may fail
unexpectedly. There is a risk of an accident.
Do not use power washers with circular jet
nozzles to clean the vehicle. Have damaged
tires or chassis components replaced imme-
diately.
!Do not use acidic wheel cleaning productsto remove brake dust. This could damagewheel bolts and brake components.
!Do not park your vehicle for a long periodof time directly after cleaning, particularlyafter cleaning the wheel rim with wheelcleaner. Wheel cleaner can lead to theincreased corrosion of the brake discs andpads. Therefore, drive for a few minutesafter cleaning. By heating up the brakes, thebrake discs and pads dry. The vehicle canthen be parked for a long period of time.
Cleaning the windows
GWARNING
You could become trapped by the wind-
shield wipers if they start moving while
cleaning the windshield or wiper blades.
There is a risk of injury.
Always switch off the windshield wipers and
the ignition before cleaning the windshield
or wiper blades.
!Do not use dry cloths, abrasive products,solvents or cleaning agents containing sol-vents to clean the inside of the windows. Donot touch the insides of the windows withhard objects, e.g. an ice scraper or ring.There is otherwise a risk of damaging thewindows.
!Clean the water drainage channels of thewindshield and the rear window at regularintervals. Deposits such as leaves, petalsand pollen may under certain circumstances
prevent water from draining away. This canlead to corrosion damage and damage toelectronic components.
XClean the inside and outside of the windowswith a damp cloth and a cleaning productthat is recommended and approved byMercedes-Benz.
Cleaning wiper blades
GWARNING
If the windshield wipers are set in motion
while you are cleaning the windshield, you
can be trapped by the wiper arm. There is a
risk of injury.
Always switch off the windshield wipers and
the ignition before cleaning the windshield.
!Do not pull the wiper blade. Otherwise, thewiper blade could be damaged.
!Do not clean wiper blades too often anddo not rub them too hard. Otherwise, thegraphite coating could be damaged. Thiscould cause wiper noise.
!Hold the wiper arm securely when foldingback. The windshield could be damaged ifthe wiper arm smacks against it suddenly.
XFold the windshield wiper arms away fromthe windshield.
XCarefully clean the wiper blades with adamp cloth.
XFold the windshield wiper arms back againbefore switching on the ignition.
Cleaning the exterior lighting
!Only use cleaning agents or cleaningcloths that are suitable for plastic lenses.Caustic, irritant or otherwise unsuitablecleaning agents or cleaning cloths couldscratch or damage the exterior lighting plas-tic lenses.
XClean the plastic lenses of the exterior lightswith a wet sponge and a mild cleaningagent, e.g. Mercedes-Benz car shampoo orcleaning cloths.
Care249
Maintenance and care
Z
Page 252 of 306
Cleaning the mirror turn signals
!Only use cleaning agents or cleaningcloths that are suitable for plastic lenses.Unsuitable cleaning agents or cleaningcloths could scratch or damage the plasticlenses of the mirror turn signals.
XClean the plastic lenses of the mirror turnsignals in the exterior mirror housing using awet sponge and mild cleaning agent, e.g.Mercedes-Benz car shampoo or with clean-ing cloths.
Cleaning the sensors
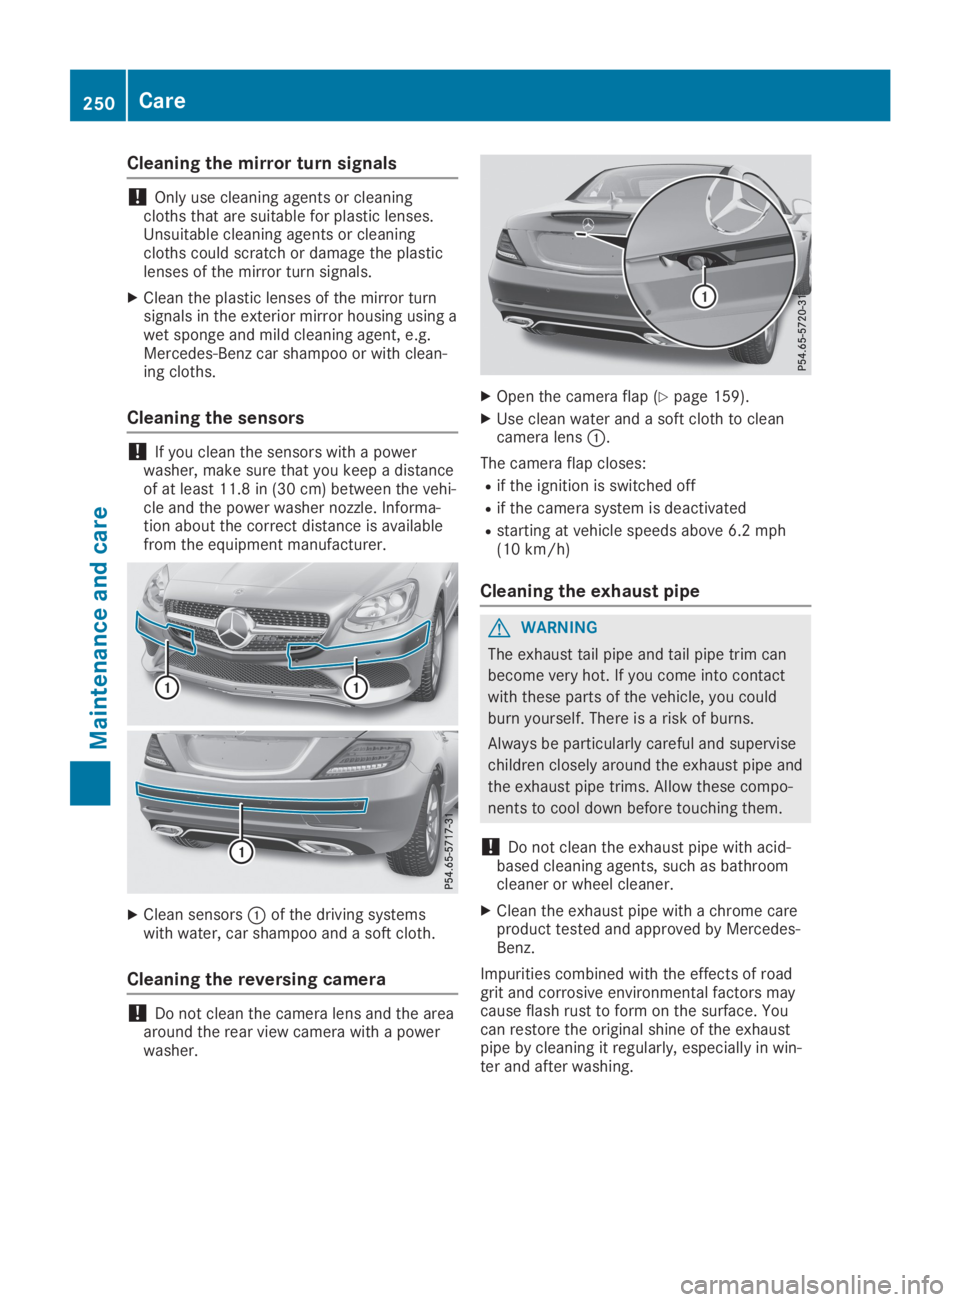
!If you clean the sensors with a powerwasher, make sure that you keep a distanceof at least 11.8 in(30 cm) between the vehi-cleand the power washer nozzle. Informa-tion about the correct distance is availablefrom the equipment manufacturer.
XClean sensors�Cof the driving systemswith water, car shampoo and a soft cloth.
Cleaning the reversing camera
!Do not clean the camera lens and the areaaround the rear view camera with a powerwasher.
XOpen the camera flap (Ypage 159).
XUse clean water and a soft cloth to cleancamera lens�C.
The camera flap closes:
Rif the ignition is switched off
Rif the camera system is deactivated
Rstarting at vehicle speeds above 6.2 mph(10 km/h)
Cleaning the exhaust pipe
GWARNING
The exhaust tail pipe and tail pipe trim can
become very hot. If you come into contact
with these parts of the vehicle, you could
burn yourself. There is a risk of burns.
Always be particularly careful and supervise
children closely around the exhaust pipe and
the exhaust pipe trims. Allow these compo-
nents to cool down before touching them.
!Do not clean the exhaust pipe with acid-based cleaning agents, such as bathroomcleaner or wheel cleaner.
XClean the exhaust pipe with a chrome careproduct tested and approved by Mercedes-Benz.
Impurities combined with the effects of roadgrit and corrosive environmental factors maycause flash rust to form on the surface. Youcan restore the original shine of the exhaustpipe by cleaning it regularly, especially in win-ter and after washing.
250Care
Maintenance and care
Page 260 of 306
Always make sure that neither you nor the bat-tery is electrostatically charged. A build-up ofelectrostatic charge can be caused, for exam-ple:
Rby wearing clothing made from syntheticfibers
Rdue to friction between clothing and seats
Rif you push or pull the battery across thecarpet or other synthetic materials
Rif you wipe the battery with a cloth
GWARNING
During the charging process, a battery pro-
duces hydrogen gas. If a short circuit occurs
or sparks are created, the hydrogen gas can
ignite. There is a risk of an explosion.
RMake sure that the positive terminal of a
connected battery does not come into
contact with vehicle parts.
RNever place metal objects or tools on a
battery.
RIt is important that you observe the
described order of the battery terminals
when connecting and disconnecting a bat-
tery.
RWhen jump-starting, make sure that the
battery poles with identical polarity are
connected.
RIt is particularly important to observe the
described order when connecting and dis-
connecting the jumper cables.
RNever connect or disconnect the battery
terminals while the engine is running.
GWARNING
Battery acid is caustic. There is a risk of
injury.
Avoid contact with skin, eyes or clothing. Do
not inhale any battery gases. Do not lean
over the battery. Keep children away from
batteries. Wash away battery acid immedi-
ately with plenty of clean water and seek
medical attention.
HEnvironmental note
Batteries contain pollutants.
It is illegal to dispose of
them with the household
rubbish. They must be col-
lected separately and dis-
posed of in an environmen-
tally responsible recycling
system.
Dispose of batteries in an
environmentally responsible
manner. Take discharged
batteries to a qualified spe-
cialist workshop or to a col-
lection point for used bat-
teries.
!Have the battery regularly checked at aqualified specialist workshop.
Comply with the service intervals in theMaintenance Booklet, or contact a qualifiedspecialist workshop for more information.
!Always have work on batteries carried outat a qualified specialist workshop.
Should it, in exceptional circumstances, beabsolutely necessary to disconnect the 12-volt battery yourself, please observe the fol-lowing:
RSecure the vehicle to prevent it from roll-ing away.
RSwitch off the ignition.
RDisconnect the negative terminal first andthen the positive terminal.
The transmission is locked in position�]after disconnecting the battery.
After the work has been done, install thebattery and replace the cover of the positiveterminal clamp firmly.
Comply with safety precautions and take pro-tective measures when handling batteries.
Risk of explosion.
Fire, open flames and smoking areprohibited when handling the bat-tery. Avoid creating sparks.
258Battery (vehicle)
Breakdo wn assis tan ce
Page 277 of 306
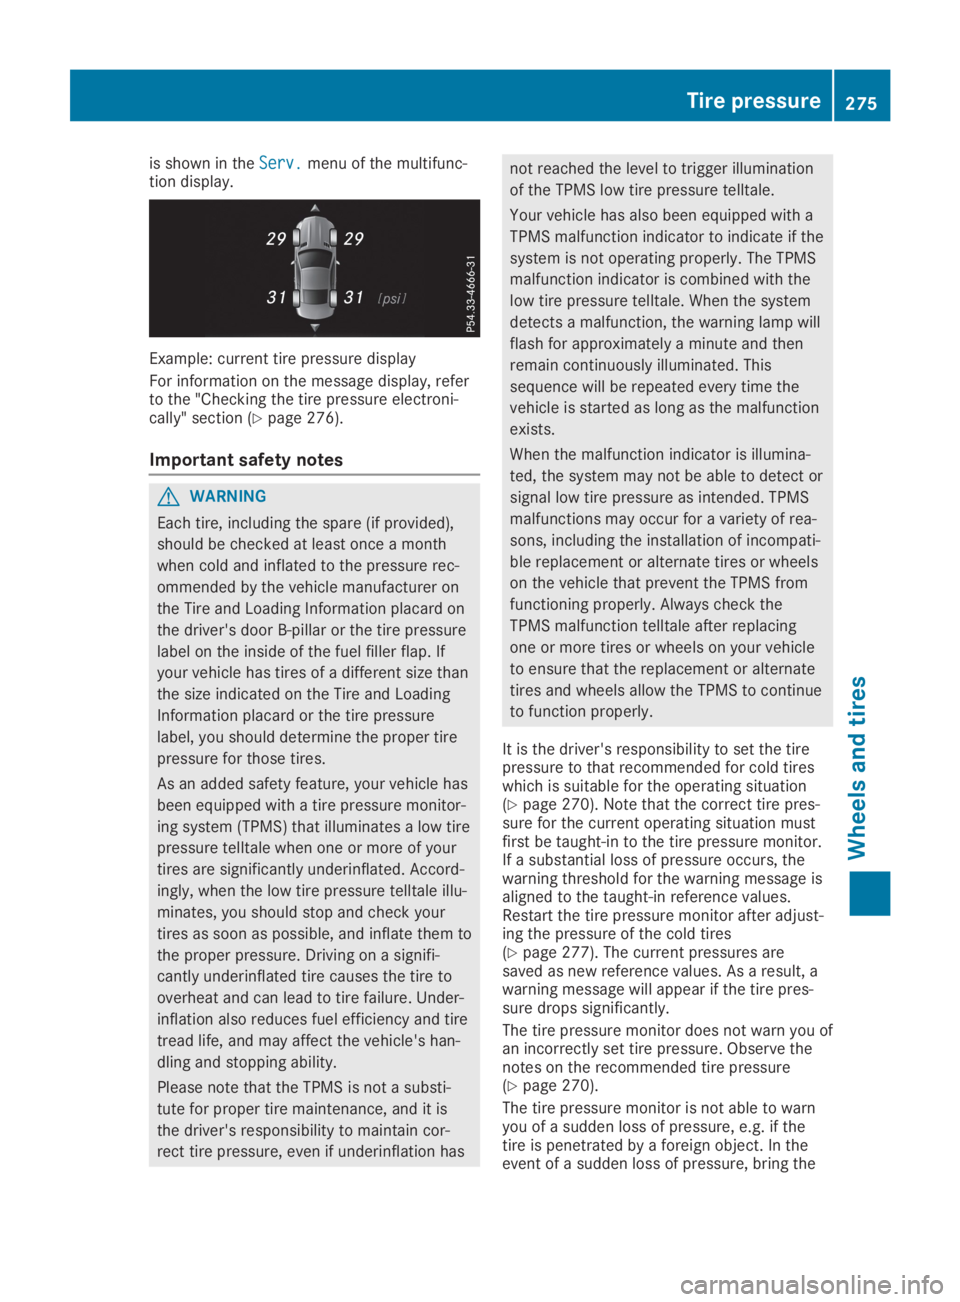
is shown in theServ.Serv.menu of the multifunc-tion display.
Example: current tire pressure display
For information on the message display, referto the "Checking the tire pressure electroni-cally" section (Ypage 276).
Important safety notes
GWARNING
Each tire, including the spare (if provided),
should be checked at least once a month
when cold and inflated to the pressure rec-
ommended by the vehicle manufacturer on
the Tire and Loading Information placard on
the driver's door B-pillar or the tire pressure
label on the inside of the fuel filler flap. If
your vehicle has tires of a different size than
the size indicated on the Tire and Loading
Information placard or the tire pressure
label, you should determine the proper tire
pressure for those tires.
As an added safety feature, your vehicle has
been equipped with a tire pressure monitor-
ing system (TPMS) that illuminates a low tire
pressure telltale when one or more of your
tires are significantly underinflated. Accord-
ingly, when the low tire pressure telltale illu-
minates, you should stop and check your
tires as soon as possible, and inflate them to
the proper pressure. Driving on a signifi-
cantly underinflated tire causes the tire to
overheat and can lead to tire failure. Under-
inflation also reduces fuel efficiency and tire
tread life, and may affect the vehicle's han-
dling and stopping ability.
Please note that the TPMS is not a substi-
tute for proper tire maintenance, and it is
the driver's responsibility to maintain cor-
rect tire pressure, even if underinflation has
not reached the level to trigger illumination
of the TPMS low tire pressure telltale.
Your vehicle has also been equipped with a
TPMS malfunction indicator to indicate if the
system is not operating properly. The TPMS
malfunction indicator is combined with the
low tire pressure telltale. When the system
detects a malfunction, the warning lamp will
flash for approximately a minute and then
remain continuously illuminated. This
sequence will be repeated every time the
vehicle is started as long as the malfunction
exists.
When the malfunction indicator is illumina-
ted, the system may not be able to detect or
signal low tire pressure as intended. TPMS
malfunctions may occur for a variety of rea-
sons, including the installation of incompati-
ble replacement or alternate tires or wheels
on the vehicle that prevent the TPMS from
functioning properly. Always check the
TPMS malfunction telltale after replacing
one or more tires or wheels on your vehicle
to ensure that the replacement or alternate
tires and wheels allow the TPMS to continue
to function properly.
It is the driver's responsibility to set the tirepressure to that recommended for cold tireswhich is suitable for the operating situation(Ypage 270). Note that the correct tire pres-sure for the current operating situation mustfirst be taught-in to the tire pressure monitor.If a substantial loss of pressure occurs, thewarning threshold for the warning message isaligned to the taught-in reference values.Restart the tire pressure monitor after adjust-ing the pressure of the cold tires(Ypage 277). The current pressures aresaved as new reference values. As a result, awarning message will appear if the tire pres-sure drops significantly.
The tire pressure monitor does not warn you ofan incorrectly set tire pressure. Observe thenotes on the recommended tire pressure(Ypage 270).
The tire pressure monitor is not able to warnyou of a sudden loss of pressure, e.g. if thetire is penetrated by a foreign object. In theevent of a sudden loss of pressure, bring the
Tire pressure275
Wheels and tires
Z
Page 292 of 306
Raising the vehicle
GWARNING
If you do not position the jack correctly at
the appropriate jacking point of the vehicle,
the jack could tip over with the vehicle
raised. There is a risk of injury.
Only position the jack at the appropriate
jacking point of the vehicle. The base of the
jack must be positioned vertically, directly
under the jacking point of the vehicle.
!Only position the jack at the appropriatejacking point of the vehicle. Otherwise, youcould damage the vehicle.
Observe the following when raising the vehi-cle:
RTo raise the vehicle, only use the vehicle-specific jack that has been tested andapproved by Mercedes-Benz. If used incor-rectly, the jack could tip over with the vehi-cle raised.
RThe jack is designed only to raise and holdthe vehicle for a short time while a wheelis being changed. It must not be used forperforming maintenance work under thevehicle.
RAvoid changing the wheel on uphill anddownhill slopes.
RBefore raising the vehicle, secure it fromrolling away by applying the parking brakeand inserting wheel chocks. Do not disen-gage the parking brake while the vehicle israised.
RThe jack must be placed on a firm, flat andnon-slip surface. On a loose surface, a large,flat, load-bearing underlay must be used. Ona slippery surface, a non-slip underlay mustbe used, e.g. rubber mats.
RDo not use wooden blocks or similar objectsas a jack underlay. Otherwise, the jack willnot be able to achieve its load-bearing capa-city due to the restricted height.
RMake sure that the distance between theunderside of the tires and the ground doesnot exceed 1.2 in (3 cm).
RNever place your hands and feet under theraised vehicle.
RDo not lie under the vehicle.
RDo not start the engine when the vehicle israised.
RDo not open or close a door or the trunk lidwhen the vehicle is raised.
RMake sure that no persons are present inthe vehicle when the vehicle is raised.
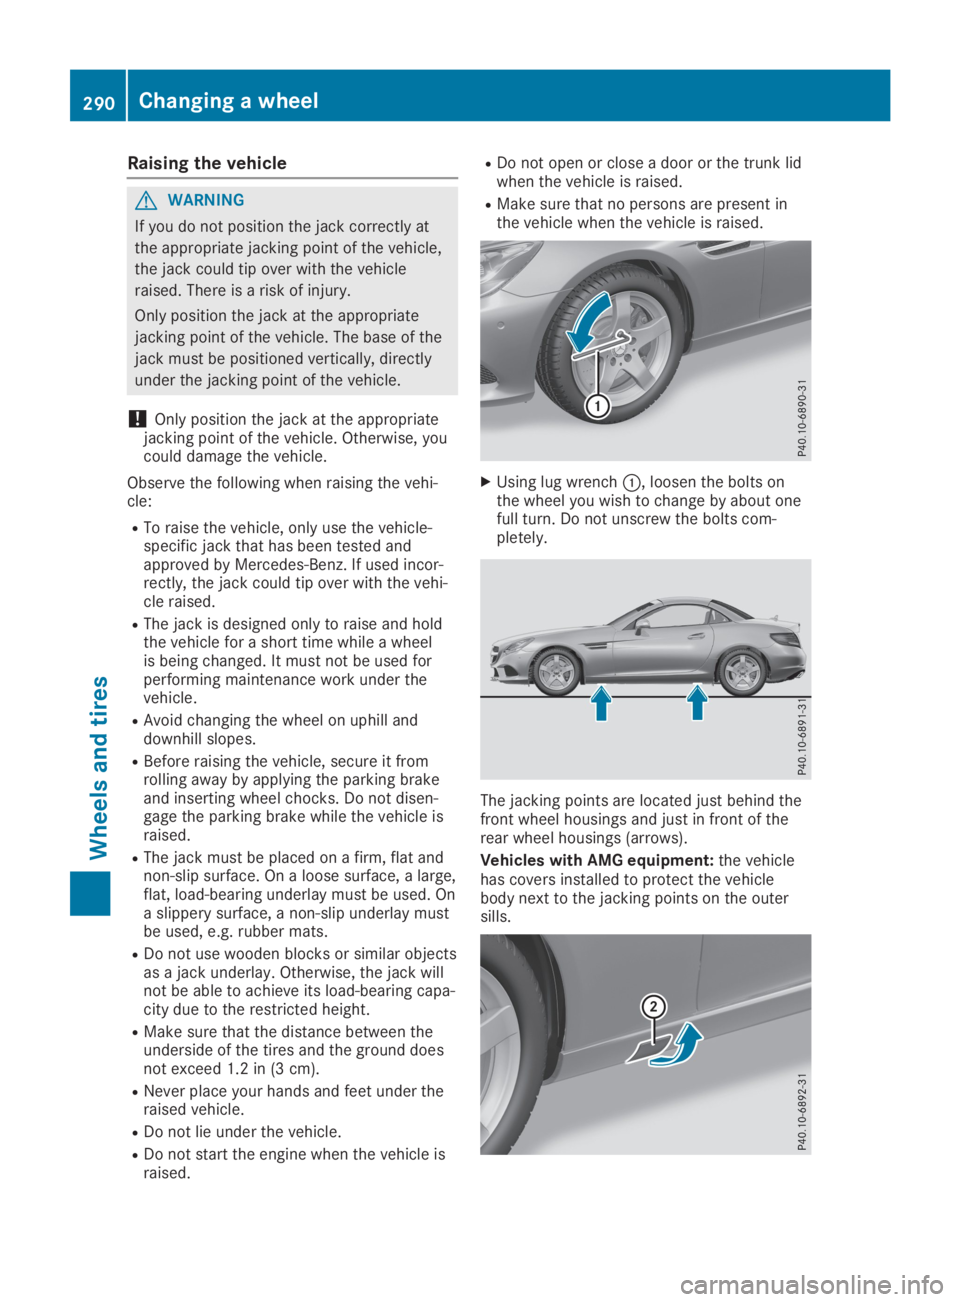
XUsing lug wrench�C, loosen the bolts onthe wheel you wish to change by about onefull turn. Do not unscrew the bolts com-pletely.
The jacking points are located just behind thefront wheel housings and just in front of therear wheel housings (arrows).
Vehicles with AMG equipment:the vehiclehas covers installed to protect the vehiclebody next to the jacking points on the outersills.
290Changing a wheel
Wheels and tires
Page 302 of 306
Do not mix such fuels with the fuel recom-mended for your vehicle.
!To ensure the longevity and full perform-ance of the engine, only premium-gradeunleaded gasoline must be used.
If standard unleaded gasoline is unavailableand you have to refuel with unleaded gaso-line of a lower grade, observe the followingprecautions:
ROnly fill the fuel tank to half full with regu-lar unleaded gasoline and fill the rest withpremium-grade unleaded gasoline as soonas possible.
RDo not drive at the maximum speed.
RAvoid sudden acceleration and enginespeeds over 3,000 rpm.
You will usually find information about the fuelgrade on the fuel pump. If you cannot find thelabel on the fuel pump, ask the gas stationstaff.
iFor further information, consult a qualifiedspecialist workshop or visithttp://www.mbusa.com (USA only).
As a temporary measure, if the recommendedfuel is not available, you may also use regularunleaded gasoline with an octane rating of87 AKI/91 RON. This may reduce engine per-formance and increase fuel consumption.Avoid driving at full throttle and sudden accel-eration. Never refuel using gasoline with alower AKI.
iThe fuels you can use in your vehicle maydiffer from the information in the Operator'sManual depending on the country. The fuelsthat have been approved for your vehiclecan be found on the instruction label on theinside of the fuel filler flap.
Information on refueling (Ypage 133).
Additives in gasoline
!Operating the engine with fuel additivesadded later can lead to engine failure. Donot mix fuel additives with fuel. This doesnot include additives for the removal andprevention of residue buildup. gasoline mustonly be mixed with additives recommendedby Mercedes-Benz. Comply with the instruc-tions for use on the product label. Moreinformation about recommended additivescan be obtained from any authorizedMercedes-Benz Center.
Mercedes-Benz recommends that you usebranded fuels that have additives.
The fuel quality available in some countriesmay not be sufficient. Residue could build upin the fuel injection system as a result. In suchcases, and in consultation with an authorizedMercedes-Benz Center, the fuel may be mixedwith the cleaning additive recommended byMercedes-Benz. You must observe the notesand mixing ratios specified on the container.
Engine oil
General notes
!Do not use engine oil or an oil filter withspecifications deviating from thoseexpressly required for the prescribed serviceintervals. Do not change the engine oil or oilfilter in order to set replacement intervalslonger than those prescribed. This couldotherwise cause damage to the engine orexhaust gas aftertreatment.
Follow the instructions on the service inter-val display for changing the engine oil. Thiscould otherwise cause damage to theengine or exhaust gas aftertreatment.
When handling engine oil, observe the impor-tant safety notes on service products(Ypage 298).
The engine oils are matched to the perform-ance of Mercedes-Benz engines and serviceintervals. You should therefore only use engineoils and oil filters that are approved for vehi-cles with maintenance systems.
For a list of approved engine oils and oil filters,consult an authorized Mercedes-Benz Center.Or visit the websitehttp://bevo.mercedes-benz.com.
300Service products and filling capacities
Technical data
Page 303 of 306
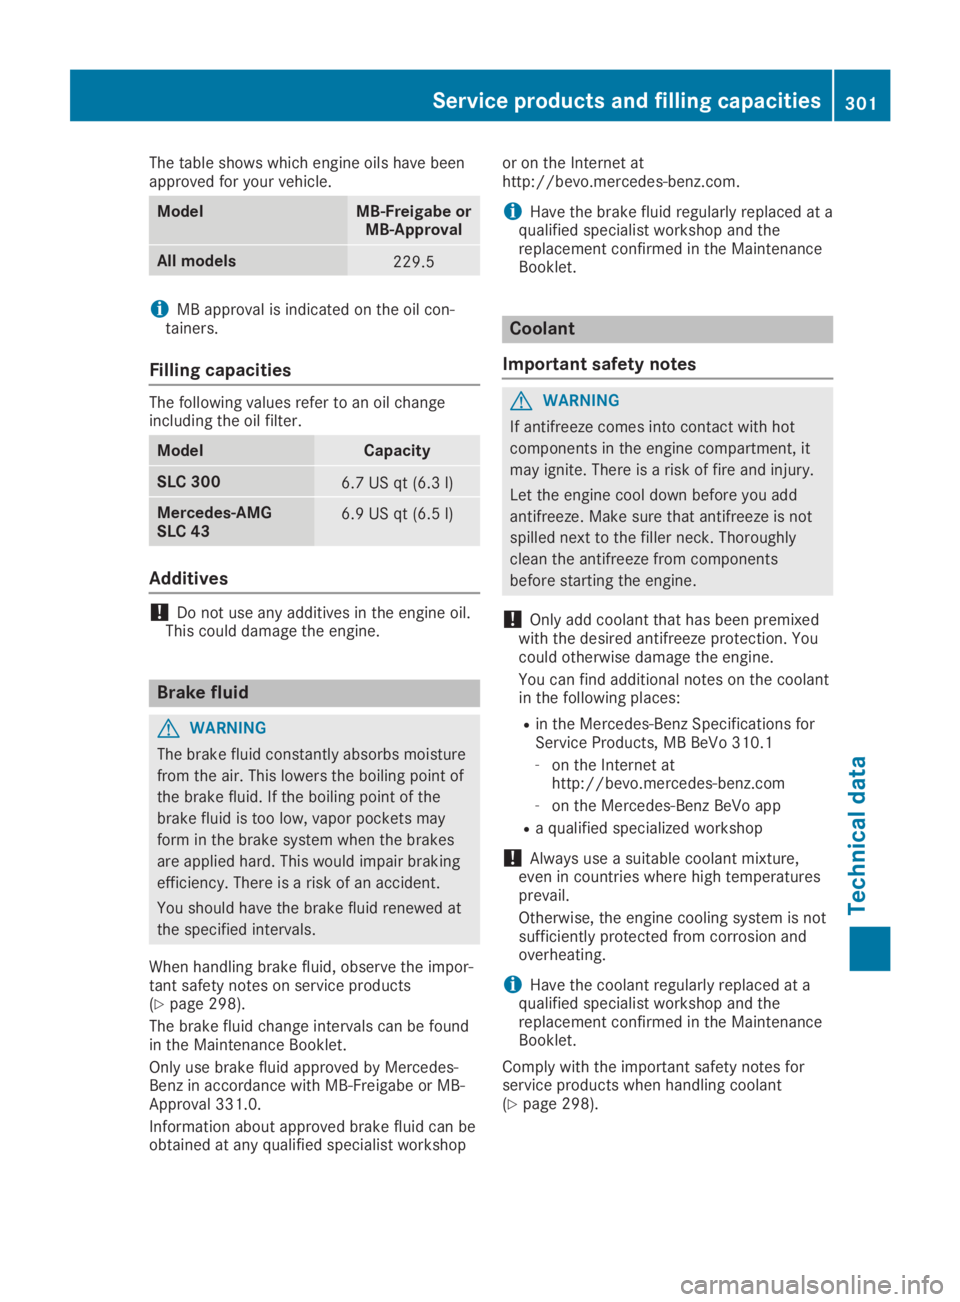
The table shows which engine oils have beenapproved for your vehicle.
ModelMB-Freigabe orMB-Approval
All models229.5
iMB approval is indicated on the oil con-tainers.
Filling capacities
The following values refer to an oil changeincluding the oil filter.
ModelCapacity
SLC 3006.7 US qt (6.3l)
Mercedes-AMGSLC 436.9 US qt (6.5l)
Additives
!Do not use any additives in the engine oil.This could damage the engine.
Brake fluid
GWARNING
The brake fluid constantly absorbs moisture
from the air. This lowers the boiling point of
the brake fluid. If the boiling point of the
brake fluid is too low, vapor pockets may
form in the brake system when the brakes
are applied hard. This would impair braking
efficiency. There is a risk of an accident.
You should have the brake fluid renewed at
the specified intervals.
When handling brake fluid, observe the impor-tant safety notes on service products(Ypage 298).
The brake fluid change intervals can be foundin the Maintenance Booklet.
Only use brake fluid approved by Mercedes-Benz in accordance with MB-Freigabe or MB-Approval 331.0.
Information about approved brake fluid can beobtained at any qualified specialist workshop
or on the Internet athttp://bevo.mercedes-benz.com.
iHave the brake fluid regularly replaced at aqualified specialist workshop and thereplacement confirmed in the MaintenanceBooklet.
Coolant
Important safety notes
GWARNING
If antifreeze comes into contact with hot
components in the engine compartment, it
may ignite. There is a risk of fire and injury.
Let the engine cool down before you add
antifreeze. Make sure that antifreeze is not
spilled next to the filler neck. Thoroughly
clean the antifreeze from components
before starting the engine.
!Only add coolant that has been premixedwith the desired antifreeze protection. Youcould otherwise damage the engine.
You can find additional notes on the coolantin the following places:
Rin the Mercedes-Benz Specifications forService Products, MB BeVo 310.1
-on the Internet athttp://bevo.mercedes-benz.com
-on the Mercedes-Benz BeVo app
Ra qualified specialized workshop
!Always use a suitable coolant mixture,even in countries where high temperaturesprevail.
Otherwise, the engine cooling system is notsufficiently protected from corrosion andoverheating.
iHave the coolant regularly replaced at aqualified specialist workshop and thereplacement confirmed in the MaintenanceBooklet.
Comply with the important safety notes forservice products when handling coolant(Ypage 298).
Service products and filling capacities301
Technical data
Z