2019 MERCEDES-BENZ SL ROADSTER height
[x] Cancel search: heightPage 45 of 330
If
achild younger thantwelve yearsold and
under 5ft (1.5 0m) inheight istravelin gin the
vehic le:
R always securethe child inachild restraint
syst emsuitable forthis Merc edes- Benz
vehic le.The child restraint systemmust be
appropr iatetothe age, weight andsize of
the child.
R always observethe instruct ions andsafet y
not eson "Children inthe vehic le"
(Y page 57)inaddition tothe child
rest raint systemmanuf acturer' sinst allation
and operat inginst ruct ions
R always observethe instruct ions andsafet y
not eson the "Occ upant Classific ationSys-
tem (OCS)" (Ypage 48) G
WARN
ING
The seat belts maynotperf orm theirint en-
ded protective func tion if:
R the yare damaged, modified,extreme ly
dirt y,bleache dor dyed
R the seat beltbuck leisdamaged or
ext reme lydirt y
R the Emergen cyTens ionin gDev ices, belt
anc horage sor iner tiareels havebeen
modif ied.
Seat belts maybedamaged inan acc ident ,
althoug hthe damage maynotbevisible, e.g.
due tosplint ersofglass. Modifie dor dam-
aged seatbelts maytearorfail, e.g. inan
acc ident .Modifie dEm ergen cyTens ionin g
Dev ices could accident allytrigger orfail to
deploy whennecessary. Thisposes an
inc reased riskofinjury oreven fatalinj ury.
Never modifythe seat belts ,Em ergen cyTen-
sion ingDev ices, beltanchorage sand inertia
reels. Make surethattheseat belts are
undamage d,not worn outand clean .Follow-
ing anacc ident ,have theseat belts checked
immed iatelyataqualified specialist work-
shop.
Only useseat belts thathave been approv ed
for your vehic leby Merc edes- Benz. Prop
eruse oftheseat belts Obser
vethe safet ynot eson the seat belt
(Y page 42).
Ev ery vehic leocc upant mustobservethe fol-
lowing notestoens ure aproper lyworn seat
belt canprov idefull prot ection. Also make
sure thatallvehic leocc upant sare always
wearin gthe seat beltcorrectlywhile thevehi-
cle isin mot ion.
When fastenin gthe seat belt, always make
sure that:
R the seat beltbuck leton gue isinse rted only
int othe belt buck lebelon gingtothat seat
R the seat beltispulled tightacro ssyour body
Av oid wearin gbulky clothing ,e.g. awint er
coat .
R the seat beltisnot twist ed
Only thencan theforces which occurbe dis-
tr ibuted overthearea ofthe belt.
R the shoulder sectionofthe belt isrout ed
acro ssthe centerofyour shoulder
The shoulder sectionofthe seat beltshould
not touc hyour neckor be rout edunder your
arm orbehin dyour back.
R the lapbelt istaut andpasses acrossyour
lap aslow down aspossible
The lapbelt must always berout edacro ss
your hipjointsand notacro ssyour abdo-
men .This applies particularly topregn ant
women .If nec essary, pushthelapbelt down
to your hipjointand pullittigh tusing the
shoulder sectionofthe belt.
R the seat beltisnot rout edacro sssharp,
point edorfragile objects
If you have such itemslocat edon orinyour
clot hing ,e.g. pens ,keys oreyeglasses ,
sto rethe seinasuitable place.
R only oneperso nis using aseat belt
Inf ant sand childr enmust nevertravel sit-
tin gon the lapofavehic leocc upant .In the
even tof an acc ident ,the ycould becrus hed
betwee nthe vehic leocc upant andseat belt.
R obje ctsare neversecur edwith aseat beltif
the seat beltisalso being usedbyone of
the vehic le'soccupant s
Also ensure that thereare neverobje cts
betwee naperso nand theseat, e.g.cush-
ions .
Seat belts areonly intended tosecur eand
rest rain vehic leocc upant s.Always observethe
not esinthe "Stowage options/com partmen ts" Occupa
ntsaf ety
43Safety Z
Page 47 of 330
passenger
seatbelts arenot fasten ed,awarn-
ing tonesounds. Awarning tonealso sounds
with increasing intensit yfor 60secon dsor
until thedriver orfron tpassenger havefas-
ten edtheir seatbelts.
If the driver orfron tpassenger unfastentheir
seat belts during thejourn ey,the seat belt
warning isactiv ated again. Air
bags
Introd uction The
installation pointofan airbag canberec-
ogniz edbythe AIRB AGmarkin g.
An airbag complem entsthe corr ectlyfasten ed
seat belt. Itis no substit uteforthe seat belt.
When deployed, anairbag canincrease the
prote ction provided forthe respect ivevehicle
occ upant.
Not allairbags aredeployed inan acciden t.
The various airbags workindepen dentlyof
each other (Ypage 53).
However ,no system available todaycancom-
pletely eliminate injuries andfatalities .
It is also notpossible torule outarisk ofinjury
caused byan airbag duetothe high speed at
which theairbag mustbedeployed.
Impor tantsafet ynotes G
WARN
ING
If you donot sitinthe corr ectseat position ,
the airbag cann otprote ctas intended and
could evencause additional injury when
deployed. Thisposes anincr eased riskof
inj ury oreven fatalinjury.
To avoid hazardous situations,always make
sure thatallofthe vehicle's occupants:
R have fasten edtheir seatbelts correctly,
includin gpregnan twomen
R are sitting corr ectlyand maint ainthe
greatest possible distancetothe airbags
R follow thefollowing instruct ions
Always makesurethatthereare noobjec ts
between theairbag and thevehicle's occu-
pants . All
vehicle occupants mustobserve thefollow-
ing notestoavoid risksposed bythe airbag
when itdeploys.
R Adj ust the seats properly beforebeginning
your journ ey.Always makesurethatthe
seat isin an almost upright position .The
cen terofthe head restraint must support
the head atabout eyelevel.
R Move thedriver' sand front-passenger seats
as far back aspossible. Thedriver' sseat
position mustallow thevehicle tobe driven
safely.
R Only holdthesteer ingwheel onthe outside.
This allows theairbag tobe fully deployed.
R Always leanagainst thebackr estwhile driv-
ing. Donot lean forward orlean against the
door orside window. Youmay other wisebe
in the deployment areaofthe airbags.
R Always keepyourfeetinthe foot well in
fron tof the seat. Donot putyour feetonthe
dashboard, forexample. Yourfeetmay oth-
erwise beinthe deployment areaofthe air-
bag.
R For this reason, alwayssecurepersonsless
than 5ft (1.5 0m) tall insuitable restraint
systems .Up tothis height, theseat belt
cann otbe worn correctly.
If achild istraveling inyour vehicle, also
observe thefollowing notes:
R Always securechildren undertwelve years
of age and less than 5ft (1.5 0m) tall insuit-
able child restraint systems .
R Secur eachild tothe fron t-passenger seat
only when thefron t-passenger frontairbag
is deactiv ated,andthen onlyinarearward-
facin gchild restraint system. Thefront-
passenger frontairbag isdeactiv atedwhen
the PAS SENGER AIRBAGOFF indicat or
lamp islit con tinuously (Ypage 41).
R Always observe theinstruct ions andsafety
not eson the "Occupant Classification Sys-
tem (OCS)" (Ypage 48)and on"Children
in the vehicle" (Ypage 57)inaddition to
the child restraint system manufact urer's
inst allation andoperatin ginst ruct ions.
Objects inthe vehicle interior mayrestrict
the airba gfrom functioning correctly.To
avoid risksresultin gfrom thespeed ofthe air-
bag asitdeploys, vehicleoccupants must
ensure thefollowing points. Occupant
safety
45Safet y Z
Page 100 of 330
The
seats canstillbeadjusted whenthereis
no Smart Keyinthe ignition lock. G
WARNIN
G
When youadjust aseat, youorother vehicle
occupant scould become trapped, e.g.on
the seat guide rail.There isarisk ofinjury.
When adjusting aseat, make surethatno
one hasany body parts inthe sweep ofthe
seat. G
WARNIN
G
If the driver's seatisnot engaged, itcould
move forwards asfar asthe next catchdur-
ing movemen tsuch asbraking orabrupt
changes ofdirection .As aresult, youwould
be pushed againstyourseatbeltbythe
unsecured driver'sseat.
This could cause youtolose controlofthe
vehicle. Theseat beltcann otprotec tas
inten dedandcould result inadditional
injury.
There isarisk ofan accident andinjury.
Before everyjourney, makesurethatthe
driver's seatisfully engaged.
Observe thesafety noteson "Air bags"
(Y page 45)and "Children inthe vehicle"
(Y page 57). G
WARNIN
G
If you adjust theseat height carelessly, you
or other vehicle occupant scould betrapped
and thereby injured.Children inparticular
could accident allypress theelectric alseat
adjustmen tbutton sand become trapped.
There isarisk ofinjury.
While moving theseats, makesurethatyour
hands orother bodyparts donot getunder
the lever assembly ofthe seat adjustmen t
system. G
WARNIN
G
If the head restraints arenot installed ornot
adjusted correctly,they cannotprovide pro-
tect ionasinten ded.There isan increased
risk ofinjury inthe head andneck area, e.g.
in the event ofan accident orwhen braking. Always
drivewiththehead restraints instal-
led. Before driving off,make sureforevery
vehicle occupant thatthecent erofthe head
restr aintsupports theback ofthe head at
about eyelevel. G
WARNIN
G
You could losecontrolofyour vehicle ifyou
do the following whiledriving:
R adjust thedriver's seat,head restraint,
steerin gwheel ormirrors
R fasten theseat belt
There isarisk ofan accident .
Adjust thedriver's seat,head restraint,
steerin gwheel andmirror andfasten your
seat beltbefore startingthe engine.
! To
prevent damage tothe seats andthe
seat heating, observethefollowing notes:
R Do not spill liquids ontothe seats. Drythe
seats assoon aspossible ifliquid does
get spilled onthe seats.
R Ifthe seat covers aredamp orwet, donot
switch onthe seat heating. Also,donot
use theseat heating todry the seats.
R Clean theseat covers asrecomm ended;
see the"Inter iorcare" section .
R Do not trans portheavy loadsonthe
seats. Donot place pointed objectson
the seat cushions suchaskniv es,nails or
tools. Where possible, usetheseats only
for carrying passengers.
R When operating theseat heating, donot
cover theseats withinsulating materials,
e.g. blankets ,coats, bags,protec tivecov-
ers, child seats orbooster seats.
R When theseat heating isswitched on,the
seat surface canbedamaged asaresult
of object sbeing placed onthe seats, for
example, seatcushions, childseats and
protec tivecovers notapproved by
Mercedes- Benz.
! Make
surethatthere arenoobject sin the
footwell underorbehind theseats when
moving theseats back. There isarisk that
the seats and/or theobject scould bedam-
aged.
i The
head restraints cannotbe removed. 98
SeatsSeats,
steering wheelandmirrors
Page 101 of 330
For
more information,contact aqu alifi ed
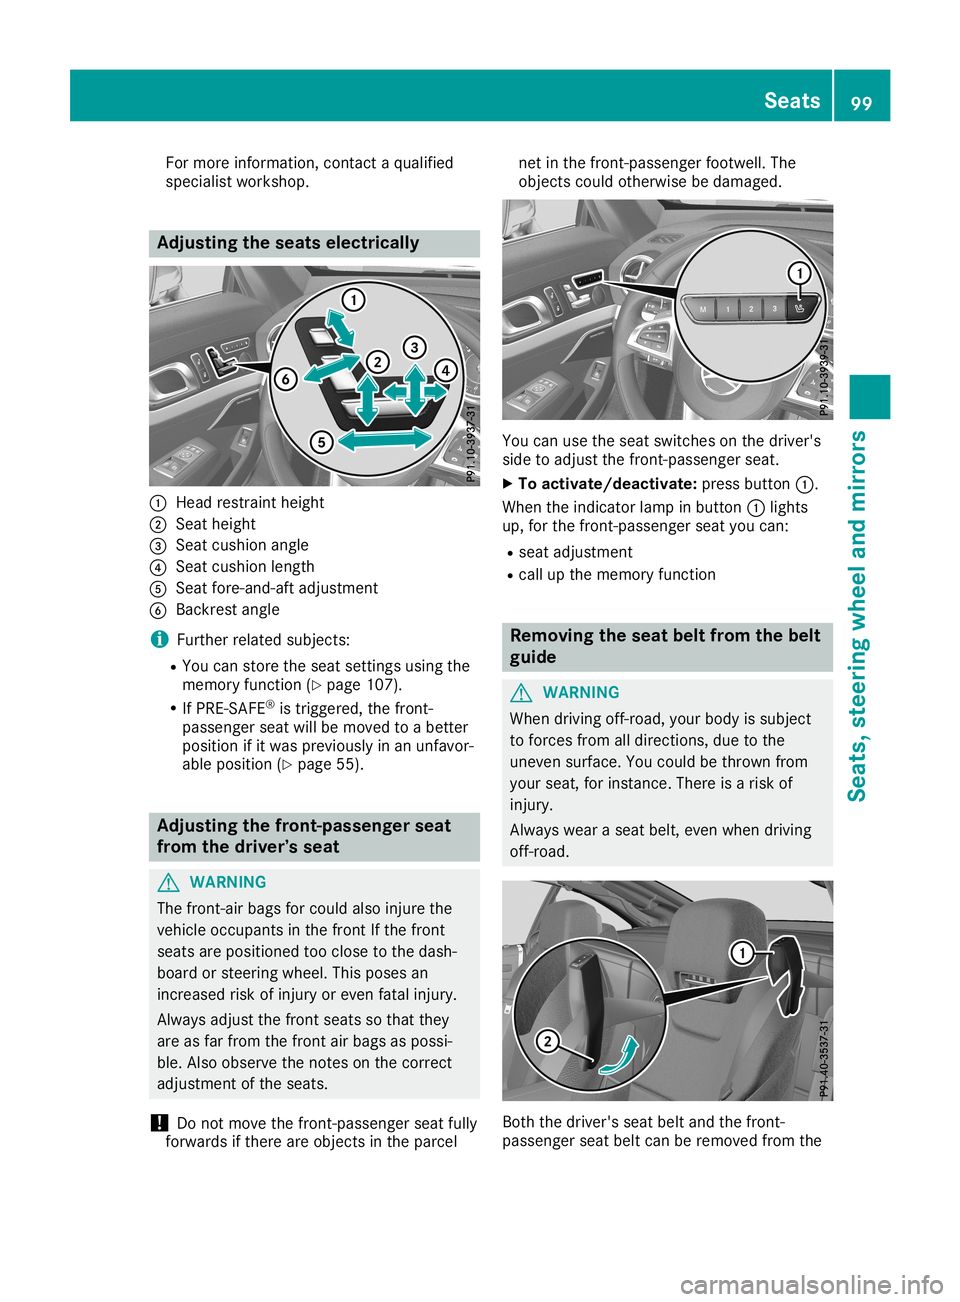
spe cialist wor kshop . Adjusti
ngthe seats elec trical ly 0043
Hea drestra intheight
0044 Seathei ght
0087 Seatcush ionangl e
0085 Seatcush ionleng th
0083 Seatfore -and-a ftad justme nt
0084 Backre stangl e
i Furthe rrel ated subjects:
R You canstore theseatsetting susi ng the
memo ryfuncti on(Ypage 107 ).
R IfPR E-SAFE ®
is trigg ered,the front-
pa sseng ersea twi llbe move dto abetter
pos itionif it wa spre viousl yin an unfa vor-
ab lepos ition(Y page 55). Adjusti
ngthe fron t-passe ngerse at
from thedrive r’sseat G
WARNI
NG
The front-ai rba gs for cou ldalso injur ethe
vehi cleoccup antsinthe front Ifthe front
sea tsare positioned tooclos eto the dash-
boa rdorsteer ingwhe el.Thispos esan
increa sedrisk ofinjur yor even fatalinjur y.
Alw aysad just thefront seatsso that they
are asfar from thefront airba gs aspos si-
ble .Also observe thenotes onthe corre ct
ad justme ntofthe seats.
! Do
not move thefront-pa ssengersea tful ly
forw ardsif there areobje ctsinthe parcel net
inthe front-pa ssengerfootw ell.The
obje ctscou ldother wise be damag ed. You
canusetheseatswi tches onthe driver's
sid eto adjust thefront-pa ssengersea t.
X To acti vate/ deactivate :pre ssbutton 0043.
Whe nthe indicator lamp inbu tton 0043lights
up ,for the front-pa ssengersea tyo ucan:
R sea tad justme nt
R cal lup the memo ryfuncti on Remo
vingthe seat beltfrom thebelt
gui de G
WARNI
NG
Whe ndri ving off-roa d,your bod yis sub ject
to force sfrom alldir ectio ns,dueto the
unev ensur face .You couldbe throw nfrom
yo ur sea t,for insta nce. Thereisarisk of
injur y.
Alw ayswe arasea tbel t,even whendri ving
off-roa d. Both
thedriver's seatbel tand thefront-
pa sseng ersea tbel tcan beremo vedfrom the Se
ats
99Seats, stee ring wheeland mirrors Z
Page 102 of 330
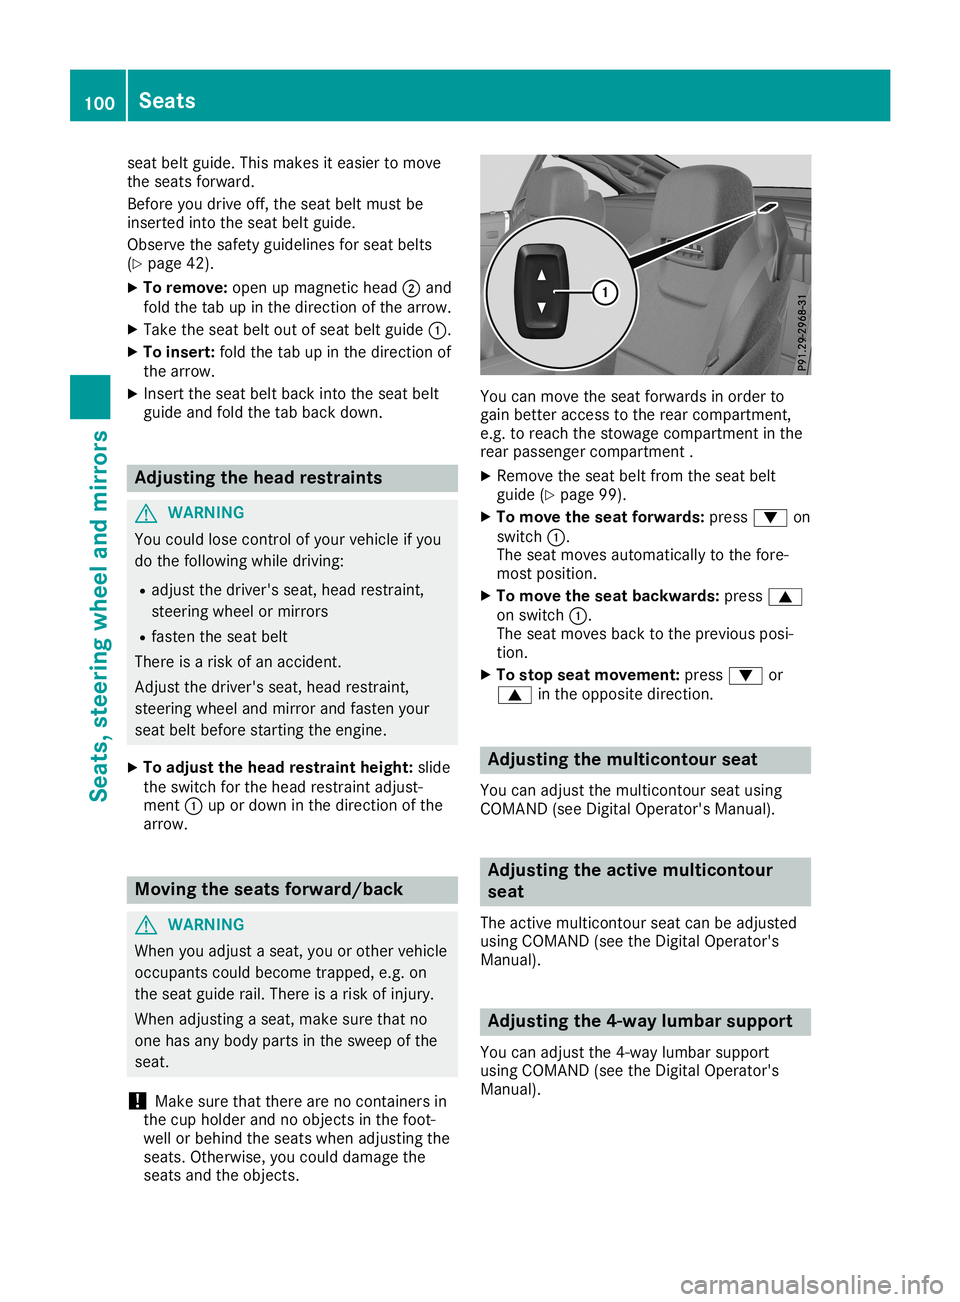
seat
beltguide .This makes iteasier tomove
the seats forward.
Before youdrive off,theseat beltmust be
inserted intotheseat beltguide .
Observe thesafety guidelinesforseat belts
(Y page 42).
X To remove: openupmagnetic head0044and
fold thetabupinthe direction ofthe arrow.
X Take theseat beltoutofseat beltguide 0043.
X To insert: foldthetabupinthe direction of
the arrow.
X Insert theseat beltback intotheseat belt
guide andfold thetabback down. Adjusting
thehead restra ints G
WARNING
You could losecontrolofyour vehicle ifyou
do the followi ngwhile driving:
R adjust thedriver's seat,head restraint,
steering wheelormirrors
R fasten theseat belt
There isarisk ofan accident.
Adjust thedriver's seat,head restraint,
steering wheelandmirror andfasten your
seat beltbefore starting theengine.
X To adju stthe head restra intheight: slide
the switch forthe head restraint adjust-
ment 0043upordown inthe direction ofthe
arrow. Moving
theseats forward/back G
WARNING
When youadjust aseat, youorother vehicle
occupants couldbecome trapped, e.g.on
the seat guide rail.There isarisk ofinjury.
When adjusting aseat, make surethatno
one hasany body parts inthe sweep ofthe
seat.
! Make
surethatthere arenocont ainers in
the cup holder andnoobjects inthe foot-
well orbehind theseats when adjusting the
seats. Otherwise, youcould damage the
seats andtheobjects. You
canmove theseat forwards inorder to
gain better access tothe rear compartment ,
e.g. toreach thestowage compartment inthe
rear passenger compartment .
X Remove theseat beltfrom theseat belt
guide (Ypage 99).
X To move theseat forwards: press0064on
switch 0043.
The seat moves automaticall yto the fore-
most position.
X To move theseat backwards: press0063
on switch 0043.
The seat moves backtothe previous posi-
tion.
X To stop seatmovement: press0064or
0063 inthe opposite direction. Adjusting
themulticontour seat
You canadjust themulticontour seatusing
COMAND (seeDigital Operator's Manual). Adjusting
theactive multicontour
seat
The active multicontour seatcanbeadjusted
using COMAND (seetheDigital Operator's
Manual ). Adjusting
the4-way lumbar support
You canadjust the4-way lumbarsupport
using COMAND (seetheDigital Operator's
Manual ). 100
SeatsSeats,
steering wheeland mirrors
Page 105 of 330
Steering
wheel Import
antsafety notes G
WARNING
You could losecontrolofyour vehicle ifyou
do the following whiledriving:
R adjust thedriver's seat,head restraint ,
steering wheelormirrors
R fasten theseat belt
There isarisk ofan accident.
Adjust thedriver's seat,head restraint ,
steering wheelandmirror andfasten your
seat beltbefore startingthe engine. G
WARNING
Children couldinjure themselves ifthey
adjust thesteering wheel.Thereisarisk of
injury.
Never leavechildren unsupervised inthe
vehicle.
When leaving thevehicle, alwaystake the
SmartK eywith youand lock thevehicle. This
also applie sfor the Digital Vehicle Keyifthe
"Digital Vehicle Key"functionisactivated via
Mercedes meconn ect.
The electrically adjustablesteeringwheelcan
still beadjusted whenthereisno SmartK eyin
the ignition lock. Adjust
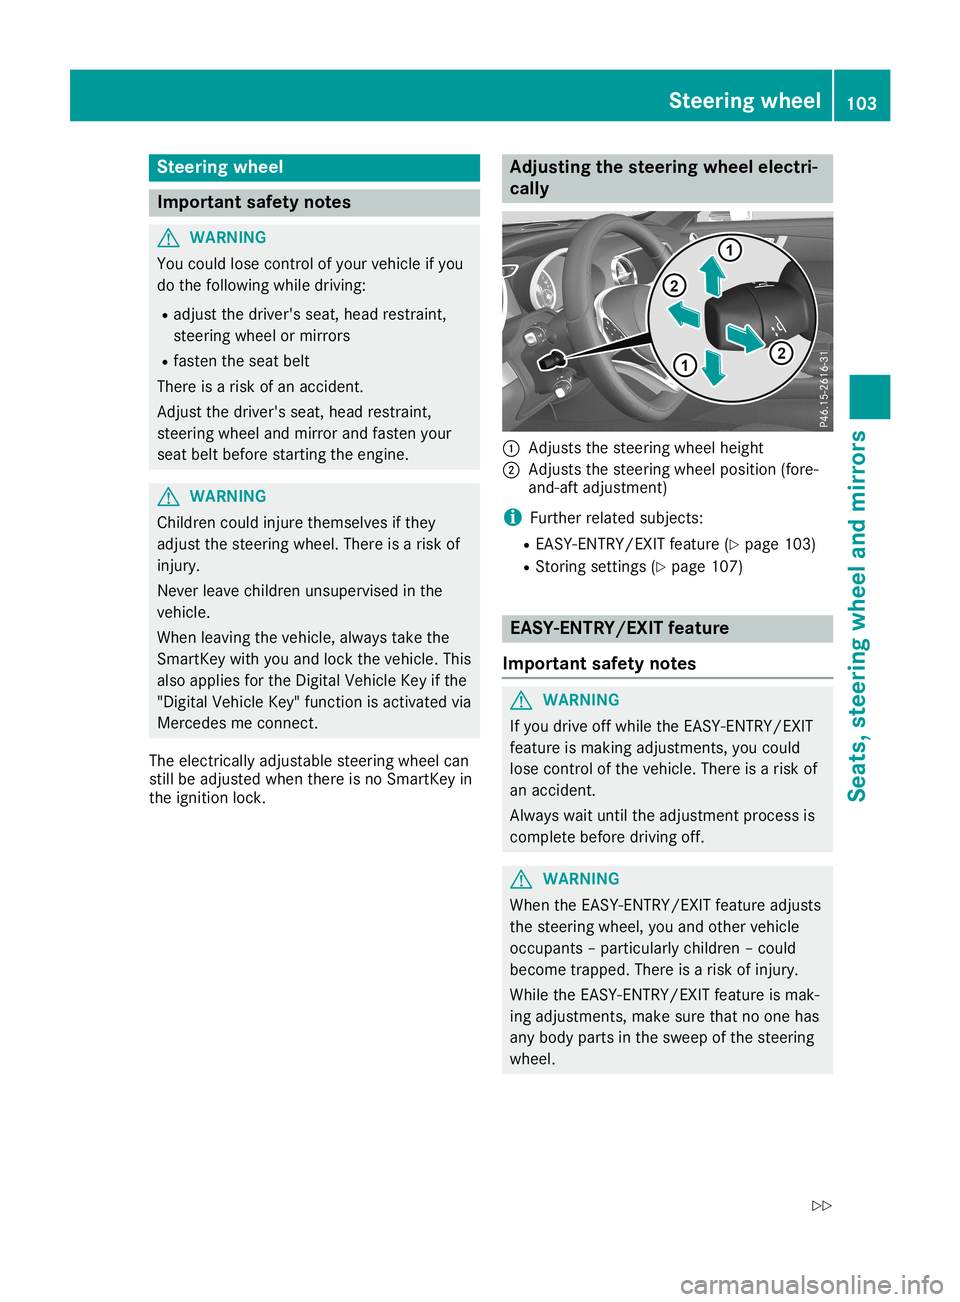
ingthe steering wheelelectri-
cally 0043
Adjust sthe steering wheelheight
0044 Adjust sthe steering wheelposition (fore-
and-aft adjustment )
i Further relatedsubjects:
R EAS Y-ENTRY/E XITfeature (Ypage 103)
R Stor ingsettin gs(Y page 107) EASY
-ENTR Y/EXITfeatur e
Import antsafety notes G
WARNING
If you drive offwhile theEAS Y-ENTRY/E XIT
feature ismaking adjustment s,you could
lose controlofthe vehicle. Thereisarisk of
an accident.
Always waituntil theadjustment processis
complete beforedriving off. G
WARNING
When theEAS Y-ENTRY/E XITfeature adjusts
the steering wheel,youand other vehicle
occupants –particularly children–could
become trapped. Thereisarisk ofinjury.
While theEAS Y-ENTRY/E XITfeature ismak-
ing adjustment s,make surethatnoone has
any body parts inthe sweep ofthe steering
wheel. Steering
wheel
103Seats,steering wheeland mirrors
Z
Page 172 of 330
Selec
tingtheCURVE setting
In the CURVE driveprogram, thecurve tilting
funct ionisactivated. Thevehicle tiltsbyup to
2.65 degrees intobends. Thetiltfunct ionand
the comfort suspension tuningincrease driving
comfort incorner s.CURVE isavaila bleinthe
speed rangebetween 9mph (15km/h) and
112 mph (180km/h). Selectthismode on
winding roadsinparticular. Outsidethisspeed
range, theCURVE driveprogram isthe same
as the Comfort driveprogram.
The curve tilting functionmonitor sthe road in
front ofyour vehicle bymeans ofacamera
attached atthe top ofthe windshield. This
funct ionisautomatically activeifyou select
the CURVE driveprogram. Thesystem is
operational atspeeds ofup to112 mph
(180 km/h).
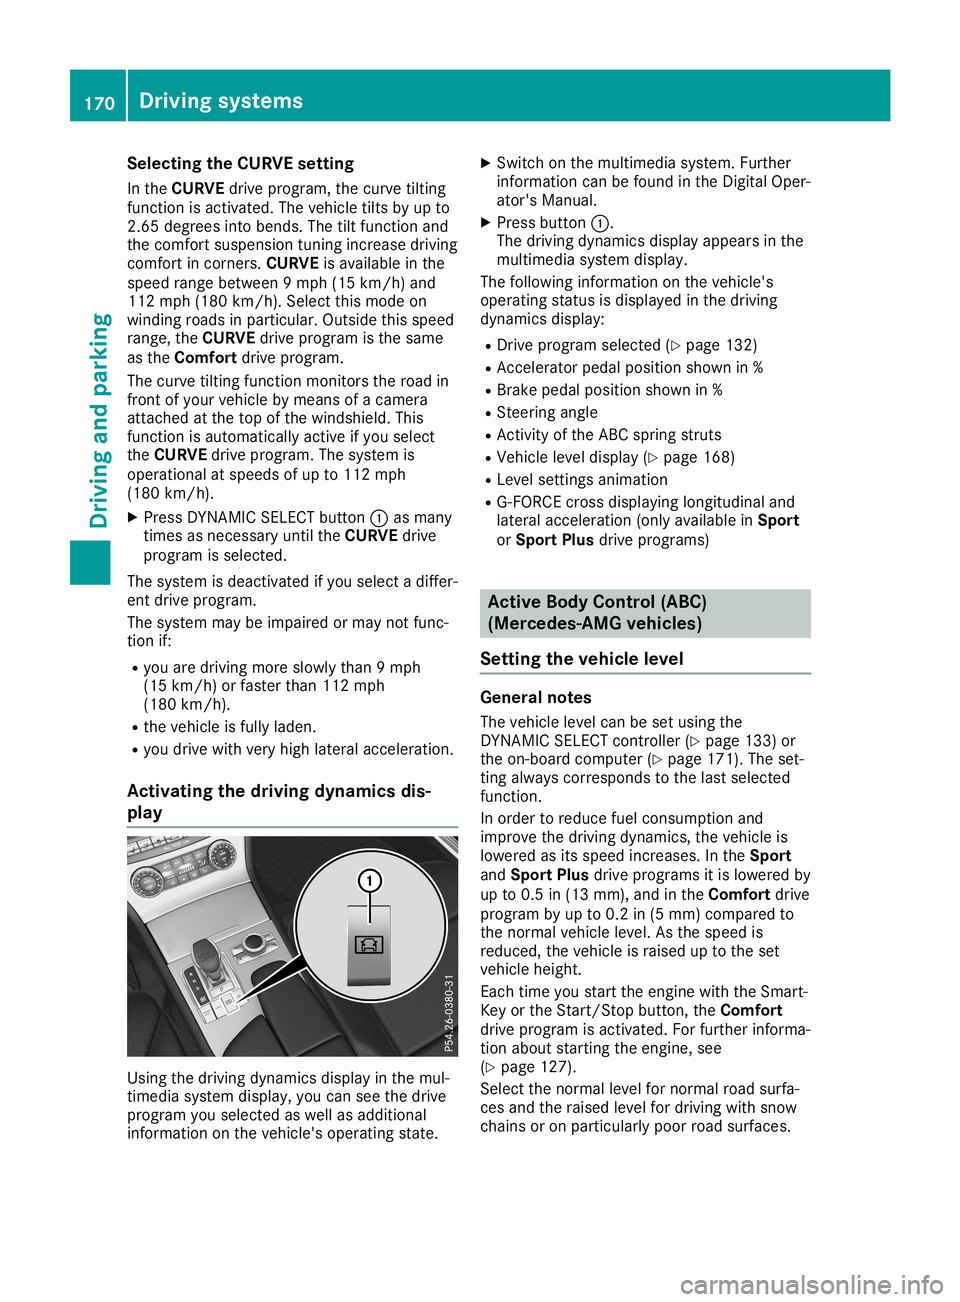
X Press DYNAMIC SELECTbutton 0043asmany
times asnecessary untiltheCURVE drive
program isselected.
The system isdeactivated ifyou select adiffer-
ent drive program.
The system maybeimpaired ormay notfunc-
tion if:
R you aredriving moreslowly than9mph
(15 km/h) orfaster than112mph
(180 km/h).
R the vehicle isfully laden.
R you drive withveryhigh lateral acceleration.
Activating thedriving dynamicsdis-
play Using
thedriving dynamics displayinthe mul-
timedia systemdisplay,you can seethedrive
program youselected aswell asadditional
information onthe vehicle's operating state. X
Switch onthe multimedia system.Further
information canbefound inthe Digital Oper-
ator's Manual.
X Press button 0043.
The driving dynamics displayappears inthe
multimedia systemdisplay.
The following information onthe vehicle's
operating statusisdisplay edinthe driving
dynamics display:
R Drive program selected (Ypage 132)
R Acc elerator pedalposition shownin%
R Brake pedalposition shownin%
R Steerin gangle
R Act ivity ofthe ABC spring struts
R Vehicle leveldisplay (Ypage 168)
R Level settingsanimation
R G-FORCE crossdisplay inglongitudinal and
lateral acceleration (onlyavaila bleinSport
or Sport Plusdrive programs) Active
BodyControl (ABC)
(Mercedes-AMG vehicles)
Setting thevehicle level General
notes
The vehicle levelcanbeset using the
DYNAMIC SELECTcont roller (Ypage 133)or
the on-board computer (Ypage 171). Theset-
ting alwa yscorresponds tothe last selected
funct ion.
In order toreduce fuelconsumpt ionand
improve thedriving dynamics, thevehicle is
lowered asits speed increases. Inthe Sport
and Sport Plusdrive programs itis lowered by
up to0.5 in(13 mm), andinthe Comfort drive
program byup to0.2 in(5 mm) compared to
the normal vehicle level.Asthe speed is
reduced, thevehicle israised uptothe set
vehicle height.
Each timeyoustart theengine withtheSmart-
Key orthe Start /Stopbutton, theComfort
drive program isactivated. Forfurther informa-
tion about startin gthe engine, see
(Y page 127).
Select thenormal levelfornormal roadsurfa-
ces and theraised levelfordriving withsnow
chains oron particularly poorroadsurfaces. 170
Driving
systemsDriving andparking
Page 182 of 330
Under
thefollowi ngcircumstances, therear
view camera willnotfunction, orwill function
in alimited manner:
R ifthe trunk lidisopen
R in heavy rain,snow orfog
R at night orinvery dark places
R ifthe camera isexposed tovery bright light
R ifthe area islit by fluorescent bulbsor LED
lighting (thedispla ymay flicker)
R ifthere isasudden changeintemperature,
e.g. when driving intoaheated garagein
winter
R ifthe camera lensisdirty orobstructed.
Observe thenotes oncleaning
(Y page 275)
R ifthe rear ofyour vehicle isdamage d.Inthis
case, havethecamera position andsetting
checked ataqual ified speciali stworkshop.
The field ofvision andother functions ofthe
rear view camera mayberestrict eddue to
additional accessories onthe rear ofthe vehi-
cle (e.g. license plateholder, bicycle rack).
On vehicles with<004B0048004C004A004B0057001000440047004D00580056005700440045004F
0048[ chassis,
leaving thestandard heightcanresult ininac-
curacies inthe guide lines,depending ontech-
nical conditions.
i The
cont rast ofthe displa ymay beaffec-
ted bythe sudden presence ofsunlight or
other lightsources, e.g.when exiting a
garage. Payparticular attentioninthis situa-
tion.
i If
usabi lityisseverely restricted,e.g. due
to pixel errors, havethedispla yrepaired or
replaced.
Activating/ deactivating therear view
camera X
To activate: makesurethattheSmartKey
is in position 0048inthe ignition lock.
X Make surethattheActivation byRgear Activation
byRgear
function isselected inthe multimedia sys-
tem; seetheDigital Operator's Manual.
X Engage reverse gear.
The multimedia systemshowsthearea
behind thevehicle withguide lines.
The image fromtherear view camera is
avail able throughout themaneuvering proc-
ess. To
deactivate: therear view camera deacti-
vates ifyou shift thetransmission toposition
005D, orafter driving forwards ashort distance.
The inner segments ofthe warning indicator
are displa yedinred ifthere isacomplete sys-
tem failure.The indicator lampinthe
PARKTRONIC buttonlightsup.
If the system failsatthe rear ofthe vehicle:
R the rear segments areshown inred when
backing up.
R the rear segments arehidden whendriving
forwards.
Displays inthe multim ediasystem The
rear view camera mayshow adistorted
view ofobstacles, showthemincorrect lyor
not atall. The rear view camera doesnotshow
objects inthe followi ngpositions:
R very close tothe rear bumper
R under therear bumper
R in close range above thehandle onthe trunk
lid
! Objects
notatground levelmayappea rto
be further awaythan theyactually are,e.g.:
R the bumper ofaparked vehicle
R the drawba rof atrailer
R the ball coupling ofatrailer towhitch
R the rear section ofan HGV
R aslanted post
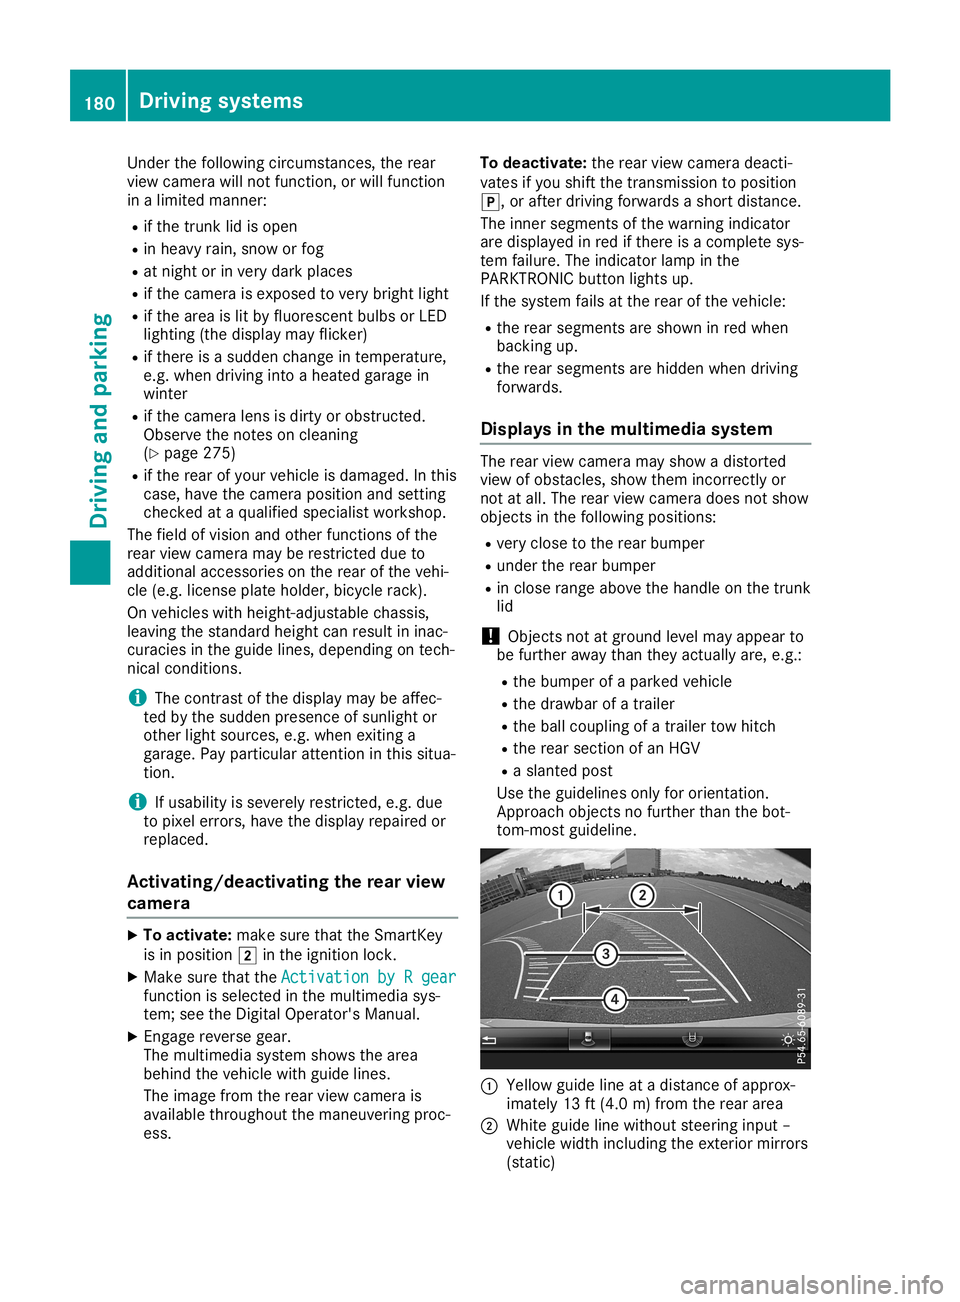
Use theguide linesonlyfororientation.
Approach objectsnofurther thanthebot-
tom-most guideline. 0043
Yello wguide lineatadistance ofapprox-
imately 13ft(4.0 m)from therear area
0044 White guidelinewithout steering input–
vehicle widthincluding theexterior mirrors
(static) 180
Driving
systemsDriving andparking