2019 MERCEDES-BENZ SL ROADSTER warning light
[x] Cancel search: warning lightPage 254 of 330
opened,
theloading aidrises automatically.
When theroof isclosed, thetrunk partition
remains inthe open position. Thetrunk par- tition
moves tothe closed position automat-
ically when theroof islowered.
Problems withtheloading aid Problem
Possible
causes/conse quencesand0050 0050
Solutions It
is no longer possible
to lower thestowed
roof inthe trunk using
the loading aid. You
cann otclose thetrunk anymore.
X Call aquali fiedspecialist workshop. Stowage
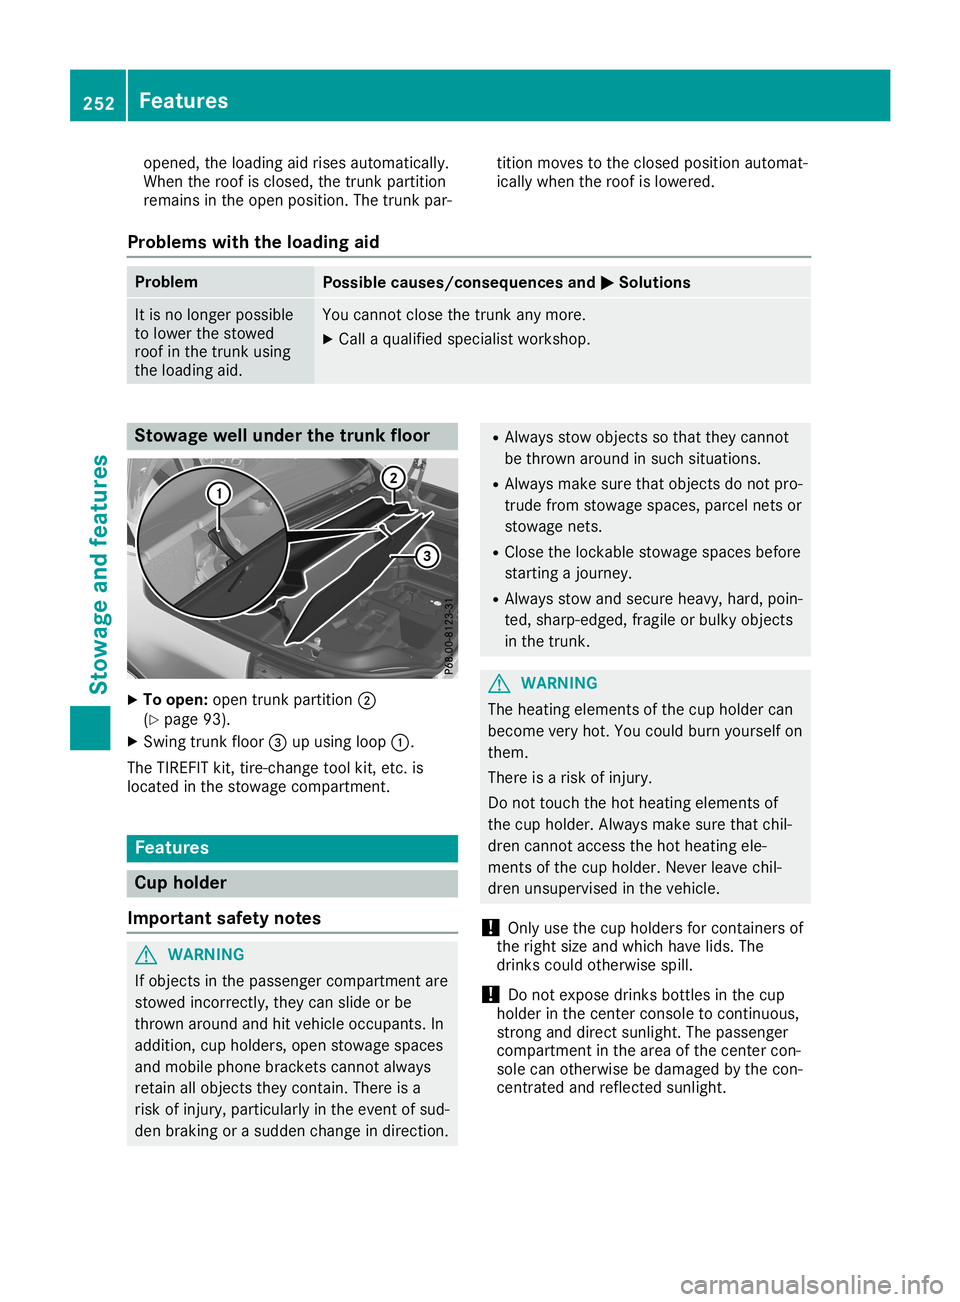
wellunder thetrunk floor X
To open: opentrunk partition 0044
(Y page 93).
X Swing trunkfloor0087upusing loop0043.
The TIREFIT kit,tire-c hange toolkit,etc. is
located inthe stowage compartm ent. Featur
es Cup
holder
Import antsafety notes G
WARNING
If object sin the passenger compartmentare
stowed incorrectly, theycanslide orbe
thrown around andhitvehicle occupant s.In
addition, cupholders, openstowage spaces
and mobile phonebracket scann otalway s
retain allobject sthey contain.There isa
risk ofinjury, particularly inthe event ofsud-
den braking orasudden changeindirection . R
Always stowobject sso that they cannot
be thrown around insuch situations.
R Always makesurethatobject sdo not pro-
trude fromstowage spaces,parcelnetsor
stowage nets.
R Close thelockable stowagespacesbefore
start ingajourney.
R Always stowandsecure heavy,hard,poin-
ted, sharp-edged, fragileorbulky object s
in the trunk . G
WARNING
The heating elements ofthe cup holder can
become veryhot.Youcould burnyourself on
them.
There isarisk ofinjury.
Do not touch thehot heating elements of
the cup holder. Alwaysmakesurethatchil-
dren cannotaccess thehot heating ele-
ment sof the cup holder. Neverleavechil-
dren unsupervised inthe vehicle.
! Only
usethecup holders forcont ainers of
the right sizeandwhich havelids.The
drinks couldotherwise spill.
! Do
not expose drinksbottles inthe cup
holder inthe cent erconsole tocont inuous,
stron gand direct sunlight. Thepassenger
compartm entinthe area ofthe cent ercon-
sole canotherwise bedamaged bythe con-
cent rated andreflect edsunlight. 252
Featur
esStowage andfeatu res
Page 258 of 330
R
The indicator lampinone ormore ofthe fol-
lowing buttonscont inues tolight upred
after thesystem self-diagnosis:
- SOS button
- 0052 Roadside Assistancecallbutton
- 00D9 MBInfo callbutton
R Aft erthe system self-diagnosis, theInoper‐ Inoper‐
ative ative
orService NotActivated Service
NotActivated mes-
sage appears inthe multifunct iondisplay .
If amalfunct ionisindicated asoutlined above,
the system maynotoperate asexpect ed.In
the event ofan emergenc y,help willhave to
be summoned byother means.
Have thesystem checkedatthe nearest
Mercedes- BenzServic eCenter orcont actthe
following servicehotlines:
R USA: Mercedes- BenzCustomer Assistance
Center at1-8 00-FOR-ME RCedes
(1-80 0-367-6372 )or 1-86 6-990-9007
R Canada: Customer Serviceat
1-88 8-92 3-8367
Emergency call Import
antsafety notes G
WARNING
It can bedangerous toremain inthe vehicle,
even ifyou have pressed theSOS button in
an emergenc yif:
R you seesmoke insideoroutside ofthe
vehicle, e.g.ifthere isafire after anacci-
dent
R the vehicle ison adangerous sectionof
road
R the vehicle isnot visible orcann oteasily
be seen byother roadusers, particularly
when darkorinpoor visibility conditions
There isarisk ofan accident andinjury.
Leave thevehicle immediately inthis orsim-
ilar situations assoon asitis safe todo so.
Move toasafe location alongwithother
vehicle occupant s.In such situations, secure
the vehicle inaccordanc ewith national regu-
lations, e.g. with awarning triangle.
A license agreement mustbeinplace inorder
to activate theMercedes meconn ectservice.
Make surethatyour system isactivated andoperational.
Toregister, pressthe00D9 MB
Info callbutton .If any ofthe steps mentioned
are not carried out,thesystem maynotbe
activated.
If you have questions abouttheactivation ,
cont actone ofthe following telephone hot-
lines:
R USA: Mercedes-B enzCustomer Assistance
Center at1-80 0-FOR-MERCedes
(1-80 0-367-6372)or1-86 6-990-9007
R Canada: Customer Serviceat
1-88 8-923-8367
General notes
An emergenc ycall isdialed automatically ifan
air bag orEmergen cyTensionin gDevice istrig-
gered.
i You
cann otend anautomatically triggered
emergenc ycall yourself.
An emergenc ycall can also beinitiated man-
ually .
As soon asthe emergenc ycall has been initi-
ated, theindicator lampinthe SOS button
flashes. Themultifunct iondisplay showsthe
Connecting Call Connecting
Callmessage.
The audio output ismuted.
Once theconn ection hasbeen made, the
Call Connected Call
Connected messageappearsinthe mul-
tifunc tiondisplay .
All important informationonthe emergenc yis
transm itted,forexample:
R Current location ofthe vehicle (asdeter-
mined bythe GPS system)
R Vehicle identificat ionnumber
R Infor mation onthe severity ofthe accident
Short lyafter theemergenc ycall has been initi-
ated, avoice connection isautomatically
established betweentheCustomer Assistance
Center andthevehicle occupant s.
R Ifthe vehicle occupant sare responsive, the
Mercedes-B enzCustomer AssistanceCenter
attempt sto get more informat iononthe
emergenc y.
R Ifthere isno response fromthevehicle
occupant s,an ambulance isimmediately
sent tothe vehicle.
If no voice connection canbeestablished to
the Mercedes-B enzCustomer AssistanceCen-
ter, thesystem hasbeen unable toinitiate an
emergenc ycall. 256
Featur
esStowage andfeatu res
Page 262 of 330
garage
dooropener, contactanauthorized
Mercedes-B enzCenter.
Altern atively, youcan callthefollowing tele-
phone assistance services:
R USA: Mercedes-B enzCustomer Assistance
Center at1-80 0-FOR-MERCedes
R Canada: Customer Serviceat
1-80 0-38 7-0100
R HomeLink ®
hotline 1-800-355-3515(free of
charge)
More informat iononHomeLink ®
and/or com-
patible products isalso availa bleonline at
htt p:// www.homelink.c om.
Notes onthe declaration ofconf ormity
(Y page 27).
USA: FCCID:CB2HMIH L4
Canada: IC:279B -HMIH L4
Import antsafety notes G
WARNING
When youoperate orprogram thedoor with
the integrat edgarage dooropener, persons
in the range ofmovement ofthe door may
become trappedorbe struck bythe door.
There isarisk ofinjury.
When usingtheintegrat edgarage door
opener, alwaysmake surethatnobody is
within therange ofmovement ofthe door. G
DANGER
Combustion enginesemitpoisonous
exhaust gasessuchascarbon monoxide.
Inhaling theseexhaust gasesishazardous to
health andcanresult inpoisoning. Thereisa
risk offatal injury. Therefore, neverleavethe
engine runningan enclosed spacewithout
adequa tevent ilation.
Program ming Program
mingthebutt ons
Pay atten tiontothe "Important safetynotes"
(Y page 260). Garage
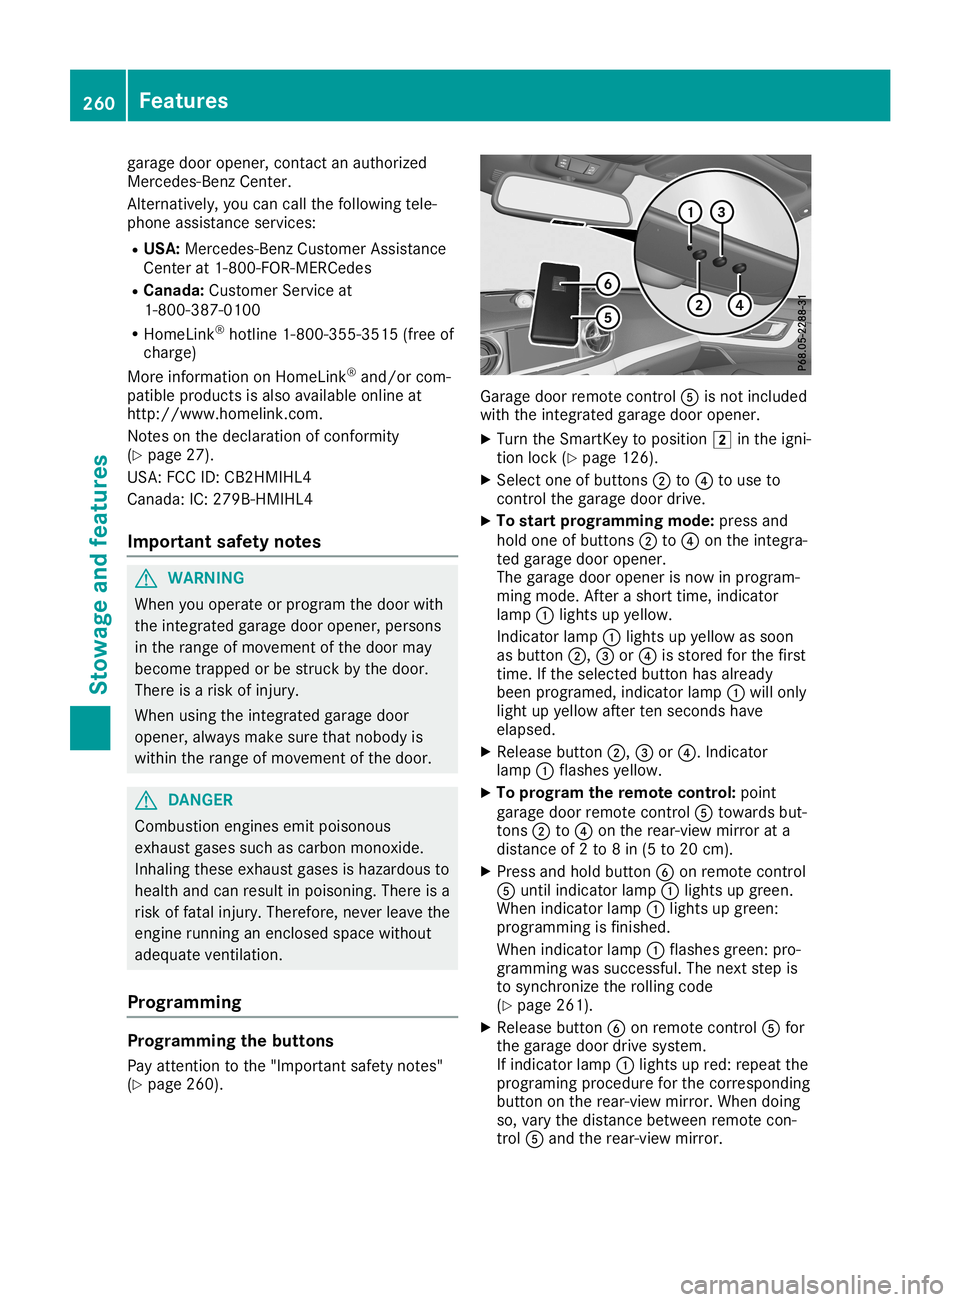
doorremote control0083 isnot included
with theintegrat edgarage dooropener.
X Turn theSmart Keytoposition 0048inthe igni-
tion lock (Ypage 126).
X Select oneofbutton s0044 to0085 touse to
cont rolthe garage doordrive.
X To star tprogr ammingmode: pressand
hold oneofbutton s0044 to0085 onthe integra-
ted garage dooropener.
The garage dooropener isnow inprogram-
ming mode. Afterashort time,indicator
lamp 0043lights upyellow .
Indicator lamp0043lights upyellow assoon
as button 0044,0087or0085 isstored forthe first
time. Ifthe selected buttonhasalready
been programed, indicatorlamp0043will only
light upyellow aftertenseconds have
elapsed.
X Release button0044,0087or0085. Indicator
lamp 0043flashes yellow.
X To progr amthe remote control: point
garage doorremote control0083 towards but-
tons 0044to0085 onthe rear-view mirrorata
distance of2to 8in (5 to 20 cm).
X Press andhold button 0084onremote control
0083 until indicator lamp0043lights upgreen.
When indicator lamp0043lights upgreen:
programming isfinished.
When indicator lamp0043flashes green:pro-
gramming wassuccessful. Thenext step is
to synchron izethe rolling code
(Y page 261).
X Release button0084onremote control0083 for
the garage doordrive system.
If indicator lamp0043lights upred: repeat the
programing procedureforthe correspon ding
button onthe rear-view mirror.Whendoing
so, vary thedistance between remotecon-
trol 0083and therear-view mirror. 260
Featur
esStowage andfeatu res
Page 274 of 330
Observe
thelegal requirements ineach coun-
try.
X Do not use hotwater anddonot wash the
vehicle indirect sunlight.
X Use asoft sponge toclean.
X Use amild cleaning agent,suchasacar
shampoo approved byMercedes-Benz .
X Thoroughly hosedown thevehicle witha
gentle jetofwater.
X Do not point thewater jetdirectly towards
the airinlet orthe edges ofdecorative foils.
X Use plenty ofwater andrinse outthe
sponge frequently.
X Rinse thevehicle withclean water anddry
thoroughly withachamois.
X Do not letthe cleaning agentdryonthe
paintwork orthe decorative foils.
Careful lyremove alldeposits ofroad saltas
soon aspossible whendriving inwinter.
Powe rwashers G
WARNING
The water jetfrom acircular jetnozz le(dirt
blasters) cancause invisible exteriordam-
age tothe tires orchassis component s.
Components damagedinthis way may fail
unexpectedly. Thereisarisk ofan accident.
Do not use power washers withcircular jet
nozz lestoclean thevehicle. Havedamaged
tires orchassis component sreplaced imme-
diately .
! Vehicles
withdecorative film:parts ofyour
vehicle arecovered withdecorative film.
Maintain adistance ofat least 27.5in
(70 cm) between thefilm-covered partsof
the vehicle andthenozz leof the power
washer.
Information aboutthe correct distance is
avail able from theequip ment manufacturer.
Move thepower washer nozzlearound when
cleaning yourvehicle.
The water temperature ofthe power washer
must notexceed 140‡(60 †).
! Alway
smaintain adistance ofat least
12 in(30 cm) between thevehicle andthe
power washer nozzle.Information aboutthe
correct distance isavail able from theequip -
ment manufacturer. Move
thepower washer nozzlearound when
cleaning yourvehicle.
Do not aim directly atany ofthe followi ng:
R Tires
R Door gaps, roofgaps, joints, etc.
R Electrical component s
R Battery
R Plug-type couplings
R Light bulbs
R Seals
R Trim elements
R Ventilation slots
Damaged sealsorelectrical component s
can lead toleaks orfailu res.
! Vehicles
withHAND S-FREE ACCESS: ifa
SmartKey withKEYLES S-GOiswithin the
detection rangeofthe KEYLES S-GO
antenn a,the followi ngsituations couldlead
to the unintent ionalopening ofthe trunk lid:
R using acar wash
R using apower washer
Make surethattheSmartKey isat least
6.5 ft(2 m) awa yfrom thevehicle.
Cleani ngthe paintwork !
Do
not affix:
R stickers
R films
R magnetic platesorsimila ritems
to painted surfaces. Youcould otherwise
damage thepaintwork.
Scratc hes,corrosive deposits,areasaffected
by corrosion anddamage causedbyinade-
quate carecannot alwaysbe completely
repaired. Insuch cases, visitaqual ified spe-
cialist workshop.
X Remove dirtimmediately ,where possible ,
while avoidi ngrubbing toohard.
X Soak insect remains withinsect remover
and rinse offthe treated areasafterwards.
X Soak birddroppings withwater andrinse off
the treated areasafterwards.
X Remove treeresin, oils,fuels andgreases by
rubbing gentlywithacloth soaked inpetro-
leum ether orlighter fluid
X Remove coolantandbrake fluidwithamoist
cloth andclear water. 272
CareMaintenance
andcare
Page 288 of 330
G
WARNING
During chargingand jump-starting, explosivegase scan escap efrom thebattery .There isa
risk ofan explo sion.
Particu larlyavoi dfire, open flames,creating sparksand smoking. Ensurethereissuffi cient
ventila tionwhilechargi ngand jump-starting. Donot leanover abattery . G
WARNING
During thechargi ngprocess ,a battery produceshydrogen gas.Ifashort circuitoccurs or
spar ksare created ,the hydrogen gascan ignite. Thereisarisk ofan explo sion.
R Make surethattheposi tive terminal ofaconnected batterydoesnotcome intocontact with
vehicl eparts.
R Never placemetal objects ortools onabattery .
R Itis impor tantthatyouobse rvethe descri bedorder ofthe battery terminal swhen connect-
ing and disconnecting abattery .
R When jump-starting, makesurethatthebattery poleswith identical polarityareconnected.
R Itis particu larlyimpor tanttoobse rvethe descri bedorder whenconnecting anddisconnect-
ing the jumper cables.
R Never connect ordisconnect thebattery terminal swhi lethe engine isrunning. G
WARNING
A discha rgedbattery canfreeze attempera turesbelow freezing point.Whenjump-starting the
vehicl eor chargi ngthe battery ,gase scan escap efrom thebattery .There isarisk ofan explo -
sion.
Allow thefrozen battery tothaw outbefore chargingitor jump-starting.
! Avoid
repeatedand lengthy starting attempts. Otherwise,the catal yticconverter couldbe
dama gedbythe non-combusted fuel.
If the indica tor/warni nglamp sdo not light up atlow tempera tures,itis very likelythat thedis-
charge dbattery hasfrozen. Inthis case, youmay neither chargethebattery norjump-start the
vehicl e.The service lifeofathawe d-outbattery maybeshorter. Thestarting characteristics can
be impa ired,particu larlyat low tempera tures.Havethethawe d-outbattery checked ataqua li-
fied speci alist worksho p.
Do not start thevehicl eusi ng arapi dchargi ngdevi ce.Ifyou rvehicl e'sbattery isdischa rged,the
engine canbejump-started fromanother vehicleor from adonor battery using jumper cables.
Observe thefollowi ngpoints:
R The battery isnot accessi bleinall vehicl es.Ifthe other vehicle'sbattery isnot accessi ble,
jump-start thevehicl eusi ng adonor battery orajump-starting device.
R You may onlyjump-start thevehicl ewhen theengine andexhau stsystem arecold.
R Do not start theengine ifthe battery isfrozen. Letthe battery thawfirst.
R Only jump-start frombatterie swith a12 Vvoltag erating.
R Only usejumper cableswhi chhave asuffi cient cross-section andinsul ated terminal clamps.
R Ifthe battery isfull ydischa rged,leavethe battery thatisbei ng used tojump-start connected
for afew minutes beforeattempting tostart. Thischarge sthe battery slightly.
R Make surethatthetwo vehicl esdo not touch. 286
Jump-star
tingBreakdown assistance
Page 303 of 330
stantly,
thetire pressure monitorismalfunc-
tioning.
In addition tothe warning lamp,amessage
appea rsinthe multifunction display.Observe
the information ondispla ymessages
(Y page 227).
It may take uptoten minutes foramalfunc-
tion ofthe tire pressure monitortobe indica-
ted. Amalfunction willbeindicated bythe tire
pressure warninglampflashing forapprox-
imately oneminute andthen remaining lit.
When themalfunction hasbeen rectified, the
tire pressure warninglampgoesoutafter a
few minutes ofdriving.
The tirepressure valuesindicated bythe on-
board computer maydiffer fromthose meas-
ured atagas station withapressure gage.The
tire pressures shownbythe on-board com-
puter refertothose measured atsea level. At
high altitudes, thetire pressure valuesindica-
ted byapressure gagearehigher thanthose
shown bythe on-board computer. Inthis case,
do not reduce thetire pressures.
The operation ofthe tire pressure monitorcan
be affected byinterferen cefrom radio trans-
mitting equipment (e.g.radio headphones,
two-way radios)thatmay bebeing operated in
or near thevehicle.
Checki ngthe tire pressure electroni-
cally X
Make surethattheSmartKey isin position
0048 (Ypage 126)inthe ignition lock.
X Press the0059 or0065 button onthe steer-
ing wheel toselect theServ. Serv.
menu.
X Press the0063 or0064 button toselect
Tire Pressure Tire
Pressure.
X Press 0076.
The current tirepressure ofeach tireis
shown inthe multifunction display.
If the vehicle hasbeen parked forover
20 minutes, theTire pressure willbe Tire
pressure willbe
displayed afterdriving afew minutes displayed
afterdriving afew minutes
message appears.
Aft erateach-in process, thetire pressure
monitor automatically detectsnewwheels or
new sensors. Aslong asaclear allocation of
the tire pressure valuetothe individua lwheels
is not possible ,the Tire Pressure Monitor Tire
Pressure Monitor
Active Active
displaymessage isshown instead of
the tire pressure display.The tirepressures
are alread ybeing monitored. Tire
pressure monitorwarning mes-
sages The
tirepressure monitordetectsapressure
loss inone ormore tires:
R Ifthe tire pressure monitordetectsapres-
sure lossinone ormore tires,awarning
message isshown inthe multifunction dis-
play .The yellow tire pressure warninglamp
then lights up.
R Ifthe Please Correct TirePressure Please
Correct TirePressure
message appearsinthe multifunction dis-
play ,the tire pressure inat least onetireis
too low. Thetirepressure mustbecorrect ed
when theopportunity arises.
R Ifthe Check Tires Check
Tiresmessage appearsinthe
multifunction display,the tire pressure inat
least onetirehas dropped significantly. The
tires must bechecked.
R Ifthe Warning TireMalfunction Warning
TireMalfunction mes-
sage appea rsinthe multifunction display,
the tire pressure inat least onetirehas
dropped suddenly .The tires must be
checked.
Observe theinstruct ionsandsafety notesin
the displa ymessages inthe "Tires" section
(Y page 227).
If the wheel positions onthe vehicle arerota-
ted, thetire pressures maybedispla yedfor
the wrong positions forashort time.Thisis
rectified afterafew minutes ofdriving, andthe
tire pressures aredispla yedforthe correct
positions.
Restart ingthe tire pressure monitor When
yourestart thetire pressure monitor,all
existing warning messages aredeleted andthe
warning lampsgoout. Themonitor usesthe
currently settire pressures asthe reference
values formonitoring. Inmost cases, thetire
pressure monitorwillautomaticall ydetect the
new reference valuesafteryouhave changed
the tire pressure. However, youcan also set
reference valuesmanuall yas described here.
The tirepressure monitorthenmonitors the
new tirepressure values.
X Set thetire pressure tothe value recom-
mended forthe corresponding drivingsitua-
tion onthe Tire andLoading Information
placard onthe driver's sideB-pillar
(Y page 296). Tire
pressur e
301Wheels andtires Z