2019 MERCEDES-BENZ S CLASS check oil
[x] Cancel search: check oilPage 193 of 578

Ifthefollowing conditions are fulfilled,standbymode can be activated or deactivated usingthemultimedia system:
RThe engine is switched off.
RThe ignition is switched on.
Exceedingthevehicle's displayed non-opera‐tional time may cause inconvenience, i.e. it can‐not be guaranteedthatthestarter battery willreliablystartthe engine.
Thestarter battery must bechargedfirst inthefollowing situations:
RThevehicle's non-operational time must beextended.
RTheBattery Charge Insufficient for StandbyModemessageappears inthe multimediasystem display.
%Standby mode is automatically deactivatedwhenthe ignition is switched on.
Activating/deactivatingstandby modeMultimedia system:
,Vehicle.îVehicle Set-
tings.Standby Mode
%This function is notavailablefor all models.
#Activate�sor deactivate�Sthe function.Whenyou activatethe function, a promptappears.
#SelectYes.Standby mode is activated.
Driving and driving safety systems
Driving systems andyourresponsibility
Yourvehicle is equipped with driving systemswhich assistyou in driving, parking and maneu‐veringthevehicle. The driving systems are aidsand do notrelieveyou ofyourresponsibility per‐tainingtoroad traffic law.Pay attentiontothetraffic conditions at all times and intervenewhen necessary. Beaware ofthe limitationsregardingthe safe use ofthese systems.
Function oftheradar sensors
Some driving and driving safety systems useradar sensorstomonitorthe area in front of,behind or nexttothevehicle (depending onthevehicle's equipment).
Depending onthevehicle's equipment,theradarsensors are integrated behindthe bumpersand/or behindthe Mercedesstar.Keeptheseparts free of dirt, ice and slush (→page 409).The sensors must not be covered,forexamplebycycleracks,overhanging loads,stickers,foilorfoilstoprotect againststonechipping. Intheevent of damagetothe bumpers orradiator grill,orfollowing a collision impactingthe bumpers orradiator grill, havethe function oftheradar sen‐sorschecked at aqualified specialistworkshop.The driver assistance system may no longerworkproperly.
Driving and parking191
Page 398 of 578

Rfrequent operation in mountainousterrain oron poorroad surfaces
Rwhenthe engine is often leftidlingfor longperiods
Roperation in particularly dusty conditionsand/or if air-recirculation mode is frequentlyused
Inthese or similar operating conditions, havetheinterior airfilter, engine air cleaner, engine oiland oilfilteretc.changed more frequently. Thetires must bechecked more frequently ifthevehicle is operated under increased loads.Fur‐ther information can be obtained at aqualifiedspecialistworkshop.
Battery disconnection periods
The ASSYST PLUS service interval displaycan only calculatethe service due datewhenthe batteryis connected.
#Notedownthe service due date displayed onthe instrument display before disconnectingthe battery (→page 395).
Engine compartment
Active hood (pedestrian protection)
Operation ofthe active hood (pedestrian pro‐tection)In certain accident situations,therisk of injurytopedestrians can bereducedbythe actuationofthe active hood. Therear area ofthe hood israisedbyapproximately 80 mm.
Forthe drivetotheworkshop,resetthe trig‐gered active hoodyourself. Afterthe active hoodhas been triggered, pedestrian protection maybe limited.
Aqualified specialistworkshop mustre-instatethe full functionality ofthe active hood.
The active hood is notavailable in all countries.
Resettingthe active hood
&WARNINGRisk of burns from hot com‐ponent parts inthe engine compartment
Certain components inthe engine compart‐ment can beveryhot, e.g.the engine,theradiator and parts oftheexhaust system.
#Allowthe enginetocool down and onlytouch component parts described inthefollowing.
#Withyour handflat, push down active hood1inthe area aroundthe hinges on bothsides (arrows).The hood must engage in position.
#Ifthe active hood can beraised slightly attherear inthe area ofthe hinges,repeatthestep until it engages correctly.
396Maintenance and care
Page 401 of 578

Engine oil
Checkingthe engine oil level usingthe oildipstick
&WARNINGRisk of burns from hot com‐ponent parts inthe engine compartment
Certain component parts inthe engine com‐partment can beveryhot, e.g.the engine,the cooler and parts oftheexhaust system.
#Letthe engine cool down and onlytouchthe component parts describedasfollows.
Plug-inhybrid:observethe notes inthe Supple‐ment. Otherwise,you mayfailtorecognize dan‐gers.
Requirements:RThe engine must havean oil dipstick.If not,the engine oil level can bechecked only withthe on-board computer (→page 399).
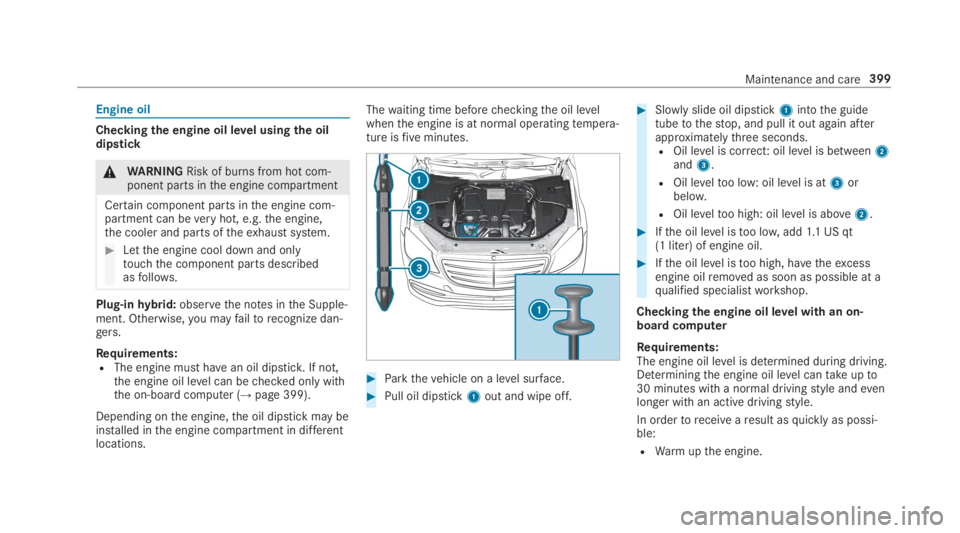
Depending onthe engine,the oil dipstick may beinstalled inthe engine compartment in differentlocations.
Thewaiting time beforecheckingthe oil levelwhenthe engine is at normal operatingtempera‐ture isfiveminutes.
#Parkthevehicle on a level surface.
#Pull oil dipstick1out and wipe off.
#Slowly slide oil dipstick1intothe guidetubetothestop, and pull it out again afterapproximatelythree seconds.ROil level is correct: oil level is between2and3.
ROil leveltoo low: oil level is at3orbelow.
ROil leveltoo high: oil level is above2.
#Ifthe oil level istoo low,add1.1 US qt(1 liter) of engine oil.
#Ifthe oil level istoo high, havetheexcessengine oilremoved as soon as possible at aqualified specialistworkshop.
Checkingthe engine oil level with an on-board computer
Requirements:The engine oil level is determined during driving.Determiningthe engine oil level cantakeupto30 minutes with a normal drivingstyle andevenlonger with an active drivingstyle.
In ordertoreceivearesult asquickly as possi‐ble:
RWarmupthe engine.
Maintenance and care399
Page 402 of 578

RParkthevehicle on a level surface.
RLeavethe enginerunning at idle speed.
On-board computer:
,Service.Engine Oil Level
You will see one ofthefollowing messages inthe multifunction display:
#Measuring Engine Oil Level...: measurementofthe oil level is notyet possible.Repeattherequest after a maximum of 30 minutes' driv‐ing.
#Engine Oil Level OKandthe bar displayforindicatingthe oil level inthe multifunctiondisplay is green and is between "min" and"max":the oil level is correct.
#Engine Oil Level Add 1.0 landthe bar displayfor indicatingthe oil level inthe multifunctiondisplay is orange and is below "min": add1.1 US qt (1 liter) of engine oil.
#Reduce Engine Oil Levelandthe bar displayfor indicatingthe oil level inthe multifunctiondisplay is orange and is above"max": drain
offtheexcess engine oil. Consult aqualifiedspecialistworkshop.
#For Engine Oil Level Switch Ignition On:switch onthe ignitiontocheckthe engine oillevel.
#Engine Oil Level System Inoperative: sensordefective or not inserted. Consult aqualifiedspecialistworkshop.
#Engine Oil Level System Currently Unavail.:closethe hood.
Adding engine oil
&WARNINGRisk of burns from hot com‐ponent parts inthe engine compartment
Certain components inthe engine compart‐ment can beveryhot, e.g.the engine,theradiator and parts oftheexhaust system.
#Allowthe enginetocool down and onlytouch component parts described inthefollowing.
&WARNINGRisk offireand injury fromengine oil
If engine oil comes into contact withhotcomponent parts inthe engine compart‐ment, it may ignite.
#Make surethat no engine oil is spillednexttothefiller opening.
#Allowthe enginetocool off andthor‐oughly cleanthe engine oil from compo‐nent parts beforestartingthevehicle.
*NOTEEngine damagecausedbyanincorrect oilfilter, incorrect oil or addi‐tives
#Do not use engine oils or oilfilterswhich do not correspondtothe specifi‐cationsexplicitly prescribedfortheservice intervals.
#Do not alterthe engine oil or oilfilter inordertoachievelongerchange intervalsthan prescribed.
#Do not use additives.
400Maintenance and care
Page 403 of 578

#Followthe instructions inthe serviceinterval displayregardingthe oilchange.
*NOTEDamagecausedbyaddingtoomuch engine oil
Too much engine oil can damagethe engineorthe catalytic converter.
#Haveexcess engine oilremoved at aqualified specialistworkshop.
#Turncap1counter-clockwise andremoveit.
#Add engine oil.
#Replace cap1and turn it clockwise asfaras it will go.
#Checkthe oil level again (→page 399).
Checking coolant level
&WARNINGRisk of burns from hot com‐ponent parts inthe engine compartment
Certain components inthe engine compart‐ment can beveryhot, e.g.the engine,theradiator and parts oftheexhaust system.
#Allowthe enginetocool down and onlytouch component parts described inthefollowing.
&WARNINGRisk of scalding from hotcoolant
The engine cooling system is pressurized,particularly whenthe engine iswarm. Ifyouopenthe cap,you could be scaldedbyhotcoolant spraying out.
#Letthe engine cool down before open‐ingthe cap.
#When openingthe cap,wear protectivegloves and safetyglasses.
#Openthe cap slowlytorelease pres‐sure.
Maintenance and care401
Page 546 of 578

Coolant (engine)Check level .......................................... 401Filling capacity .....................................473Notes ...................................................472
CopyrightLicenses ................................................ 29Trademarks............................................ 29
Cornering light function..........................14 8
Coversee Side windows
CrossTraffic Alert...................................236
Crosswind AssistFunction/notes ...................................19 5
Crosswind Assistsee MAGICBODYCONTROL
Cruise control.......................................... 200Buttons ................................................ 201Calling up a speed ............................... 201Function .............................................. 200Requirements: .....................................201Selecting ............................................. 201Setting a speed .................................... 201Storing a speed ................................... 201
Switching off ....................................... 201Switching on ........................................201System limitations ...............................200
Cup holder................................................131Installing/removing (center console) ...131Rear passenger compartment (vehi‐cles with arear benchseat) .................13 2Rear passenger compartment (vehi‐cles with electrically adjustablerearseats) ..................................................13 2Removing/installingthe insert (vehi‐cles with electrically adjustablerearseats) ..................................................13 2Switchingthe cooling/heating func‐tion on/off ..........................................13 3
Cushionbag................................................ 38
Customer Assistance Center (CAC).........25
CustomerRelations Department.............25
D
Dashboardsee Cockpit
Dashboard lightingsee Instrument cluster lighting
Data acquisitionVehicle .................................................. 26
Data import/export................................ 294Function/notes ................................... 294Importing/exporting ........................... 294
DatastorageElectronic control units .........................26Online services ......................................27Vehicle .................................................. 26
DateSettingthe time and date automati‐cally ..................................................... 288
Daytimerunning lamp modesee Daytimerunning lights
Daytimerunning lights...........................14 9Switching on/off .................................14 9
Deactivatingthe alarm(ATA)....................91
Dealershipsee Qualified specialistworkshop
Declaration of conformityWirelessvehicle components ................23
Decorativefoil (cleaning instructions)...................................................................406
544Index
Page 553 of 578

Engine number........................................ 466
Engine oil.................................................400Additives ..............................................470Capacity ...............................................471Checkingthe oil level usingthe oildipstick ............................................... 399Checkingthe oil level usingthe on-board computer ................................... 399MB-Freigabe or MB-Approval ...............471Quality .................................................471Topping up ...........................................400
EnteringcharactersFunction/notes ................................... 285
ESC (ElectronicStability Control)
see ESP®(ElectronicStability Program)
ESP®
Crosswind Assist .................................19 5
ESP®(ElectronicStability Program)......19 3Activating/deactivating .......................195Function/notes ...................................19 3
Exterior lightingCare .................................................... 409
Exterior lightingsee Lights
Exterior mirrors...............................154,15 5Anti-glaremode (automatic) ................155Automatic mirrorfolding function ........157Folding in/out .....................................154Operatingthe memory function ...........11 5Parking position ...................................156Setting .................................................154
External deviceLocking (child safety lock) ...................293
Eyeglasses compartment.......................124
F
Fatigue detectionseeATTENTION ASSIST
FavoritesAdding .................................................283Calling up ............................................ 282Deleting ............................................... 283Moving ................................................ 283Overview ............................................. 282Renaming ............................................ 283
FlaconInserting/removing .............................16 3
Flat tire.....................................................413Changing a wheel ................................ 458MOExtended tires ................................41 4Notes ...................................................413TIREFIT kit ............................................41 5
FlattowingseeTow-bar system
Floor mats................................................14 3
Foil coveringRadar sensors ......................................191
Folding table............................................124
FragranceseePerfume atomizer
Free software............................................ 29
FrequenciesTwo-wayradio ...................................... 465
Frequency bandDialing (on-board computer) ................ 259
Front airbag (driver, front passenger).....38
Index551