2019 MERCEDES-BENZ GLS SUV ad blue
[x] Cancel search: ad bluePage 31 of 729
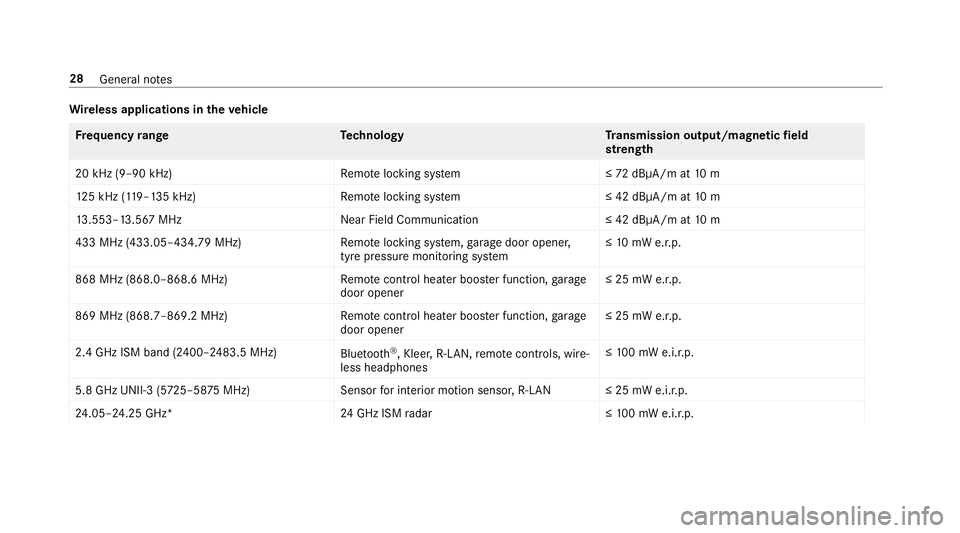
Wire
less applications in theve hicle Fr
equency rang eT echnology Transmission output/magn etic field
st re ngth
20 kHz (9–90 kHz)R emotelocking sy stem ≤72 dBμA/m at 10 m
12 5 kHz (1 19–135 kHz)R emotelocking sy stem ≤ 42 dBμA/m at10 m
13 .553–13.567 MHz Near Field Communication ≤ 42 dBμA/m at10 m
433 MHz (433.05–434.79 MHz) Remo telocking sy stem, garage door opener,
tyre pressure monitoring sy stem ≤
10 mW e.r.p.
868 MHz (868.0–868.6 MHz) Remo tecontrol hea ter boos ter function, garage
door opener ≤ 25 mW e.r.p.
869 MHz (868.7–869.2 MHz )Remotecontrol hea ter boos ter function, garage
door opener ≤ 25 mW e.r.p.
2.4 GHz ISM band (2400–2483.5 MHz) Bluetooth ®
, Kleer, R-LA N, remo tecontrols, wi re‐
less headphones ≤
10 0 mW e.i.r.p.
5.8 GHz UNII-3 (5 725–58 75MHz) Sensorfor interior motion sensor, R-LA N≤ 25 mW e.i.r.p.
24 .05–24.25 GHz* 24GHz ISM radar ≤10 0 mW e.i.r.p. 28
General no tes
Page 153 of 729
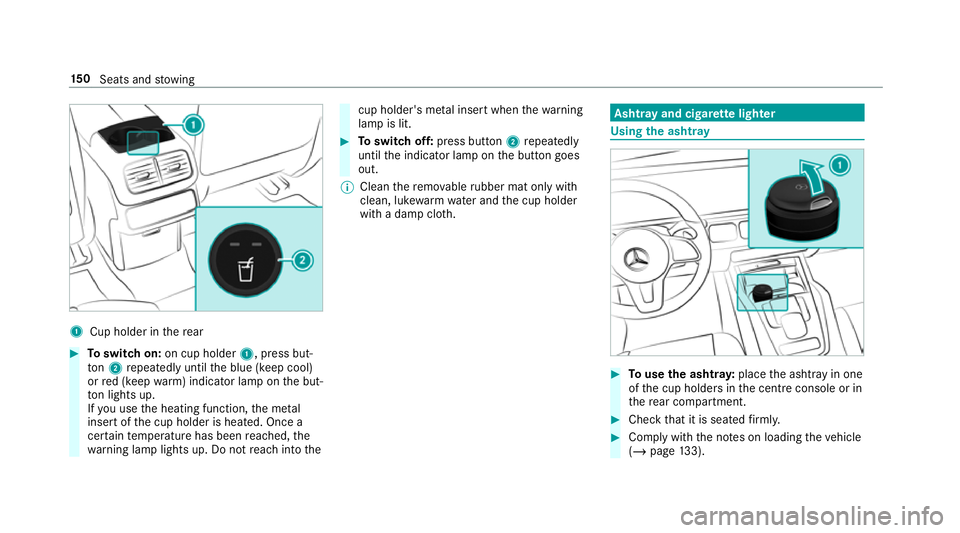
1
Cup holder in there ar #
Toswitch on: on cup holder 1, press but‐
to n2 repeatedly until the blue (keep cool)
or red (keep warm) indicator lamp on the but‐
to n lights up.
If yo u use the heating function, the me tal
inse rtof the cup holder is heated. Once a
cer tain temp erature has been reached, the
wa rning lamp lights up. Do not reach into the cup holder's me
tal inse rtwhen thewa rning
lamp is lit. #
Toswitch off: press button 2repeatedly
until the indicator lamp on the button goes
out.
% Clean there mo vable rubber mat only with
clean, luk ewarmwate r and the cup holder
with a damp clo th. Asht
ray and cigar ette lighter Using
the ashtr ay #
Touse the ashtr ay:place the ashtray in one
of the cup holders in the cent reconsole or in
th ere ar compartment. #
Check that it is seated firm ly. #
Comply with the no tes on loading theve hicle
(/ page 133). 15 0
Seats and stowing
Page 186 of 729
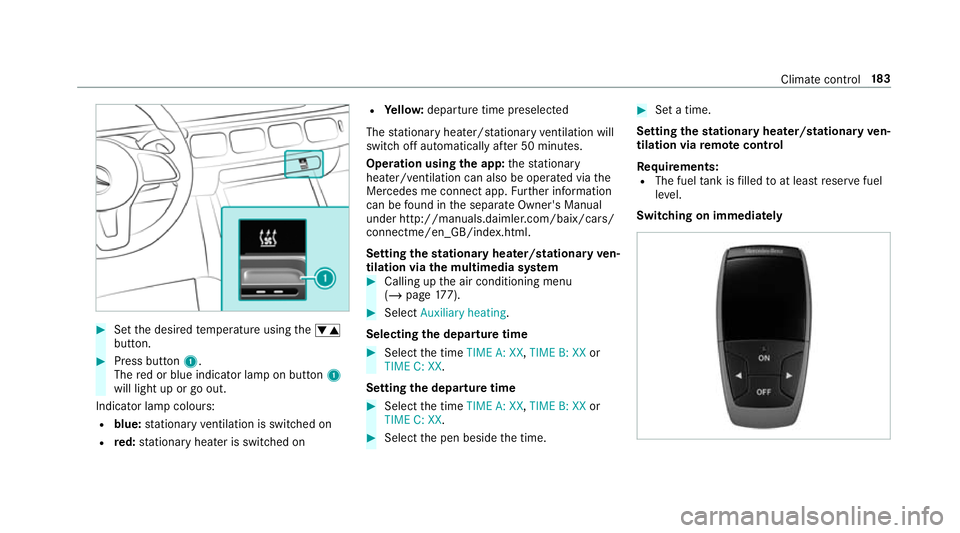
#
Set the desired temp erature using thew
button. #
Press button 1.
The red or blue indicator lamp on button 1
will light up or go out.
Indicator lamp colours: R blue: stationary ventilation is switched on
R red: stationary heater is swit ched on R
Yello w: departure time preselected
The stationary heater/ stationary ventilation will
switch off au tomatically af ter 50 minutes.
Operation using the app: thest ationary
heater/ ventilation can also be operated via the
Mercedes me connect app. Further information
can be found in the separate Owner's Manual
under http://manuals.daimler.com/baix/cars/
connectme/en_GB/index.html.
Setting thest ationary heater/stationary ven‐
tilation via the multimedia sy stem #
Calling up the air conditioning menu
(/ page 177). #
Select Auxiliary heating.
Selecting the departu retime #
Select the time TIME A: XX, TIME B: XXor
TIME C: XX.
Setting the departu retime #
Select the time TIME A: XX, TIME B: XXor
TIME C: XX. #
Select the pen beside the time. #
Set a time.
Setting thest ationary heater/stationary ven‐
tilation via remo tecont rol
Re quirements:
R The fuel tank is filled toat least reser vefuel
le ve l.
Switching on immedia tely Climate cont
rol18 3
Page 199 of 729
th
e sy stem. Clean the brakes af ter driving off-
ro ad. If youth en notice reduced braking ef fect
or hear scraping noises, ha vethe brake sy stem
ch ecked at a qualified specialist workshop.
Ad just your driving style to thech anged braking
ch aracteristics.
* NO
TEDama gecaused bydriving over
obs tacles The
vehicle can be damaged by:
R driving up on high kerbs or unpa ved
ro ads.
R quickly driving over obs tacles su chas
ke rbs, speed bumps or po tholes.
R heavy objects hitting the underbody or
ch assis components. #
Do not drive over obs tacles that could
damage theve hicle. #
Check theve hicle regular lyfor dama ge
during off-road driving. #
Adjust theve hicle speed tosuit the
ro ad sur face conditions. #
Ifth ere is damage, consult a qualified
specialist workshop immediately. +
ENVIRONMENTAL
NOTEEnvironmental
dama gedue tonon-obser vance of pro‐
hibition signs Environmental pr
otection has priority. Treat
nature with respect. #
Be sure toobser veprohibition signs. Checklist before driving off-road
Check
thefo llowing points before driving off-
ro ad:
R Fuel le vel
R Vehicles with a diesel engine: AdBlue ®
le vel
R Engine oil le vel:fill engine oil up tothe maxi‐
mum le velto ensure full gradeability
(/ page 534).
R Tyre-change tool kit and spare wheel
R Tyres and wheels %
Information about special all-ter rain tyres for
re trofitting is available from any qualified
specialist workshop.
Off-road driving
Re ad this section before driving your vehicle off-
ro ad. Practise bydriving over more gentle off-
ro ad terrain firs t.
R Obse rveth e no tes on the cross-country ABS
(/ page 229).
R If necessar y,select theF orG drive
program (vehicles with an Off-road pac kage)
before driving off-road (/ page 204).
R Before driving off-road, shift the transfer
case totheLO W RANGE off-roadgear (vehi‐
cles with an Offroad pac kage ) (/ page 211).
R Select a vehicle le vel suitable for off-road ter‐
ra in (/ page 265). Toavo id damaging the
ve hicle, make sure there is alw ays suf ficient
ground clearance.
R Alw ayske ep the engine running and in gear
when driving on downhill gradients and
slopes. Obse rveth e no tes on driving in
mountainous terrain. 19 6
Driving and pa rking
Page 218 of 729
4
QR code forre scue card
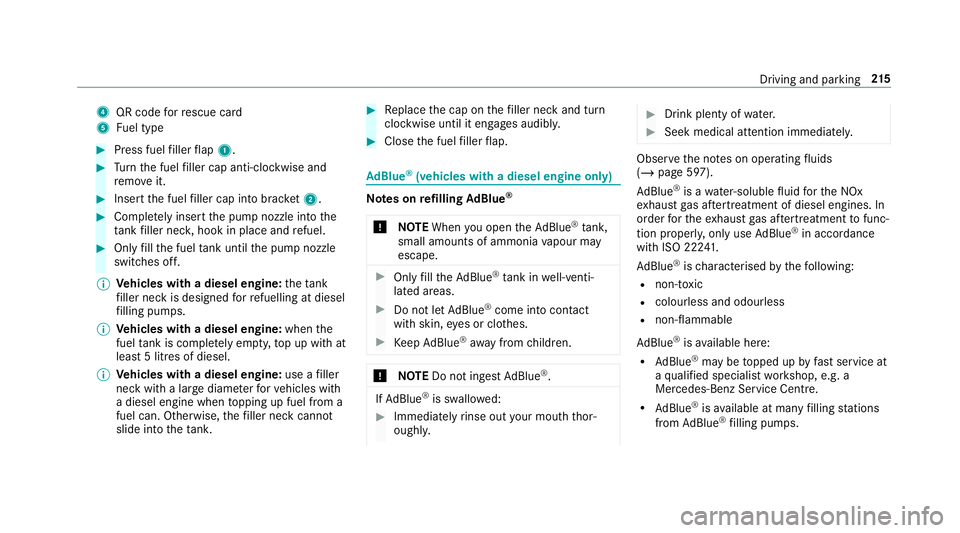
5 Fuel type #
Press fuel filler flap 1. #
Turn the fuel filler cap anti-clockwise and
re mo veit. #
Insert the fuel filler cap into brac ket2. #
Comp lete ly inse rtthe pump nozzle into the
ta nk filler nec k,hook in place and refuel. #
Only fill th e fuel tank until the pump nozzle
switches off.
% Vehicles with a diesel engine: theta nk
fi ller neck is designed forre fuelling at diesel
fi lling pumps.
% Vehicles with a diesel engine: whenthe
fuel tank is compl etely em pty, top up with at
least 5 litres of diesel.
% Vehicles with a diesel engine: use afiller
neck with a lar gediame terfo rve hicles with
a diesel engine when topping up fuel from a
fuel can. Otherwise, thefiller neck cannot
slide into theta nk. #
Replace the cap on thefiller neck and turn
clockwise until it engages audibl y. #
Close the fuel filler flap. Ad
Blue ®
(vehicles with a diesel engine on ly) Note
s onrefilling AdBlue ®
* NOTEWhen you open theAd Blue ®
tank,
small amounts of ammonia vapour may
escape. #
Only fill th eAd Blue ®
tank in well-venti‐
lated areas. #
Do not let AdBlue ®
come into contact
wi th skin, eyes or clo thes. #
Keep AdBlue ®
aw ay from children. *
NOTEDo not ingest AdBlue ®
. If
Ad Blue ®
is swallo wed: #
Immediately rinse out your mouth thor‐
oughl y. #
Drink plenty of water. #
Seek medical attention immediately. Obser
vethe no tes on operating fluids
(/ page 597).
Ad Blue ®
is a water-soluble fluid forth e NOx
ex haust gas af tertre atment of diesel engines. In
order forth eex haust gas af tertre atment tofunc‐
tion properly, only use AdBlue ®
in acco rdance
with ISO 22 241.
Ad Blue ®
is ch aracterised bythefo llowing:
R non-t oxic
R colourless and odourless
R non-flammable
Ad Blue ®
is available here:
R AdBlue ®
may be topped up byfast service at
a qu alified specialist workshop, e.g. a
Mercedes-Benz Service Centre.
R AdBlue ®
is available at many filling stations
from AdBlue ®
filling pumps. Driving and parking
215
Page 219 of 729
R
Alternati vely, AdBlue ®
is available at qualified
specialist workshops, e.g. Mercedes-Benz
Service Centres, and at many filling stations
in Ad Blue ®
re fill canis ters or AdBlue ®
re fill
bottles.
% Ensure the connection between there fill
con tainer and vehicle filler neck does not
drip.
To p up AdBlue ®
* NOTEEngine dama gedue toAd Blue ®
being in the fuel #
AdBlue ®
must not be used tofill the
fuel tank. #
Only use AdBlue ®
to fill th eAd Blue ®
ta nk. #
Do not overfill theAd Blue ®
tank. *
NO
TEContamination of theve hicle inte‐
ri or due toAd Blue ®
lea kage #
Afterto pping up, carefully close the
Ad Blue ®
re fill con tainer. #
Avoid car rying AdBlue ®
re fill con tainers
permanently in theve hicle. Re
quirements:
R The vehicle is unloc ked.
R Refill AdBlue See Owner’s Manual . The
Ad Blue ®
tank is down tothere ser veleve l.
R AdBlue system fault Perf. reduced in XXX
miles See Owner's Manual .Yo u can on ly
drive theve hicle overth e dis tance shown.
The AdBlue ®
tank is down tothere ser ve
le ve l.
R Top up AdBlue Perf. reduced: XXX km/h No
start in XXX km You can on ly drivetheve hi‐
cle at the speed shown and overth e dis tance
shown. Refill Ad Blue ®
as soon as possible. R
Refill AdBlue No start in XXX miles. You can
on ly drive theve hicle overth e dis tance
shown. Refill Ad Blue ®
as soon as possible.
R Refill AdBlue Engine start not possible. The
ve hicle can no longer be star ted.
Yo u can see theAd Blue ®
ra nge and le vel in the
multifunction display (/ page 325).
% The AdBlue ®
ra nge shown depends strongly
on the driving style and operating condi‐
tions. The actual range can therefore deviate
from the calculated range. 216
Driving and pa rking
Page 220 of 729
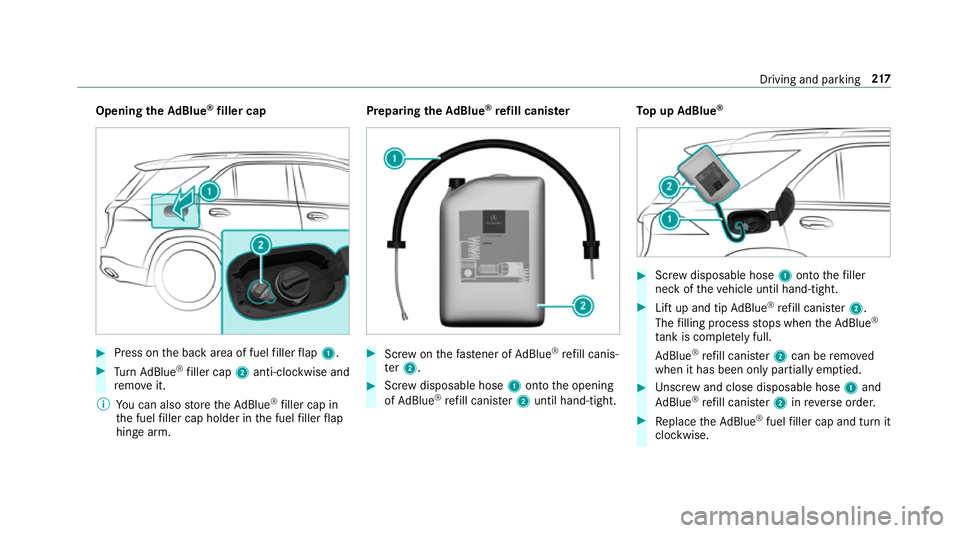
Opening
theAd Blue ®
filler cap #
Press on the back area of fuel filler flap 1. #
Turn AdBlue ®
filler cap 2anti-clockwise and
re mo veit.
% You can also store theAd Blue ®
filler cap in
th e fuel filler cap holder in the fuel filler flap
hin gearm. Prepa
ring theAd Blue ®
re fill canis ter #
Screw onthefast ener of AdBlue ®
re fill canis‐
te r2. #
Screw disposable hose 1onto the opening
of Ad Blue ®
re fill canis ter2 until hand-tight. To
p up AdBlue ® #
Screw disposable hose 1onto thefiller
neck of theve hicle until hand-tight. #
Lift up and tip AdBlue ®
re fill canis ter2.
The filling process stops when theAd Blue ®
ta nk is compl etely full.
Ad Blue ®
re fill canis ter2 can be remo ved
when it has been only partially em ptied. #
Unscr ew and close disposable hose 1and
Ad Blue ®
re fill canis ter2 inreve rse order. #
Replace theAd Blue ®
fuel filler cap and turn it
clockwise. Driving and parking
217
Page 221 of 729
#
Close the fuel filler flap. #
Swit chon the ignition for at least 60 sec‐
onds.
% Ifth eve hicle could not be star ted as the
Ad Blue ®
tan kwa s em pty, it can take up to
60 seconds forth ere fill to be de tected. #
Start theve hicle.
% Avoid storing AdBlue ®
re fill con tainers per‐
manently in theve hicle. Pa
rking Pa
rking theve hicle &
WARNING Risk of accident and inju ry
caused byan insuf ficiently secu redve hi‐
cle rolling away.
If th eve hicle is not securely par ked suf fi‐
ciently, it can rollaw ay in an uncont rolled
wa yev en at a slight downhill gradient. #
Ensure that the par kedve hicle is alw ays
properly secured against rolling away as
fo llo ws: R
on uphill or downhill gradients, turn
th e front wheels so that theve hicle
ro lls towa rdsth eke rb if it starts
moving.
R apply the parking brake.
R switch the transmission toposition
j. &
WARNING Risk offire caused byhot
ex haust sy stem parts
Flammable material such as lea ves, grass or
twigs may ignite if they come into contact
wi th hot parts of theex haust sy stem or
ex haust gasflow. #
Park theve hicle so that no flammable
material can come into con tact wi thhot
ve hicle components. #
In particular, do not park on dry grass‐
land or har vested grain fields. &
WARNING Risk of accident and inju ry
due tochildren left unat tended in the
ve hicle
If ch ildren are left unat tended in theve hicle,
th ey could:
R Open doo rs,th ereby endangering other
persons or road users.
R Get out and be stru ck byoncoming traf‐
fi c.
R Ope rate ve hicle equipment and become
trapped, forex ample.
In addition, thech ildren could also set the
ve hicle in motion, forex ample by:
R Releasing the parking brake.
R Changing the transmission position.
R Starting theve hicle. #
Never lea vechildren unat tended in the
ve hicle. #
When leaving theve hicle, alw aysta ke
th eke y with you and lock theve hicle. 218
Driving and pa rking