2019 MERCEDES-BENZ GLS SUV length
[x] Cancel search: lengthPage 49 of 729

St
atus of the front passenger front airbag Fu
nction of the automatic front passenger
front airbag shu toff
The automatic front passenger front airbag shut‐
off is able todetect whe ther the front passenger
seat is occupied bya person or a child restra int
sy stem. The front passenger front airbag is ena‐
bled or disabled accordingly.
When fitting a child restra int sy stem tothe front
passenger seat, alw ays make sure of thefo llow‐
ing:
R Ensure that thech ild restra int sy stem is posi‐
tioned cor rectly (/ page 58).
R Alw ays obser vethech ild restra int sy stem
manufacturer's ins tallation instructions.
R Never place objects, e.g. cushions, under or
behind thech ild restra int sy stem.
R Fully retract the seat cushion length adjust‐
ment.
R The entire base of thech ild restra int sy stem
must alw aysre st on the sitting sur face of the
front passenger seat. R
The backrest of thefo rw ard-facing child
re stra int sy stem must, as far as possible, be
re sting on the seat backrest of the front
passenger seat.
R The child restra int sy stem must not touch the
ro of or be put under stra in by the head
re stra ints. Adjust the seat backrest inclina‐
tion and the head restra int setting accord‐
ing ly. &
WARNING Risk of inju ryor death due to
objects between the seat sur face and
th ech ild restra int sy stem
Objects between the seat sur face and the
ch ild restra int sy stem could af fect the func‐
tion of the automatic front passenger front
airbag shutoff.
This could result in the front passenger front
airbag not functioning as intended during an
accident. #
Do not place any objects between the
sitting sur face and thech ild restra int
sy stem. #
The entire base of thech ild restra int
sy stem must alw aysre st on the sitting
sur face of the front passenger seat. #
The backrest of thefo rw ard-facing child
re stra int sy stem must, as far as possi‐
ble, be resting on the seat backrest of
th e front passenger seat. #
Alw ays comply with thech ild restra int
sy stem manufacturer's ins tallation
instructions. A person on
the front passenger seat must
obser vethefo llowing information:
R Fasten seat belts cor rectly (/ page 38).
R Sit in an almost upright seat position with
their back against the seat backrest.
R Sit with their feet resting on thefloor, if pos‐
sible.
The front passenger front airbag may otherwise
be disabled bymis take ,fo rex ample in thefo l‐
lowing situations:
R The front passen ger transfers their weight by
supporting themselves on a vehicle armrest. 46
Occupant saf ety
Page 52 of 729

of
thech ild, PASSENGER AIR BAG OFF may be lit
continuously or be off. Alw ays obser vethefo l‐
lowing information. &
WARNING Risk of inju ryor death due to
incor rect positioning of thefo rw ard-
fa cing child restra int sy stem
If yo u secure a child in a forw ard-facing child
re stra int sy stem on the front passenger seat
and you position the front passenger seat too
close tothe cockpit, in theeve nt of an acci‐
dent, thech ild could:
R Come into con tact wi th theve hicle inte‐
ri or if thePA SSENGER AIR BAG OFF indi‐
cator lamp is lit, forex ample.
R Bestru ck bythe airbag if thePA SSENGER
AIR BAG OFF indicator lamp is off. #
Alw ays mo vethe front passenger seat
as far back as possible and fully retract
th e seat cushion length adjustment.
Alw ays make sure that the shoulder belt
st ra p is cor rectly routed from the seat
belt outlet on theve hicle tothe shoul‐
der belt guide on thech ild restra int sys‐ te
m. The shoulder belt stra p must be
ro uted forw ards and down wards from
th e seat belt outlet. If necessar y,adjust
th e seat belt outlet and the front
passenger seat accordingly. #
Alw ays obser vethech ild restra int sys‐
te m manufacturer's ins tallation instruc‐
tions. When
fitting a child restra int sy stem tothe front
passenger seat, obser vetheve hicle-specific
information (/ page77).
If a person is sitting on the front passenger
seat: PASSENGER AIR BAG OFF may be lit con‐
tinuously or be off, depending on the person's
st ature.
A person on the front passenger seat must
alw ays obser vethefo llowing information:
R Ifth e front passenger seat is occupied byan
adult or a person with a stature cor respond‐
ing tothat of an adult, thePA SSENGER AIR
BA G OFF indicator lamp must be off. This
indicates that the front passenger front air‐
bag is enabled. If
th ePA SSENGER AIR BAG OFF indicator
lamp is lit continuousl y,an adult or person
with a build cor responding tothat of an adult
should not use the front passenger seat.
Ins tead, they should use a rear seat.
R Ifth e front passenger seat is occupied by a
person of smaller stature (e.g. a teenager or
small adult), thePA SSENGER AIR BAG OFF
indicator lamp either lights up continuously
or remains off, depending on there sult of the
classi fication.
- Ifth ePA SSENGER AIR BAG OFF indicator
lamp is off: mo vethe front passenger
seat as far back as possible, or the per‐
son of smaller stature should use a rear
seat.
- Ifth ePA SSENGER AIR BAG OFF indicator
lamp is lit continuously: the person of
smaller stature should not use the front
passenger seat. Occupant saf
ety49
Page 81 of 729

R
When using a rear wa rd-facing child restra int
sy stem on the front passenger seat, the front
passenger front airbag must alw ays be disa‐
bled. This is only the case if thePA SSENGER
AIR BAG OFF indicator lamp is lit continu‐
ously (/ page47).
R Ifth ePA SSENGER AIR BAG OFF indicator
lamp is off, the front passenger front airbag
is enabled. The front passenger front airbag
may deploy during an accident.
Securing thech ild restra int sy stem with the
seat belt on the front passenger seat
When fitting a belt-secu redch ild restra int sys‐
te m on the front passenger seat, alw ays obser ve
th efo llowing:
O Obser
vethech ild restra int sy stem manufac‐
turer's ins tallation and operating instruc‐
tions.
O Fo
r a child restra int sy stem in the "Univer‐
sal" or "Semi-Universal" categor y,make
sure that the sy stem has been appr oved for
th eve hicle seat. Obser
vethe no tes under "Suitability of
seats for attaching belt-secu redch ild
re stra int sy stems" (/ page72).
O When using a
forw ard-facing child restra int
sy stem in Group I: remo vethe head
re stra int from there spective seat, if possi‐
ble.
Af terth ech ild restra int sy stem has been
re mo ved, replace the head restra ints again
immediately and adjust them cor rectly.
O The ba
ckrest of thefo rw ard-facing child
re stra int sy stem must, as far as possible, be
re sting on the seat backrest of the front
passenger seat.
O Fo
r cer tain child restra int sy stems of weight
category II or III there may be limitations for
th e maximum size setting, e.g. due topossi‐
ble con tact wi th thero of.
O The
child restra int sy stem must not be ten‐
sioned between thero of and the seat cush‐
ion and/or be fitted facing the wrong direc‐
tion. Adjust the seat backrest inclination
accordingly. O
The
child restra int sy stem must not be put
under stra in by the head restra ints. Adjust
th e head restra ints according ly.
O Ne
ver place objects under or behind the
ch ild restra int sy stem, e.g. cushions. #
Set the front passenger seat as far back as
possible and mo vethe seat into the highest
position. #
Fully retract the seat cushion length adjust‐
ment. #
Adjust the seat cushion inclination so that
th e front edge of the seat cushion is in the
highest position and there ar edge of the
seat cushion is in the lo west position. #
Set the seat backrest toan almost vertical
position. #
Fitthech ild restra int sy stem.
The entire base of thech ild restra int sy stem
must alw aysre st on the sitting sur face of the
front passenger seat. #
Alw ays make sure that the shoulder belt
st ra p is cor rectly routed from the seat belt 78
Occupant saf ety
Page 99 of 729
The
tailgate can open or close unin tentionally in
th efo llowing situations:
R If a person's arms or legs are moving in the
sensor de tection range, e.g. when polishing
th eve hicle or picking up objects.
R If objects are mo ved or placed behind the
ve hicle, e.g. tensioning stra ps or luggage.
R If clamping stra ps, tarp aulins or other co ver‐
ings are pulled over the bumper.
R If a pr otective mat with a length reaching
ove rth e boot sill down into the de tection
ra nge of the sensors is used.
R Ifth e pr otective mat is not secured cor rectly.
R When working on the trailer hitch, trailers or
re ar bicycle rack s.
Deactivate theke y functions (/ page84) or do
not car rytheke y about your person in such sit‐
uations. Limiting
the opening angle of the tailgate Ac
tivating the opening angle limiter
Yo u can limit the opening angle of theta ilgate in
th eto p half of its opening range toappr ox‐
imately 20 cm before the end position. #
Stop the opening procedure of theta ilgate at
th e desired position. #
Press and hold the closing button in theta il‐
ga te until you hear a sho rtacoustic signal.
The opening angle limiter will be activated.
The tailgate will then stop in thestored posi‐
tion when opened.
To open theta ilgate full y,pull the handle on the
outside of theta ilgate again af ter it has stopped
automaticall y.
Deactivating the opening angle limiter #
Press and hold the closing button in theta il‐
ga te until two sho rtacoustic signals sound. Un
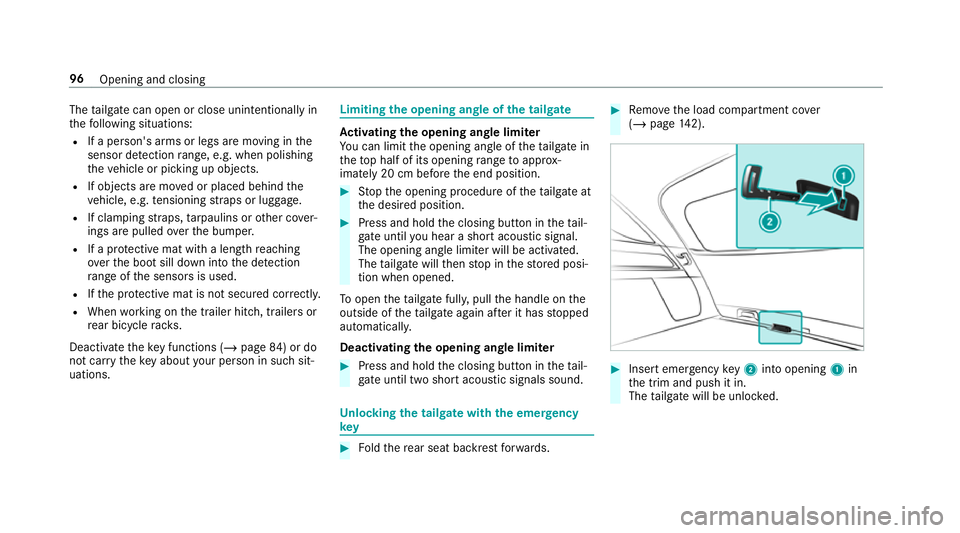
locking the tailgate with the emer gency
key #
Foldthere ar seat backrest forw ards. #
Remo vethe load compartment co ver
( / page 142). #
Insert emergency key2 into opening 1in
th e trim and push it in.
The tailgate will be unloc ked. 96
Opening and closing
Page 117 of 729

#
Alw ays drive with the head restra ints
fi tted. #
Before driving off, ma kesure forev ery
ve hicle occupant that the cent reofthe
head restra int supports the back of the
head at about eye le vel. Do not inter
change the head restra ints of the
front and rear seats. Otherwise, you will not be
able toadjust the height and angle of the head
re stra ints cor rectl y.
Ad just the head restra int fore -and-aft position so
th at it is as close as possible tothe back of your
head. &
WARNING Risk of inju ryor death due to
incor rect seat position
The seat belt does not of ferth e intended
le ve l of pr otection if you ha venot mo vedthe
seat backrest toan almost vertical position.
When braking or in theeve nt of an accident,
yo u could slide underneath the seat belt and
sus tain abdominal or neck injuries, forex am‐
ple. #
Adjust the seat proper lybefore begin‐
ning your journe y. #
Alw ays ensure that the seat backrest is
in an almost vertical position and that
th e shoulder section of your seat belt is
ro uted across the cent reofyour shoul‐
der. 1
Head restra int height
2 Seat backrest inclination
3 Seat height
4 Seat cushion length
5 Seat cushion inclination
6 Seat fore -and-aft position #
Saving the settings with the memory function
(/ page 131). 11 4
Seats and stowing
Page 285 of 729

Problem
Possible causes/consequences and M
MSolutions
Re ar 1 or all-round 2segments light
up red. The ésymbol appears in
th e multifunction displa y.Pa
rking Assist PARKTRONIC is malfunctioning and has been deacti vated due tosignal inter fere nce. #
Start theve hicle again. #
Check if Parking Assist PARKTRONIC is working at a dif fere nt location.
Re ar 1 or all-round 2segments light
up red. At the same time, a warning
to ne sounds for appro ximately 2 sec‐
onds everytime theve hicle is star ted.
The é symbol appears in the multi‐
function displa y. The sensors are dirty. #
Clean the sensors and obser vethe no tes on care of vehicle parts (/ page545).
Pa rking Assist PARKTRONIC has been deacti vated due toa malfunction. #
Start theve hicle again. #
Ifth e problem persists, consult a qualified specialist workshop. Fu
nction of the passive side impact pr otec‐
tion
Pa ssive side impact pr otection is an additional
Pa rking Assist PARKTRONIC function which
wa rnsth e driver about obs tacles at the side of
th eve hicle. A warning is issued when obs tacles
are de tected between the front and rear de tec‐
tion range. In order for an object on the side to
be de tected, the sensors in the front and rear
bumper must firs t de tect the object while you
are driving past it. During
the parking procedure or manoeuvring,
objects are de tected as theve hicle drives past.
If yo usteer in the direction of a de tected obs ta‐
cle and there is a risk of a lateral collision, a
wa rning is issued. The segments on the sides
light up yellow or red, depending on the dis tance
to the obs tacle. Segment colour depending on distance
Colour Lateral distance in
cm
Ye llo wA pprox. 30 - 60
Re dA pprox. < 30 In order
for lateral front or rear segments tobe
displa yed, theve hicle must firs t tr ave l a dis tance
of at least half of theve hicle length. Once the282
Driving and parking
Page 286 of 729
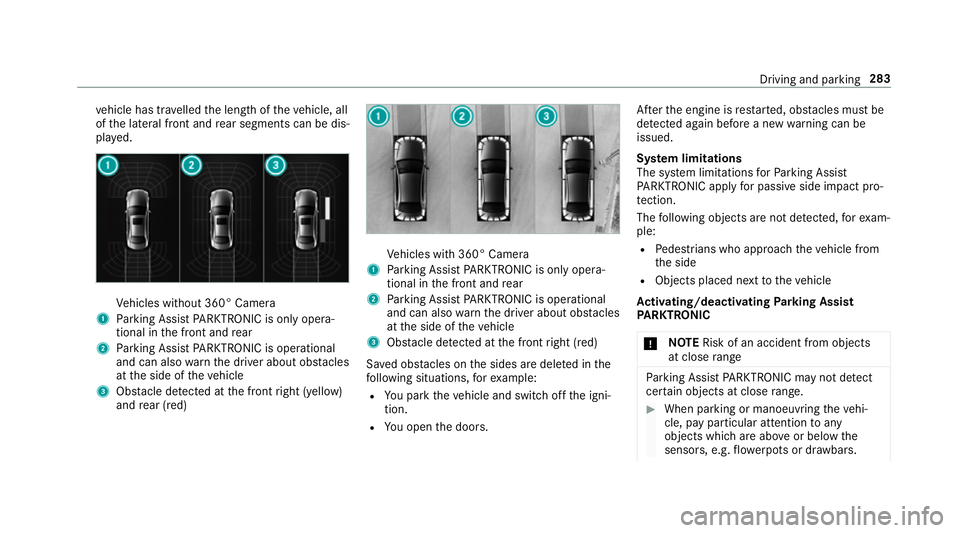
ve
hicle has tr avelled the length of theve hicle, all
of the lateral front and rear segments can be dis‐
pla yed. Ve
hicles without 360° Camera
1 Parking Assist PARKTRONIC is on ly opera‐
tional in the front and rear
2 Parking Assist PARKTRONIC is operational
and can also warnthe driver about obs tacles
at the side of theve hicle
3 Obstacle de tected at the front right (yellow)
and rear (red) Ve
hicles with 360° Camera
1 Parking Assist PARKTRONIC is on ly opera‐
tional in the front and rear
2 Parking Assist PARKTRONIC is operational
and can also warnthe driver about obs tacles
at the side of theve hicle
3 Obstacle de tected at the front right (red)
Sa ved obs tacles on the sides are dele ted in the
fo llowing situations, forex ample:
R You park theve hicle and switch off the igni‐
tion.
R You open the doors. Af
terth e engine is restar ted, obs tacles must be
de tected again before a new warning can be
issued.
Sy stem limitations
The sy stem limitations forPa rking Assist
PA RKTRONIC apply for passive side impact pro‐
te ction.
The following objects are not de tected, forex am‐
ple:
R Pedestrians who approach theve hicle from
th e side
R Objects placed next totheve hicle
Ac tivating/deactivating Parking Assist
PA RKTRONIC
* NO
TERisk of an accident from objects
at close range Pa
rking Assist PARKTRONIC may not de tect
cer tain objects at close range. #
When pa rking or manoeuvring theve hi‐
cle, pay particular attention toany
objects which are abo veor below the
sensors, e.g. flowe rpots or dr awbars. Driving and parking
283
Page 288 of 729
Te
aching-in Trailer Manoeuvring Assist #
Drive forw ards a short dis tance wi th the car/
trailer combination.
The comple tedte ach-in process is shown in
th e media displa y.
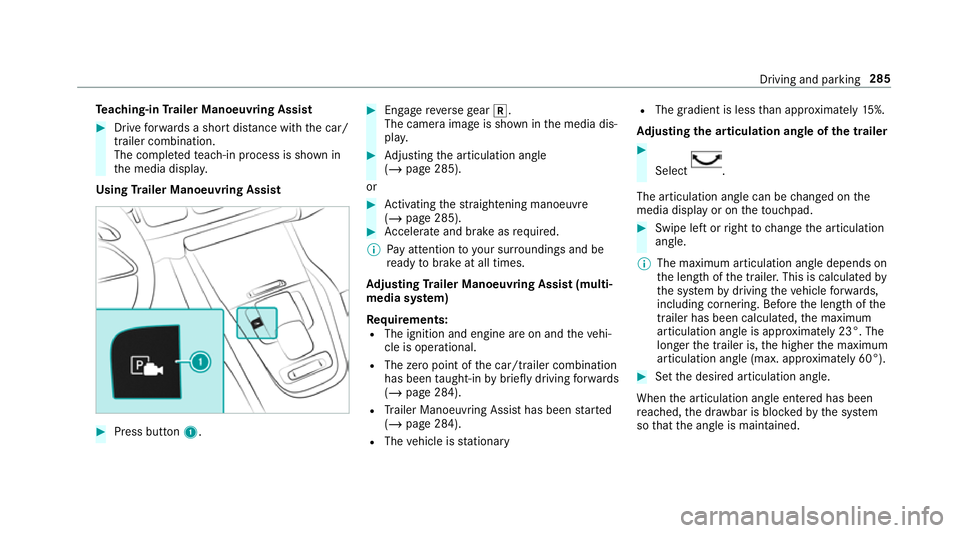
Using Trailer Manoeuvring Assist #
Press button 1. #
Engage reve rsege ar k.
The camera image is shown in the media dis‐
pla y. #
Adjusting the articulation angle
(/ page 285).
or #
Activating thest ra ightening manoeuvre
(/ page 285). #
Accelerate and brake as requ ired.
% Pay attention toyour sur roundings and be
re ady tobrake at all times.
Ad justing Trailer Manoeuvring Assist (multi‐
media sy stem)
Re quirements:
R The ignition and engine are on and theve hi‐
cle is operational.
R The zero point of the car/t railer combination
has been taught-in bybrief lydriving forw ards
(/ page 284).
R Trailer Manoeuv ring Assi sthas been star ted
( / page 284).
R The vehicle is stationary R
The gradient is less than appr oximately 15%.
Ad justing the articulation angle of the trailer #
Select .
The articulation angle can be changed on the
media display or on theto uchpad. #
Swipe left or right tochange the articulation
angle.
% The maximum articulation angle depends on
the length of the trailer. This is calculated by
th e sy stem bydriving theve hicle forw ards,
including cornering. Before the length of the
trailer has been calculated, the maximum
articulation angle is appr oximately 23°. The
longer the trailer is, the higher the maximum
articulation angle (max. appr oximately 60°). #
Set the desired articulation angle.
When the articulation angle entered has been
re ached, the dr awbar is bloc kedby the sy stem
so that the angle is maintained. Driving and parking
285