2019 MERCEDES-BENZ GLS SUV change time
[x] Cancel search: change timePage 514 of 729
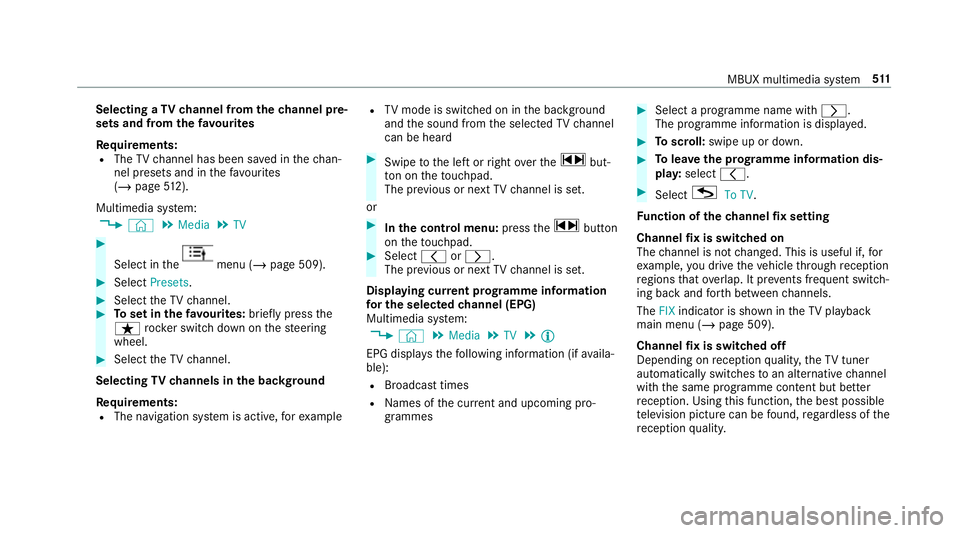
Selecting a
TVchannel from thech annel pre‐
sets and from thefa vo urites
Re quirements:
R The TVchannel has been sa ved in thech an‐
nel presets and in thefa vo urites
(/ page 512).
Mul timedia sy stem:
4 © 5
Media 5
TV #
Select in the menu (/
page 509). #
Select Presets. #
Select theTV channel. #
Toset in thefa vo urites: briefly press the
ß rocker switch down on thesteering
wheel. #
Select theTV channel.
Selecting TVchannels in the bac kground
Re quirements:
R The navigation sy stem is active, forex ample R
TVmode is switched on in the bac kground
and the sound from the selected TVchannel
can be heard #
Swipe tothe left or right over the~ but‐
to n on theto uchpad.
The pr evious or next TVchannel is set.
or #
Inthe control menu: pressthe~ button
on theto uchpad. #
Select qorr.
The pr evious or next TVchannel is set.
Displ aying cur rent prog ramme in form ation
fo r the selected channel (EPG)
Multimedia sy stem:
4 © 5
Media 5
TV 5
Õ
EPG displa ys thefo llowing information (if availa‐
ble):
R Broadcast times
R Names of the cur rent and upcoming pro‐
grammes #
Select a programme name wi thr .
The programme information is displa yed. #
Toscroll: swipe up or down. #
Tolea vethe prog ramme in form ation dis‐
pla y:select q. #
Select GTo TV.
Fu nction of thech annel fix setting
Channel fix is switched on
The channel is not changed. This is useful if, for
ex ample, you drive theve hicle thro ugh reception
re gions that ove rlap. It pr events frequent switch‐
ing ba ckand forth between channels.
The FIXindicator is shown in theTV playback
main menu (/ page 509).
Channel fix is switched off
Depending on reception qualit y,theTV tuner
au tomatical lyswitches toan alternative channel
with the same programme conte nt but better
re ception. Using this function, the best possible
te levision picture can be found, rega rdless of the
re ception qualit y. MBUX multimedia sy
stem 511
Page 517 of 729
Te
lete xt Te
lete xt ove rview
Te lete xt pa ges are located between page 100
and page 899.
A dynamic telete xt pa geconsi sts of se veral sub‐
pages.
The display of subpages changes automatically
or can be called up with the ar row buttons.
Information on MHEG-5 digital telete xt:
R digi taltelete xt is only available in some coun‐
tries, e.g. the UK and New Zealand
R interactive multimedia applications such as
weather fore casts, ne wsreports and sport
re sults are available
R it may take some time before all the pages
load Showing
telete xt
Multimedia sy stem:
4 © 5
Media 5
TV 5
Z
5 General 5
Teletext #
Toswitch topage selection: switch
between number entry and selection using
th e ar row button with Íand123 . #
Tocall up a side: enterthe numbers in quick
succession.
or #
Select the ar row buttons. #
Toreturn totheTV prog ramme: selectTV.
MHEG-5 digital telete xt
Apart from the functions described abo ve, addi‐
tional options can be used. #
Tocall up data content using colours:
select a colour. #
Tomo veback a le vel:select a list symbol. Pictu
resettings Selecting picture settings
for the TV
Multimedia sy stem:
4 © 5
Media 5
TV 5
Z
5 General 5
Video settings #
Toset the picture form at: activate one of
th eAutomatic, 4:3,8:3, 16:9, 21:9orZoom
display buttons.
The brightness is automatically set. HD prog
rammes Re
ceiving encryp ted HD prog rammes
* NO
TEDama getothe CI+ module and
Smart Card The CI+ module is designed
for use in the
home. The CI+ module can overheat and be
damaged bycontinuous exposure tohigh
outside temp eratures. 514
MBUX multimedia sy stem
Page 522 of 729
Selecting
the sound profile in the
Bu rm ester ®
high-end 3D sur round sound
sy stem
Multimedia sy stem:
4 © 5
Media 5
Burmester
5 Sound profiles
The following profiles are available:
R Pure
R 3D
R Live
R Surround
R Easy Listening #
Select a sound profile. MBUX
rear tablet Overview of
the MBUX rear tablet &
WARNING Risk of an accident from
ope rating mobile communication equip‐
ment while theve hicle is in motion
Mobile communications devices distract the
driver from the traf fic situation. This could
also cause the driver tolose control of the
ve hicle. #
Asthe driver, only operate mobile com‐
munications devices when theve hicle is
st ationar y. #
As a vehicle occupant, only use mobile
communications devices in the areas
intended forth is purpose, e.g. in the
re ar passenger compartment. &
WARNING Risk of di stra ction from oper‐
ating the multimedia sy stem with the
MBUX rear tablet
Other vehicle occupant can make changes to
th e multimedia sy stem with the MBUX rear
ta blet, e.g. adjust thevo lume of the multime‐
dia sy stem, change radio station or adjust
die ambient lighting.
The driver could be distracted from the traf‐
fi c situation byundesired changes and
th ereby cause an accident. #
Ifre qu ired lock access of the MBUX
re ar tablet tothe multimedia sy stem. #
Activate thech ild saf ety lock in the mul‐
timedia sy stem tolimit operation of the
MBUX rear tablets. &
WARNING Risk of becoming trapped
th ro ugh operation of the MBUX rear tab‐
let outside theve hicle
If th e MBUX rear tablet is operated outside
th eve hicle, seats can be mo ved using the MBUX multimedia sy
stem 519
Page 523 of 729
seat contro
l.Ve hicle occupants and animals
could become trapped bythe seat adjust‐
ment. #
Only operate the seat control when
inside theve hicle. &
WARNING Risk of inju ryas a result of
th e MBUX rear tablet not being secured
in theve hicle
If th e MBUX rear tablet is loose in theve hicle
interior, it could be throw n around and
th ereby hit vehicle occupants. #
Alw ays securely lock the MBUX rear
ta blet in the brac ket intended forth at
purpose. The MBUX
rear tablet consists of a tablet
(/ page 520) and a brac ket integrated in the
backrest (/ page 521).
If th eta blet has been paired with the multimedia
sy stem, the MBUX rear tablet can make settings
on the multimedia sy stem from there ar
passenger compartment. %
The function of operating the multimedia
sy stem with the paired tablet, can be
bloc ked in the multimedia sy stem.
The MBUX rear tablet can also be used outside
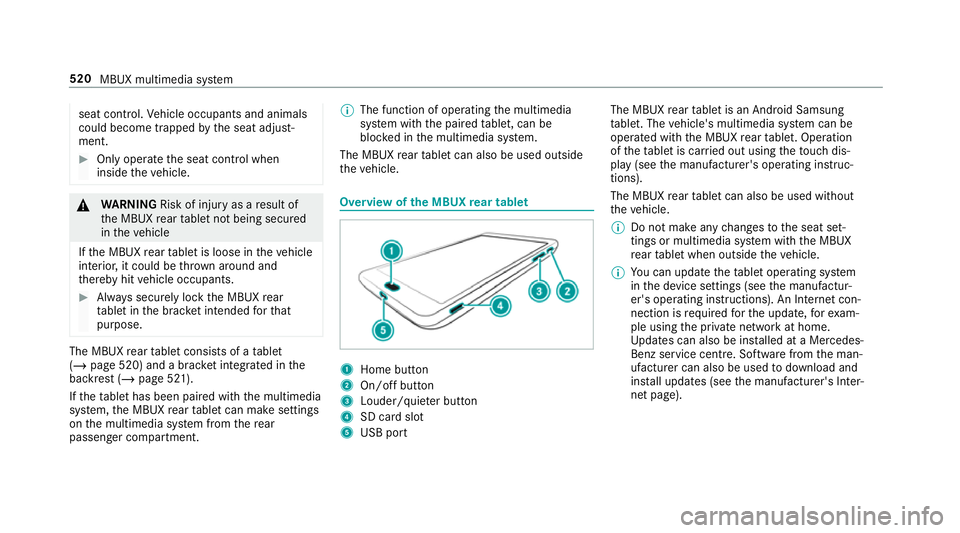
th eve hicle. Overview of
the MBUX rear tablet 1
Home button
2 On/off button
3 Louder/quiet er button
4 SD card slot
5 USB port The MBUX
rear tablet is an Android Samsung
ta blet. The vehicle's multimedia sy stem can be
operated with the MBUX rear tablet. Operation
of theta blet is car ried out using theto uch dis‐
play (see the manufacturer's operating instruc‐
tions).
The MBUX rear tablet can also be used without
th eve hicle.
% Do not make any changes tothe seat set‐
tings or multimedia sy stem with the MBUX
re ar tablet when outside theve hicle.
% You can update theta blet operating sy stem
in the device settings (see the manufactur‐
er's operating instructions). An Internet con‐
nection is requ ired forth e update, forex am‐
ple using the private network at home.
Up dates can also be ins talled at a Mercedes-
Benz service centre. Software from the man‐
ufacturer can also be used todownload and
ins tall updates (see the manufacturer's Inter‐
net page). 520
MBUX multimedia sy stem
Page 528 of 729
#
Select ßforth ere qu ired seat.
The settings forth e selected seat are reset. Setting climate control
for the rear
passenger comp artment (Rear Seat Enter‐
tainment Sy stem) Setting
the airflow #
Select thete mp erature display at the lo wer
edge of there ar displa y. #
Select Second row of seats orThird row of
seats. #
Set the air flow.
Setting thetemp erature #
Select thete mp erature display at the lo wer
edge of there ar displa y. #
Select Second row of seats orThird row of
seats. #
Set thete mp erature.
Setting the air distribution
The air distribution can be set forth e seats in
th e second row. #
Select thete mp erature display at the lo wer
edge of there ar displa y. #
Select Second row of seats . #
Select PorO forth e left or right seat.
P The air is routed thro ugh the cent re
and side air vents.
O The air is routed thro ugh thefo ot we ll
and side air vents.
Controlling the rear climate control automat‐
ical ly #
Select REAR AUTO .
Re ar climate control is controlled automati‐
call y.
Deactivating rear climate control #
Select REAR OFF.
Re ar climate control is deactivated. Setting
the ambience light in there ar
passenger comp artment Re
ar Seat En tertainment Sy stem:
4 © 5
Comfort 5
Ambient lighting
Setting the colour #
Select the colour of the light from thech ro‐
matic circle.
Ac tivating multi-coloured lighting #
Select Multi-colour. #
Select a colour programme.
Ac tivating multi-coloured animation #
Activate Multi-colour animat..
The chosen colour programme will change at
predefined inter vals.
Ad justing the brightness #
Select Brightness . #
Toactivate brightness for zones: switch
Brightness zones on or off.
If Brightness zones is switched on,the zones
can be set individually. MBUX multimedia sy
stem 525
Page 554 of 729
Ty
res without run-flat characteristics: #
Do not drive on with a flat tyre. #
Chan getheflat tyre immediately with
an emer gency spa rewheel or spare
wheel. Alternativel y,consult a qualified
specialist workshop.
Ty res with run-flat characteristics: #
Obse rveth e information and warning
no tes on MOExtended tyres (run-flat
tyres). In
theeve nt of a flat tyre, thefo llowing options
are available depending on your vehicle's equip‐
ment:
R Vehicles with MOExtended tyres: it is pos‐
sible tocontinue the journey for a short
period of time. Make sure you obse rvethe
no tes on MOExtended tyres (run-flat tyres)
(/ page 551).
R Vehicles with a TIREFIT kit: you can repair
th e tyre so that it is possible tocontinue the
jou rney for a short period of time. Todo this,
use the TIREFIT kit (/ page 553). R
Vehicles with Mercedes me connect: you
can make a call for breakdown assi stance via
th eov erhead control panel in the case of a
breakdown (/ page477).
R Allvehicles: change the wheel
(/ page 584).
% The emer gency spa rewheel is only available
in cer tain countries. Note
s on MOExtended tyres (run-flat tyres) &
WARNING Risk of accident when driving
in eme rgency mode
When driving in emer gency mode, the han‐
dling characteristics are impaired. e.g. when
cornering, when accelerating stronglyand
when braking. #
Do not exceed the permissible maxi‐
mum speed. #
Avoid any abrupt steering and driving
maneuvers as well as driving over
obs tacles (curbs, pot holes, off-road). This applies, in pa
rticular, toa loaded
ve hicle. #
Stop driving in the emer gency mode if
yo u notice:
R banging noise
R vehicle vibration
R smoke which smells like rubber
R continuous ESP ®
inter vention
R crac ksin tire side walls #
After driving in emergency mode ha ve
th erims checkedby aqu alified special‐
ist workshop with rega rd totheir fur ther
use. #
The defective tire must be replaced in
eve rycase. Wi
th MOExtended tyres (run-flat tyres), you can
continue todrive your vehicle even if there is a
tot al loss of pressure in one or more tyres. How‐
eve r,th e tyre af fected must not show any clearly
visible damage. Breakdown assis
tance 551
Page 588 of 729
R
The vehicle has been prepared for a wheel
ch ange (/ page 584).
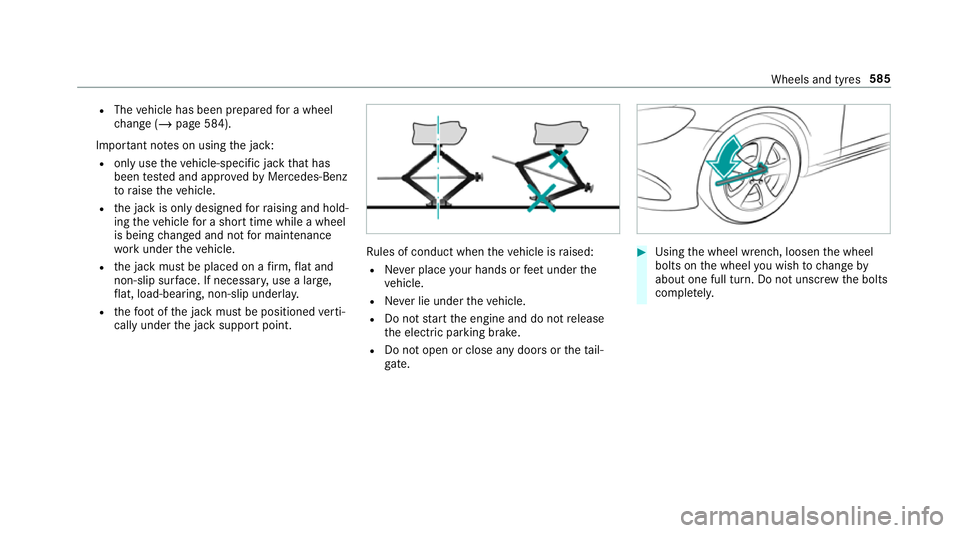
Impor tant no tes on using the jack:
R only use theve hicle-specific jack that has
been tested and appr ovedby Mercedes-Benz
to raise theve hicle.
R the jack is only designed forra ising and hold‐
ing theve hicle for a short time while a wheel
is being changed and not for maintenance
wo rkunder theve hicle.
R the jack must be placed on a firm ,fl at and
non-slip sur face. If necessar y,use a lar ge,
fl at, load-bearing, non-slip unde rlay.
R thefo ot ofthe jack must be positioned verti‐
cally under the jack support point. Ru
les of conduct when theve hicle is raised:
R Never place your hands or feet under the
ve hicle.
R Never lie under theve hicle.
R Do not start the engine and do not release
th e electric parking brake.
R Do not open or close any doors or theta il‐
gate. #
Using the wheel wrench, loosen the wheel
bolts on the wheel you wish tochange by
about one full turn. Do not unscr ewthe bolts
comple tely. Wheels and tyres
585
Page 682 of 729
1,
2, 3 ...
4MATIC ...................................................... 211
Fu nction ............................................... 211
12 V battery
see Battery (vehicle)
12 V so cket
see Soc ket (12 V)
48 V on-board electrical sy stem
Operating saf ety .................................... 24
230 V soc ket
see Soc ket (230 V)
360° Camera ........................................... 289
Ca re .................................................... 545
Fu nction .............................................. 289
Opening the camera co ver (r eve rsing
camera) .............................................. .293
Selecting a view .................................. 293
Setting favo urites ................................ 293
Swit ching automatic operation
on/off (r eversing camera) .................. .293 A
A/C function Activating/deactivating (multimedia
sy stem) ................................................ 17 7
Switching on/off (control panel) ......... 17 7
ABS (Anti-lock Braking Sy stem) ............ .229
Ac celeration
see Kickdown
Ac cess data
Setting (Blue tooth®
) ............................ 488
Ac cident and breakdown manage‐
ment
Mercedes me connect ........................ .477
Ac oustic locking verification signal
Ac tivating/deactivating ......................... 83
Ac tivating/deactivating automatic
vo lume adjustment
Burmes ter®
sur round sound sy stem ....5 17
Ac tive Blind Spot Assi st......................... 306
Ac tivating/deactivating ...................... .309
Brake application ................................. 307
Fu nction .............................................. 306
Sy stem limitations ...............................3 06AC
TIVE BODY CONT ROL.......................... 269
Fr ee driving mode ................................ 274
Individual wheel control ....................... 275
Setting the le vel .................................. .275
Suspension .......................................... 269
Ac tive Brake Assi st
Fu nction/no tes ................................... 235
Setting .................................................2 41
Ac tive Di stance Assist DISTRO NIC........ 247
Ac tive Emergency Stop Assist .............2 57
Ac tive Lane Change Assi st.................. 255
Calling up a speed ............................... 24 9
Displ ays in the instrument display .......2 58
Fu nction .............................................. 247
Increasing/decreasing speed .............. 24 9
Re quirements: .................................... .249
Ro ute-based speed adap tation ........... .252
Selecting ............................................. 24 9
St eering wheel buttons ........................ 24 9
St oring a speed ................................... 24 9
Switching off/deacti vating .................. 24 9
Switching on/activating ...................... 24 9
Sy stem limitations ...............................2 47
Ac tive Eme rgency Stop Assist ...............257 Index
67 9