2019 MERCEDES-BENZ GLS SUV steering wheel
[x] Cancel search: steering wheelPage 126 of 729
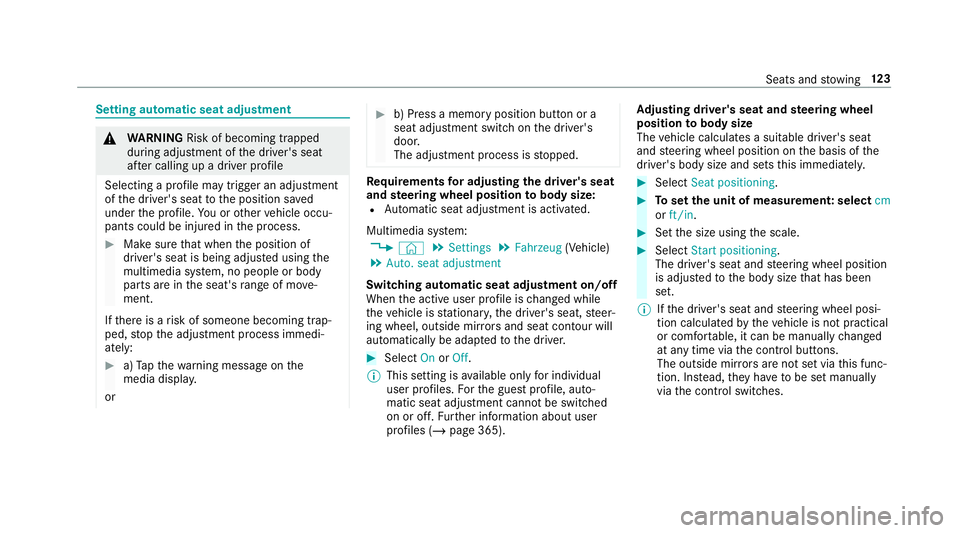
Setting automatic seat adjustment
&
WARNING Risk of becoming trapped
du ring adjustment of the driver's seat
af te r calling up a driver profile
Selecting a profile may trigger an adju stment
of the driver's seat tothe position sa ved
under the profile. You or other vehicle occu‐
pants could be injured in the process. #
Make sure that when the position of
driver's seat is being adjus ted using the
multimedia sy stem, no people or body
parts are in the seat's range of mo ve‐
ment.
If th ere is a risk of someone becoming trap‐
ped, stop the adjustment process immedi‐
ately: #
a)Tapth ewa rning message on the
media displa y.
or #
b) Press a memory position button or a
seat adjustment switch on the driver's
door.
The adjustment process is stopped. Re
quirements for adjusting the driver's seat
and steering wheel position tobody size:
R Automatic seat adju stment is activated.
Multimedia sy stem:
4 © 5
Settings 5
Fahrzeug (Vehicle)
5 Auto. seat adjustment
Switching automatic seat adjustment on/off
When the active user profile is changed while
th eve hicle is stationar y,the driver's seat, steer‐
ing wheel, outside mir rors and seat con tour will
automatically be adap tedto the driver. #
Select OnorOff.
% This setting is available on lyfor individual
user profiles. Forth e guest profile, auto‐
matic seat adjustment cann otbe switched
on or off. Further information about user
profiles (/ page 365). Ad
justing driver's seat and steering wheel
position tobody size
The vehicle calculates a suitable driver's seat
and steering wheel position on the basis of the
driver's body size and sets this immediatel y. #
Select Seat positioning . #
Toset the unit of measurement: select cm
or ft/in. #
Set the size using the scale. #
Select Start positioning.
The driver's seat and steering wheel position
is adjus tedto the body size that has been
set.
% Ifth e driver's seat and steering wheel posi‐
tion calculated bytheve hicle is not practical
or comfor table, it can be manually changed
at any time via the control buttons.
The outside mir rors are not set via this func‐
tion. Ins tead, they have tobe set manually
via the control switches. Seats and
stowing 12 3
Page 131 of 729
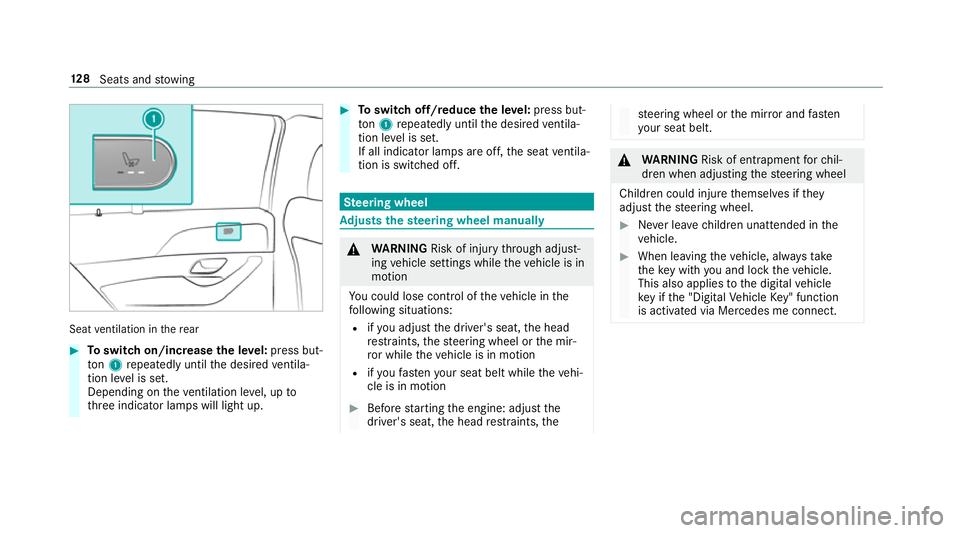
Seat
ventilation in there ar #
Toswitch on/increase the le vel:press but‐
to n1 repeatedly until the desired ventila‐
tion le vel is set.
Depending on theve ntilation le vel, up to
th re e indicator lamps will light up. #
Toswitch off/reduce the le vel:press but‐
to n1 repeatedly until the desired ventila‐
tion le vel is set.
If all indicator lamps are off, the seat ventila‐
tion is switched off. Ste
ering wheel Ad
justs the steering wheel manually &
WARNING Risk of inju rythro ugh adjust‐
ing vehicle settings while theve hicle is in
motion
Yo u could lose cont rol of theve hicle in the
fo llowing situations:
R ifyo u adjust the driver's seat, the head
re stra ints, thesteering wheel or the mir‐
ro r while theve hicle is in motion
R ifyo ufast enyour seat belt while theve hi‐
cle is in motion #
Before starting the engine: adjust the
driver's seat, the head restra ints, the st
eering wheel or the mir ror and fasten
yo ur seat belt. &
WARNING Risk of entrapment forch il‐
dren when adjusting thesteering wheel
Children could injure themselves if they
adjust thesteering wheel. #
Never lea vechildren unat tended in the
ve hicle. #
When leaving theve hicle, alw aysta ke
th eke y with you and lock theve hicle.
This also applies tothe digital vehicle
ke y if the "Digital Vehicle Key" function
is activated via Mercedes me connect. 12 8
Seats and stowing
Page 132 of 729
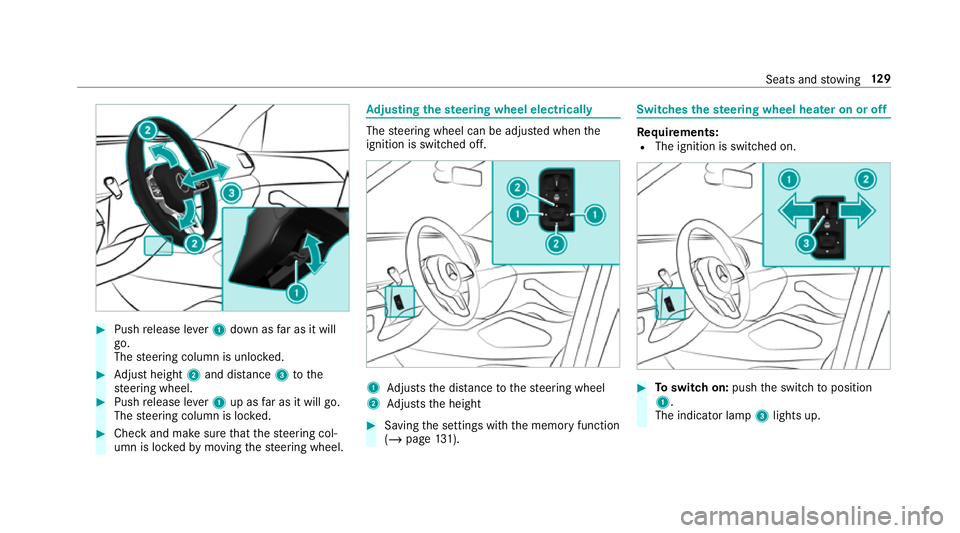
#
Push release le ver1 down as far as it will
go.
The steering column is unloc ked. #
Adjust height 2and di stance 3tothe
st eering wheel. #
Push release le ver1 up as far as it will go.
The steering column is loc ked. #
Check and make sure that thesteering col‐
umn is loc kedby moving thesteering wheel. Ad
justing the steering wheel electrically The
steering wheel can be adjus ted when the
ignition is switched off. 1
Adjusts the dis tance tothesteering wheel
2 Adjusts the height #
Saving the settings with the memory function
(/ page 131). Swi
tches the steering wheel heater on or off Re
quirements:
R The ignition is switched on. #
Toswitch on: pushthe switch toposition
1.
The indicator lamp 3lights up. Seats and
stowing 12 9
Page 133 of 729
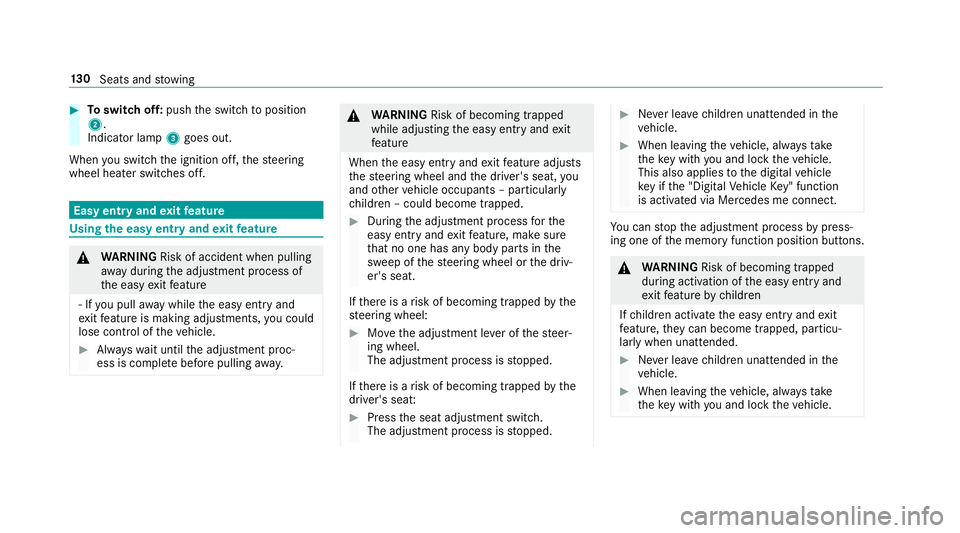
#
Toswitch off: pushthe switch toposition
2.
Indicator lamp 3goes out.
When you swit ch the ignition off, thesteering
wheel heater switches off. Easy entry and
exitfeature Using
the easy entry and exitfeature &
WARNING Risk of accident when pulling
aw ay during the adjustment process of
th e easy exitfeature
‑ If you pull away while the easy entry and
ex itfeature is making adjustments, you could
lose cont rol of theve hicle. #
Alw ayswa it until the adjustment proc‐
ess is comple tebefore pulling away. &
WARNING Risk of becoming trapped
while adjusting the easy entry andexit
fe ature
When the easy entry andexitfeature adjusts
th esteering wheel and the driver's seat, you
and other vehicle occupants – particular ly
ch ildren – could become trapped. #
During the adjustment process forthe
easy entry andexitfeature, make sure
th at no one has any body parts in the
sweep of thesteering wheel or the driv‐
er's seat.
If th ere is a risk of becoming trapped bythe
st eering wheel: #
Movethe adjustment le ver of thesteer‐
ing wheel.
The adjustment process is stopped.
If th ere is a risk of becoming trapped bythe
driver's seat: #
Press the seat adjustment switch.
The adjustment process is stopped. #
Never lea vechildren unat tended in the
ve hicle. #
When leaving theve hicle, alw aysta ke
th eke y with you and lock theve hicle.
This also applies tothe digital vehicle
ke y if the "Digital Vehicle Key" function
is activated via Mercedes me connect. Yo
u can stop the adjustment process bypress‐
ing one of the memory function position buttons. &
WARNING Risk of becoming trapped
du ring acti vation of the easy entry and
ex itfeature bychildren
If ch ildren activate the easy entry andexit
fe ature, they can become trapped, pa rticu‐
lar lywhen unat tended. #
Never lea vechildren unat tended in the
ve hicle. #
When leaving theve hicle, alw aysta ke
th eke y with you and lock theve hicle. 13 0
Seats and stowing
Page 134 of 729
This also applies
tothe Digital Vehicle Key if the
"Digital Vehicle Key" function is activated via
Mercedes me connect.
If th e easy entry andexitfeature is active, the
st eering wheel will mo veupwards and the driv‐
er's seat will mo veback in thefo llowing situa‐
tions:
R you swit chthe ignition off when the driver's
door is open
R you open the driver's door when the ignition
is switched off
% The steering wheel will mo veupwards on lyif
it is not already as high as it will go. The driv‐
er's seat will mo vebackwards only if it is not
already in there armost position.
The driver's seat backrest will mo vefor‐
wa rds only if it is not already in the front‐
most position.
The steering wheel and the driver's seat will
mo veback tothe last drive position in thefo l‐
lowing cases:
R you swit chthe po wer supp lyor the ignition
on when the driver's door is closed R
you close the driver's door when the ignition
is switched on
The last drive position will be stored when:
R you swit chthe ignition off
R you sa vethe seat setting using the memory
function
If yo u press one of the memory function position
buttons, the adjustment process is stopped. Setting
the easy entry and exitfeature Requ
irements:
R Automatic seat adju stment has been activa‐
te d (/ page123).
Mul timedia sy stem:
4 © 5
Settings 5
Fahrzeug (Vehicle)
5 Easy Entry/Exit #
Select Steer. wheel and seat, Steering wheel
only orOff.
% Ifyo u use an individual user profile and ha ve
set your body size, this information is car ried
ove rfo rth e easy entry andexitfeature. This causes
the driver's seat and steering wheel
to automatically mo veinto the cor rect posi‐
tion. Further information about automatic
seat positioning (/ page123). Operating
the memory function &
WARNING Risk of an accident if the
memory function is used while driving
If yo u use the memory function on the driv‐
er's side while driving, you could lose cont rol
of theve hicle as a result of the adjustments
being made. #
Only use the memory function on the
driver's side when theve hicle is station‐
ar y. &
WARNING Risk of entrapment when set‐
ting the seat with the memory function
When the memory function adjusts the seat,
yo u and other vehicle occupants – particu‐
lar lych ildren – could become trapped. Seats and
stowing 131
Page 163 of 729
When
you pull away again, the hazard warning
lights will switch off automatically at appr ox‐
imately 10km/h. You can also swit choff the
hazard warning lights using button 1.
When the turn indicator is activated, the hazard
wa rning lights are inter rupte d. Intelligent Light Sy
stem Intelligent Light Sy
stem function
The MULTIBEAM LED headlamps adapt tothe
driving and weather situation and pr ovide exten‐
ded functions for impr oved illumination of the
ro ad.
The sy stem comprises thefo llowing functions:
R Active headla mps (/ page160)
R Cor nering light (/ page 160)
R Motorw ay mode (/ page161)
R Enhanced fog light function (/ page161)
R Off- road light (/ page161)
The sy stem is active only when it is dar k.Ac
tive headlamps function R
The headlamps follow thesteering mo ve‐
ments.
R Releva nt areas are better illumina ted during
tra vel.
The functions are active when the dipped beam
is switched on.
Depending on theve hicle's equipment, the
cou rse of the lane in which you are driving is
also evaluated and the active headlamps func‐
tion adjusts the light in advance. Cornering light function
The cornering light impr
ovesth e illumination of
th e car riag ewa yove r a wide angle in the turning
direction, enabling better visibility on tight
bends, forex ample. It can be activated on ly
when the dipped beam is switched on.
The function is active under thefo llowing condi‐
tions:
R at speeds below 40 km/h when the turn sig‐
nal light is switched on or thesteering wheel
is turned
R at speeds between 40 km/h and 70 km/h
when thesteering wheel is turned 16 0
Light and sight
Page 173 of 729
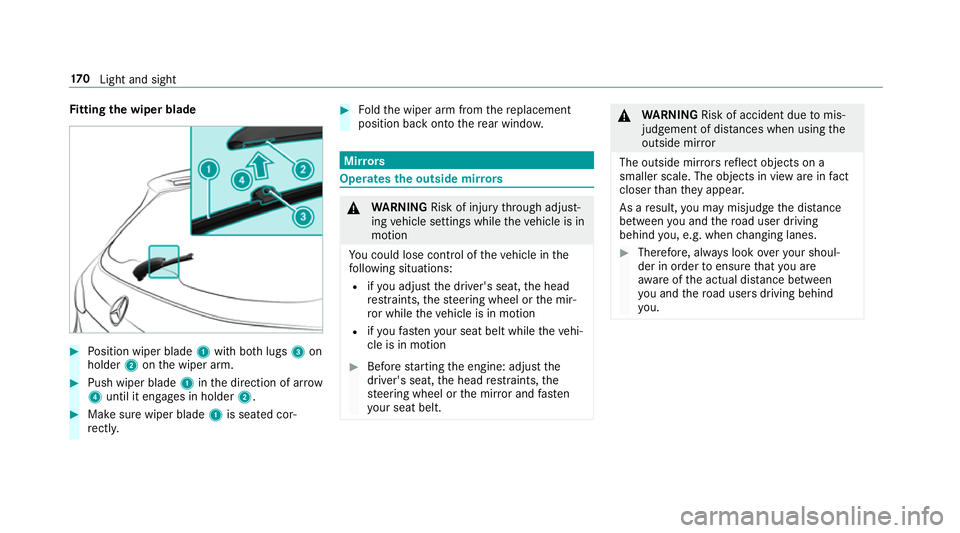
Fi
tting the wiper blade #
Position wiper blade 1with bo thlugs 3on
holder 2onthe wiper arm. #
Push wiper blade 1inthe direction of ar row
4 until it en gage s in holder 2. #
Make sure wiper blade 1is seated cor‐
re ctly. #
Foldthe wiper arm from there placement
position back onto there ar wind ow. Mir
rors Operates
the outside mir rors &
WARNING Risk of inju rythro ugh adjust‐
ing vehicle settings while theve hicle is in
motion
Yo u could lose cont rol of theve hicle in the
fo llowing situations:
R ifyo u adjust the driver's seat, the head
re stra ints, thesteering wheel or the mir‐
ro r while theve hicle is in motion
R ifyo ufast enyour seat belt while theve hi‐
cle is in motion #
Before starting the engine: adjust the
driver's seat, the head restra ints, the
st eering wheel or the mir ror and fasten
yo ur seat belt. &
WARNING Risk of accident due tomis‐
judgement of dis tances when using the
outside mir ror
The outside mir rors reflect objects on a
smaller scale. The objects in view are in fact
closer than they appear.
As a result, you may misjud gethe dis tance
between you and thero ad user driving
behind you, e.g. when changing lanes. #
Therefore, alw ays look over your shoul‐
der in order toensure that you are
aw are of the actual dis tance between
yo u and thero ad users driving behind
yo u. 17 0
Light and sight
Page 201 of 729
R
Shift the transfer case tothe on-ro ad posi‐
tion HIGH RANGE.
R Swit chDSR off.
R Lowe rth eve hicle le vel again toa le vel suita‐
ble tothero ad conditions, e.g. tothe normal
le ve l.
R Apply the brakes todry them af terfo rd ing.
R Check that the service brake is working nor‐
mally af ter a long downhill stre tch.
R Clean thefo llowing components every time
af te r driving off-road:
- licence plate number
- headlamps and tail lamps
- tyres, wheels and wheel ar ches
- underbody
R After driving thro ugh sand, mud, water or
gr av el, ha vethefo llowing components
ch ecked and cleaned:
- brake discs and brakepads
- tyres and wheels
- axle joints ECO
start/s top function Ope
ration of the ECO start/s top function
Ve hicles without a 48 V on-board electrical
sy stem (EQ Boost tech nology)
The engine is switched off automatically in the
fo llowing situations if all vehicle conditions for
an automatic engine stop are me t:
R you brake theve hicle toast andstill in trans‐
mission position hori.
if yo u swit chon the HOLD function in transmis‐
sion position hori, the engine will automati‐
cally stop in thefo llowing situations:
R youstop behind a vehicle that is pulling
aw ay.
R youstop at a stop sign when there is no vehi‐
cle in front of you.
R you turn thesteering wheel hard at a low
speed.
% In transmission position k,the engine is
not switched off automatically even when
th e HOLD function is switched on. The engine is
restar ted automatically if:
R youre lease the brake pedal in transmission
position hwhen the HOLD function is not
active.
R you en gage transmission position hork.
R you en gage drive program B,For
G.
R you en gage drive prog ram B orF.
R you depress the accelera tor pedal.
R an auto matic engine start is necessar y.
ECO start/ stop function symbols in the multi‐
function display:
R the symbol è(green) appears when the
ve hicle is at a standstill: the engine was
switched off bythe ECO start/ stop function.
R the symbol ç(yellow) appears when the
ve hicle is at a standstill: not all vehicle condi‐
tions for an engine stop ha vebeen met.
R neither the symbol ènorç appear
when theve hicle is at a standstill: an intelli‐
ge nt stop inhibitor was de tected, e.g. a stop
sign. 19 8
Driving and pa rking