2019 MERCEDES-BENZ GLS SUV key battery
[x] Cancel search: key batteryPage 83 of 398

X
Repeatedly tap the SmartKey against your
palm until battery 0087falls out.
X Insert the new battery with the positive ter-
minal facing upwards. Use a lint-free cloth to do so.
X Make sure that the surface of the battery is
free of lint, grease and other contaminants. X
Insert the front tabs of battery compartment
cover 0043into the housing first and then press
to close it.
X Insert mechanical key 0044into the SmartKey
(Y page 79).
X Check the function of all SmartKey buttons on
the vehicle. Problems with the SmartKey
Problem
Possible causes/consequences and
0050 0050Solutions You can no longer lock or
unlock the vehicle using
the SmartKey. The SmartKey battery is discharged or nearly discharged.
X Check the SmartKey battery (Y page 80) and replace it if necessary
(Y page 80).
If this does not work: X Unlock (Y page 84) or lock (Y page 84) the vehicle using the
mechanical key. There is interference from a powerful source of radio waves.
X Unlock (Y page 84) or lock (Y page 84) the vehicle using the
mechanical key. The SmartKey is faulty.
X Unlock (Y page 84) or lock (Y page 84) the vehicle using the
mechanical key.
X Have the SmartKey checked at a qualified specialist workshop. You can no longer lock or
unlock the vehicle using
KEYLESS-GO. KEYLESS-GO was deactivated.
X Reactivate KEYLESS-GO (Y page 78). The SmartKey battery is discharged or nearly discharged.
X Check the SmartKey battery (Y page 80) and replace it if necessary
(Y page 80).
If this does not work: X Unlock (Y page 84) or lock (Y page 84) the vehicle using the
mechanical key. SmartKey
81Opening and closing Z
Page 84 of 398

Problem
Possible causes/consequences and
0050
0050Solutions There is interference from a powerful source of radio waves.
X Unlock (Y page 84) or lock (Y page 84) the vehicle using the
mechanical key. KEYLESS-GO is malfunctioning.
X Lock/unlock the vehicle using the remote control function of the
SmartKey.
X Have the vehicle and SmartKey checked at a qualified specialist
workshop.
If the vehicle can also not be locked/unlocked using the remote con-
trol function:
X Unlock (Y page 84) or lock (Y page 84) the vehicle using the
mechanical key.
X Have the vehicle and SmartKey checked at a qualified specialist
workshop. The engine cannot be
started using the Smart-
Key. The on-board voltage is too low.
X Switch off non-essential consumers, e.g. seat heating or interior
lighting, and try to start the engine again.
If this does not work:
X Check the starter battery and charge it if necessary (Y page 342).
or X Jump-start the vehicle (Y page 343).
or X Consult a qualified specialist workshop. The engine cannot be
started using the Start/
Stop button. The Smart-
Key is in the vehicle. The vehicle is locked.
X Unlock the vehicle and try to start the vehicle again. The SmartKey battery is discharged or nearly discharged.
X Check the SmartKey battery (Y page 80) and replace it if necessary
(Y page 80).
If this does not work: X Start your vehicle with the SmartKey in the ignition lock. There is interference from a powerful source of radio waves.
X Start your vehicle with the SmartKey in the ignition lock. You have lost a Smart-
Key. X
Have the SmartKey deactivated at a qualified specialist workshop.
X Report the loss immediately to the vehicle insurers.
X If necessary, have the locks changed as well. You have lost the
mechanical key. X
Report the loss immediately to the vehicle insurers.
X If necessary, have the locks changed as well. 82
SmartKeyOpening and closing
Page 94 of 398
set correctly. If this is not the case, repeat the
steps above. Problems with the side windows
G
WARNING
If you close a side window again immediately after it has been blocked or reset, the side window
closes with increased or maximum force. The reversing feature is then not active. Parts of the
body could be trapped in the closing area in the process. This poses an increased risk of injury or even fatal injury.
Make sure that no parts of the body are in the closing area. To stop the closing process, releasethe switch or push the switch again to reopen the side window. Problem
Possible causes/consequences and
0050 0050Solutions A side window cannot be
closed because it is
blocked by objects, e.g.
leaves in the window
guide. X
Remove the objects.
X Close the side window. A side window cannot be
closed and you cannot
see the cause. If a side window is obstructed during closing and reopens again
slightly:
X Immediately after the window blocks, pull the corresponding switch
again until the side window has closed.
The side window is closed with increased force.
If a side window is obstructed again during closing and reopens again slightly:
X Immediately after the window blocks, pull the corresponding switch
again until the side window has closed.
The side window is closed without the automatic reversing feature. The side windows cannot
be opened or closed with
convenience opening. The SmartKey battery is discharged or nearly discharged.
X Check the SmartKey battery (Y page 80) and replace it if necessary
(Y page 80). If a side window will still not open or close due to a malfunction, consult a qualified specialist
workshop. Sliding sunroof
Important safety notes
Your vehicle may be equipped with a sliding
sunroof or a panorama roof with power tilt/slid- ing panel. In the following section, the term
"sliding sunroof" refers to both sliding sunroof
variants. G
WARNING
While opening and closing the sliding sunroof, body parts in close proximity could become
trapped. There is a risk of injury.
Make sure that no body parts are in close
proximity during the opening and closing pro-cedures. 92
Sliding sunroofOpening and closing
Page 109 of 398
The system automatically switches down from
level 2to level 1after approximately ten
minutes.
The system automatically switches off approx-
imately 35 minutes after it is set to level 1.
X Turn the SmartKey to position 0047or0048 in the
ignition lock (Y page 140).
X To switch on: press button0043repeatedly
until the desired heating level is set.
X To switch off: press button0043repeatedly
until all the indicator lamps go out.
i If the battery voltage is too low, the seat
heating may switch off.
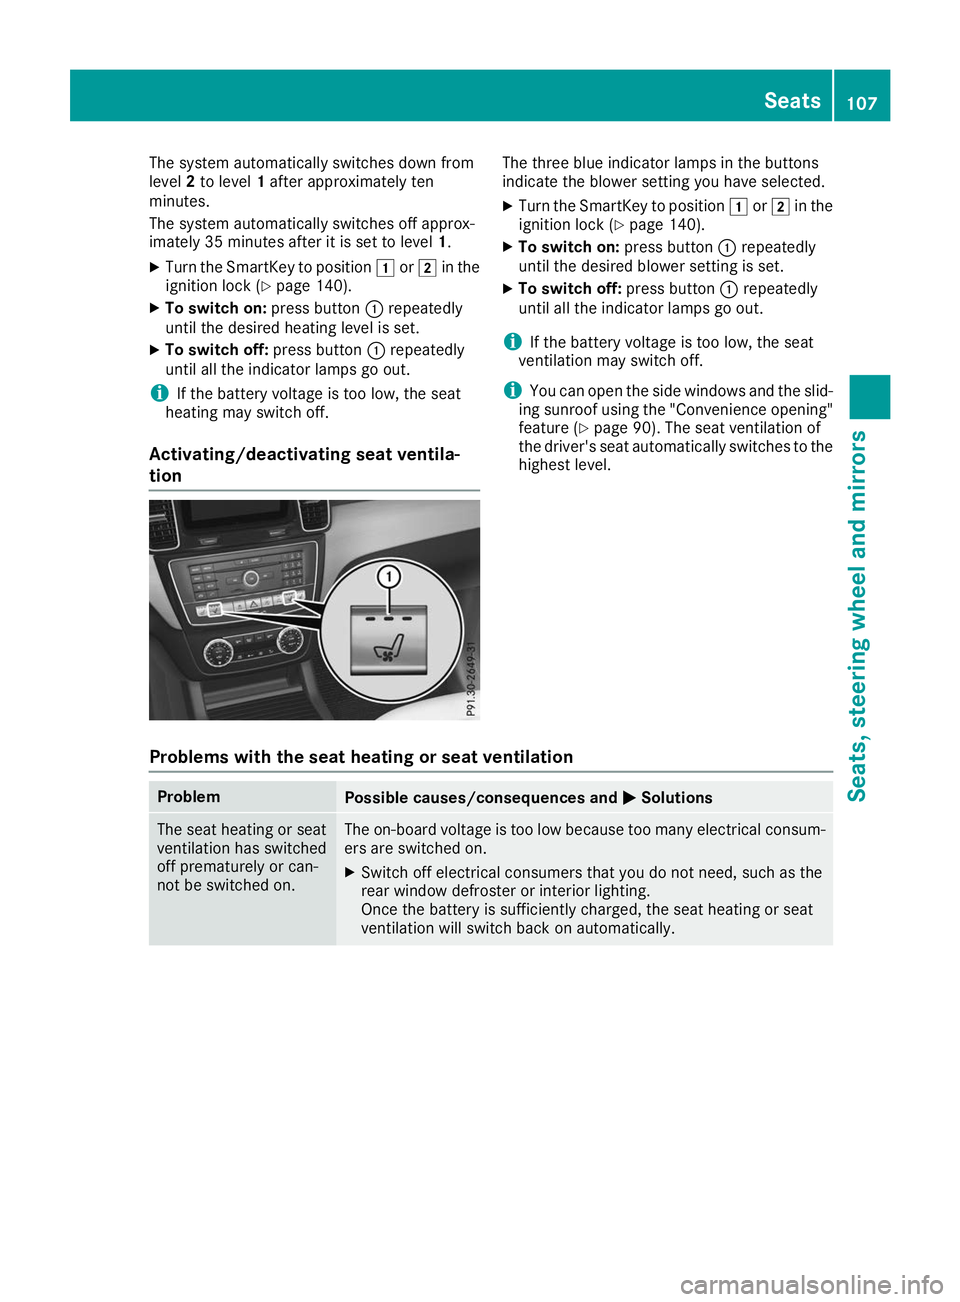
Activating/deactivating seat ventila-
tion The three blue indicator lamps in the buttons
indicate the blower setting you have selected.
X Turn the SmartKey to position 0047or0048 in the
ignition lock (Y page 140).
X To switch on: press button0043repeatedly
until the desired blower setting is set.
X To switch off: press button0043repeatedly
until all the indicator lamps go out.
i If the battery voltage is too low, the seat
ventilation may switch off.
i You can open the side windows and the slid-
ing sunroof using the "Convenience opening" feature (Y page 90). The seat ventilation of
the driver's seat automatically switches to the
highest level.
Problems with the seat heating or seat ventilation Problem
Possible causes/consequences and
0050 0050Solutions The seat heating or seat
ventilation has switched
off prematurely or can-
not be switched on. The on-board voltage is too low because too many electrical consum-
ers are switched on.
X Switch off electrical consumers that you do not need, such as the
rear window defroster or interior lighting.
Once the battery is sufficiently charged, the seat heating or seat
ventilation will switch back on automatically. Seats
107Seats, steering wheel and mirrors Z
Page 113 of 398
X
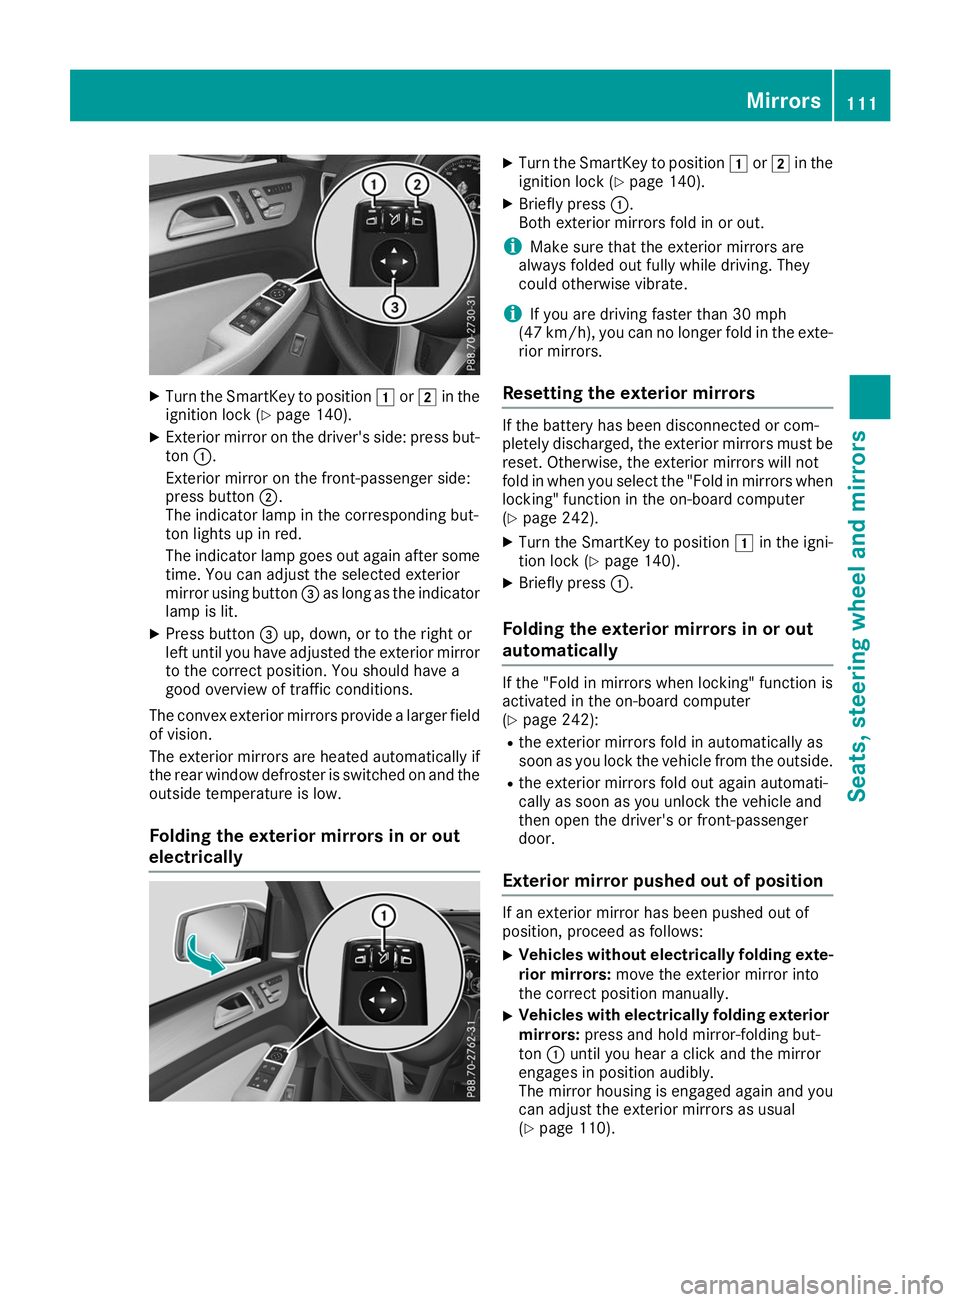
Turn the SmartKey to position 0047or0048 in the
ignition lock (Y page 140).
X Exterior mirror on the driver's side: press but-
ton 0043.
Exterior mirror on the front-passenger side:
press button 0044.
The indicator lamp in the corresponding but-
ton lights up in red.
The indicator lamp goes out again after some
time. You can adjust the selected exterior
mirror using button 0087as long as the indicator
lamp is lit.
X Press button 0087up, down, or to the right or
left until you have adjusted the exterior mirror
to the correct position. You should have a
good overview of traffic conditions.
The convex exterior mirrors provide a larger field of vision.
The exterior mirrors are heated automatically if
the rear window defroster is switched on and the
outside temperature is low.
Folding the exterior mirrors in or out
electrically X
Turn the SmartKey to position 0047or0048 in the
ignition lock (Y page 140).
X Briefly press 0043.
Both exterior mirrors fold in or out.
i Make sure that the exterior mirrors are
always folded out fully while driving. They
could otherwise vibrate.
i If you are driving faster than 30 mph
(47 km/h), you can no longer fold in the exte-
rior mirrors.
Resetting the exterior mirrors If the battery has been disconnected or com-
pletely discharged, the exterior mirrors must be
reset. Otherwise, the exterior mirrors will not
fold in when you select the "Fold in mirrors whenlocking" function in the on-board computer
(Y page 242).
X Turn the SmartKey to position 0047in the igni-
tion lock (Y page 140).
X Briefly press 0043.
Folding the exterior mirrors in or out
automatically If the "Fold in mirrors when locking" function is
activated in the on-board computer
(Y
page 242):
R the exterior mirrors fold in automatically as
soon as you lock the vehicle from the outside.
R the exterior mirrors fold out again automati-
cally as soon as you unlock the vehicle and
then open the driver's or front-passenger
door.
Exterior mirror pushed out of position If an exterior mirror has been pushed out of
position, proceed as follows:
X
Vehicles without electrically folding exte-
rior mirrors: move the exterior mirror into
the correct position manually.
X Vehicles with electrically folding exterior
mirrors: press and hold mirror-folding but-
ton 0043until you hear a click and the mirror
engages in position audibly.
The mirror housing is engaged again and you
can adjust the exterior mirrors as usual
(Y page 110). Mirrors
111Seats, steering wheel and mirrors Z
Page 118 of 398
The daytime running lamps improve the visibility
of your vehicle during the day. To do this, the
daytime running lamps function must be
switched on using the on-board computer
(Y page 240).
If the engine is running and you turn the light
switch to 0060or0058, the manual settings
take precedence over the daytime running
lamps.
Low-beam headlamps
Even if the light sensor does not detect that it is dark, the parking lamps and low-beam head-
lamps switch on when the ignition is switched on and the light switch is set to the 0058position.
This is a particularly useful function in the event
of rain and fog.
X To switch on the low-beam headlamps:
turn the SmartKey to position
0048in the igni-
tion lock or start the engine.
X Turn the light switch to 0058.
The green 0058indicator lamp in the instru-
ment cluster lights up.
Rear fog lamp
The rear fog lamp improves visibility of your
vehicle for the traffic behind in the event of thick fog. Please take note of the country-specific
regulations for the use of rear fog lamps.
X To switch on the rear fog lamp: turn the
SmartKey to position 0048in the ignition lock or
start the engine.
X Turn the light switch to 0058or0071.
X Press the 005Ebutton.
The yellow 005Eindicator lamp in the instru-
ment cluster lights up.
X To switch off the rear fog lamp: press the
005E button.
The yellow 005Eindicator lamp in the instru-
ment cluster goes out.
Parking lamps ! If the battery charge is very low, the parking
lamps or standing lamps are automatically
switched off to enable the next engine start.
Always park your vehicle safely and in a well lit area, in accordance with the relevant legal
stipulations. Avoid using the 0060parking
lamps over a period of several hours. If pos-
sible, switch on the right-hand 0064or left-
hand 0063 standing lamps. X
To switch on: turn the light switch to 0060.
The green 0060indicator lamp in the instru-
ment cluster lights up.
Standing lamps Switching on the standing lamps ensures the
corresponding side of the vehicle is illuminated.X To switch on the standing lamps: the
SmartKey should not be in the ignition lock or in key position 0092in the ignition lock.
X Turn the light switch to 0063(left-hand side of
the vehicle) or 0064(right-hand side of the
vehicle).
Vehicles towing a trailer: both the right-hand
and left-hand standing lamps (tail lamps) are
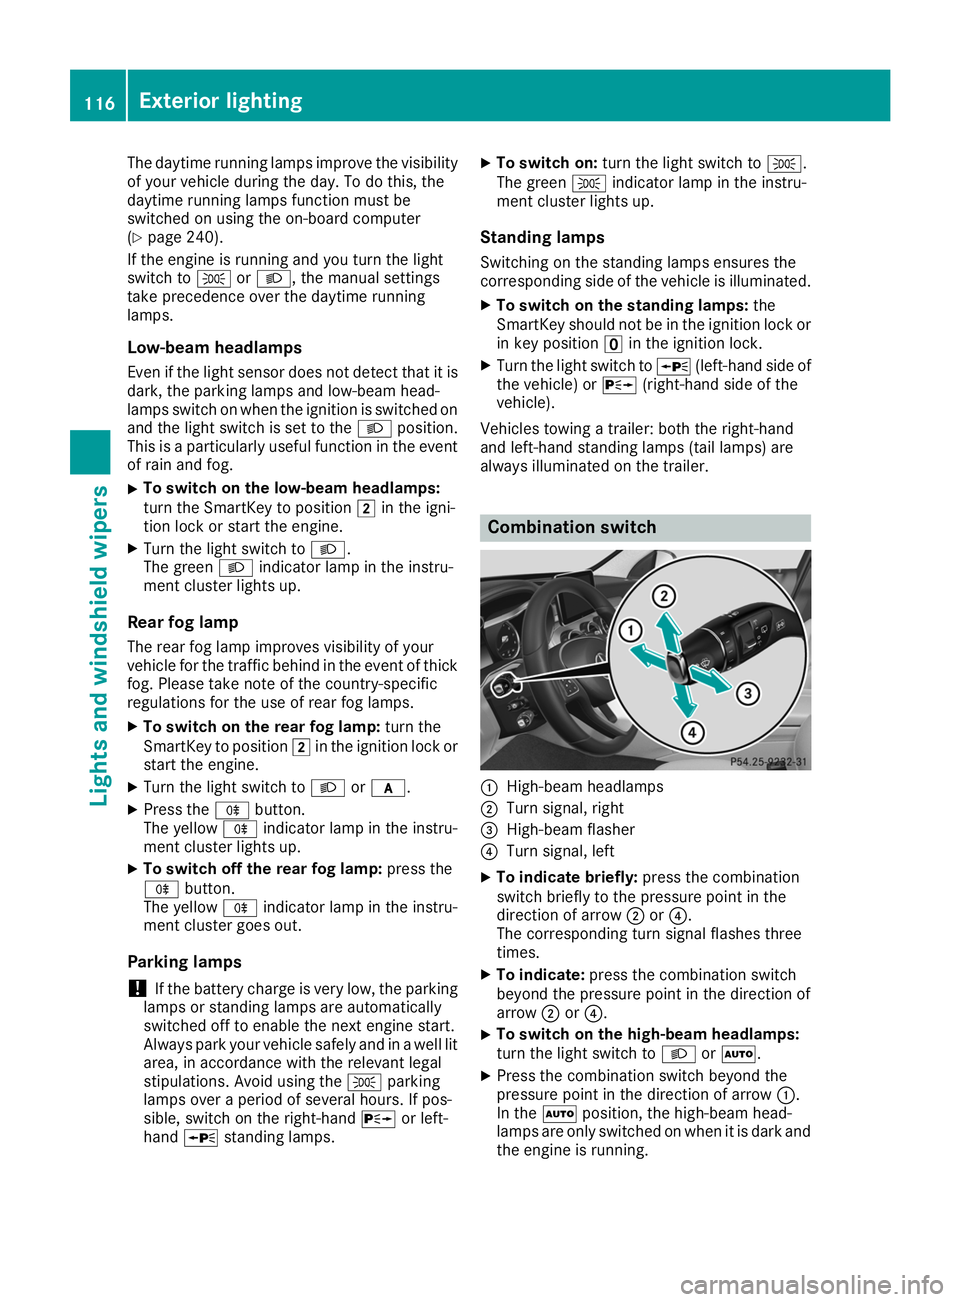
always illuminated on the trailer. Combination switch
0043
High-beam headlamps
0044 Turn signal, right
0087 High-beam flasher
0085 Turn signal, left
X To indicate briefly: press the combination
switch briefly to the pressure point in the
direction of arrow 0044or0085.
The corresponding turn signal flashes three
times.
X To indicate: press the combination switch
beyond the pressure point in the direction of
arrow 0044or0085.
X To switch on the high-beam headlamps:
turn the light switch to 0058or0058.
X Press the combination switch beyond the
pressure point in the direction of arrow 0043.
In the 0058position, the high-beam head-
lamps are only switched on when it is dark and
the engine is running. 116
Exterior lightingLights and windshield wipers
Page 121 of 398
The headlamp range is set automatically
depending on the distance between the vehi-
cle and other road users.
If you are driving at speeds above approx-
imately 19 mph (30 km/h) and no other road
users have been detected:
The high-beam headlamps are switched on
automatically. The 0057indicator lamp in the
instrument cluster also lights up.
If you are driving at speeds below approx-
imately 16 mph (25 km/h) or other road users
have been detected or the roads are ade-
quately lit:
The high-beam headlamps are switched off
automatically. The 0057indicator lamp in the
instrument cluster goes out. The 00CEindi-
cator lamp in the multifunction display
remains lit.
X To switch off: move the combination switch
back to its normal position or move the light
switch to another position.
The 00CE indicator lamp in the multifunction
display goes out. Headlamps fogged up on the inside
Certain climatic and physical conditions may
cause moisture to form in the headlamp. This
moisture does not affect the functionality of the headlamp. Interior lighting
Overview of interior lighting
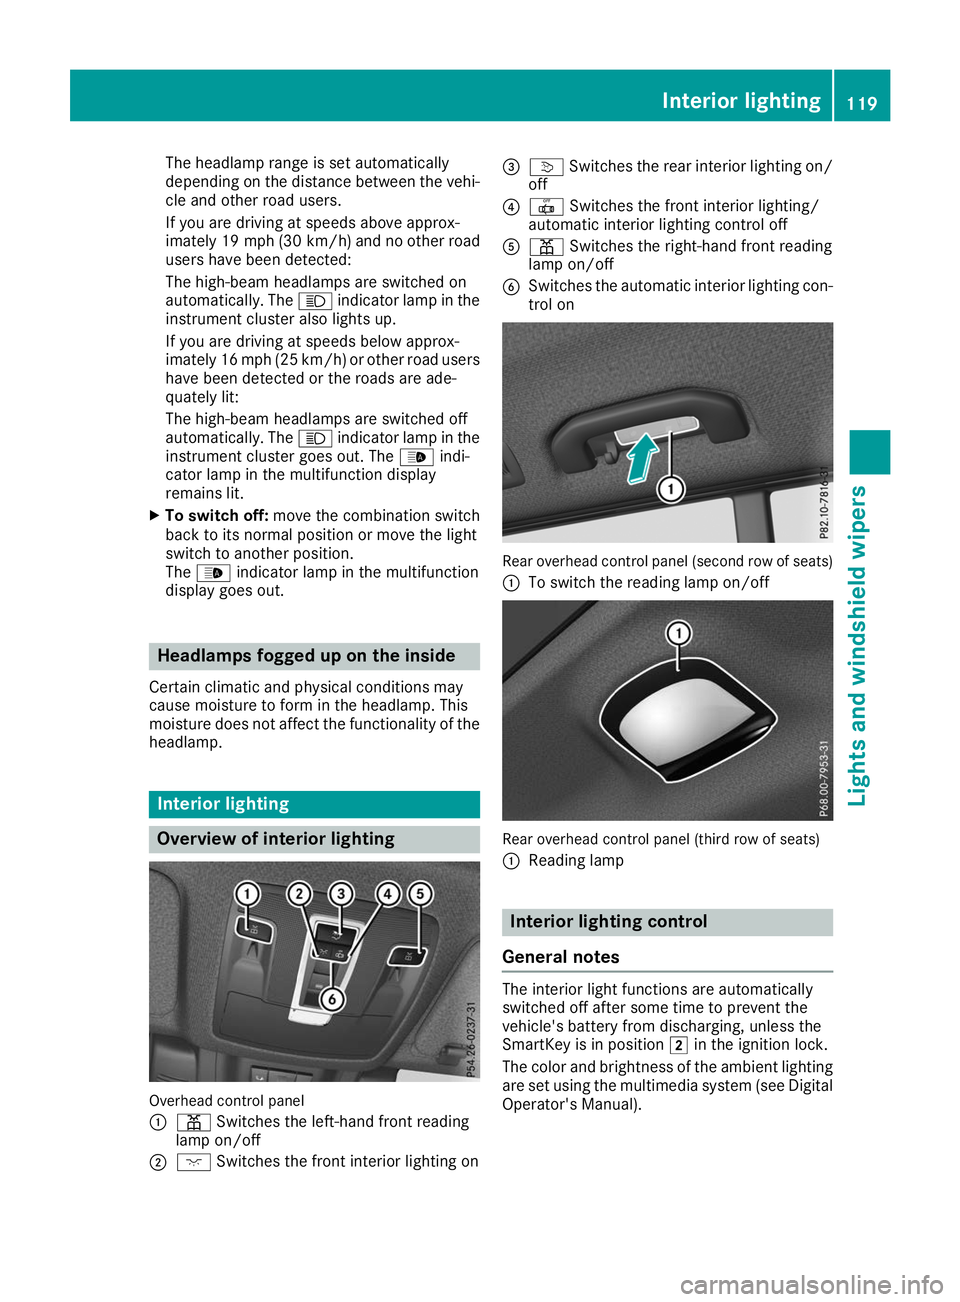
Overhead control panel
0043 003D Switches the left-hand front reading
lamp on/off
0044 004A Switches the front interior lighting on 0087
0043 Switches the rear interior lighting on/
off
0085 0033 Switches the front interior lighting/
automatic interior lighting control off
0083 003D Switches the right-hand front reading
lamp on/off
0084 Switches the automatic interior lighting con-
trol on Rear overhead control panel (second row of seats)
0043 To switch the reading lamp on/off Rear overhead control panel (third row of seats)
0043
Reading lamp Interior lighting control
General notes The interior light functions are automatically
switched off after some time to prevent the
vehicle's battery from discharging, unless the
SmartKey is in position
0048in the ignition lock.
The color and brightness of the ambient lighting
are set using the multimedia system (see Digital Operator's Manual). Interior lighting
119Lights and windshield wipers Z
Page 136 of 398
Activating/deactivating
X
Turn the SmartKey to position 0048in the igni-
tion lock (Y page 140).
X To activate: press the0064button.
The indicator lamp in the 0064button lights
up.
The climate control system switches to the
following settings:
R high airflow
R high temperature
R air distribution to the windshield and front
side windows
R air-recirculation mode off
X To deactivate: press the0064button.
The indicator lamp in the 0064button goes
out. The previously selected settings are
restored. Air-recirculation mode remains
deactivated. MAX COOL maximum cooling
The MAX COOL function is only available in vehi-
cles for the USA.
MAX COOL is only operational when the engine is running.
X To activate: press the00C9button.
The indicator lamp in the 00C9button lights
up.
X To deactivate: press the00C9button.
The indicator lamp in the 00C9button goes
out. The previously selected settings are
restored.
When you activate MAX COOL, climate control
switches to the following functions: R maximum cooling
R maximum airflow
R air-recirculation mode on Removing condensation from the win-
dows
Windows fogged up on the inside X
Activate the 005Aor0056 cooling with air
dehumidification function.
X Activate automatic mode 0058.
X If the windows continue to fog up, activate the
"windshield defrosting" function
(Y page 133).
i You should only select this setting until the
windshield is clear again.
Windows fogged up on the outside X
Activate the windshield wipers.
X Press the 008Fbutton repeatedly until the
009C or009B symbol appears in the display.
i You should only select this setting until the
windshield is clear again.
i If you clean the windows regularly, they do
not fog up so quickly. Rear window defroster
General notes The rear window defroster has a high current
draw. You should therefore switch it off as soon
as the rear window is clear. Otherwise, the rear
window defroster switches off automatically
after several minutes.
If the battery voltage is too low, the rear window defroster may switch off.
Activating/deactivating X
Turn the SmartKey to position 0048in the igni-
tion lock (Y page 140).
X Press the 006Cbutton.
The indicator lamp in the 006Cbutton lights
up or goes out. 134
Operating the climate control systemsClimate cont
rol