2019 MERCEDES-BENZ GLS SUV emergency towing
[x] Cancel search: emergency towingPage 313 of 398

lished between the Customer Assistance Center
and the vehicle occupants.
R If the vehicle occupants respond, the
Mercedes-Benz Customer Assistance Center
attempts to get more information on the
emergency.
R If there is no response from the vehicle occu-
pants, an ambulance is immediately sent to
the vehicle.
R If the relevant mobile phone network is not
available, no emergency call can be initiated.
The indicator lamp in the SOS button flashes
continuously.
No voice connection can be established to the
Mercedes-Benz Customer Assistance Center.
The Call Call Failed
Failed message appears on the mul-
tifunction display and must be confirmed.
In this case, summon assistance by other
means.
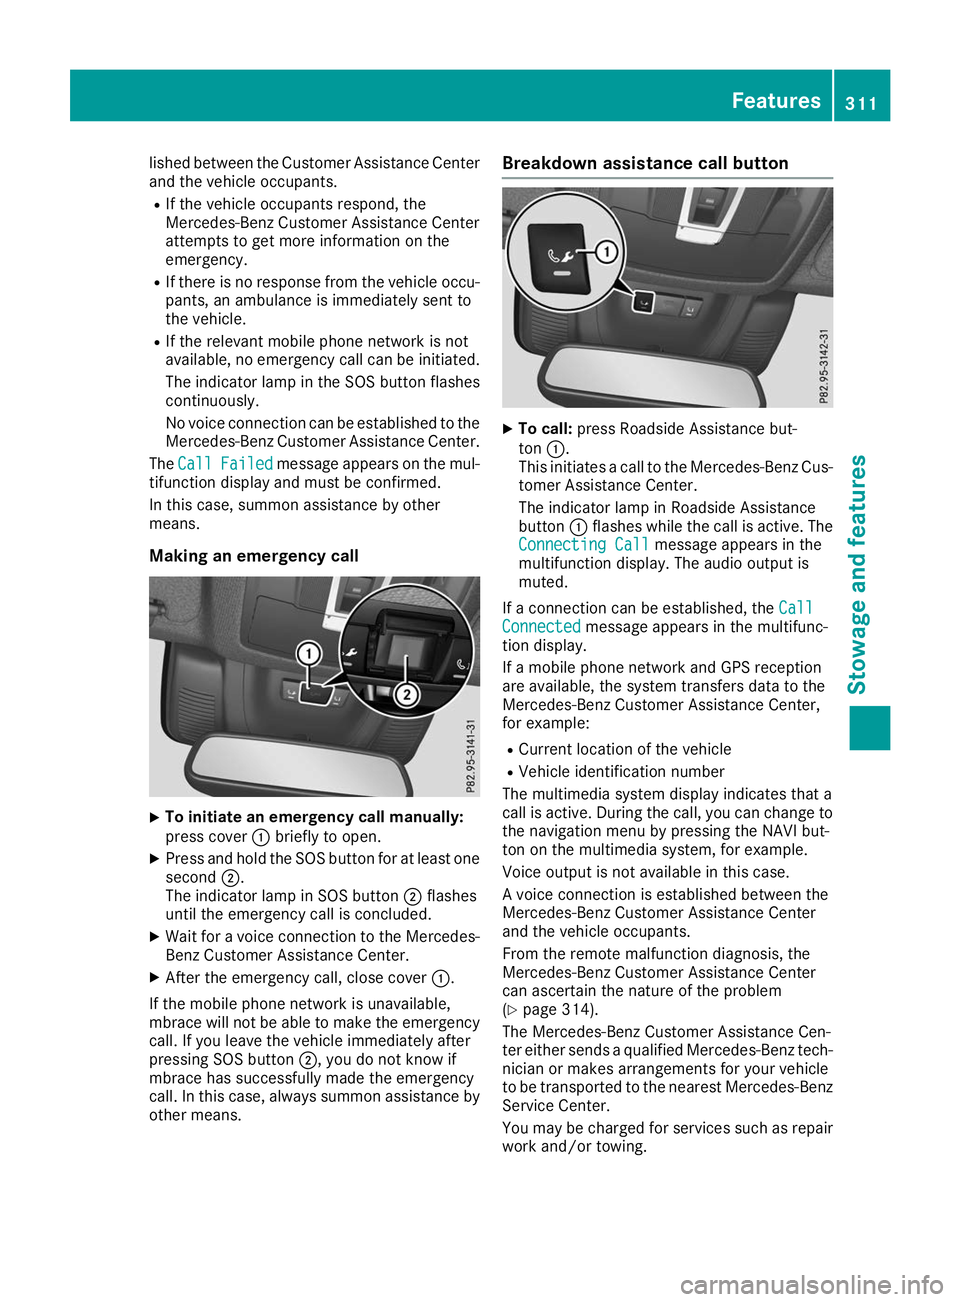
Making an emergency call X
To initiate an emergency call manually:
press cover 0043briefly to open.
X Press and hold the SOS button for at least one
second 0044.
The indicator lamp in SOS button 0044flashes
until the emergency call is concluded.
X Wait for a voice connection to the Mercedes-
Benz Customer Assistance Center.
X After the emergency call, close cover 0043.
If the mobile phone network is unavailable,
mbrace will not be able to make the emergency
call. If you leave the vehicle immediately after
pressing SOS button 0044, you do not know if
mbrace has successfully made the emergency
call. In this case, always summon assistance by other means. Breakdown assistance call button
X
To call: press Roadside Assistance but-
ton 0043.
This initiates a call to the Mercedes-Benz Cus-
tomer Assistance Center.
The indicator lamp in Roadside Assistance
button 0043flashes while the call is active. The
Connecting Call Connecting Call message appears in the
multifunction display. The audio output is
muted.
If a connection can be established, the Call Call
Connected Connected message appears in the multifunc-
tion display.
If a mobile phone network and GPS reception
are available, the system transfers data to the
Mercedes-Benz Customer Assistance Center,
for example:
R Current location of the vehicle
R Vehicle identification number
The multimedia system display indicates that a
call is active. During the call, you can change to
the navigation menu by pressing the NAVI but-
ton on the multimedia system, for example.
Voice output is not available in this case.
A voice connection is established between the
Mercedes-Benz Customer Assistance Center
and the vehicle occupants.
From the remote malfunction diagnosis, the
Mercedes-Benz Customer Assistance Center
can ascertain the nature of the problem
(Y page 314).
The Mercedes-Benz Customer Assistance Cen-
ter either sends a qualified Mercedes-Benz tech-
nician or makes arrangements for your vehicle
to be transported to the nearest Mercedes-Benz
Service Center.
You may be charged for services such as repair work and/or towing. Features
311Stowage and features Z
Page 337 of 398

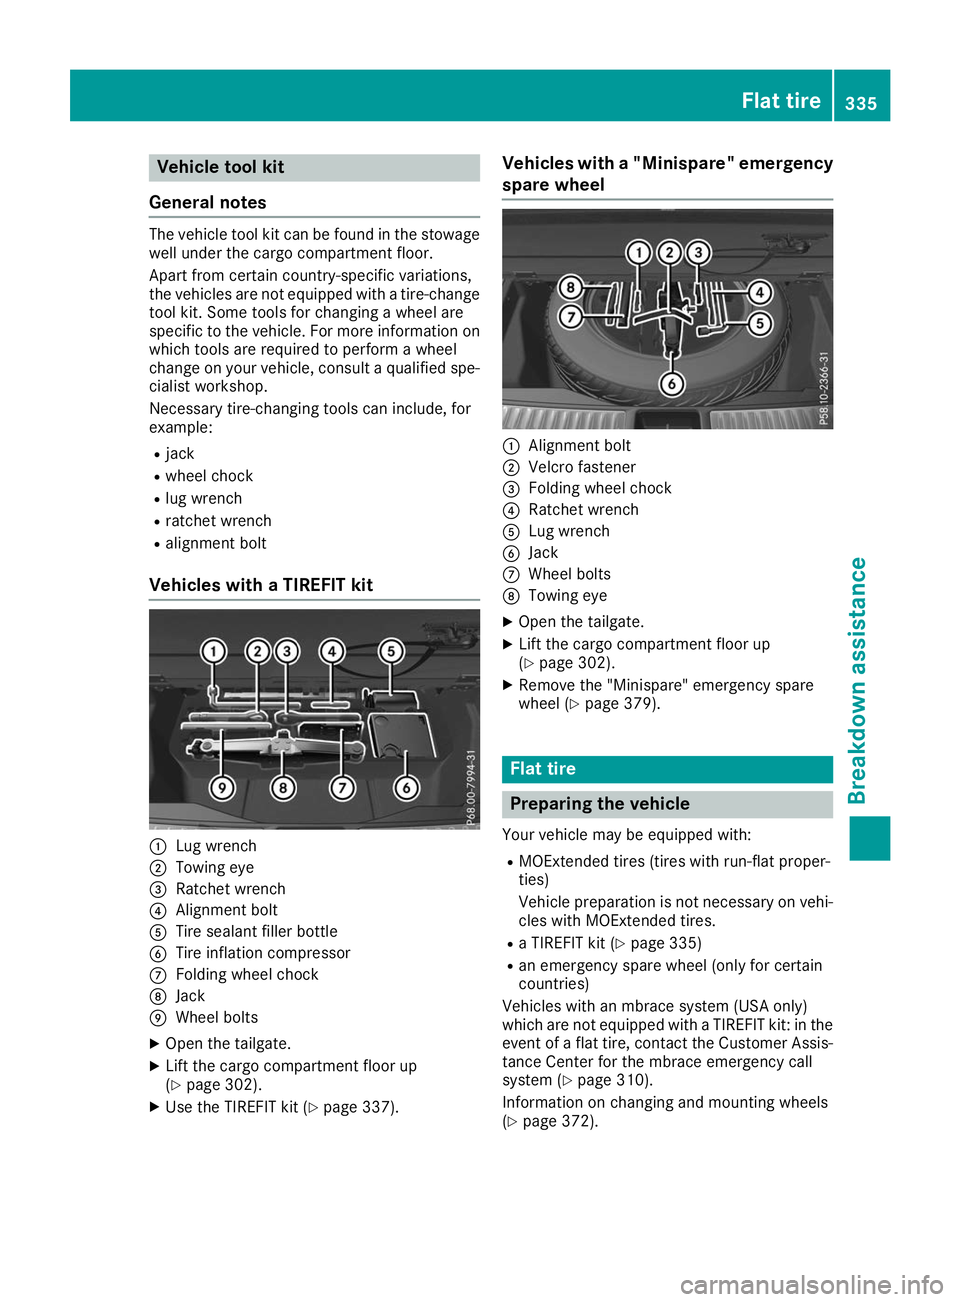
Vehicle tool kit
General notes The vehicle tool kit can be found in the stowage
well under the cargo compartment floor.
Apart from certain country-specific variations,
the vehicles are not equipped with a tire-change
tool kit. Some tools for changing a wheel are
specific to the vehicle. For more information on
which tools are required to perform a wheel
change on your vehicle, consult a qualified spe-
cialist workshop.
Necessary tire-changing tools can include, for
example:
R jack
R wheel chock
R lug wrench
R ratchet wrench
R alignment bolt
Vehicles with a TIREFIT kit 0043
Lug wrench
0044 Towing eye
0087 Ratchet wrench
0085 Alignment bolt
0083 Tire sealant filler bottle
0084 Tire inflation compressor
006B Folding wheel chock
006C Jack
006D Wheel bolts
X Open the tailgate.
X Lift the cargo compartment floor up
(Y page 302).
X Use the TIREFIT kit (Y page 337). Vehicles with a "Minispare" emergency
spare wheel 0043
Alignment bolt
0044 Velcro fastener
0087 Folding wheel chock
0085 Ratchet wrench
0083 Lug wrench
0084 Jack
006B Wheel bolts
006C Towing eye
X Open the tailgate.
X Lift the cargo compartment floor up
(Y page 302).
X Remove the "Minispare" emergency spare
wheel (Y page 379). Flat tire
Preparing the vehicle
Your vehicle may be equipped with: R MOExtended tires (tires with run-flat proper-
ties)
Vehicle preparation is not necessary on vehi-
cles with MOExtended tires.
R a TIREFIT kit (Y page 335)
R an emergency spare wheel (only for certain
countries)
Vehicles with an mbrace system (USA only)
which are not equipped with a TIREFIT kit: in the event of a flat tire, contact the Customer Assis-tance Center for the mbrace emergency call
system (Y page 310).
Information on changing and mounting wheels
(Y page 372). Flat tire
335Breakdown assis tance
Page 381 of 398

the time restriction on use as well as the speed
limitation specified on the emergency spare
wheel.
Replace the tires after six years at the latest,
regardless of wear. This also applies to the
emergency spare wheel.
When you are driving with the collapsible spare wheel mounted, the tire pressure loss warning
system or the tire pressure monitor cannot func-
tion reliably. Only restart the tire pressure loss
warning system or tire pressure monitor when
the defective wheel has been replaced with a
new wheel.
Vehicles with tire pressure monitor: after
mounting an emergency spare wheel, the sys-
tem may still display the tire pressure of the
removed wheel for a few minutes. The value dis- played for the mounted emergency spare wheelis not the same as the current tire pressure of
the emergency spare wheel. Removing/stowing the emergency
spare wheel
Vehicles with a "Minispare" emergency
spare wheel under the cargo compart-
ment floor Always observe the instructions and safety
notes in the "Mounting a wheel" section
(Y page 373).
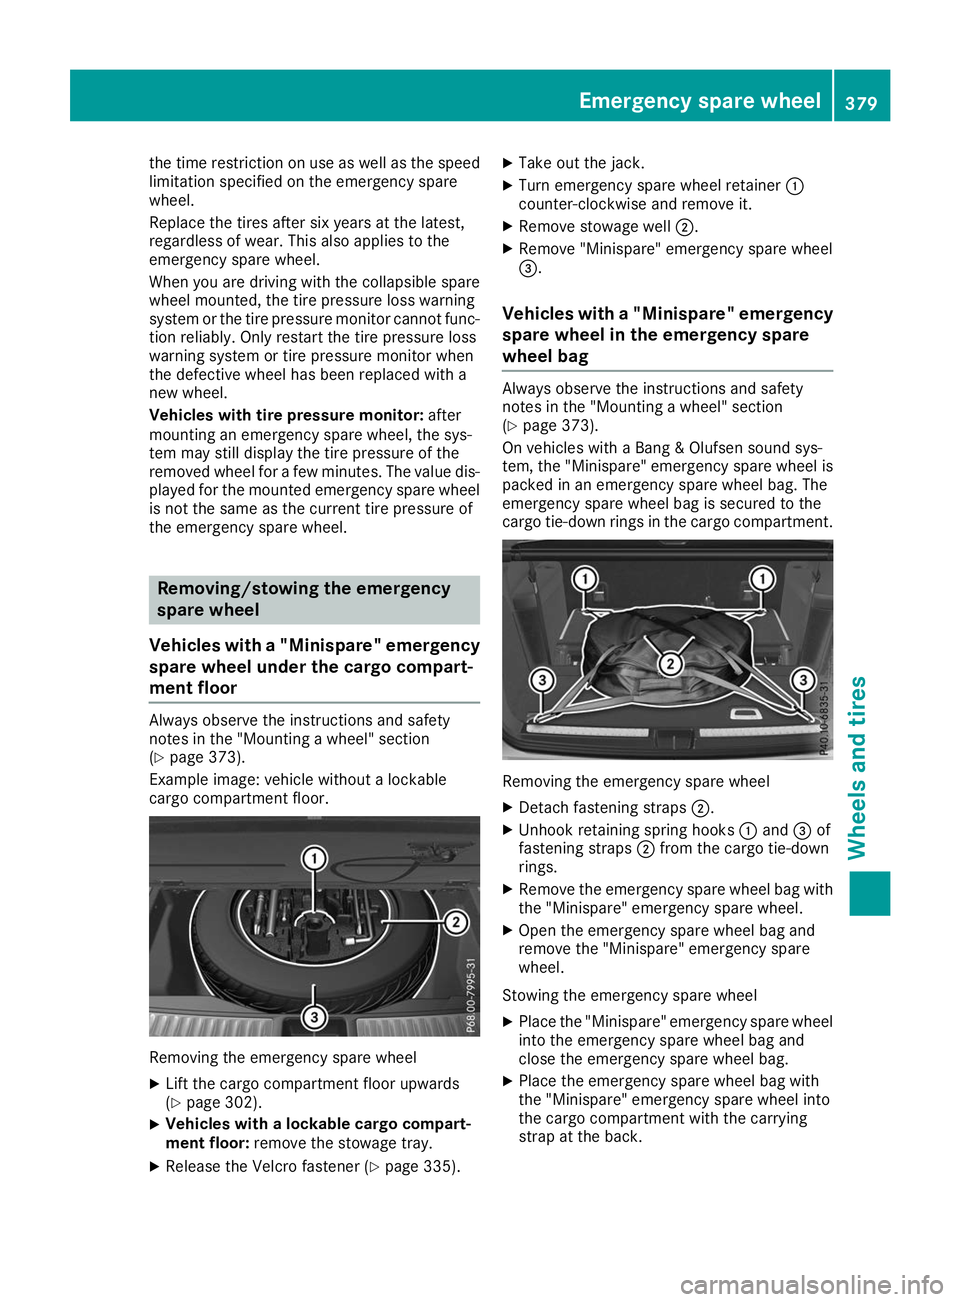
Example image: vehicle without a lockable
cargo compartment floor. Removing the emergency spare wheel
X Lift the cargo compartment floor upwards
(Y page 302).
X Vehicles with a lockable cargo compart-
ment floor: remove the stowage tray.
X Release the Velcro fastener (Y page 335).X
Take out the jack.
X Turn emergency spare wheel retainer 0043
counter-clockwise and remove it.
X Remove stowage well 0044.
X Remove "Minispare" emergency spare wheel
0087.
Vehicles with a "Minispare" emergency
spare wheel in the emergency spare
wheel bag Always observe the instructions and safety
notes in the "Mounting a wheel" section
(Y page 373).
On vehicles with a Bang & Olufsen sound sys-
tem, the "Minispare" emergency spare wheel is
packed in an emergency spare wheel bag. The
emergency spare wheel bag is secured to the
cargo tie-down rings in the cargo compartment. Removing the emergency spare wheel
X Detach fastening straps 0044.
X Unhook retaining spring hooks 0043and 0087of
fastening straps 0044from the cargo tie-down
rings.
X Remove the emergency spare wheel bag with
the "Minispare" emergency spare wheel.
X Open the emergency spare wheel bag and
remove the "Minispare" emergency spare
wheel.
Stowing the emergency spare wheel X Place the "Minispare" emergency spare wheel
into the emergency spare wheel bag and
close the emergency spare wheel bag.
X Place the emergency spare wheel bag with
the "Minispare" emergency spare wheel into
the cargo compartment with the carrying
strap at the back. Emergency spare
wheel
379Wheels an d tires Z
Page 382 of 398

X
Hook retaining spring hooks 0043and 0087of
fastening straps 0044into the cargo tie-down
rings.
X Tighten fastening straps 0044.
Mercedes-AMG vehicles with a collaps-
ible spare wheel under the cargo com-
partment floor !
Only place the collapsible spare wheel in the
vehicle when it is dry. Otherwise, moisture
may get into the vehicle.
Always observe the instructions and safety
notes in the "Mounting a wheel" section
(Y page 373).
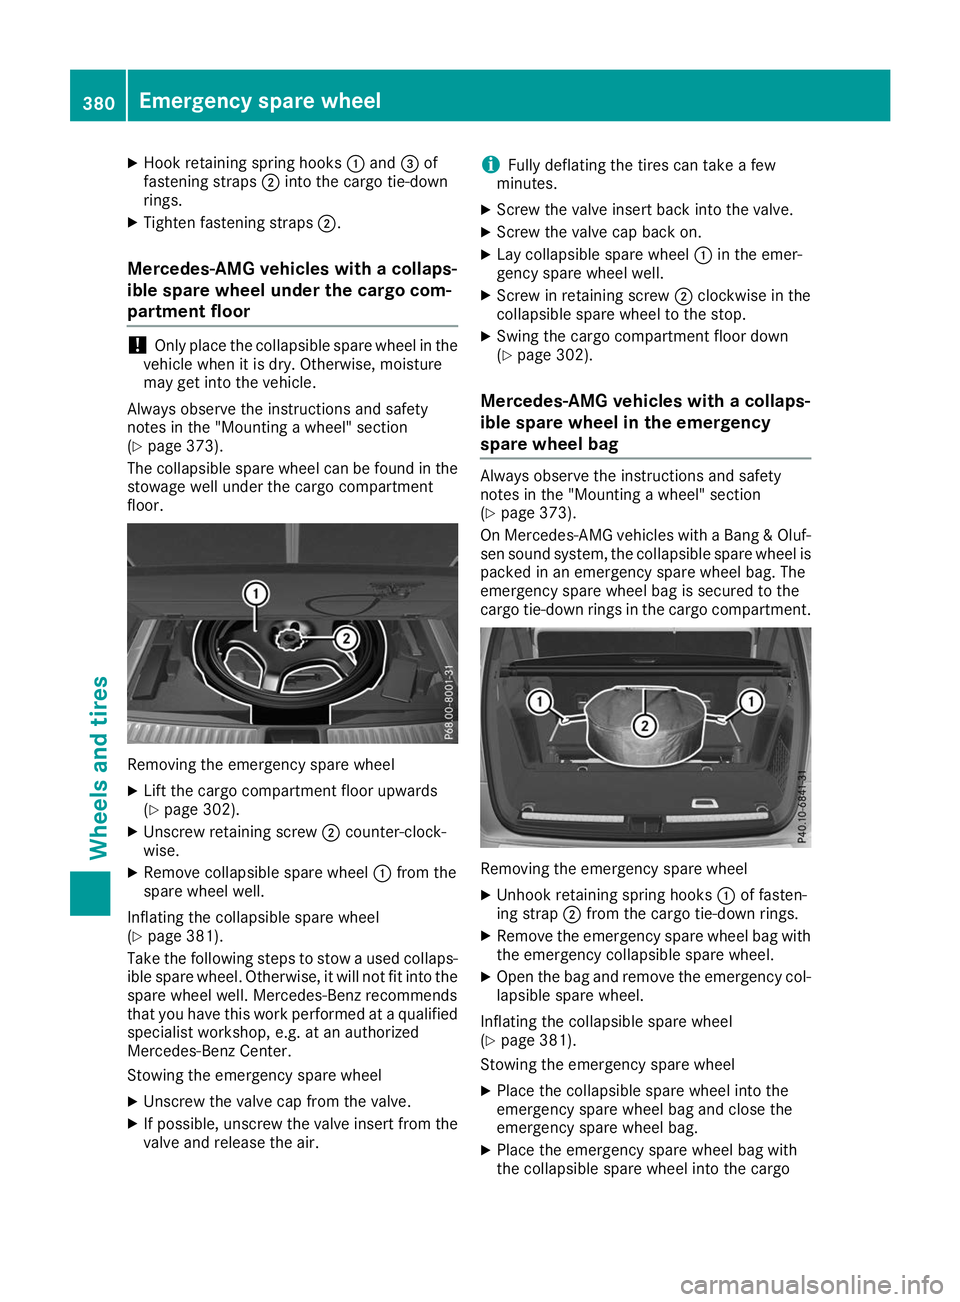
The collapsible spare wheel can be found in the stowage well under the cargo compartment
floor. Removing the emergency spare wheel
X Lift the cargo compartment floor upwards
(Y page 302).
X Unscrew retaining screw 0044counter-clock-
wise.
X Remove collapsible spare wheel 0043from the
spare wheel well.
Inflating the collapsible spare wheel
(Y page 381).
Take the following steps to stow a used collaps- ible spare wheel. Otherwise, it will not fit into the
spare wheel well. Mercedes-Benz recommends
that you have this work performed at a qualified
specialist workshop, e.g. at an authorized
Mercedes-Benz Center.
Stowing the emergency spare wheel
X Unscrew the valve cap from the valve.
X If possible, unscrew the valve insert from the
valve and release the air. i
Fully deflating the tires can take a few
minutes.
X Screw the valve insert back into the valve.
X Screw the valve cap back on.
X Lay collapsible spare wheel 0043in the emer-
gency spare wheel well.
X Screw in retaining screw 0044clockwise in the
collapsible spare wheel to the stop.
X Swing the cargo compartment floor down
(Y page 302).
Mercedes-AMG vehicles with a collaps-
ible spare wheel in the emergency
spare wheel bag Always observe the instructions and safety
notes in the "Mounting a wheel" section
(Y
page 373).
On Mercedes-AMG vehicles with a Bang & Oluf-
sen sound system, the collapsible spare wheel is
packed in an emergency spare wheel bag. The
emergency spare wheel bag is secured to the
cargo tie-down rings in the cargo compartment. Removing the emergency spare wheel
X Unhook retaining spring hooks 0043of fasten-
ing strap 0044from the cargo tie-down rings.
X Remove the emergency spare wheel bag with
the emergency collapsible spare wheel.
X Open the bag and remove the emergency col-
lapsible spare wheel.
Inflating the collapsible spare wheel
(Y page 381).
Stowing the emergency spare wheel
X Place the collapsible spare wheel into the
emergency spare wheel bag and close the
emergency spare wheel bag.
X Place the emergency spare wheel bag with
the collapsible spare wheel into the cargo 380
Emergency spare wheelWheels and tires