2019 MERCEDES-BENZ GLS SUV oil reset
[x] Cancel search: oil resetPage 21 of 398

Correct usage .................................. 47
Fastening ........................................
.48
Important safety guidelines .............46
Introduction .....................................45
Releasin g......................................... 48
Switching belt adjustment on/off
(on-board computer) ...................... 241
Warning lamp ................................. 275
Warning lamp (function) ................... 48
Seats
Adjusting (electrically) ..................... 98
Adjusting the 4-way lumbar sup-
port ................................................ 106
Adjusting the head restraint ............ 99
Calling up a stored setting (mem-
ory function) .................................. 114
Cleaning the cover ......................... 332
Entry position (3rd row of seats) .... 103
Exit position (3rd row of seats) ...... 104
Folding down/up (third row of
seats) ............................................. 101
Folding the 2nd row of seats
forward electrically ........................ 105
Folding the 2nd row of seats
forward manually ........................... 103
Folding the rear bench seat for-
wards/back ................................... 298
Important safety notes .................... 97
Overview .......................................... 97
Seat heating problem .................... 107
Seat ventilation problem ................ 107
Storing settings (memory func-
tion) ............................................... 113
Switching seat heating on/of f....... 106
Switching seat ventilation on/of f.. 107
Section
Sliding sunroof ................................. 92
Selector lever
Cleaning ......................................... 332
Sensors (cleaning instructions) ....... 330
Service menu (on-board com-
puter) .................................................. 239
Service message
see ASSYST PLUS
Service products
Brake fluid ..................................... 387
Coolant (engine) ............................ 387
Engine oil ....................................... 386 Fuel ................................................ 385
Important safety notes .................. 384
Refrigerant (air-conditioning sys-
tem) ............................................... 388
Washer fluid ................................... 388
Setting the air distribution ............... 133
Setting the airflow ............................ 133
Setting the date/time format
see also Digital Operator's Man-
ual .................................................. 287
Setting the language
see also Digital Operator's Man-
ual .................................................. 287
Setting the time
see also Digital Operator's Man-
ual .................................................. 287
Settings
Factory (on-board computer) ......... 242
On-board computer ....................... 240
SETUP (on-board computer,
Mercedes-AMG vehicles) .................. 243
Side impact air bag ............................. 51
Side marker lamp (display mes-
sage) ................................................... 257
Side windows
Cleaning ......................................... 329
Convenience closing feature ............ 90
Convenience opening feature .......... 90
Hinged side window s....................... 89
Important safety information ........... 88
Opening/closing .............................. 89
Overview .......................................... 88
Problem (malfunction) ..................... 92
Resetting ......................................... 91
Reversing feature ............................. 89
SIRIUS services
see also Digital Operator's Man-
ual .................................................. 287
Sliding sunroof
Important safety notes .................... 92
Opening/closing .............................. 93
Problem (malfunction) ..................... 96
Resetting ......................................... 94
see Panorama roof with power
tilt/sliding panel
SmartKey
Changing the battery ....................... 80 Index
19
Page 244 of 398

For further information on belt adjustment, see
(Y page 48).
Switching the fold-in mirrors when lock-
ing feature on/off
This function is only available when the vehicle is
equipped with the electrical fold-in function.
When you activate the Auto.
Auto. Mirror Mirror Folding
Folding
function, the exterior mirrors are folded in when
the vehicle is locked. The exterior mirrors fold
out automatically again as soon as you unlock
the vehicle.
X Press the 0059or0065 button on the steering
wheel to select the Sett.
Sett. menu.
X Press the 0064or0063 button to select the
Convenience
Convenience submenu.
X Press 0076to confirm.
X Press the 0064or0063 button to select the
Auto. Mirror Folding
Auto. Mirror Folding function.
If the Auto. Mirror Folding Auto. Mirror Folding function is
switched on, the multifunction display shows the exterior mirror in orange.
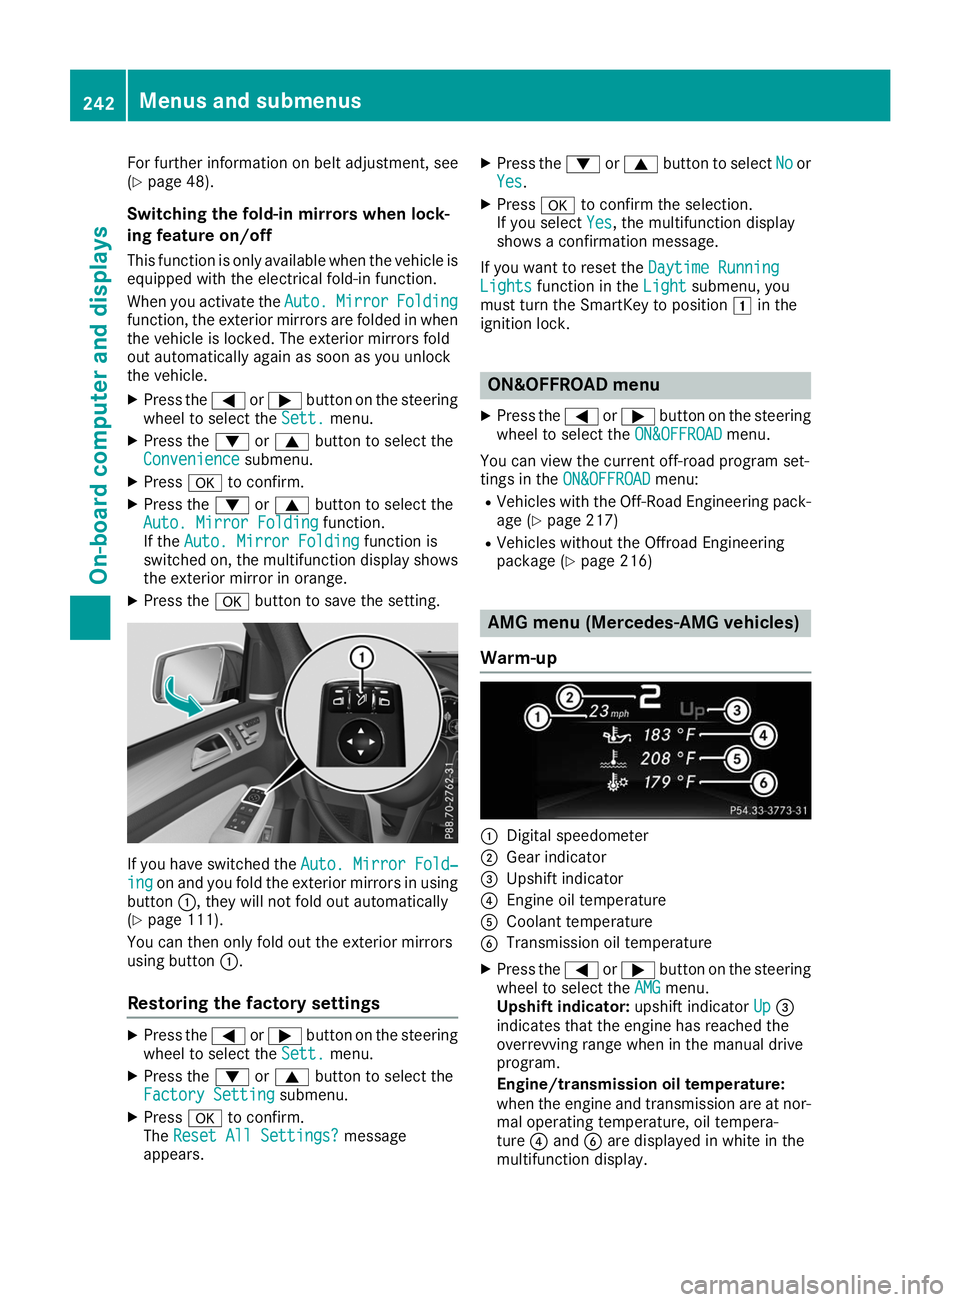
X Press the 0076button to save the setting. If you have switched the
Auto. Mirror Fold‐
Auto. Mirror Fold‐
ing
ing on and you fold the exterior mirrors in using
button 0043, they will not fold out automatically
(Y page 111).
You can then only fold out the exterior mirrors
using button 0043.
Restoring the factory settings X
Press the 0059or0065 button on the steering
wheel to select the Sett.
Sett. menu.
X Press the 0064or0063 button to select the
Factory Setting Factory Setting submenu.
X Press 0076to confirm.
The Reset All Settings?
Reset All Settings? message
appears. X
Press the 0064or0063 button to select No Noor
Yes Yes.
X Press 0076to confirm the selection.
If you select Yes
Yes, the multifunction display
shows a confirmation message.
If you want to reset the Daytime Running
Daytime Running
Lights
Lights function in the Light
Lightsubmenu, you
must turn the SmartKey to position 0047in the
ignition lock. ON&OFFROAD menu
X Press the 0059or0065 button on the steering
wheel to select the ON&OFFROAD
ON&OFFROADmenu.
You can view the current off-road program set-
tings in the ON&OFFROAD
ON&OFFROAD menu:
R Vehicles with the Off-Road Engineering pack-
age (Y page 217)
R Vehicles without the Offroad Engineering
package (Y page 216) AMG menu (Mercedes-AMG vehicles)
Warm-up 0043
Digital speedometer
0044 Gear indicator
0087 Upshift indicator
0085 Engine oil temperature
0083 Coolant temperature
0084 Transmission oil temperature
X Press the 0059or0065 button on the steering
wheel to select the AMG AMGmenu.
Upshift indicator: upshift indicatorUp
Up0087
indicates that the engine has reached the
overrevving range when in the manual drive
program.
Engine/transmission oil temperature:
when the engine and transmission are at nor-
mal operating temperature, oil tempera-
ture 0085and 0084are displayed in white in the
multifunction display. 242
Menus and submenusOn-board computer and displays
Page 327 of 398

Further information on windshield washer fluid
(Y page 388). ASSYST PLUS
Service message
i If the scheduled service intervals are excee-
ded, this may result in damage to the vehicle.
You can obtain up-to-date information concern-
ing the servicing of your vehicle from a qualified specialist workshop, e.g. an authorized
Mercedes-Benz Center or at
http://www.mbusa.com (USA only).
i The ASSYST PLUS service interval display
does not show any information on the engine
oil level. Observe the notes on the engine oil
level (Y page 322).
The multifunction display shows a service mes-
sage for several seconds, e.g.:
R Service A in .. Days Service A in .. Days
R Service A Due
Service A Due
R Service A Exceeded by .. Days
Service A Exceeded by .. Days
Depending on the operating conditions of the
vehicle, the remaining time or distance until the next service due date is displayed.
The letter A
A or B B, possibly in connection with a
number or another letter, shows the type of ser-
vice. A
A stands for a minor service and B
Bfor a
major service.
Further information can be obtained at a quali-
fied specialist workshop.
The ASSYST PLUS service interval display does
not take into account any periods of time during
which the battery is disconnected.
Maintaining the time-dependent service sched-
ule:
X Note down the service due date displayed in
the multifunction display before disconnect-
ing the battery.
or
X After reconnecting the battery, subtract the
battery disconnection periods from the ser-
vice date shown on the display. Hiding a service message
X Press the 0038or0076 button on the steering
wheel. Displaying service messages
X Switch on the ignition.
X Press the 0059or0065 button on the steering
wheel to select the Serv. Serv.menu.
X Press the 0063or0064 button to select the
ASSYST
ASSYST PLUS
PLUSsubmenu and confirm by press-
ing the 0076button.
The service due date appears in the multi-
function display. Information about Service
Resetting the ASSYST PLUS service
interval display !
If the ASSYST PLUS service interval display
has been inadvertently reset, this setting can
be corrected at a qualified specialist work-
shop.
Have service work carried out as described in the Maintenance Booklet. This may otherwise
lead to increased wear and damage to the
major assemblies or the vehicle.
A qualified specialist workshop will reset the
ASSYST PLUS service interval display after the
service work has been carried out. You can also obtain further information on maintenance
work, for example.
Special service requirements The specified maintenance interval takes only
the normal operation of the vehicle into
account. Under increased load on the vehicle,
maintenance work must be carried out more
frequently, for example:
R Regular city driving with frequent intermedi-
ate stops
R If the vehicle is primarily used to travel short
distances
R Use in mountainous terrain or on poor road
surfaces
R If the engine is often left idling for long periods
Under these or similar conditions, have, for
example, the air filter, engine oil and oil filter
replaced or changed more frequently. Under
arduous operating conditions, the tires must be checked more often. Further information can be
obtained at a qualified specialist workshop. ASSYST PLUS
325Maintenance and care Z