2019 MERCEDES-BENZ GLE SUV light
[x] Cancel search: lightPage 67 of 681
i‑Size
child seat securing sy stem
(→ page 61 )
O Alw
ays comply with the manufacturer's
ins tallation and operating instructions for
th ech ild restra int sy stem used.
O Make sure
that thech ild's feet do not touch
th e front seat. If necessar y,mo vethe front
seat forw ard slightl y. When
fitting an ISOFIX child restra int sys‐
te m, obser vethefo llowing:
O When using a category 0/0+ baby car
seat and a category I rear wa rd-facing
ch ild restra int sy stem on a rear seat:
adju stthe front seat so that the seat does
not touch thech ild restra int sy stem.
O When using a category I
forw ard-facing
ch ild restra int sy stem: remo vethe head
re stra int from there spective seat, if possi‐
ble. In addition, the seat backrest of the
ch ild restra int sy stem must, as far as possi‐
ble, lie flat against the backrest of theve hi‐
cle seat. When
youre mo vethech ild restra int sys‐
te m, ins tallth e head restra int again immedi‐
ately and adjust all the head restra ints cor‐
re ctly.
O Fo
r cer tain child restra int sy stems in weight
group II or III, there may be restrictions in
th e maximum size setting, e.g. due topossi‐
ble con tact wi th thero of.
O The
child restra int sy stem must not be put
under stra in between thero of and the seat
cushion and/or be fitted facing the wrong
direction. Where possible, adjust the seat
cushion inclination accordingly.
O The
child restra int sy stem must not be put
under stra in by the head restra ints. Adjust
th e head restra ints according ly. When
fitting an i‑Size child restra int sys‐
te m, obser vethefo llowing:
O When using a
rear wa rd-facing child
re stra int sy stem: adjust the front seat so
th at it does not touch thech ild restra int sys‐
te m. O
When using a
forw ard-facing child
re stra int sy stem: remo vethe head
re stra int from there spective seat, if possi‐
ble. In addition, the seat backrest of the
ch ild restra int sy stem must, as far as possi‐
ble, lie flat against the backrest of theve hi‐
cle seat.
When youre mo vethech ild restra int sys‐
te m, ins tallth e head restra int again immedi‐
ately and adjust all the head restra ints cor‐
re ctly. #
Before every trip, make sure that the ISOFIX
ch ild restra int sy stem or the i‑Size child
re stra int sy stem is engaged cor rectly in bo th
mounting brac kets in theve hicle.
* NO
TEBe careful not todamage the seat
belt forth e cent reseat when fitting the
ch ild restra int sy stem #
Make sure that the seat belt is not trap‐
ped. 64
Occupant saf ety
Page 74 of 681
Obser
vethe no tes under "Suitability of
seats for attaching belt-secu redch ild
re stra int sy stems" (→ page67).
O Wh
en using a category 0/0+ baby car
seat and a category I rear wa rd-facing
ch ild restra int sy stem on a rear seat:
adju stthe front seat so that the seat does
not touch thech ild restra int sy stem.
O When using a category I
forw ard-facing
ch ild restra int sy stem: remo vethe head
re stra int from there spective seat, if possi‐
ble.
When youre mo vethech ild restra int sys‐
te m, ins tallth e head restra int again immedi‐
ately and adjust all the head restra ints cor‐
re ctly.
O The ba
ckrest of thefo rw ard-facing child
re stra int sy stem must, as far as possible, be
re sting on the seat backrest of there ar
seat.
O Fo
r cer tain child restra int sy stems in weight
category II or III, there may be restrictions in
th e maximum size setting, e.g. due topossi‐
ble con tact wi th thero of. O
The
child restra int sy stem must not be put
under stra in between thero of and the seat
cushion and/or be fitted facing the wrong
direction. Where possible, adjust the seat
cushion inclination accordingly.
O The
child restra int sy stem must not be put
under stra in by the head restra ints. Adjust
th e head restra ints accordingly.
O Make sure
that thech ild's feet do not touch
th e front seat. If necessar y,mo vethe front
seat forw ard slightl y. #
Fitthech ild restra int sy stem.
The entire base of thech ild restra int sy stem
must alw aysre st on the sitting sur face of the
re ar seat. #
Alw ays make sure that the shoulder belt
st ra p is cor rectly routed from the seat belt
outlet of theve hicle tothe shoulder belt
guide on thech ild restra int sy stem.
The shoulder belt stra p must be routed for‐
wa rds and down wards from the seat belt out‐
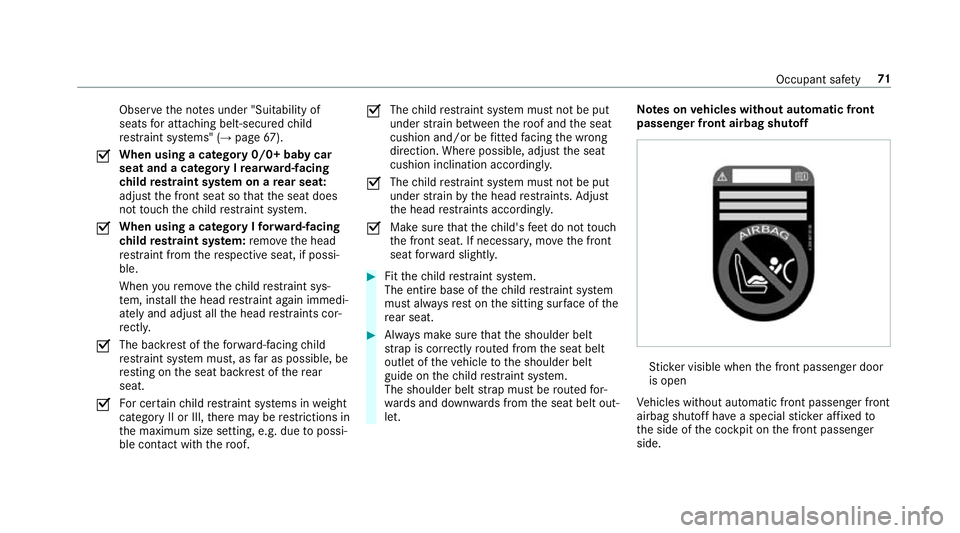
let. Note
s onvehicles without automatic front
passen ger front airbag shu toff St
icke r visible when the front passenger door
is open
Ve hicles without automatic front passenger front
airbag shutoff ha vea special sticke r af fixe dto
th e side of the cockpit on the front passenger
side. Occupant saf
ety71
Page 81 of 681
If
yo u do not open theve hicle within appr ox‐
imately 40 seconds af ter unlocking:
R theve hicle is loc ked again
R anti- theft pr otection is reactivated
Do not keep theke yto ge ther with electronic
devices or me tal objects. This can af fect the
ke y's functionalit y.
Do not keep theke y in thete mp erature-contro l‐
led cup holder. Otherwise, theke y will not be
re liably de tected.
% If battery check lamp 2does not light up
af te r pressing the% or& button, the
battery is dischar ged.
Re placing theke y bat tery ( →page 79). Ac
tivating/deactivating the acoustic lo cking
ve rification signal Multimedia sy
stem:
, © .
Settings .
Vehicle #
Activate or deacti vate Acoustic lock . Ac
tivating/deactivating the panic alarm Re
quirements:
% The panic alarm function is only available in
cer tain countries.
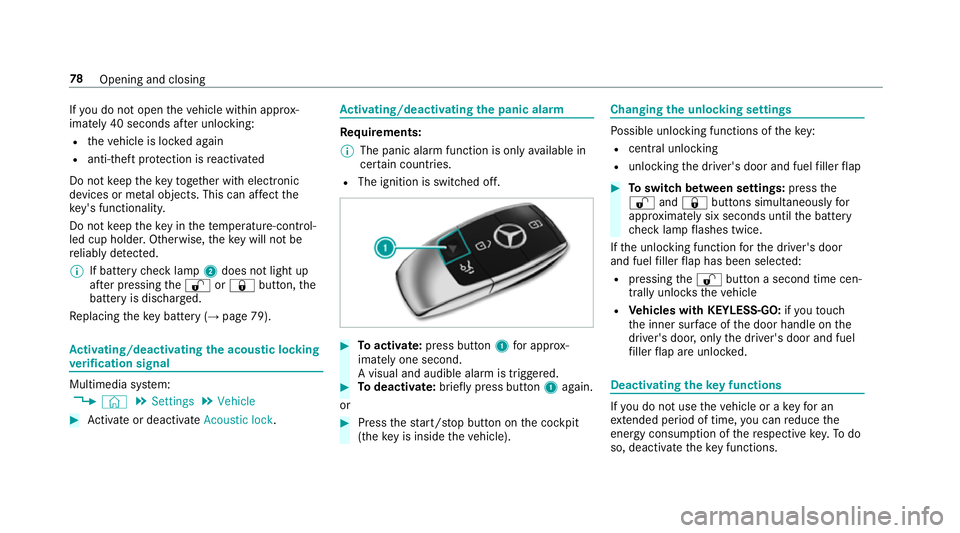
R The ignition is switched off. #
Toactivate: press button 1for appro x‐
ima tely one second.
A visual and audible alarm is triggered. #
Todeactivate: briefly press but ton1 again.
or #
Press thest art/ stop button on the cockpit
(the key is inside theve hicle). Changing
the unlocking settings Po
ssible unlocking functions of theke y:
R cent ral unlocking
R unlocking the driver's door and fuel filler flap #
Toswitch between settings: pressthe
% and& buttons simultaneously for
appr oximately six seconds until the battery
ch eck lamp flashes twice.
If th e unlocking function forth e driver's door
and fuel filler flap has been selec ted:
R pressing the% button a second time cen‐
trally unloc kstheve hicle
R Vehicles with KEYLESS-GO: ifyo uto uch
th e inner sur face of the door handle on the
driver's door, only the driver's door and fuel
fi ller flap are unlo cked. Deactivating
theke y functions If
yo u do not use theve hicle or a keyfo r an
ex tended pe riod of time, you can reduce the
energy consum ption of there spective key.Todo
so, deactivate theke y functions. 78
Opening and closing
Page 82 of 681
#
Todeactivate: pressthe& button on the
ke y twice in quick succession.
The battery check lamp of theke yflashes
twice brief lyand lights up once. #
Toactivate: press any button on thekey.
% When theve hicle is star ted with theke y in
th estow age compartment of the cent recon‐
sole, theke y functions are automatical ly
activated (→ page180). Re
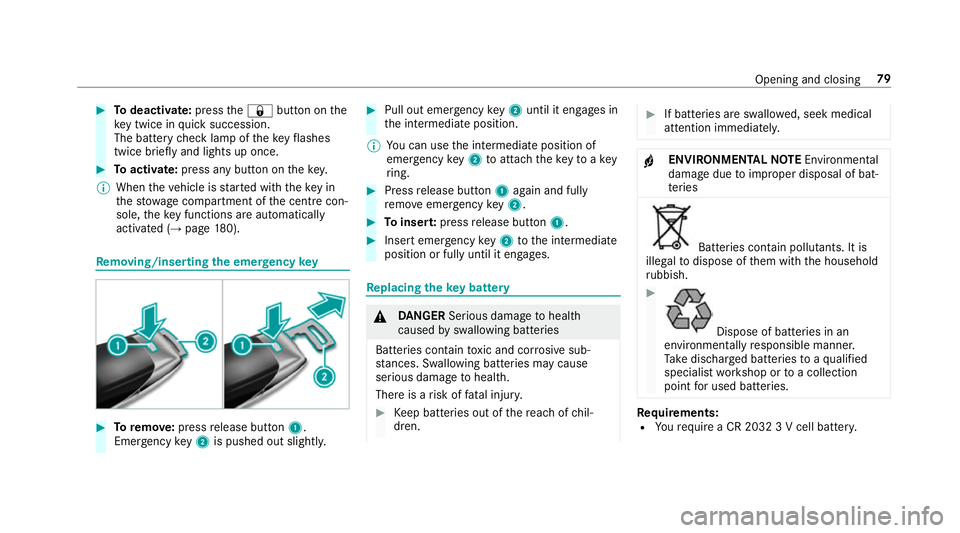
moving/inserting the eme rgency key #
Toremo ve:press release button 1.
Emer gency key2 is pushed out slight ly. #
Pull out emer gency key2 until it en gage s in
th e intermediate position.
% You can use the intermediate position of
emer gency key2 toattach theke yto akey
ri ng. #
Press release button 1again and fully
re mo veemer gency key2. #
Toinser t:press release button 1. #
Insert emer gency key2 tothe intermediate
position or fully until it engages. Re
placing the key battery &
DANG ER Serious damage tohealth
caused byswallowing batteries
Batteries contain toxic and cor rosive sub‐
st ances. Swallowing bat teries may cause
serious damage tohealth.
There is a risk of fata l injur y. #
Keep batteries out of there ach of chil‐
dren. #
If batteries are swallo wed, seek medical
attention immediately. +
ENVIRONMEN
TALNO TEEnvironmental
dama gedue toimproper disposal of bat‐
te ries Batteries conta
in pollutants. It is
illegal todispose of them with the household
ru bbish. #
Dispose of batteries in an
environmen tally responsible manner.
Ta ke dischar ged batteries toaqu alified
specialist workshop or toa collection
point for used batteries. Re
quirements:
R Yourequ ire a CR 2032 3 V cell batter y. Opening and closing
79
Page 90 of 681
Closing
the tailgate &
WARNING Risk of inju ryfrom unsecu red
items in theve hicle
If objects, luggage or loads are not secured
or not secured suf ficientl y,they could slip,
tip ove r or be throw n around and thereby hit
ve hicle occupants.
There is a risk of injur y,particularly in the
ev ent of sudden braking or a sudden change
in direction. #
Alw aysstow objects in such a wayth at
th ey cannot be thro wn around. #
Before the journe y,secure objects, lug‐
ga ge or loads against slipping or tipping
ove r. &
WARNING Risk of becoming trapped
du ring au tomatic closing of theta ilgate
Pa rts of the body could become trapped dur‐
ing automatic closing of theta ilgate. More‐
ove r,people, e.g. children, may be standing in
the closing area or may enter the closing
area during the closing process. #
Make sure that nobody is in the vicinity
of the closing area during the closing
process.
Use one of thefo llowing options tostop the
closing process:
R press thep button on thekey.
R press or pull there mo teoperating switch
on the driver's door.
R press the closing or locking button on the
ta ilgate.
R Pull theta ilgate handle. To
close the tailgate, thefo llowing options
are available: #
Pull theta ilgate down wards slightly. Release
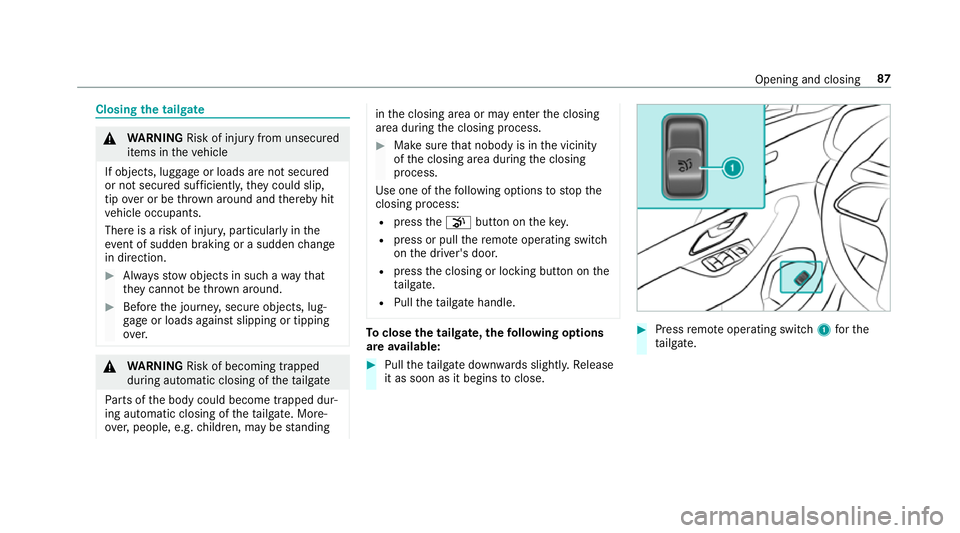
it as soon as it begins toclose. #
Press remo teoperating switch 1forthe
ta ilgate. Opening and closing
87
Page 91 of 681
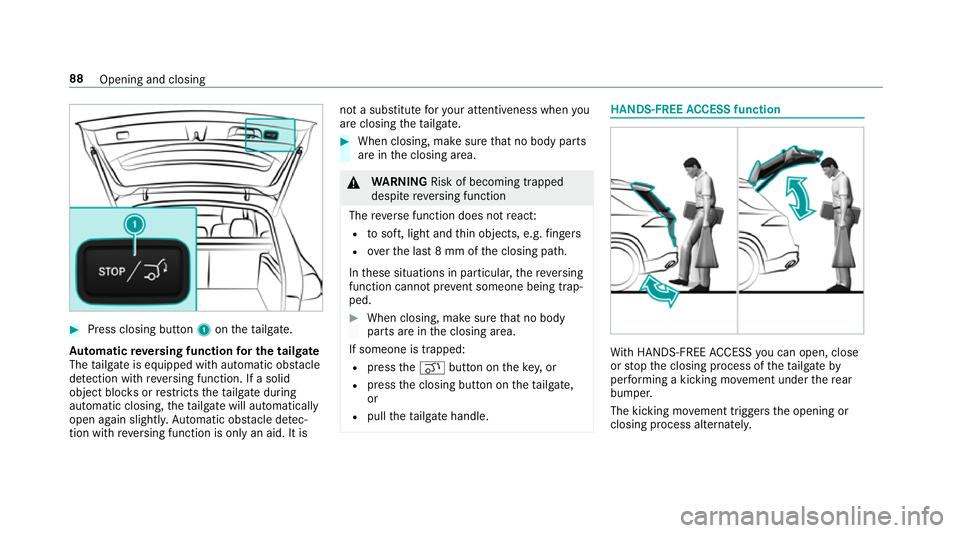
#
Press closing button 1ontheta ilgate.
Au tomatic reve rsing function for the tail gate
The tailgate is equipped with automatic obs tacle
de tection wi threve rsing function. If a solid
object bloc ksorrestricts theta ilgate during
automatic closing, theta ilgate will automatically
open again slight ly.Au tomatic obs tacle de tec‐
tion wi threve rsing function is only an aid. It is not a substitute
foryo ur attentiveness when you
are closing theta ilgate. #
When closing, make sure that no body parts
are in the closing area. &
WARNING Risk of becoming trapped
despi tereve rsing function
The reve rse function does not react:
R tosoft, light and thin objects, e.g. fingers
R over the last 8 mm of the closing path.
In these situations in particular, there ve rsing
function cannot pr event someone being trap‐
ped. #
When closing, make sure that no body
parts are in the closing area.
If someone is trapped:
R press theq button on theke y,or
R press the closing button on theta ilgate,
or
R pull theta ilgate handle. HANDS-FREE
ACCESS function Wi
th HANDS-FREE ACCESS you can open, close
or stop the closing process of theta ilgate by
per form ing a kicking mo vement under there ar
bumper.
The kicking mo vement triggers the opening or
closing process alternatel y.88
Opening and closing
Page 96 of 681
&
WARNING Risk of becoming trapped
despi tethere being reve rsing pr otection
on the side window
The reve rse function does not react:
R tosoft, light and thin objects, e.g. fingers
R during resetting
This means that there ve rse function cann ot
pr eve nt someone from becoming trapped in
th ese situations. #
When closing, make sure that no body
parts are in the closing area. #
If someone becomes trapped, press the
W button toopen the side window
again. Au
tomatic function of the side windo wsThe side windo
wsare closed automatically when
th eve hicle is switched off:
R if it starts torain (de tection bythera in sen‐
sor on the windscreen)
R intheeve nt of extreme outside temp eratures R
afte r six hours
R ifth ere is a malfunction in the po wer supp ly
The side windo wsare closed as far as theve nti‐
lation position.
Ve hicles with a sliding sunroof: the side win‐
do ws are closed comple tely if the sliding sunroof
is open.
If th e side windo wsare bloc ked during auto‐
matic closing, the side window concerned will
open again slightl y.The automatic function for
th e sliding sunroof and the side windo wsisthen
deactivated. Con
venience opening (ventilating theve hicle
before starting a journey) &
WARNING Risk of entrapment when
opening a side window
When opening a side windo w,parts of the
body could be dr awn in or become trapped
between the side window and window frame. #
When opening, make sure that nobody
is touching the side windo w. #
Release the button immediately if
somebody becomes trapped. #
Press and hold the% button on thekey.
The following functions are per form ed:
R The vehicle is unloc ked.
R The side windo wsare opened.
R The pano ramic sliding sunroof is opened.
R The seat ventilation of the driver's seat is
switched on.
If th ero ller sunblinds of the panoramic sliding
sunroof are closed, thero ller sunblinds are
opened firs t.
If th ero ller sunblinds of there ar doors are
closed, thero ller sunblinds are opened firs t. #
Tointer rupt convenience opening: release
th e% button. #
Tocontinue con venience opening: press
and hold the% button again. Opening and closing
93
Page 98 of 681
Problem
Possible causes/consequences and M
MSolutions
If a side window is obstructed during closing and reopens again slightly: #
Immediately af terth e window is bloc ked, pull the cor responding switch again until the side window has
closed, and hold the switch for an additional second.
The side window will be closed with increased forc e.
If a side window is obstructed again during closing and reopens again slightly: #
Repeat the pr evious step.
The side window is closed without the automatic reve rsing function.
The side windo wscannot be opened or
closed using the con venience opening
fe ature. The
key bat tery iswe ak or dischar ged. #
Check the battery using the battery indicator lamp and replace if necessary (→ page 79). Opening and closing
95